RECORDING WEEK: Once upon a time, everything in the recording studio was analogue - mics, mixers, outboard, tape… everything. In recent years, of course, the convenience, affordability and power of digital technology - first hardware, then software - have trumped those cumbersome, expensive old boxes in terms of ubiquity; but the fact is, the characteristic warmth and grit of valve- and transformer-based gear are arguably more sought after now than they ever have been.
Fortunately, the current generation of analogue-emulating plugin effects are convincing enough in their sound and vibe to serve as far more than mere stand-ins for the real thing. We'd challenge anyone to hear the difference between a Pultec EQP-1a and Universal Audio's plugin virtualisation of it in the mix, or be 100% confident in stating that the hiss and saturation of u-he's Satin tape emulation weren't actually being generated by the the real mechanical thing. Truly, the computer musician has never had it so good when it comes to getting authentic analogue processing in their virtual studio.
In this walkthrough, we'll show you how to use a range of incredible plugins to construct three analogue-style recording and mixing chains.

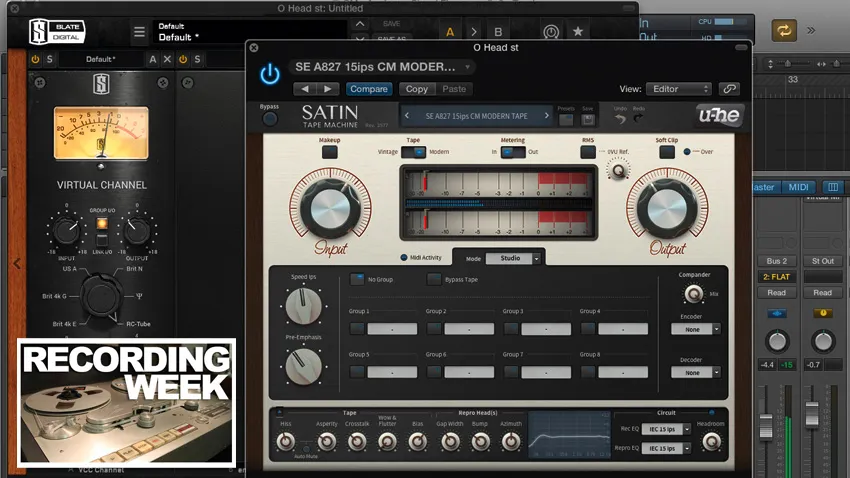
Step 1: Our first setup mimics mixing down from an analogue desk, with the three main components in signal flow order: a tape machine with its outputs running into mixing desk channels, summed at the desk's mix bus. For a clean, quiet tape sound, on each channel we add u-he's Satin with a modern high-output tape type.
Full mix flat
Full mix with tape sim

Step 2: The next stage is the desk channel itself, inserted after the tape simulation. Slate Digital's Virtual Channel includes six desk emulations, which you can mix and match as you please, but we'll keep it authentic and use the same model for all channels - in this case, the clean, uncoloured Brit N. If we use this plugin's grouping feature, we can switch settings on all grouped tracks simultaneously.
Full mix with tape and console sim

Step 3: Now for the mix bus. Slate Digital Virtual MixBuss, placed on our DAW's master output bus, allows us to set input level and drive, so we can add the right amount of colour, again using the clean Brit N setting. The results are best assessed by A/B-ing with the unprocessed mix, and to demonstrate, we've got two setups to switch between.
Full mix with tape and console sim and MixBuss

Step 4: Now for an analogue recording setup, with channels running through the mixing desk (originally for applying EQ and compression "on the way in", but here we'll recreate just the saturation/warming aspects) before being recorded to tape. We're focusing solely on a drum kit, so the first step is to load up channel and tape plugins for each drum kit track, setting the channels to a clean setting - the Brit 4k G in Slate Digital's Virtual Channel will do.
Full drum mix flat

Step 5: Vintage tape saturates easily, while modern tape at 30ips enhances high frequencies. With u-he Satin, we're using vintage tape on our snare and kick tracks. For a fatter snare, push the level higher and remember that the VU metering won't show the transient peaks, so the level could appear quite low. For kick presence, push the level. Also, try different circuit EQ curves to see which sounds best.
Kick and snare dry
Kick and snare with tape sim

Step 6: To cure our weak and lifeless overheads, we'll change their channel emulation to one that's more coloured, like Slate Digital's RC-Tube - increasing the drive adds odd and even harmonics. Next in line is the tape machine. We're using a modern tape at 15ips to add subtle thickness to the sound. A/Bing the results with the flat, unprocessed tracks reveals the difference that this has made.
Overheads dry
Overheads with console and tape sim

Step 7: Finally, let's use a 'pick and mix' chain on our room mics track - something only possible in the digital domain. The order is: mic preamp, tape on repro head, then master buss channel processor. First, let's swap out the channel emulation for a different one - the Lindell 6X-500 CM will work great. Using its transformer design and increasing the input drive (and reducing the output) we're adding subtle harmonic distortion.
Room mics dry
Room mics with preamp sim

Step 8: Next, the Repro head. Here we're using modern tape at 15ips, which in itself adds roundness to the low frequencies and slightly curtails the highs. However, our plugin, u-he Satin, lets us adjust the head bump level and head gap width, so we can further boost the low frequencies, and subtly influence where this boost is. This also influences our high-frequency response.
Room mics with preamp and tape sim

Step 9: The final plugin in this chain, Slate Digital's Virtual Mix Buss, is designed for the master buss, but here we're using it on a normal track channel. It offers a number of mixing desk simulations, and we're going for the classic SSL E series-style mix bus (Slate's Brit 4k E). This adds further 2nd and 3rd harmonic distortions as we increase the drive. Finally, A/B-ing the results reveals an overall fatter sound with less harsh top end.
Full processed drum mix
Recording Week is brought to you in association with Universal Audio. Check out the Recording Week hub page for more tips and tutorials.
