“One day in Berlin, Eno came running in and said, ‘I have heard the sound of the future’”: How to replicate the trailblazing pulse of I Feel Love
I Feel Love’s innovative electronic rhythm section set the stage for pretty much everything that followed, and here’s how you can recreate its bewitching energy in your DAW
Want all the hottest music and gear news, reviews, deals, features and more, direct to your inbox? Sign up here.
You are now subscribed
Your newsletter sign-up was successful
Influential songs come in many shapes and styles, but making a track which goes on to universally transform music and culture is a rare thing indeed.
Giorgio Moroder and Pete Bellotte produced a number of hits with Donna Summer, including the sublime Love to Love You Baby in 1975.
In the following year, while working on her fifth album, I Remember Yesterday, the production team decided that they wanted each track to reflect the musical flavours of various different historical decades.
They explored 60s girl groups and navigated 70s disco, but when it came to the last track on the album, they wanted to create something that looked ahead to a hypothetical, electronic-tinged future…
Article continues belowThe result was the epic I Feel Love, which charted at number one in the UK for four weeks during the summer of 1977.
While its commercial impact globally was equally impressive, I Feel Love’s true legacy would be how it became a benchmark for electronic music producers.
Alongside pioneers such as Kraftwerk, the track acted as a green light for musicians and producers who wanted to produce music entirely electronically. So, by wildly envisioning the future, Moroder, Bellotte and Summer essentially invented it.
In fact - as recounted by David Buckley in his Kraftwerk biography Publikation, when Brian Eno (then working with David Bowie on his hailed Berlin trilogy) first heard the record, he raced to tell his creative accomplice.
Want all the hottest music and gear news, reviews, deals, features and more, direct to your inbox? Sign up here.
"One of the songs which certainly impacted greatly in the summer of 1977 was a song which sounded as if Kraftwerk had gone potty and recruited a bona fide American soul singer,” wrote Buckley. “In fact, it wasn’t Kraftwerk, but Italian musician and producer Giorgio Moroder. ‘One day in Berlin,’ says Bowie, ‘Eno came running in and said, “I have heard the sound of the future.” He puts on I Feel Love, by Donna Summer, he said, “This is it, look no further. This single is going to change the sound of club music for the next 15 years.”’ Which was more or less right.”
Many years later, the technical commonalities between this track and the explosion of electronic dance music, became impossible to ignore - and I Feel Love became regarded as a vital part of its birth. You can read more on that aspect of the song over in this article.

It was arguably the first high profile track where a sequentially looped bassline was coupled with a four-to-the-floor bass drum, and electronically replicated off-beat hi-hats.
Giorgio Moroder explained that when writing the song, the bassline was the first thing to be composed.
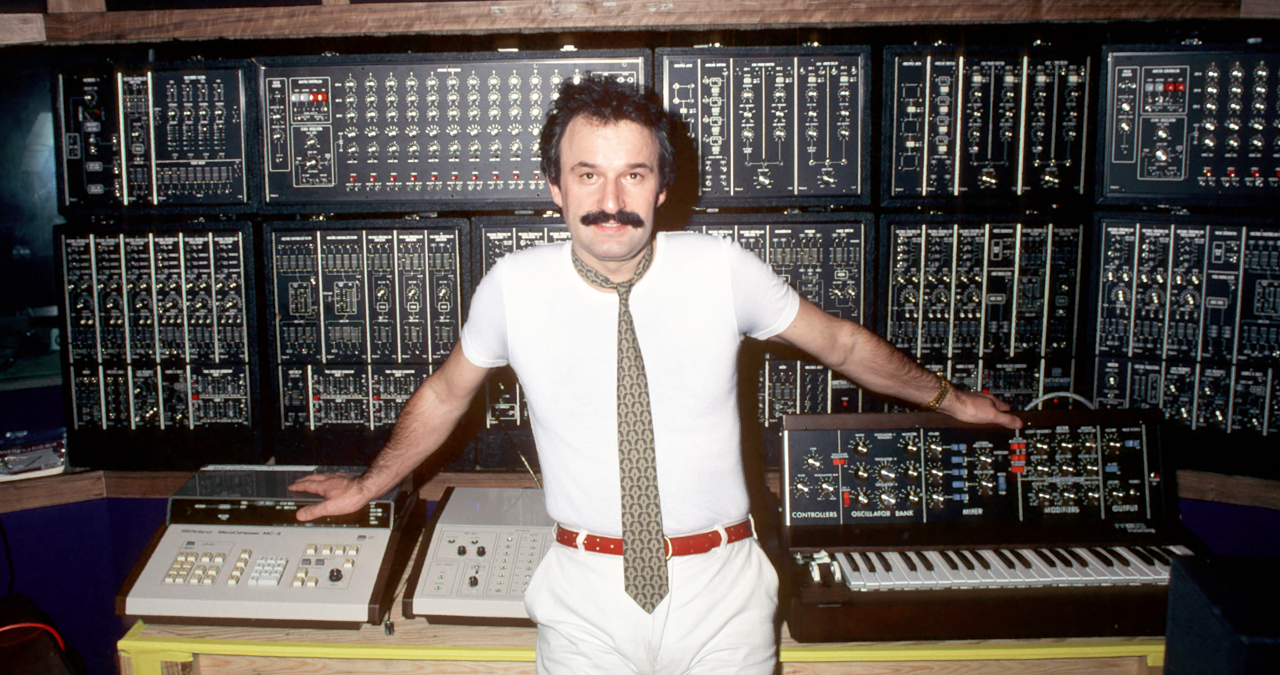
He had borrowed a Moog Modular synthesizer from classical composer, Eberhard Schoener. Aided by Schoener’s assistant, Robby Wedel, they set about synchronising the Moog’s step sequencer to a click track, recording to 16-track analog tape.
This was not without its difficulties and complexities, as the Moog would continually wander in pitch. It was something of a happy accident when Moroder’s engineer accidentally added delay to the bass part, and cementing the infectious pattern that we know today.
Thankfully, we don't need a room taken up by a Moog Modular (or a huge reel-to-reel tape machine) to recreate this classic bass sound. In fact, it's relatively easy to build in our DAWs using a synth plugin (and a little delay).
In order to capture the sound accurately, we will need synthesiser with at least two oscillators, or possibly even three. If using a two oscillator sound source, having the ability to modulate at least one of the waveforms (PWM) would be an advantage. However, we are choosing to adopt a Minimoog oscillator sound source, which will offer us a very similar sound up-front, but will require a slight workaround.
As the original sound was created using a Moog Modular, we are going to use the Minimoog plugin from Universal Audio, which gives us the initial sound, but like the original Minimoog, it does not offer PWM. Thankfully we have options, which we will explore while building this patch.
As we will need to use tempo sync’d delay later on, it is easiest to load your synth via your DAW, rather than as a standalone instrument. Be sure to load a mono instance of the instrument. Once loaded, create a default patch and head to Oscillator 1. Set the octave range to 16’ and the waveform to a sawtooth.
Make sure the oscillator is turned up to its maximum level.
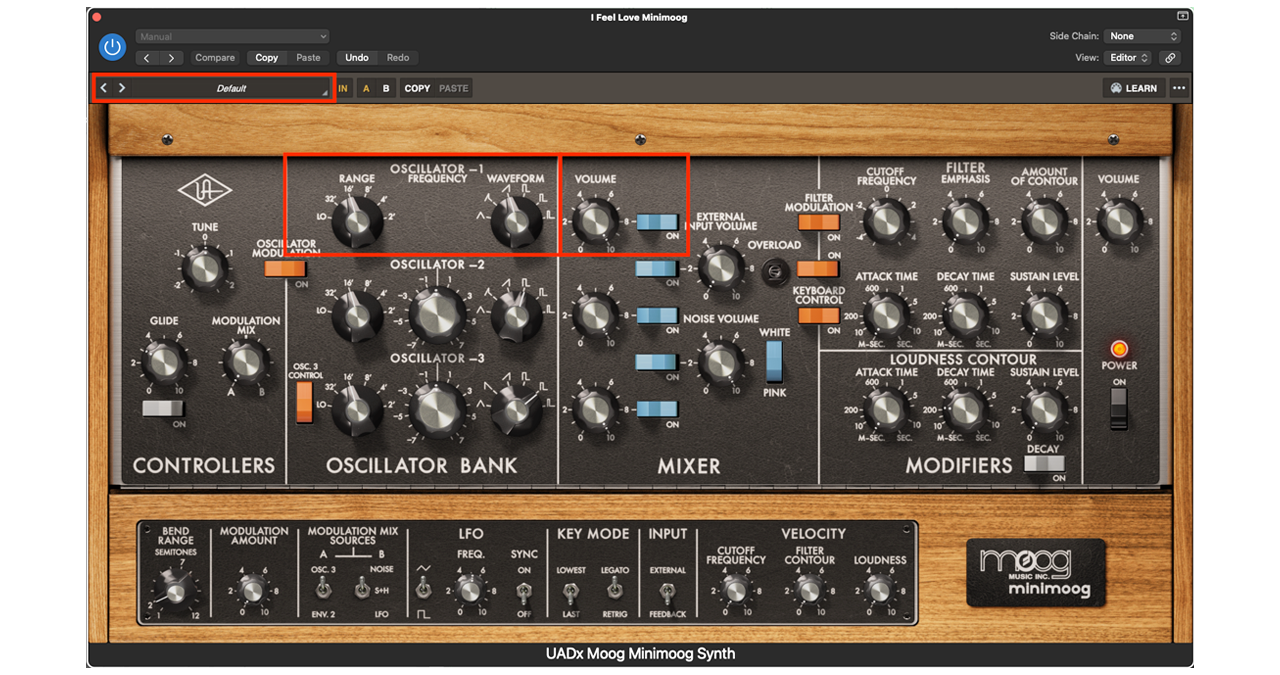
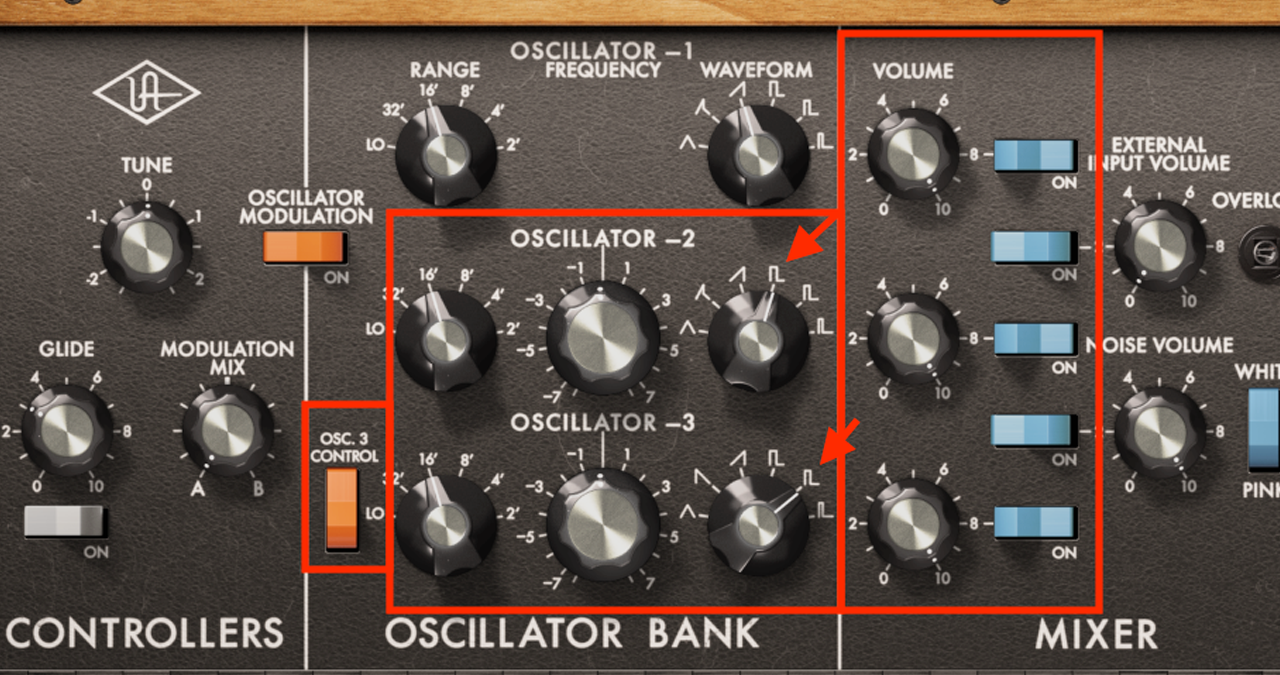
Move to oscillators 2 & 3, and set both ranges to 16’. Be sure that Oscillator 3 has ‘OSC 3 Control’ switched on, which means that its pitch is controlled from your keyboard or MIDI.
As we do not have PWM available on the Minimoog, we are going to add some different harmonic interest using a square wave and modulated pulse waveform, which are both available with Oscillators 2 and 3.
Once you have selected your waves, make sure that the volume of both oscillators is turned up to maximum.
If you are using a synth which allows PWM, use a second oscillator set to a pulse wave with PWM modulated by the decay phase of an envelope. If you listen carefully to the original, you can hear the interesting harmonic content, which is likely generated by the summing of a considerable number of oscillators within a modular, coupled with movement created via PWM.
We have employed a subtle workaround, using fixed waveforms to offer a similar sound and spirit.
There is a fine-tune option available with these oscillators too. We do not want to detune very far from Oscillator 1, so adjust the tuning so that they are all fairly close together in pitch.
Move across to the filter section and set the cutoff frequency to around 30%. We don't want anything too bright, particularly as we want to add some envelope modulation, which we do by adjusting the Amount of Contour pot, to a value of 4 (or around 40% if using a different synth.)
Moving to the envelopes (or Contour Generators, in Moog language) we need to make adjustments to both the filter and loudness (amplitude) envelopes. Firstly, make sure that the decay switch is activated, then reduce the attack pots to 0. Both sustain level pots, should be reduced to 0 as well.
Finally, adjust the decay pots, so that the filter decay pot is set a little bit higher than the volume decay pot, somewhere between 200-250 milliseconds. If you don't have a timing scale available, these both need to be fairly snappy, so keep the decay times relatively short.
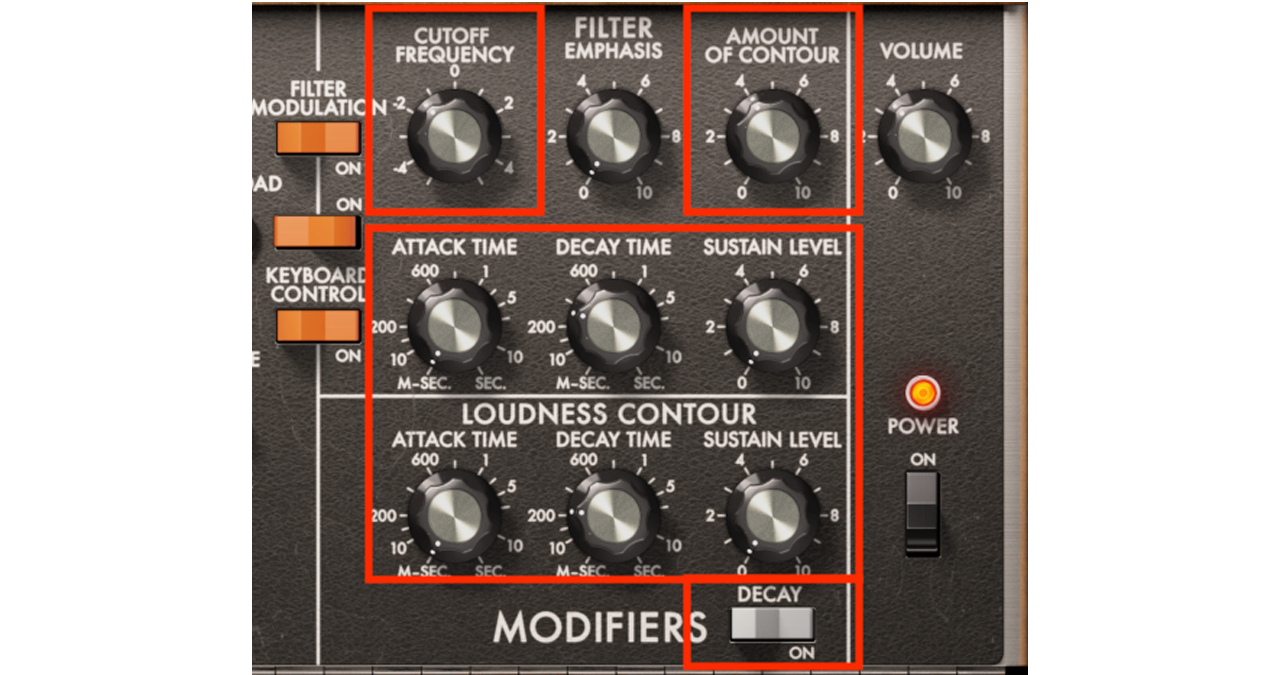
Now we have our synth sound set up and ready to go, you can play around and try replicating the original I Feel Love sequence, or create something compositionally of your own. Either way, set your DAW’s tempo to around 126 BPM. The original track clocks at 126.5 BPM, but you don't have to be that exacting!
To replicate the delay aspect of the sound, route a Bus or Aux from the initial bass channel, ensuring that the Bus/Aux channel is also in mono.
Send a healthy amount of signal to the Bus, and add some form of delay. In this setting, the simplest delay possible will be the most successful, as we do not want stereo or tape regeneration effects. If your delay offers a wet/dry control, ensure that it is set to fully wet.
We have opted to use a simple timing/sample delay, and have set our timing to match our tempo of 126.5 BPM.
You can equally use a sync’d delay set to 16th notes.
Once assigned, pan the original bass toward the left, and the delayed signal equally to the right. If necessary, adjust the volumes of both channels so that they match. Moroder discovered that hard panning these channels was too extreme, particularly for playing in a club, so a revised mix was set with moderate panning left and right.
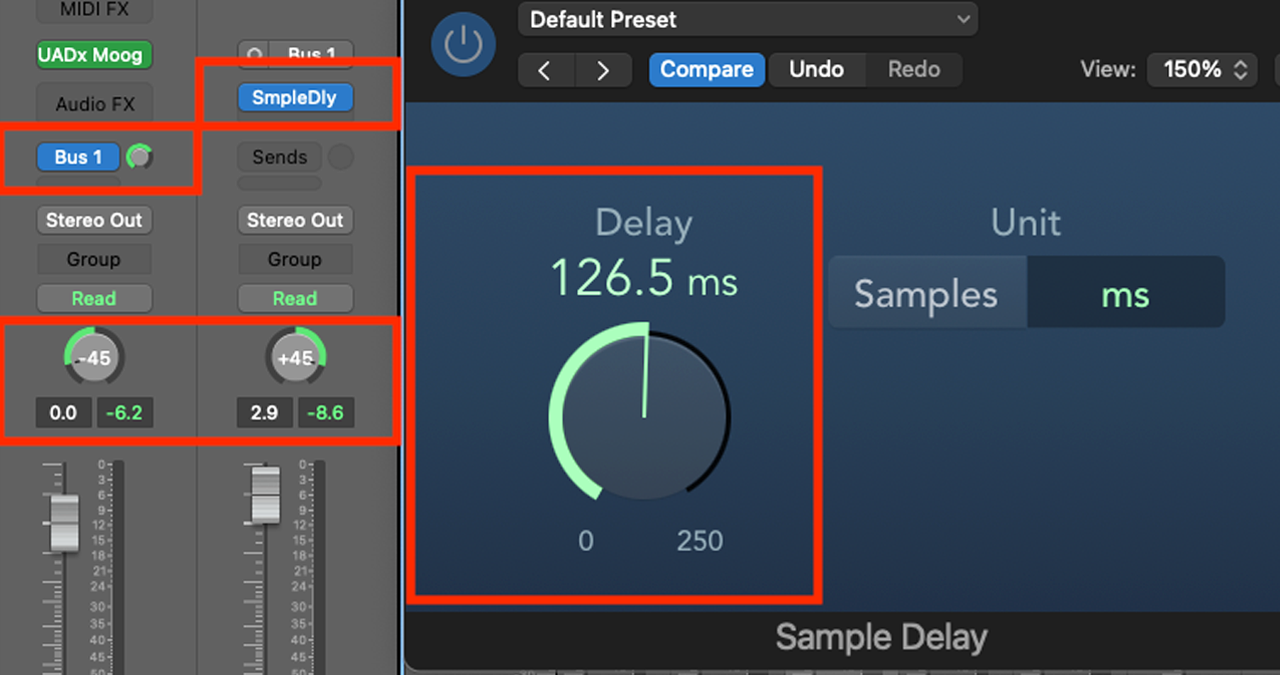
You should now hear each bass note replicated through the delay, creating a ping-pong effect, lending itself to the repetitive pattern that we know from the track.
If you want to draw further inspiration from the original, you can hear that there are lots of embellishments to the bass part, which include accenting the first couple of beats with different instrumentation.
You could also try adding a sub bass, which is probably easiest to do by lining up another synth, copying the MIDI from your bass track, and using a heavily filtered sound to play an octave lower.
Beyond that, add a string machine with plenty of rich phasing, and you too could be on the way to creating an electro-pop classic.

Roland Schmidt is a professional programmer, sound designer and producer, who has worked in collaboration with a number of successful production teams over the last 25 years. He can also be found delivering regular and key-note lectures on the use of hardware/software synthesisers and production, at various higher educational institutions throughout the UK
You must confirm your public display name before commenting
Please logout and then login again, you will then be prompted to enter your display name.

