
Last week MusicRadar reported that online retail giant Thomann had launched their #DIYKitChallenge22, giving aspiring luthiers a chance to bag up to €500 in vouchers to spend on new gear and musical goodies.
To celebrate this exciting - and rather accessible - competition, Thomann has decided to send me one of their DIY guitar kits so I can document the entire process of putting it together. Now, it has to be said that I have absolutely no experience in painting a guitar or building one for that matter - frankly, the guitar is hard enough to play on its own without worrying about making one.
That said, there's always been a certain allure to putting together my own instrument and customising it to my exact preferences - something I think most of us have thought about at some point in our playing careers. While my woodworking "skills" would leave a lot to be desired, a DIY kit guitar takes away the need for fancy routers and heavy machinery, giving way to the fun side of a project such as finishing and final assembly.
Okay, so like I said, I am certainly not an authority on finishing a guitar. This is not a step by step tutorial, but instead a window into an idiot's process of putting together a DIY guitar kit for the first time.
Really, this article is to show that if I can do this, then anyone can! If you are on the fence about giving it a go - like I was - then hopefully, this will prove to you that there's nothing to worry about. You really should dive in with both feet and give it a try - what's the worst that can happen, right?
What comes in the box?

When looking for the perfect kit to start my project, it became pretty apparent that there was something for everyone on the Thomann site, with electric guitars, bass guitars, ukuleles, cajon and glockenspiel filling up the DIY section.
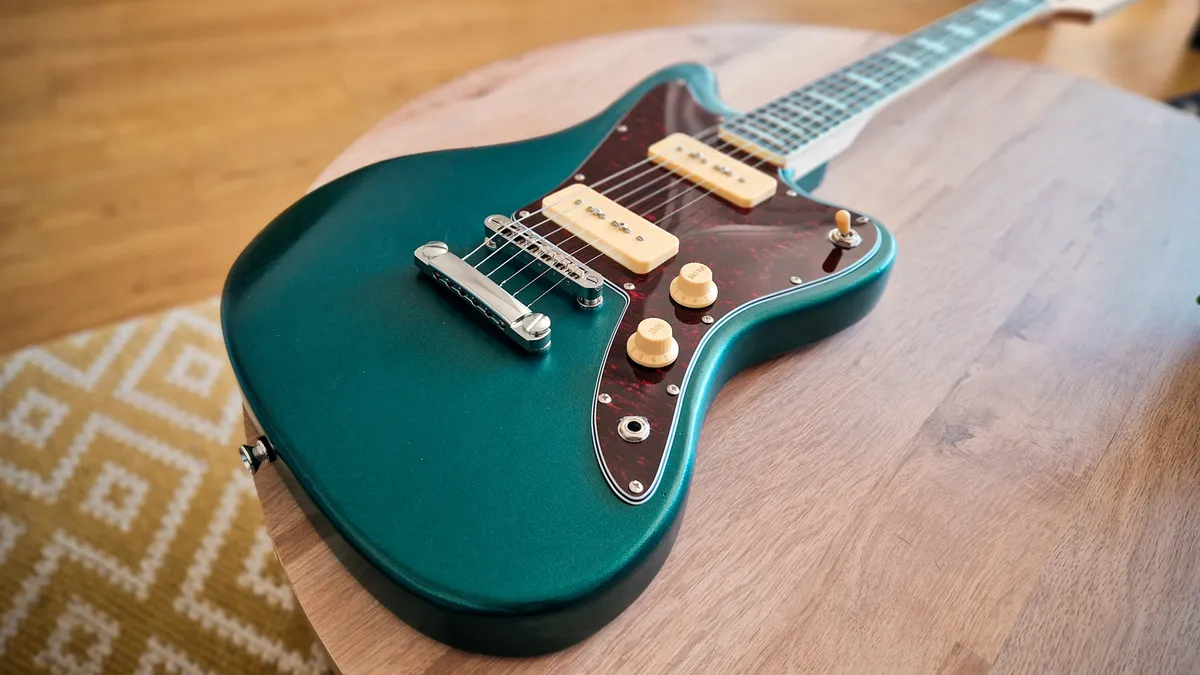
As you'd expect, the more pedestrian DIY guitar models were certainly present, with the likes of the Strat, Tele, Les Paul and SG ready for you to put your unique spin on. There were also unusual models such as the CST-24, which has clearly taken a lot of inspiration from the PRS Custom 24. Now, while all of these guitars would have most definitely done the job, the kit that spoke to me the most was the Jazzmaster - not all that surprising if you know anything about me.
In the box, there is everything you need for a fully playable guitar. Our kit came with a Rengas JM style body, maple with binding and block inlays, an Amaranth fingerboard, two P90 single coils pickups, Tune-O-Matic bridge, a set of diecast tuners, chrome backplate and a pre-wired pickguard that housed a single volume and tone control as well as a 3-way selector switch. Of course, you also get all the screws and bolts need to assemble the instrument - oh, plus a set of electric guitar strings and guitar cable.
Choosing the paint

So, once my kit arrived, the first step was to choose a colour scheme. I knew I wanted to stick to a classic Fender custom colour, but with so many brilliant colours to choose from, I didn't know which way to go. Candy Apple Red, Daphne Blue, Aztec Gold, Surf Green, and Burgundy Mist were all considered, but ultimately I chose to go in a different direction. After much thought, I'd managed to get it down to two, Shell Pink or Sherwood Green. Now, I've always had a penchant for Shell Pink, but with there already being a glorious Shell Pink Mustang bass in the house, I went for the verdant Sherwood Green - and I think I made the right choice.
Priming the body

Before I could dive in and start painting the body, I needed to prepare a space I could work. It needed to be out the way, well ventilated and big enough for me to suspend the guitar in. Luckily, my shed proved to be the ideal place. I used two large dust sheets from a well-known British hardware store to ensure I didn't end up with an emerald shed and hung the guitar from one of the rafters.
To prime the body ready for the colour, I used a nitrocellulose based white primer from Northwest Guitars. Now, I only used one 400ml can, and while that was enough to give the guitar a decent cover of white, if I were doing this again, I'd probably use two cans to ensure there wasn't any grain showing through. That said, it didn't seem to affect the overall look of the finished product.
After doing some research, the most recommended technique was to hold the can a decent distance from the guitar and spray in a smooth motion overlapping slightly as you move up the body. It's also recommended to initially spray the nozzle away from the guitar, move across the instrument and only release the nozzle once you are clear of the body. Of course, this is a lot easier said than done, but I soon got the hang of it.
As this was my first-time spray painting anything, I did get one spot where the paint started to run on the back. To remove this, I waited until the paint had thoroughly dried and sanded it smooth.
Spraying the colour coat

Okay, next was the exciting part, spraying the colour for the first time. I used the same set-up and technique as before, but this time I was spraying the Sherwood Green nitrocellulose lacquer, and you guessed it, it was from Northwest Guitars. Due to time and weather restraints, I did this over two weekends - I suppose painting a guitar in Scotland does have its drawbacks.
I used one 400ml can to cover the guitar fully, waited until it was completely dry and sanded any blemishes smooth. I repeated the process the following weekend until I was happy with the colour. On that note, I am fully aware that the photos look blue, but trust me, it's green in real life!
Spraying the clear coat

Once I was happy with the colour and the guitar was sanded smooth - and devoid of any pesky sanding particles - I sprayed a clear gloss nitro finish. Again, I used two 400ml cans and tried to get as even a finish as possible. This time, I ended up with more "orange peeling" than I did with the colour coats, but this was mostly removed after a round of wet/dry sanding and polishing.
If I were doing this project again, I'd probably spend more time on this part, as through a combination of impatience and incompetence, I did somewhat rush this stage, which ultimately led to more sanding and polishing to try and fix my mistakes - well, I suppose, you live and learn.
Assembling the guitar
Once I had a finish that I was relatively happy with, it was time to put together my shiny new axe. This was - by quite some margin - the quickest part of the project. It probably took 20 minutes to bolt the guitar together from start to finish, which is definitely a testament to how easy the instructions were to follow.

Neck
The first stage is preparing the neck by installing the machine heads. This is something I've done before, so I suddenly had a newfound confidence that was somewhat lacking through the initial stages of the project. Next, to attach the tuning keys, all you have to do is insert the mechanism from the rear side of the headstock and screw in place. Then affix the accompanying washers and nuts on the front of the headstock - done. I next installed the two string trees, and the neck was ready to be attached to the body.
Combining the neck and body is done with four large screws and is fairly self-explanatory. It has to be said that the neck fit the body like a glove, and there were no issues at all with the fit.

Bridge and pickguard
Next up is the mounting bolts for the bridge and tailpiece. These simply slot in the already routed holes but do take a little persuading with a rubber mallet to get them to sit snug with the body. It's worth noting that you need to feed the grounding wire into the bridge cavity - via the routed channel - ensuring it makes contact with the metal bolt.
As we alluded to up top, this guitar comes with a fully pre-wired pickguard, so the next step is to simply screw the scratchplate in place - something every Fender owner has done a million times before, I'm sure.

Pickups
So, not only is the pickguard pre-wired, but the pickups themselves don't require any soldering as they are simply clip in and go. Once they are attached to the wiring harness of the pickguard, they next need to be screwed into the body. This is done with two large screws for each pickup, with a set of springs providing some resistance. Unfortunately, the kit didn't come with the foam block, but it didn't seem to be an issue, and the pickups feel fairly stable in the body.

Final set-up
With everything installed, all that was left to do was to set the intonation, bridge height and action. This took around 10 minutes of playing around until I was happy with how my new guitar felt to play. After a quick polish up, the guitar was ready to go!
Obviously, the next step was to plug the guitar into an amplifier and make sure all the wiring worked, and there were no issues with the pots or selector switch.
I must say, I was actually pretty surprised with how good this guitar sounded. Yes, it has P-90 style pickups rather than the traditional Jazzmaster set, so while it doesn't sound like an actual JM, it does have a relatively rich and warm tone - something I wasn't expecting.
Couple that with a rather playable neck, and you have a guitar that performs way above its price point. I would like to get the frets dressed in the near future, as some are slightly sharp, but at £75, that's hardly a complaint.
Final thoughts

So there you have it, that was my first ever DIY guitar build. I must admit before I started, I was a little sceptical of these cheap as chips guitar kits, but I actually really enjoyed the process. Is it the best-playing guitar in the world? Of course not, but that's not what it's about, it's about the journey.
While I'm still going to leave the guitar making to the professionals in the future, it has given me a new appreciation for the craft, and I actually surprised myself with how well I did. I'm already thinking about other projects I could do and what to try next. Maybe I'll try and breathe new life into that old franken-strat I have lying around.
Have I inspired you to give it a go? Well, Thomann's #DIYKitChallenge22 started on Monday 18 April and ends on Sunday 19 June 2022 at 23:59:59 pm (CEST). If you want to join in, head over to the Thomann site for all the details. Good luck!
Looking for a new axe? Well, our buyer's guides are here to help
- Explore the best cheap electric guitars
- Bigger budget? These are the best electric guitars under $/£1,000
- Need a guitar for a little shredder? Check out the best guitars for kids
- Lefties assemble! These are the world's best left-handed guitars
- These are the best guitars for beginners
- Strum on with the best acoustic guitars to buy right now
