
Finding the causes of fret buzz on your guitar or bass is often a process of elimination – nut slots, neck relief, bridge saddle snags and even troublesome strings can all play their part. I focus on some of these in my guitar setup tutorial but uneven frets can often be another culprit – and that's not such a straightforward issue to tackle at home. Or is it?
Wood and metal move, especially over time and under the tension of playing and strings. You'll never have absolutely perfectly levelled frets as a result, but you can isolate trouble spots, file them level and then crown and polish them up again for a much improved playing experience.
This has understandably been a job for experienced techs and repair people over the years, and for good reason. It requires patience, methodical skills and the knowledge to know when not to go too far. For those reasons I'd always advise going to a professional for fret work as the first port of call, but if you do feel like investing in the tools to do some of this work yourselves, MusicNomad has been busy developing tools to make it easier for players to work on their frets, and maybe save some money in the longer term.
I was intrigued to check them out myself and the US company sent three key products from its range for me to try.
Diagnosing high frets

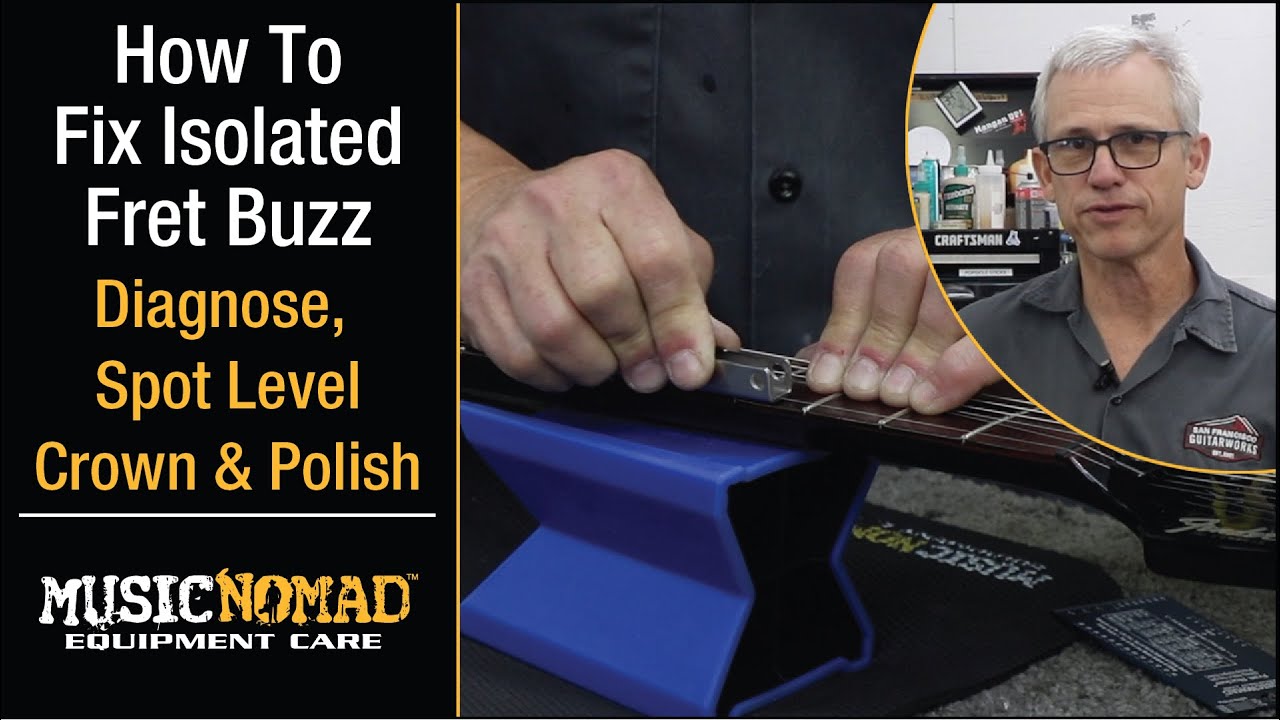
Before you can solve a problem, you need to prove its existence and isolate it; for us that means finding out what frets on our guitar are uneven. For this you need to play - thoroughly up and down the fretboard, with the kind of picking force you'd usually play with. Make a note of any buzz - the string and fret it's happening on. Then you'll need a steel fret rocker – a decent one like this MusicNomad Precision Fret Rocker shown below, with flat edges that can go across three frets at a time.
This one can also be used to measure string height when we're changing a guitar's action. Each side is a different length to allow us to do the three-fret test as we go further up the neck where the frets are closer together.

Take your time, make sure that the rocker is flat across three frets with the buzzing culprit in the middle, gently put pressure down to see if it rocks on either side. We're feeling for quite obvious tilting. Then move up and down a fret to confirm which fret is higher or lower than the other two. But just because it's high or low in the spot we're checking, it's doesn't mean the whole fret is, so it's worth checking across the fret to confirm. If it's just one part it can be better to spot file it, which we'll look at later.
How do we know if a fret is uneven enough to need filing? You'll need a feeler gauge. It's a similar idea to what we talked about when it comes to checking neck relief and adjusting your guitar's truss rod, but this time it's height of frets and requires different gauge thicknesses. The MusicNomad Precision Fret Gauge can also measure the size of frets – we'll get to that later too. The gauge is available with the Precision Fret Rocker as a set from MusicNomad.

The feeler gauge is used to measure if there is a gap of 1.5-thousandths of an inch or less under the fret rocker, and if it's higher than that, it's above tolerance and it will need filing. A 4-thousandths gauge can also be used to determine if your fret is seated properly in the fretboard – this can also cause leveling issues but is less common.
When I find a fret or area of a fret that is above the tolerance, I make a note of it and mark the area with a coloured marker pen. It means I know exactly where on the fretboard I'll need to work on later.

Levelling all the frets at once

MusicNomad's range of fret tools offers different options for various needs, and it's a brand trusted by pro techs on the road, in guitar factories and in repair shops around the world. I'm looking at three different products here but each has different strengths by design.
The first is the Fret Leveler L-Beam, available in three different sizes depending on your instrument and needs. The idea with the 17.6" option for guitar is it can cover all your frets at once so they are all levelled at the same time via the abrasive strips it comes with. There are 2 x 240 grit strips and a 400 grit included.

Better suited to guitars with numerous high frets, the 7" option can be used for more isolated 'spot levelling', while the 24" is ideal for bass necks. The top and bottom edges are precision ground to a flat accuracy tolerance of +/-.00125 and you use the L-Beam side to side as you level – as shown in the video above. The edges are also radiused to avoid the L-Beam colliding with high frets.
Levelling frets with the strings still on

If you've only got a couple of high spots, why have a whole string change to deal with them? MusicNomad's U-File kit allows you to focus on individual frets and works underneath the strings – clever!
There are three sizes (1.5", 2" and 3") in the kit for different areas of the fretboard, each with a diamond-coated file to lower the fret and allow you to hone in and monitor the area you've already marked with the pen. Like the rocker, you lay it across three frets and the high fret needs to be in the middle. You can then work it up and down or side to side depending on the high area.

Remember, for the above filing tools and approaches, you'll still need to crown and polish the file afterwards. And MusicNomad has thought of that in a rather ingenious way…
A failsafe fret crowning file? Meet the S-File

Filing down frets can be nerve-wracking – you can't undo it if it goes wrong. And the crowning part that comes next can be daunting too. This is where you're working the filed down fret back into a curved shape that's finger-friendly.
Understandably players are wary of doing it themselves and they're right to be, but MusicNomad's latest crowning tool aims to take a lot of the risk out of the equation. And it's called the Safe Zone S-File. The idea is you can't really go wrong with this tool.
We have to hand it to MusicNomad's design team in Sonoma, California, this is a really impressive tool. It's not like a traditional file – with this you can feel when it's done the job. You can hear it too.

The design prevents you from overfilling the fret because at the top of the concave file there's a small strip where there are no diamonds, so once the sides are rounded enough, the file will slide across the fret as you move back and forth on it with the S-File – you'll feel and hear it skate smoothly across the fret.

It's the simplest fret crowning solution I've tried yet and there are two sides that you use depending on your fret size; narrow-medium or wide-jumbo frets. And remember I said the MusicNomad fret gauge tool also includes a size measurer (see pic above). That's to confirm what size of fret you're working with before filing.

I like that the S-File is reassuringly weighty and the silicon handle makes it comfortable to use too.
You'll notice the nose area on each side – this is for spot fret crowning when you don't need to reshape the whole fret. A line on the side marks where you're coming into contact with the fret so you can make sure you're accurate.
Now all that's left to do is learn how to polish your guitar frets.
For more on using these MusicNomad tools to deal with fret buzz, check out the in-depth tutorial video from the brand above.
You can buy MusicNomad maintenance tools and cleaning products at Thomann, Sweetwater and Amazon, as well as from MusicNomad directly.
