
The ability to mess with time, adjusting the playback speed, position, direction and pitch of our audio is one of the most enticing and creative aspects of music production.
Take a tour through the history of recorded music and you’ll find each technological development, from analogue tape/turntables, to digital processing, sampling and DAW-based production, has made its mark. In essence you now have an awesome set of creative options derived from decades of change.
The time manipulation toolset in your DAW usually covers the basics, including delay-based effects, time-stretching and often warp-based editing so that you can adjust the timing of a vocal or nudge a few beats in a drum performance without affecting pitch.
Even so, contemporary plugins such as Cableguys TimeShaper 3 allow us to do so much more, delivering enhanced control and finesse to traditional delay-based effects, alongside powerful and creative modulation.
Here, we run you through ten ways to creatively explore time manipulation in your DAW.
1. Pitch-shifting/thickening
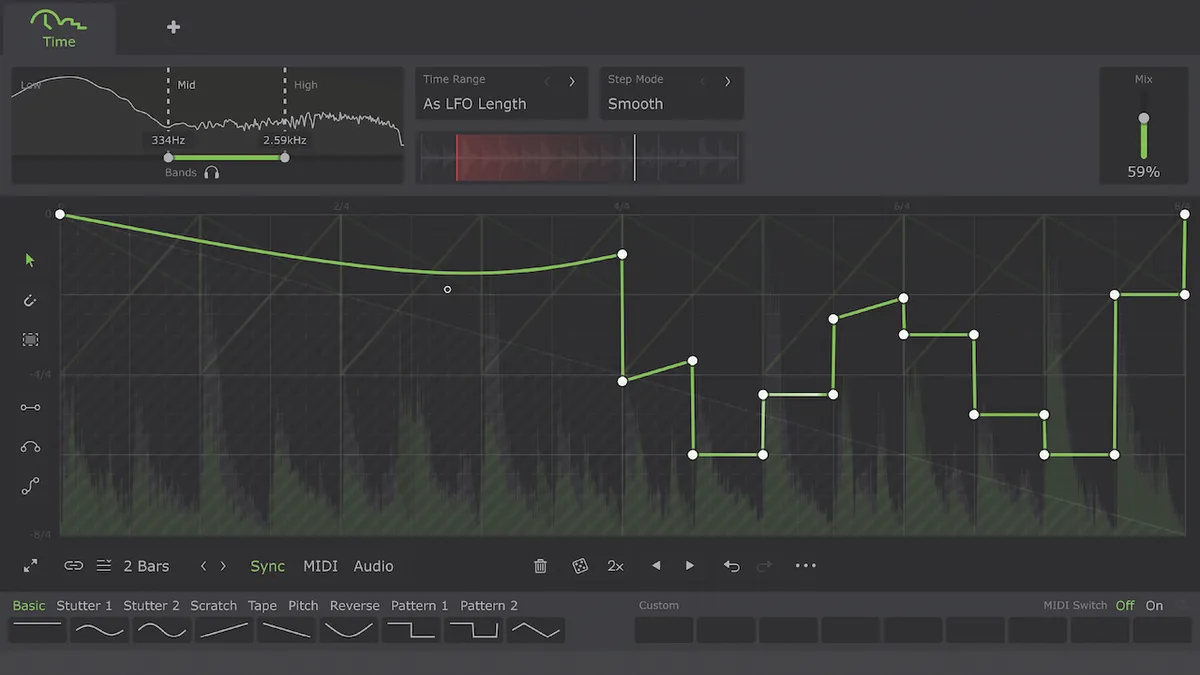
Subtle pitch manipulation when blended with your original dry signal is a great way to thicken sounds. There are various plugins you can use for this, including TimeShaper 3.
Load a straight-line Pitch preset, switch the LFO length to quarter note and set the Time Range to 20ms. With the wet/dry mix on 100%, adjust the slope of the LFO to get the desired pitch offset and then blend back in the original audio to taste using the wet/dry mix.
2. Sudden tape stop

We looked at how you can use a tailored plugin to create tape speed-up and slow-down effects. From a production perspective, one of the most common usages is the sudden tape stop, which works as an excellent way to introduce a drop section or break in the track. Try sub-grouping multiple track elements and apply the effect across all of them. And if you’re looking for a mainstream track example, check out I Gotta Feeling by the Black Eyed Peas.
3. Transition effects

Although we can create all manner of transition effects using filtered noise sweeps, there are times when we just want something a bit more individual. Sometimes the transition needs to be pitched (see the reverse piano tip). If it doesn’t, then a reverse noise sweep or backwards verby impact can do the trick. For a turn-key solution there are some great plugin options, such as Native Instruments’ Rise & Hit, which incorporates multiple reverse audio risers.
4. Reverse piano
Sometimes we need a transition effect to actually be pitched. There are various ways we can tackle this, including simply using a synth swell. However, one of the most tried and tested solutions is the reverse piano. A single note rather than a chord usually works best and all you need to do is bounce a suitable note to audio, reverse it then line it up so the loudest part hits where you want it to.
5. Backmasking

This classic reverse vocal technique goes back decades and is usually used to disguise the lyrics or even sneak in a hidden message. It can be a featured effect or buried deep in the mix for someone to discover down the line, or you could simply use it to flip any expletives and deliver a broadcast0friendly mix. Check out Freakshow Industries' excellent (and free) plugin Backmask if you want to experiment.
6. Classic time-stretch
Early time-stretch algorithms gave rise to very audible and stretched effects that were often applied to vocals. Modern DAW algorithms are way more efficient and produce fewer artefacts. However, with some careful tweaking, you should still be able to achieve these effects. Choose the oldest algo available, and try re-stretching sections multiple times for maximum graininess.
7. DAW features

Although DAWs share many time manipulation features, they often have their own specific options and strengths, and it’s always worth seeking these out. One of the best examples is audio warping in Ableton Live.
It not only feels better integrated than other DAWs, it also has a variety of modes to stretch and re-pitch your audio in both seamless and creative ways. Logic Pro may be more of a traditional DAW, but it still has some great time-manipulation features, including the excellent slow-down effect that’s built into the clip fade options.
8. Pitchy dub delay

A less common delay technique that adds interest and is popular for dub delays is actually pretty simple to recreate. We get used to setting and forgetting our delay times, but adjusting said times during the delay repeat can be a great route to cool effects.
Once you’ve set your core delay time, switch off the tempo sync and adjust or automate small changes to the delay once it’s repeating. If you’re looking for a plugin that does this particularly well, then check out PSP cmDelay in the CM Plugin Suite, which comes free with every issue of Computer Music magazine.
9. Warp factor

One of the best developments in DAW processing is warp editing and although the name varies from DAW to DAW, the concept is pretty similar. This is usually enabled on a track-by-track basis, and analyses the audio, creating transient markers. You can then manipulate the markers in order to adjust the timing. Of course, extreme settings lead to artefacts, but that might be just what you’re after.
10. Flange
Creating a simple flanger effect can be achieved by blending two identical signals with a tiny delay applied to one. However, to create a more controllable effect, it’s very useful to be able to adjust that delay, and TimeShaper 3 can do this. By using the Fine setting in the Time Range and drawing in a smooth curve, it’s easy to apply the changing delay times that work with your source audio to get the sound you want.
