How to build a home music studio: the control room
We show you how to turn your humble abode into a recording studio, starting with the all-important control room
RECORDING WEEK 2022: It’s never been easier to whip up great-sounding tracks, particularly if you’re into electronic or heavily sample-based music.
Every DAW on the market today ships with an extensive collection of ready-made loops, hits, pads and riffs, not to mention all those bundled synths and samplers. And then, when you’re happy with your mix, there are plenty of truly incredible plugin effects available that can give you a loud, shiny master, sometimes using just one knob.
If you’re an electric guitar or bass player looking to put tracks together in your more rockin’ genre of choice, though, you’re probably more interested in capturing the feeling you get from your treasured collection of amps and pedals being played for real.
And things are even more complicated for drummers, acoustic instrumentalists and singers. In short, if you’re an instrumentalist and you’re looking to really capitalise on your talents and training in the production of your own tracks, there’s no avoiding the terrifying world of sound engineering. You know… with microphones.
There was a time when you had to go to a studio to record – and at great expense, too – but now we have the option of doing it all ourselves. Since you’ve bought this magazine, you’ll probably have some kind of home setup already in place, and will have picked up a few tricks for getting the best out of it.
Today, we’re spoilt for choice when it comes to mics, audio interfaces and speakers; we have powerful computers to run the show; and we can get hold of reasonably priced software to address almost any production issues that might arise. Nonetheless, when we see our favourite recording artists at work on TV or YouTube, we can’t help but yearn to be in one of those super-posh studios.
So, what’s so great about studios anyway? It’s just a bunch of rooms with some gear in them, right? And if we have the gear, why can’t we turn our homes into studios? It’s a given that studios have good mics and preamps, and all manner of extraneous toys to play with, but it’s actually all the other stuff that makes them such wonderful places in which to record.
Want all the hottest music and gear news, reviews, deals, features and more, direct to your inbox? Sign up here.
Our first attempts at home recording are often disappointing because the sound can be crap – it can feel like there are a never-ending stream of annoying things trying to sabotage the session.
Take noise, for example. It’s a problem – both keeping it out and keeping it in. Dirty signals can make recording electric guitars a nightmare. When you set up for a session for the first time, you inevitably end up searching for just one more female XLR-to-quarter-inch jack adapter.
And why are the guitar signals so weedy, and where did that buzz come from? Studios, of course, have cupboards full of useful stuff for solving just these problems, because they’ve been there time and time again.
1. Audio feng shui
Apart from all the peripheral requirements, the main hurdles in the home studio are the rooms themselves. Good studios are masterpieces of acoustic design, whereas our own rooms contain all kinds of acoustic gremlins that can make it difficult to get a good recording – and even more difficult to hear it properly.
In this feature we’re going to look in detail at the problems you’ll encounter recording at home, and take you through some in-depth solutions. Starting with the most important space of all – the control room – we’ll show you how to get the optimum monitoring setup and solve the most common acoustic problems.
We’ll debunk some myths, reveal some trade secrets and show you, step by step, how to make basic acoustic treatments that don’t involve gimmicky software or useless bits of sponge.
2. The all-important control room
It’s essential to get your control room right first, then sort out your recording rooms. If your monitoring environment is rubbish, how can you expect to make good judgements on the sounds you’re recording in other rooms, let alone try to mix and master it all when it’s recorded?
Our quest for good monitoring and great-sounding rooms is thwarted by the unholy trinity of anti-bass, honk and reflection. Fortunately there are sonic equivalents of garlic, holy water and silver bullets to help stave off these evil forces, which we’ll show you in the following walkthroughs – and these techniques apply equally to both control rooms and recording spaces.
3. Bass nodes and modes
Rectangular rooms inevitably suffer from standing waves or ‘modes’. These are a bigger, badder version of what happens when you blow over a bottle and make it resonate, or sing in the shower and find a particularly loud note that seems to fill the space.
A normal-sized room will have X and Y dimensions that are long enough to correspond to long-wavelength bass and sub-bass frequencies (300Hz and below), and being amongst the resonance of these low frequencies results in an inaccurate listening environment and, ultimately, a mix with a bottom end that sounds totally different when played anywhere else.
Imagine you can see two big, luminous sine waves hovering in your room when you play a low bass note on your synth; one lengthways, one widthways. If you move around the room these frequencies will appear to be louder at points where the sine waves are peaking, and quieter where they trough.
There will also be points where the two different frequencies will meet and interfere with each other, causing exaggerated peaks and troughs, and if your listening position happens to be in one of these places, you’re going to end up with a highly compromised sound – either too much or too little of the modal frequencies.
As well as that, loud, high-pressure anti-nodes occur near hard walls, and are often the reason why you might hear more bass on the sofa at the back of the control room than in between the speakers. This all creates a very uneven bass response that in turn causes an unbalanced listening environment.

4. The 38% rule
Most domestic rooms are rectangular and suffer from these bass issues, but on the other hand, it’s easier to target problems in a predictable room, so you’re actually probably starting from a fairly positive position. The bass response is invariably at its weakest at the halfway point of a rectangular room, so listening at the centre of a square will be disastrous.
Fortunately, we can use the ‘38% rule’ to find a position in the room where we’re least likely to encounter bass nodes or interference. This rule says that a point 38% into the length of the room is most likely to offer an interference-free listening position.
If you measure 38% in from both ends of your room, then, you’ll get two options. Some engineers also do the 38% calculation on the width of the room, which gives four starting positions at which to place the chair.
5. Tune your room
Finding a good listening position can solve your bass problems, but it may be that the modal frequencies of your room are just too boomy. This typically happens at around 65Hz and 125Hz.
Unfortunately, no amount of foam, egg boxes or mattresses will solve this problem – you will need bass absorbers. A perusal of the websites of manufacturers like Real Traps and RPG will reveal some great and effective products, but they can be prohibitively expensive. A single 50-500Hz low-frequency absorber can cost £300 or more – and you might need six of them to deal with your issues!
It’s not difficult to make your own versions of all this stuff, though. Low-frequency absorbers work by vibrating in sympathy with the low frequencies and are mostly constructed from metal and high-density foam or rubber. From old BBC documents to public patent information from the Fraunhofer Institute, it’s all there if you look.
6. Find your listening position
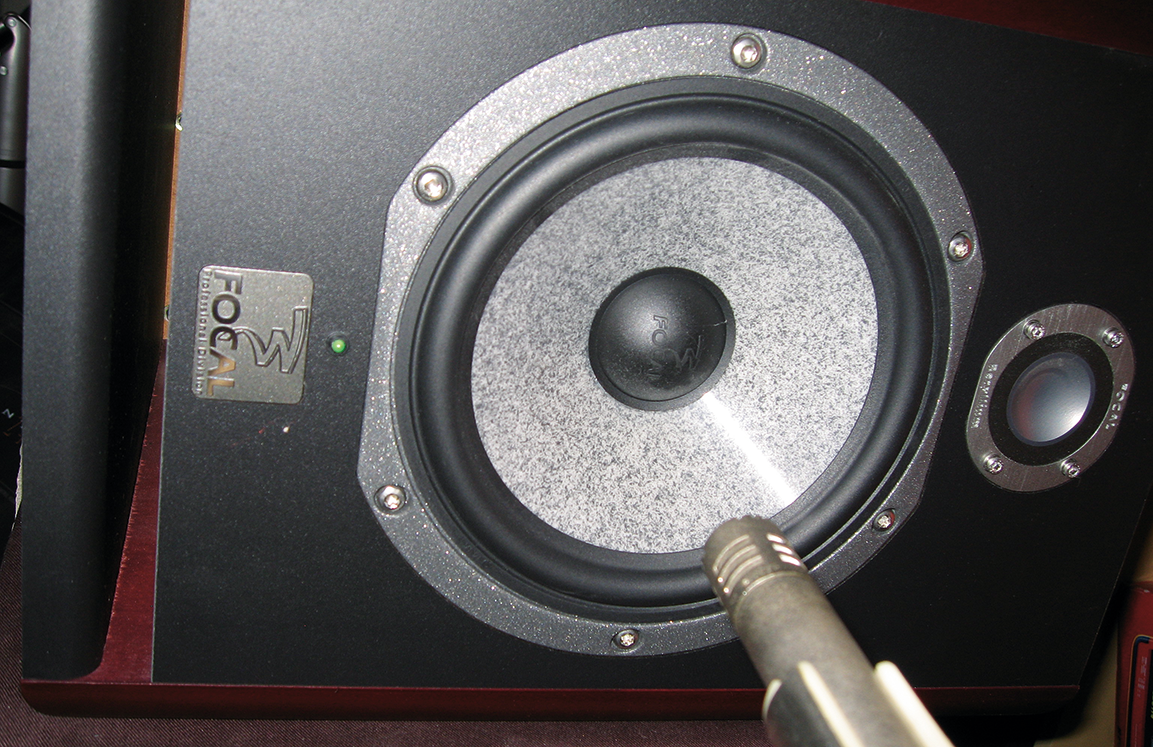
Step 1: The first step is to use a mic and a spectrum analyser to see what an even bass response looks like. Put your best condenser mic a couple of inches away from one of your speakers and use your DAW or a synth to send a sine wave test tone at 500Hz to that speaker only. Set up an input channel for the mic in your DAW and mute it.
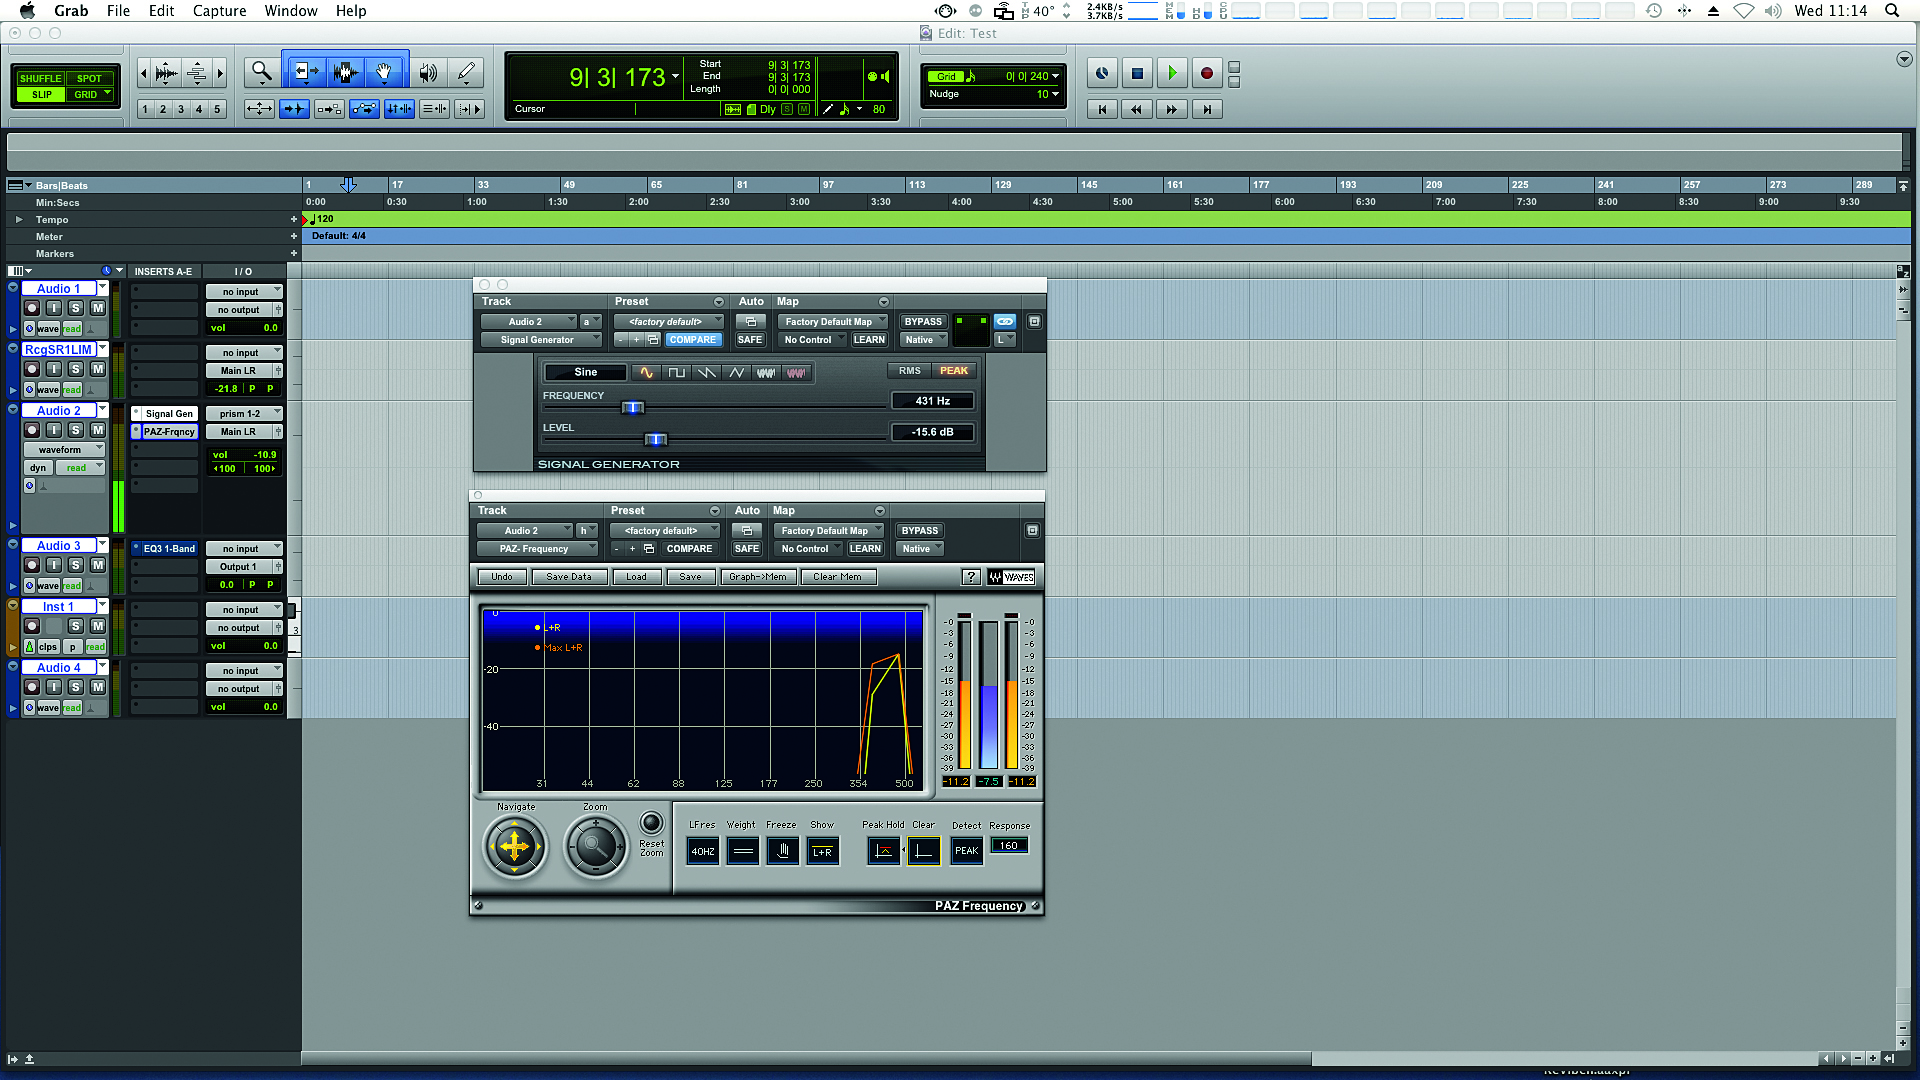
Step 2: Set the test tone and input level of the mic so that the level meters at around -12dB. Insert a spectrum analyser on the input channel, set it to ‘peak hold’ and slowly sweep the test tone from 500Hz all the way down. Take your time so that the analyser has time to register each frequency, and repeat the sweep two or three times.
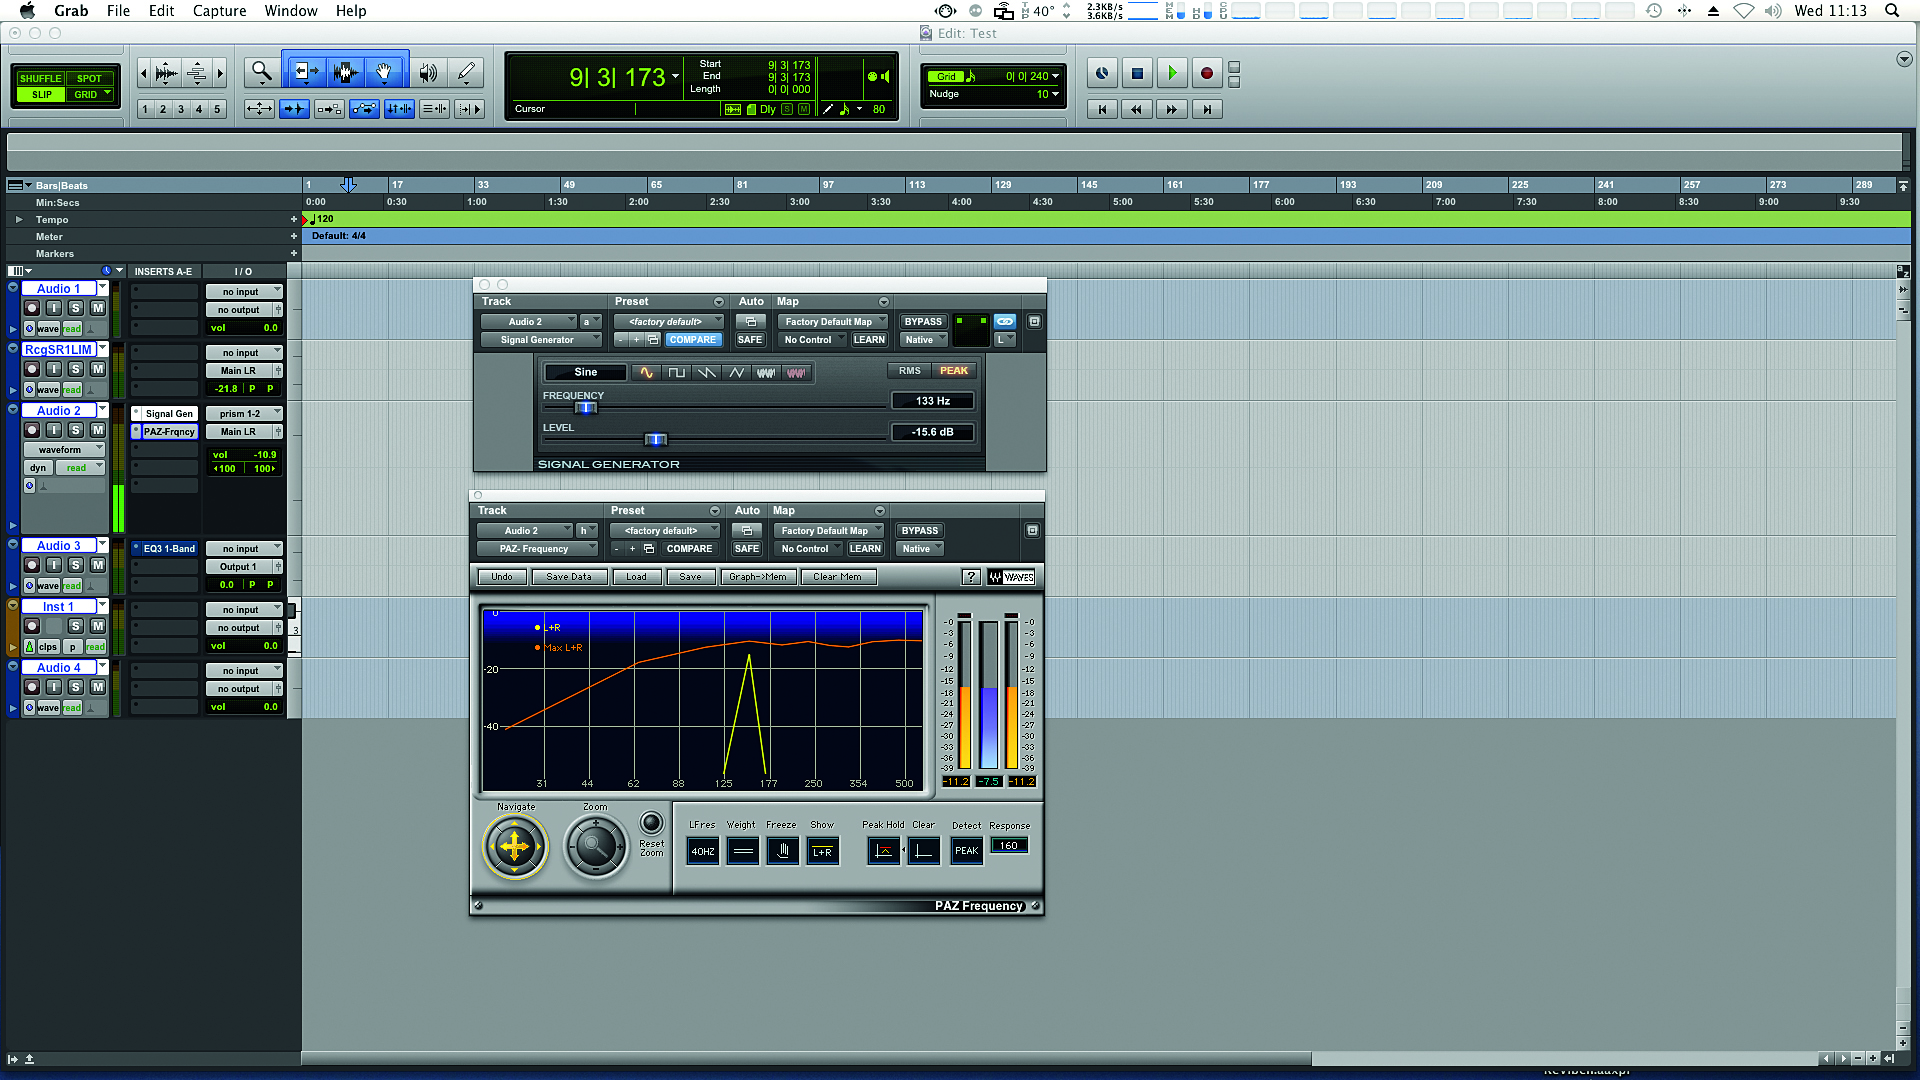
Step 3: Freeze the spectrum analyser display. You should see that the bass response drops away evenly. Typically, you might find the slope beginning at around 100Hz and dropping off 10dB by around 60Hz, then gradually plummeting nearer 40Hz. This will vary hugely depending on your mic and speakers, but we’re looking to see an even slope for comparison purposes.
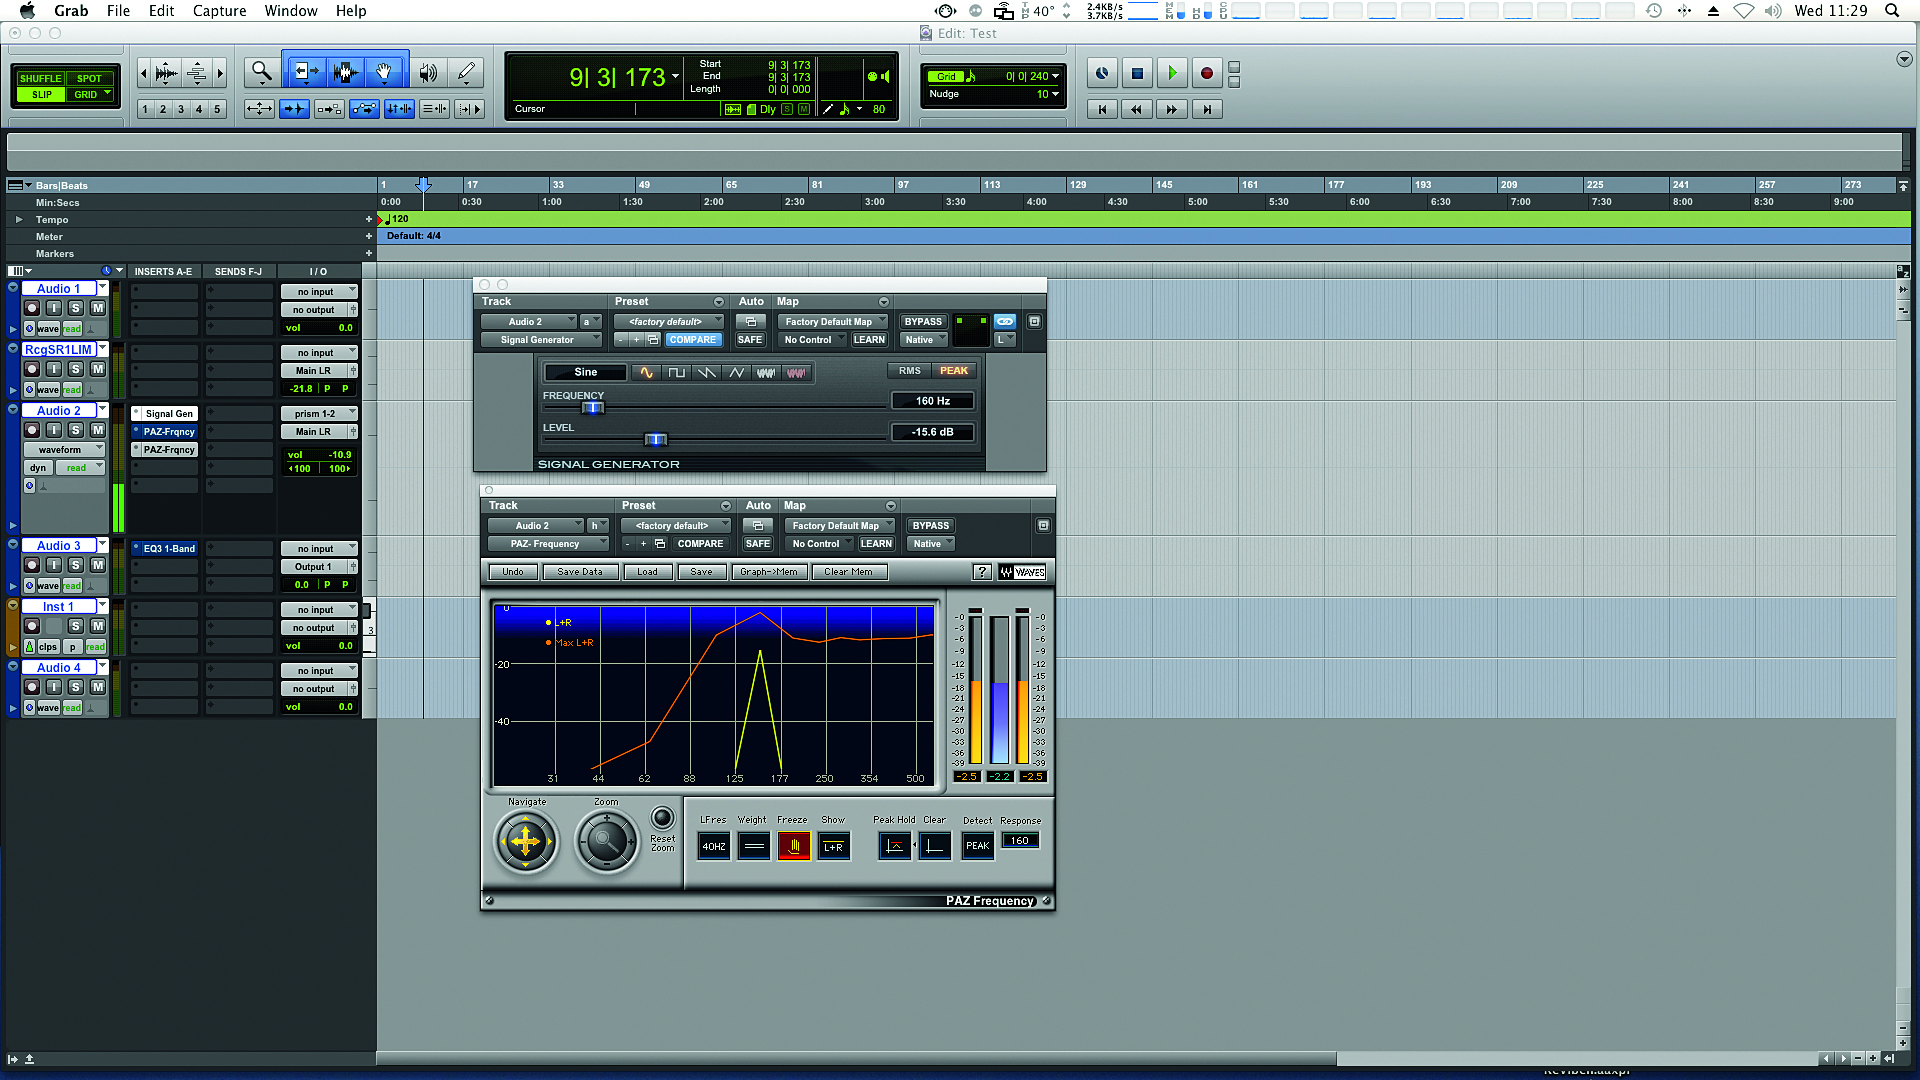
Step 4: Now move the mic to your proposed listening position, reset the tone to 500Hz and boost the mic input so that it still meters -12dB. Insert a second spectrum analyser and repeat the sweep procedure. Now freeze this second curve and you’ll probably see a few lumps and bumps in the journey from 500Hz down to 20Hz. If the trace matches Step 3, you’re sorted. If it’s lumpy, find a new position.
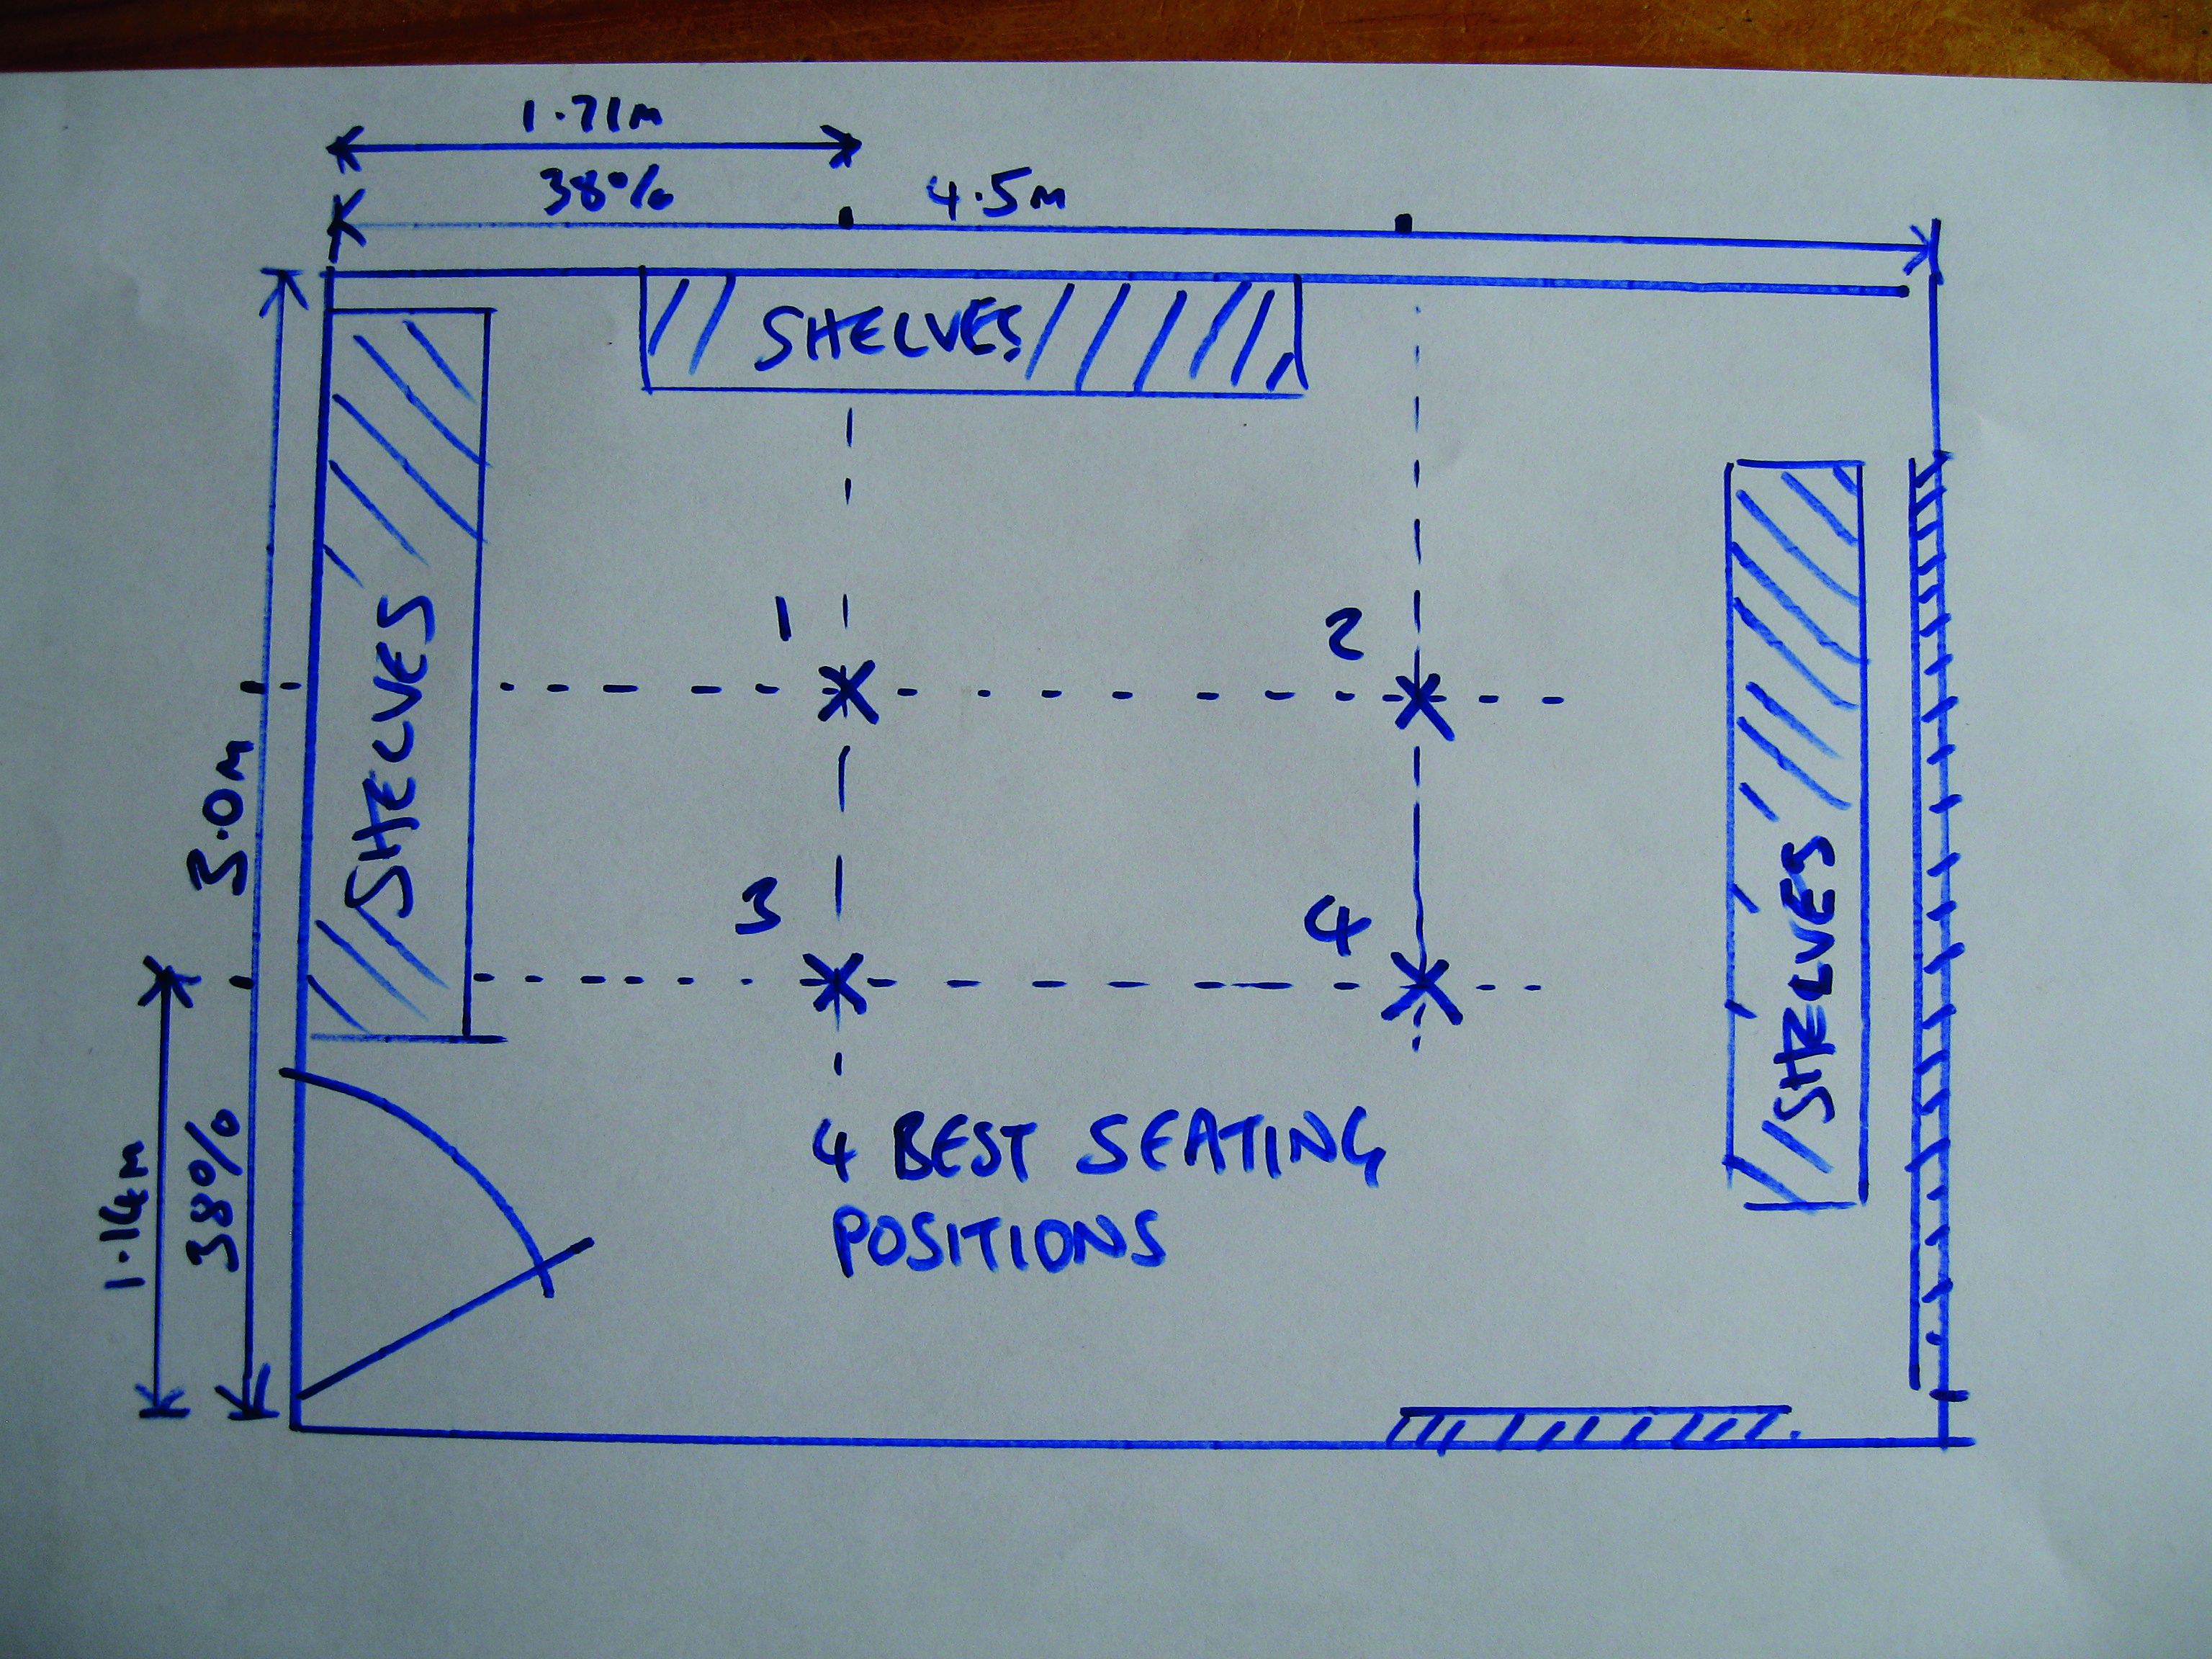
Step 5: Draw a plan of your room and measure out the 38% points. Measure both length and width to give four possible options for our new listening position. (Of course, some of these points won’t be practical.) Once you’ve found a likely spot, move the mic there and put a speaker where it would be if you were monitoring from that position, then repeat the sweep and measure process.
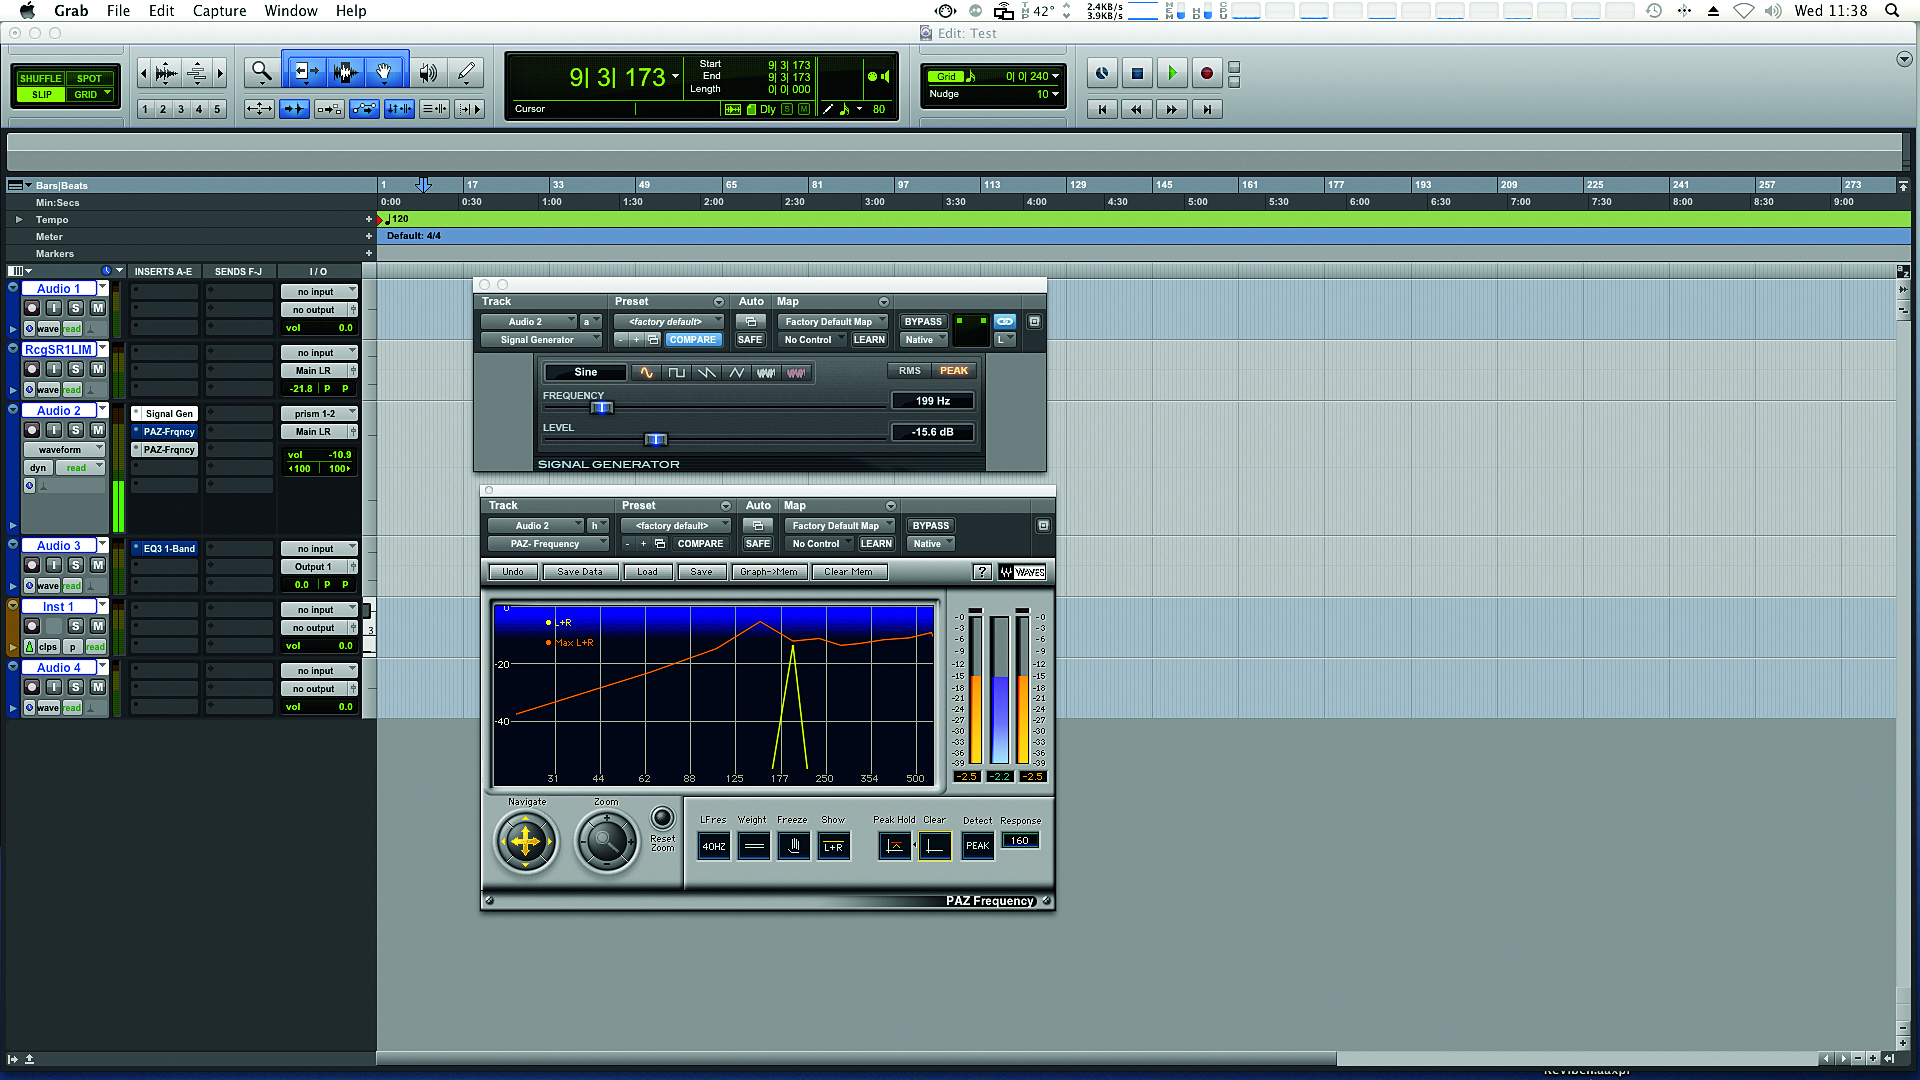
Step 6: After trying a couple of options, hopefully you’ll have found the place with the smoothest bass response curve. If there are any persistent humps you’ll need further bass/broadband absorption, but this will be the best listening position bass-wise, and you should build your control room around it. The next thing is to get your speakers correctly placed.
Computer Music magazine is the world’s best selling publication dedicated solely to making great music with your Mac or PC computer. Each issue it brings its lucky readers the best in cutting-edge tutorials, need-to-know, expert software reviews and even all the tools you actually need to make great music today, courtesy of our legendary CM Plugin Suite.
