
Last month we showed you how to build your own synth from scratch in Max for Live, a virtual programming environment and music-making toolbox that runs inside Ableton Live.
One great feature of Live is its extensive range of MIDI effects, and M4L enhances this by allowing us to build our own MIDI effects and processors. To demonstrate this, we're going to show you how to build a MIDI step sequencer, which you can use to complement the drum voice synthesiser we created in our previous tutorial.
To do this we need to create various elements: a timing clock, a display and programming grid, and a method for converting those sequences into a stream of MIDI messages.
Be sure to make full use of Max’s built-in documentation if you need to better understand any of the objects we use: just right-click on an object to access help and reference information, or simply select an option and click the Reference button to view an object’s details in the sidebar.

Step 1: In Live, drag the Max MIDI Effect device onto a MIDI track. Also add
the drum synth you made in the last tutorial, and set it up with some sounds. Open the MIDI effect in Max, and in the Inspector enable the project’s Open in Presentation option. Get rid of the default comment objects, and save your patcher as CM_StepSequencer.

Step 2: To keep our step sequencer in sync with Live, the first thing we need to know is Live’s current playback point. Press [N] (a shortcut for creating new objects) and type “transport @clocksource live”. The “@clocksource live” is an attribute name and value pair – a named argument – that tells the transport object to lock to Live’s transport.

Step 3: We need to repeatedly tell the transport to update itself. Create a new object and type “metro 64n @active 1 @autostart 1”. The “64n” is a timing value expressed as a sequencer-style note length, ie 1/64th note – be aware we can also add suffixes “nd” for dotted note lengths, and “nt” for triplets. Connect metro to transport’s left input.

Step 4: We need to know the step sequencer’s number of steps and step length. Create a “live.numbox”, name it “Num Steps” and give it an integer value range of 1 to 16. Also create a “live.menu” and name it “Step Size”. In the Inspector, click the Value/Enum field’s “edit” button and enter lengths of 1, 2, 4, 8, 16 and 32, with suffixes “nd”, “n” and “nt”.

Step 5: Patcher objects are used to create a subpatcher that doesn’t create a visual output. Create one now with the argument “StepCounter” (this is just a name). A new patcher window will open. Create three “inlet” objects. In the Inspector, set the first inlet’s Comment to “Ticks”, the second’s to “Num Steps” and the third to “Step Size”.

Step 6: To calculate the current step position compare the sequence’s total length with the current play position. Create a “translate” object with arguments “notevalues” and “ticks”, and connect the Step Size inlet to it. Connect translate’s output to the leftmost input of a new “*” multiplier object, with the Num Steps inlet connected to multiplier’s other input.

Step 7: Create a “bangbang” object, connect the Num Steps inlet to its input, and its rightmost output to the leftmost input of the multiplier. This means the multiplication is recalculated when the Num Steps value changes. Feed the multiplier’s output to the right input of a new “%” (modulo) object, which divides then outputs the remainder. Connect the Ticks inlet to modulo’s left input.

Step 8: Create a new “/“ division object, connect modulo’s output to its left input, and translate’s output to its right input. The output of the division will be the current step number, but counting from 0; we want to count from 1, so create a new “+ 1” object and feed it from the division object’s output. Connect the addition’s output to a new “change” object.

Step 9: The change object only outputs an incoming value if it is different to the previous incoming value. Connect change’s output to a new “outlet” object then close the subpatcher. Back in the main patcher window, connect transport’s Raw Ticks output (second from right) to StepCounter’s first input, Num Steps to its second input, and Step Size’s middle output to its third input.

Step 10: We’re going to use Max’s trusty matrixctrl object as our sequencer grid because it allows each cell to have more than just on or off states (our cells need to show off, on and accented states). Create a “matrixctrl”, check “Autosize to Rows and Columns”, set it to have 16 columns and 4 rows, and set the Cell Range to “3”.

Step 11: Although matrixctrl can represent multiple states, its default graphics can’t, so we need to create a custom graphic. Use an image editor to create a new image 72x24 pixels in size. Create three circles or squares of approximately 18 pixels in diameter/width, in three different colours, and distribute them evenly across the image. Save as a PNG file with transparent background.

Step 12: Back in Max’s Inspector, click the Cell Image File Choose button, then browse to and select your PNG image file. Uncheck the Has Clicked Image and Has Inactive Image options. Lock your patcher using the Padlock button at the bottom right of Max’s window and test your matrixctrl – each click in a cell should step through the three cells of the image.

Step 13: Unlock the patcher. Create a new Message object. Once created, double-click it and type in “columns $1”. When the message receives something at its first input, it will replace “$1” with the received value and then send out the message. Connect the Num Steps menu’s output to message’s left input, and message’s output to matrixctrl’s input.

Step 14: Create another Message object, set its text to “getcolumn $1”, and connect its output to matrixctrl’s input. Both column and row numbers in matrixctrl will be starting from 0, so, before sending in the value from our StepCounter we will
need to subtract 1 from it. Create a “-“ object with an argument of “1”, and connect it between StepCounter and the getcolumn message.

Step 15: Connect the getcolumn message’s output to matrixctrl’s input – this will make matrixctrl send from its right output a list containing each column cell’s value. We’ll use this list to assemble MIDI messages, but we also need to know what note each row uses. Create four “live.numbox” objects configured to show MIDI notes. Name these “Trig Note 1” to “Trig Note 4”.
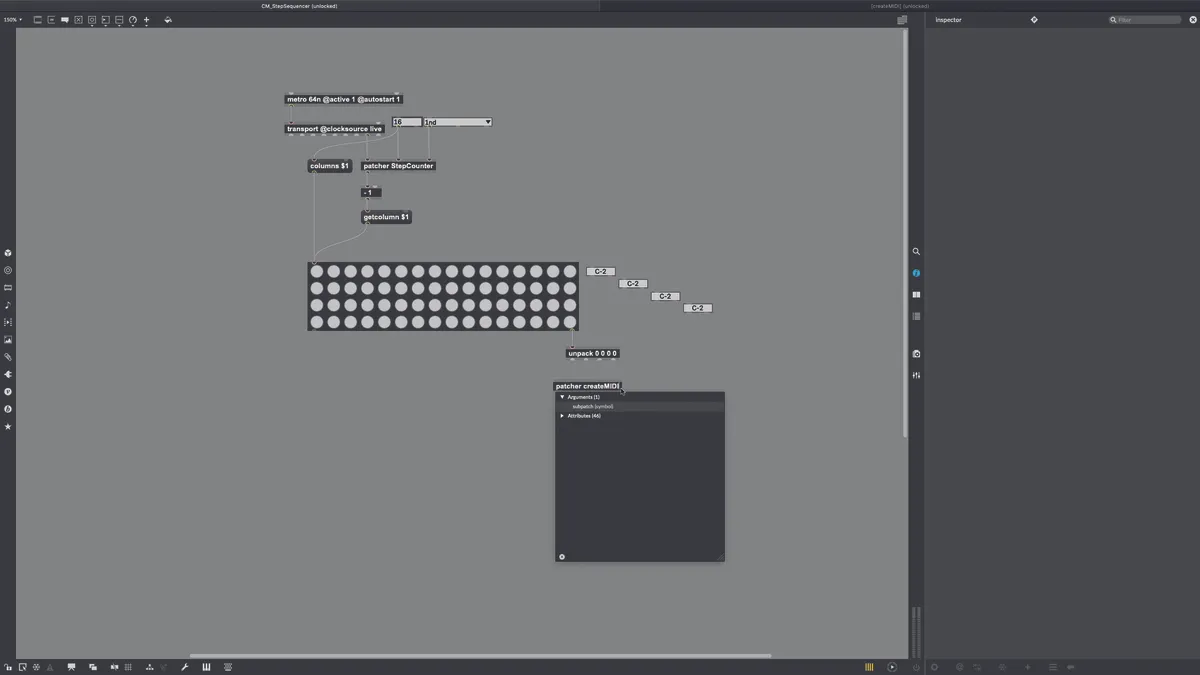
Step 16: Create an “unpack” object, give it four arguments of “0”, and connect its input to matrixctrl’s right output. Unpack breaks a list into its individual elements, and outputs each element from a dedicated output; the arguments tell it how many items to expect in the list. Create a new “patcher” with the argument “createMIDI” (remember, this argument is just a label).

Step 17: In the subpatcher, create two “inlet” objects, with their Comment parameters set to “Cell Val” and “Trig Note”, respectively. Create a “select” object with arguments of “1” and “2”. This will send a bang from one of its outputs, depending on the input value. We’ll use these bangs to create the velocity value for the output MIDI message.

Step 18: Recall that our synth responds to two velocity levels – less than 100 for standard hits, above 100 for accented hits – so we’ll output velocities of 50 and 127. Create two “int” objects, the first with an argument of “50” and the second with an argument of “127”. Connect select’s first output to the first int, and its second to the second int.

Step 19: Create a “buddy” object with two arguments of “0”. This remembers incoming values until both inputs have received a value, whereupon it outputs the values simultaneously from their own ports – this helps to synchronise events, something that can become tricky with Max. Connect the Trig Note inlet to buddy’s left input, and the outputs of both int objects to buddy’s right input.

Step 20: Create a “pack” object with two “0” arguments. This is the opposite of the unpack object that we used earlier, ie it creates a list. Connect the left and right outputs of buddy to the left and right inputs of pack (respectively). Create a “midiformat” object with an argument of “1” and connect pack’s output to its leftmost input.

Step 21: Create an “outlet” object, connect its input to midiformat’s left output, then close the subpatcher. In the main patcher, connect unpack’s leftmost output to createMIDI’s left input, and Trig Note 1’s output to createMIDI’s right input. Repeat for each of unpack’s outputs, connecting each to the appropriate Trig Note numbox. For tidiness, you can resize the unpack object, as in our image.

Step 22: We need to bang the Trig Note live.numbox objects so they send their values into the createMIDI subpatchers at the same time as the unpack object sends its messages. Create a bangbang object for each Trig Note numbox, connecting each bangbang’s input to one of unpack’s outputs, and the bangbang right outputs to the corresponding Trig Note live.

Step 23: Find the patcher’s default midiout object and connect the output from each createMIDI subpatcher to the midiout’s inlet. Select all of the interactive control elements (matrixctrl, live.menu and live.numboxes), add them to the presentation, then switch to Presentation mode and create a layout. Add “comment” objects to act as labels if desired. Save when ready and close your patcher.

Step 24: Have a play. There are a lot of improvements that could be made: a song position marker would be handy, as would a background graphic that shows where the beats lie, and the ability to store and recall sequences is notable by its absence. However, you should now feel confident enough with M4L to tackle these jobs yourself… happy developing!
Power tip: bugging out
Things don’t always work as you intended them to – or at all – when you’re building your own plugins. When this happens you have to track down and understand the bug. An easy way to do this in Max is to connect number or number~ objects at various points in a patcher, and use them to study the values that are being passed around in order to better understand the bug.
