How to build a synth in Max for Live
Create your own drum synth from scratch in Ableton's powerful music-making toolbox
Want all the hottest music and gear news, reviews, deals, features and more, direct to your inbox? Sign up here.
You are now subscribed
Your newsletter sign-up was successful
Following on from our deep dive into Native Instruments’ Reaktor, we take on another powerful tool that offers near-limitless creative possibilities to those looking to create their own synths and effects from scratch: Max for Live.
Max by Cycling ’74 is a visual programming tool but, unlike other tools such as Reaktor, it is not in-and-of-itself dedicated to creating audio processors, and has capabilities that extend into many different fields: image and video processing, hardware control, and more.
So, in reality, Max is more like a combination of an IDE (Interactive Development Environment – a software suite that assists with code development) and a runtime environment in which programs created with Max – referred to as “patchers” – can run.
This allows Max to be exceptionally open-ended, because new packages of functionality, known in the coding world as “libraries”, can be created by anybody who feels so inclined.
And because Max objects can be coded in a number of languages, including the widely used JavaScript, you don’t need to deal with fiddly compiled languages like C and C# in order to start coding your own Max objects. (The word “object” is used in programming to refer to a “thing” within a program – a value, a controller, an oscillator… whatever!)
MSP and M4L
One of the most important Max libraries for audio processing is MSP. This integrates closely with Max and provides more than 200 objects dedicated to processing and working with audio signals in one way or another. These can be recognised by the tilde (“~”) suffix given to all MSP object names – when you see that tilde you know that the object is intended for handling audio signals.
With Max and MSP you can create all sorts of different synths and effects, but integrating your creations into your music production workflow isn’t so easy because there is no plugin version of Max. Rather, you can either use Max standalone, link Max with your DAW via ReWire, or you can use Ableton Live.
Want all the hottest music and gear news, reviews, deals, features and more, direct to your inbox? Sign up here.
Max For Live (M4L) is a version of Max that integrates tightly with Ableton Live. You can add instruments, audio processors and MIDI processors created with Max directly to a track’s device chain, as well as add empty prototype devices that act as starting points for your own M4L-based devices.
The integration includes a library of visual controls – dials, buttons, etc. – that are styled to match Live’s standard look, and access to internal details about Live and its currently loaded set. M4L is a standard part of Live Suite, or can be purchased as an add-on for Live Standard and Live Intro. Ableton also distribute a number of M4L devices, both free and premium.
Geek chic
Conceptually, Max and Reaktor have an awful lot in common: both of them work by using virtual patch wires in order to link together objects that perform some function or other; both create a distinction between audio and event connections; and both come packed with pre-made building blocks from which you can create your own synths and audio processors.
In practice, however, Max feels a lot closer to writing code than Reaktor does: object names are often multi-part affairs separated by dots, for example “live.dial” or “jit.buffer”; object names can be quite obscure, for example “phasor~” for a sawtooth oscillator; and there’s no avoiding programming concepts such as integers, floats, lists, and more.
If you already know a bit about coding then Max’s code-y-ness shouldn’t trouble you, but if coding isn’t your thing then you may have to work a bit harder at first to understand how to do things with Max. It is worth the effort, though, and you’re helped along the way by Max’s excellent integrated help and reference system. And of course there’s the tutorials we have created for you here!
Our focus across this tutorial will be on learning to work with and program in M4L, and so the devices we’ll create are intended to demonstrate how to work with M4L, and to help introduce you to some of the most important objects and techniques.
To this end we’re going to make an analogue-style drum synth. If you don’t have Live then adapting the projects for Max MSP is possible, largely by replacing Live.* controllers with Max’s built-in equivalents; that being said, you may find it slightly easier just to install the Live Suite demo and enjoy its full Max integration.
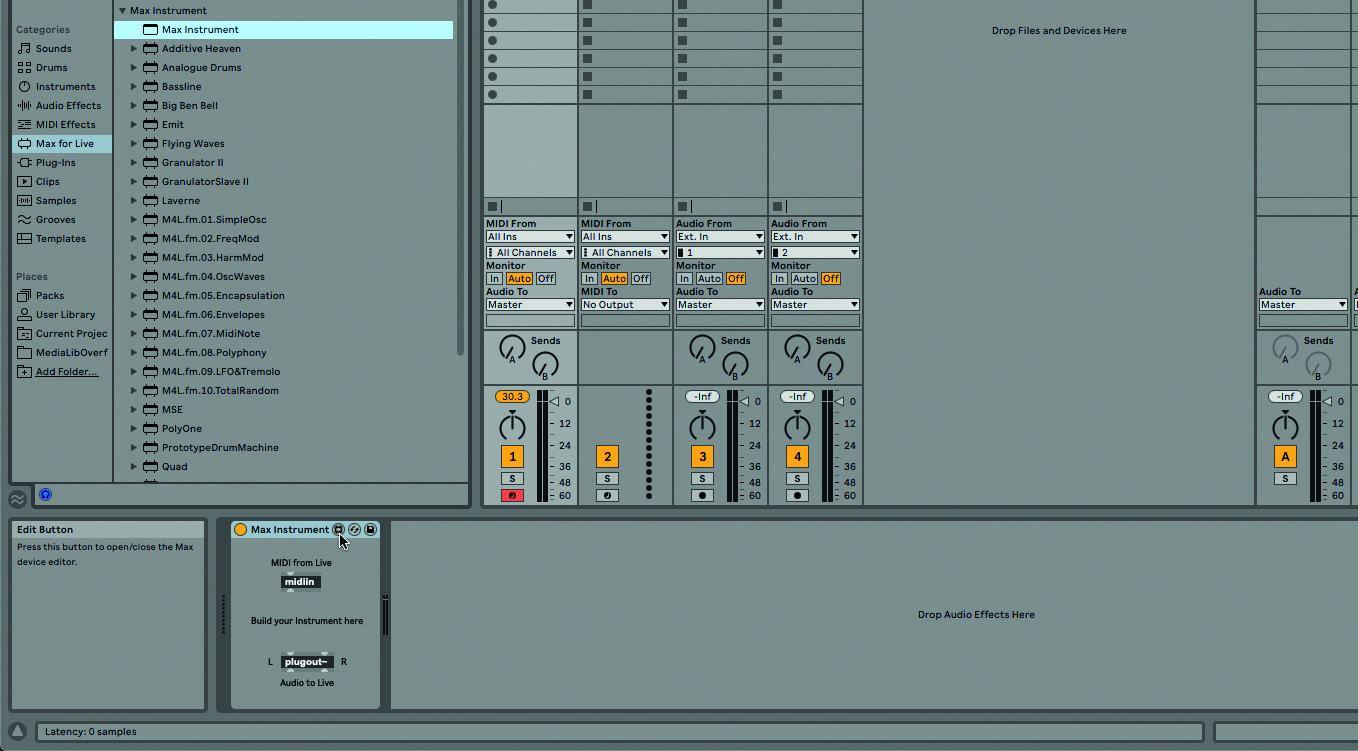
Step 1: The drum synth we’re about to create will have multiple voices, with each voice being an instance of the same mini synth. Create a new Live set and drag a new Max Instrument to a MIDI track. Locate the new device in the track’s device list then click on its Edit button to open the device for editing in Max.
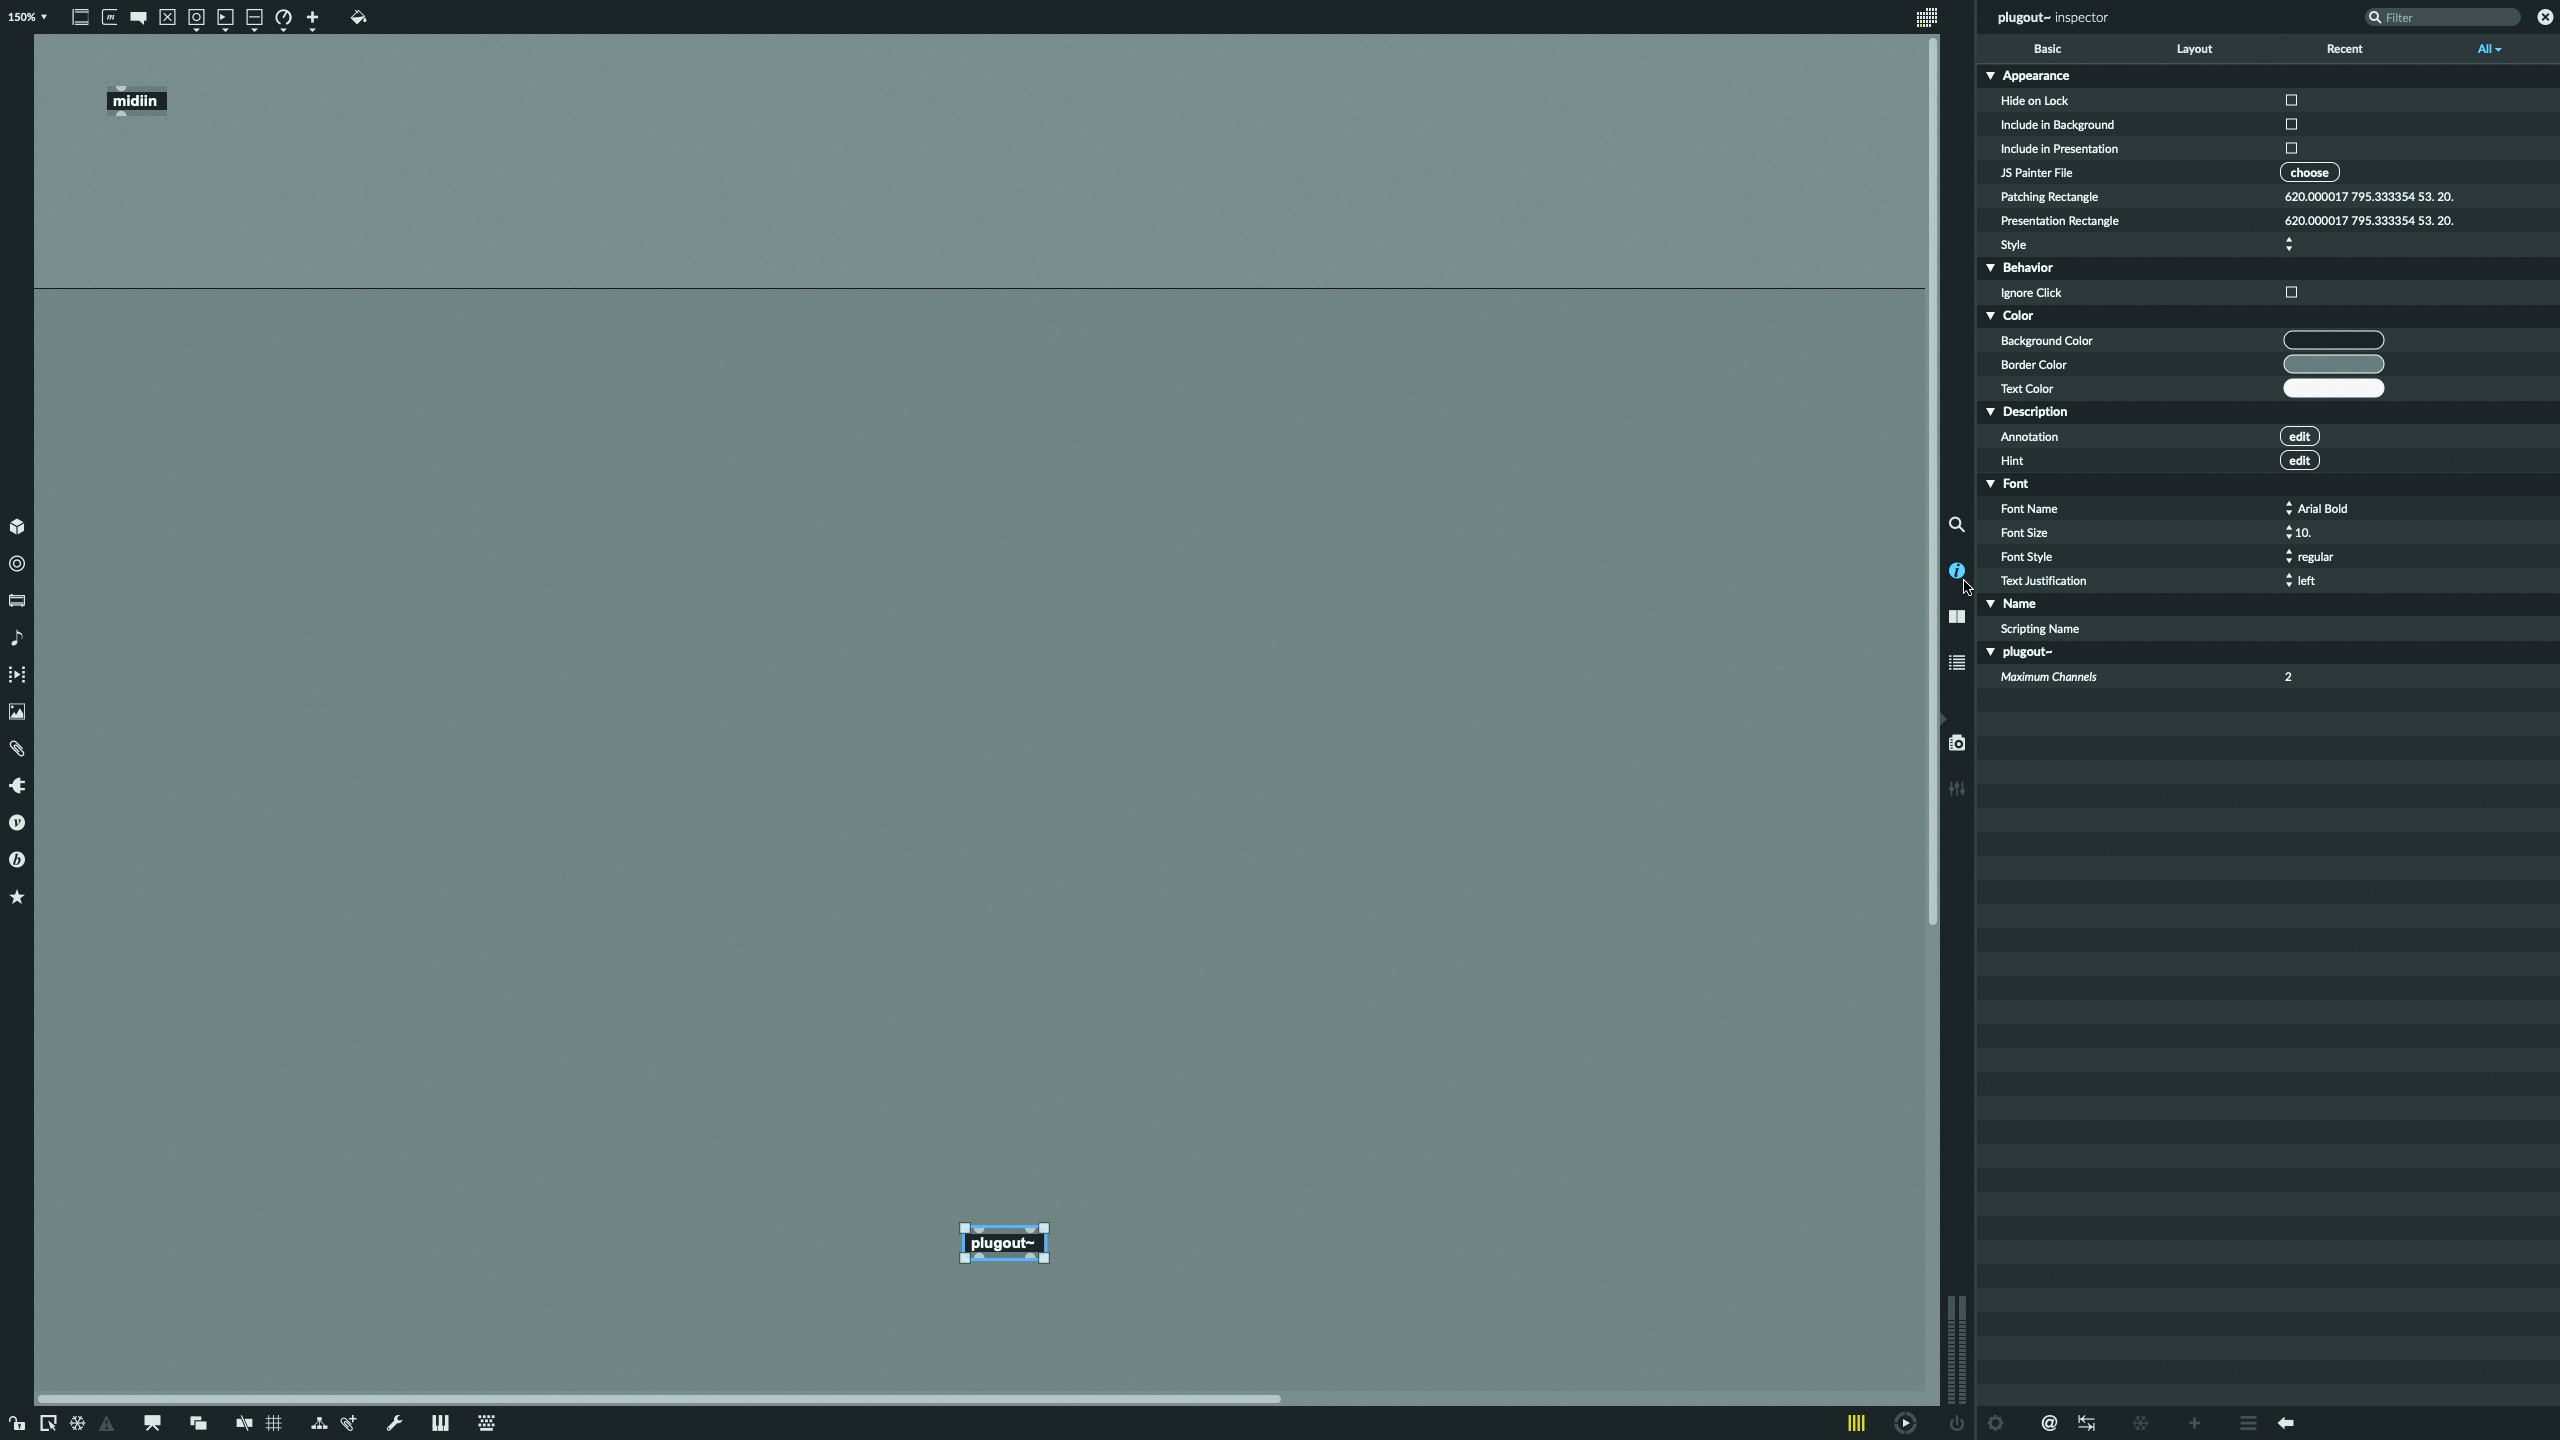
Step 2: Max has created a default MIDI input, “midiin”, and a default audio output, “plugout~”. The tilde “~” indicates this is a MSP object, and designed to handle audio signals rather than events or messages. Delete the comment objects that are labelling things and drag plugout~ down to the bottom of the screen. Click the “i” button to open the Inspector sidebar.
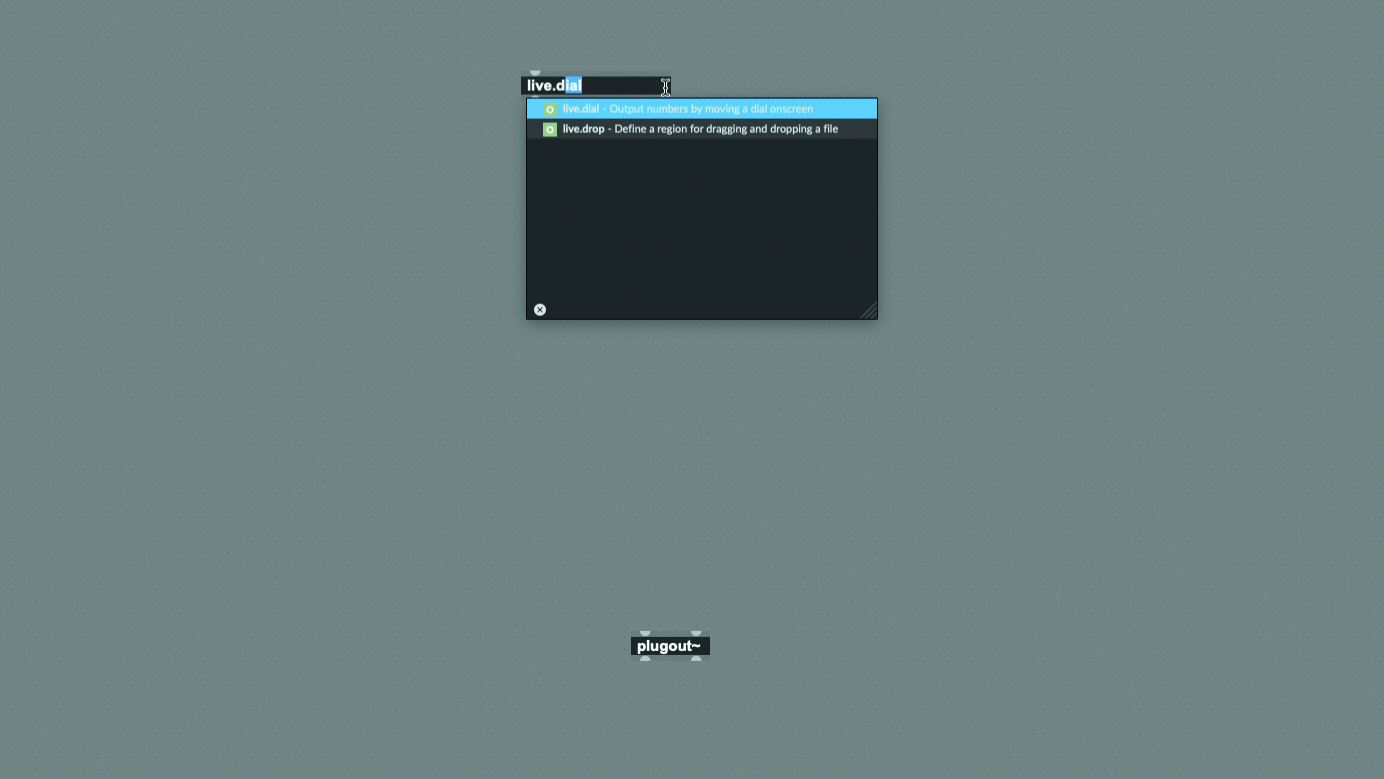
Step 3: Double-click an empty area of the patcher, type “live.dial” in the field that appears, and hit Enter. In the Inspector’s All tab, enter “Oscillator Pitch” for the Long Name (visible when selecting controllers in Live), and “Pitch” for the short name (shown above the dial). In the Range/Enum field enter “40. 10000.”, tick Initial Enable and enter an initial value of “440.”
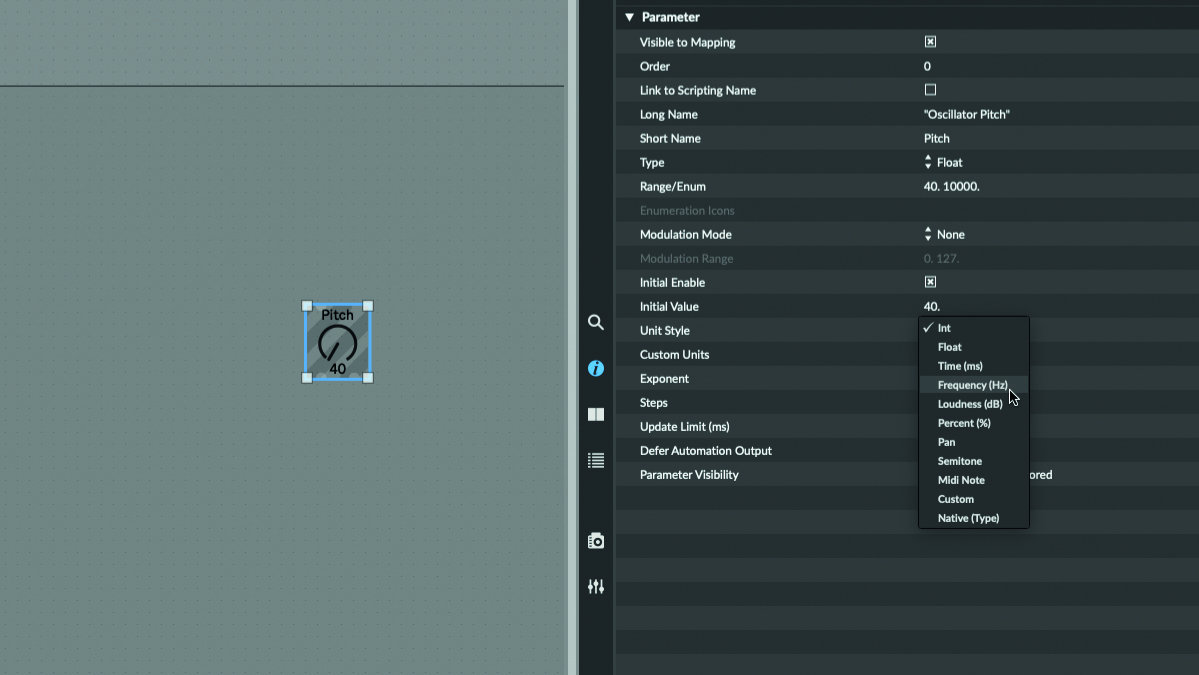
Step 4: The “.” we’re adding to the numbers tells Max to handle them as floats (ie decimals) rather than integers (ie whole numbers). The range we’ve entered is in Hz, so change Unit Style to “Hz”. Frequency doubles per octave, making lower frequencies hard to dial-in. Setting the dial’s Exponent property to “2” will fix this without impacting the overall value range too much.
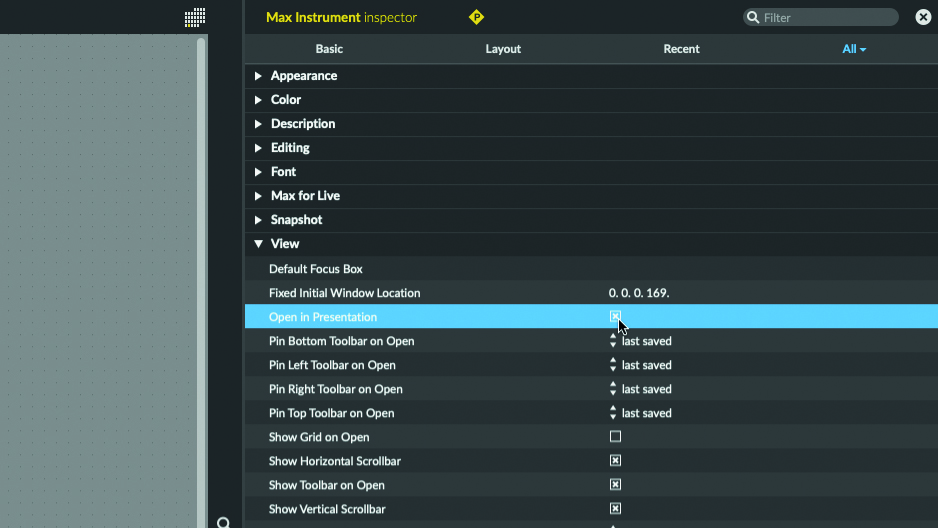
Step 5: Max’s Presentation Mode allows us to lay out the Live device control panel, and hide things we don’t want to see in that panel. Click the “P” symbol at the top of the Inspector to view the patcher’s parameters, scroll to the View group and tick Open in Presentation. This tells Live to always display the patcher in Presentation mode.
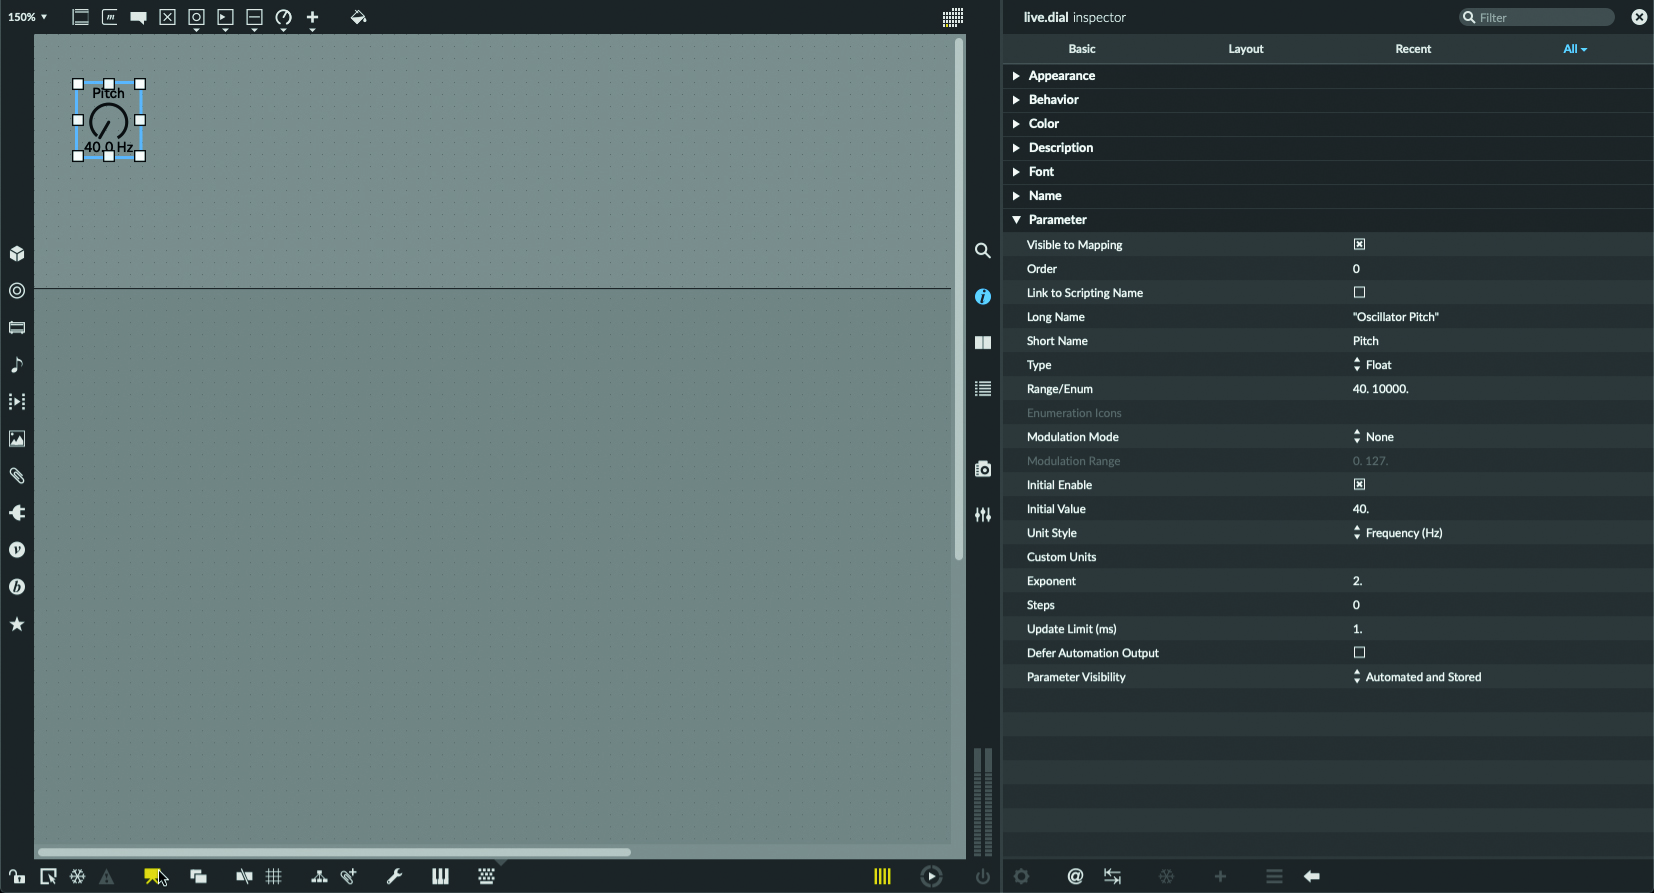
Step 6: Right-click the Pitch dial and select Add to Presentation. Enable Presentation Mode from Max’s bottom border, then position the dial above the horizontal divider (this shows where the bottom of the device panel will be in Live). Save the patcher (we’ve called ours “CM Drum Synth”) and close it. Notice that your dial is visible in Live, but midiin is not.
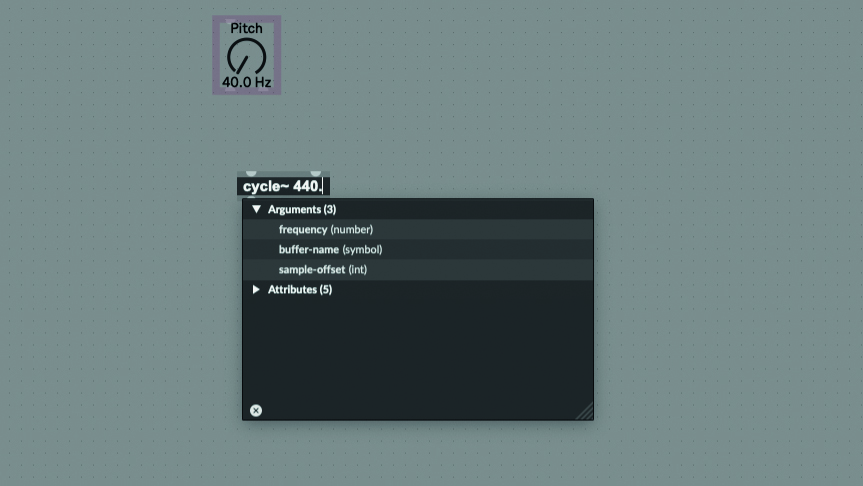
Step 7: Reopen the device in Max and switch back to Patching mode. Double-click to create a new object and type “cycle~” followed by [space] – a pop list of arguments appears. These are essentially default values that we can set now and override later. Type “440.” following the space and hit enter – we now have a sine wave oscillator running at 440Hz.
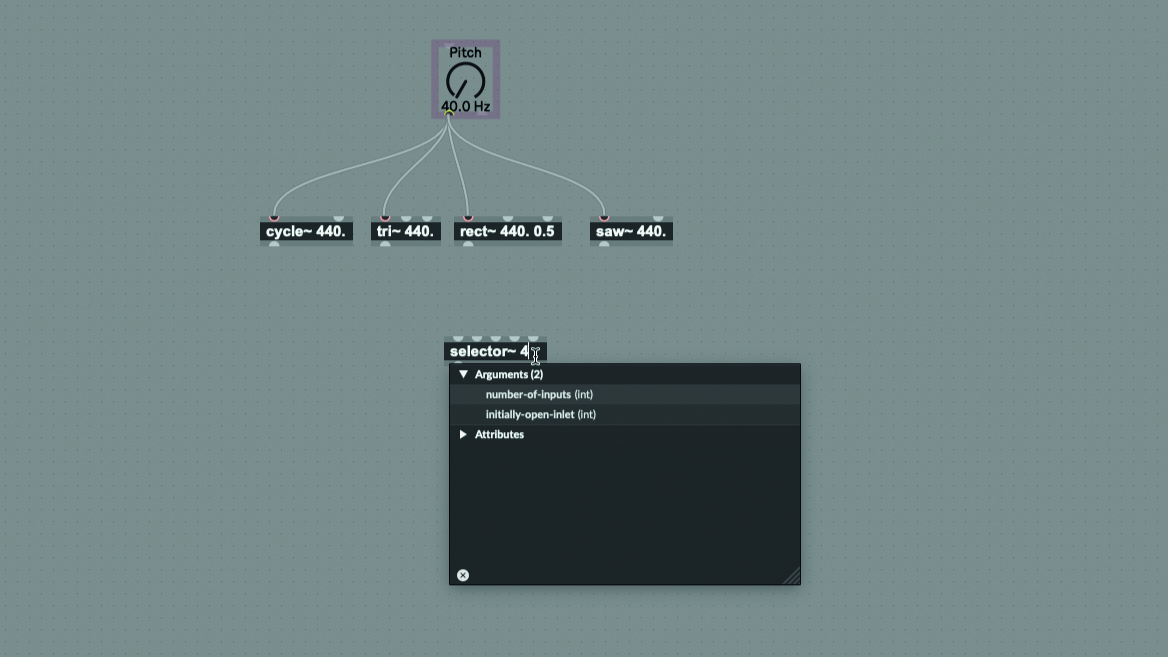
Step 8: Create three more oscillator objects, “tri~”, “rect~” and “saw~”, all with the same “440.” frequency argument. Add a second argument to rect~ with a value of 0.5 – this sets the pulse width. Connect the leftmost output of the Pitch dial to the leftmost input of each oscillator. Create a “selector~” object with an argument of 4, thereby specifying its number of inlets.
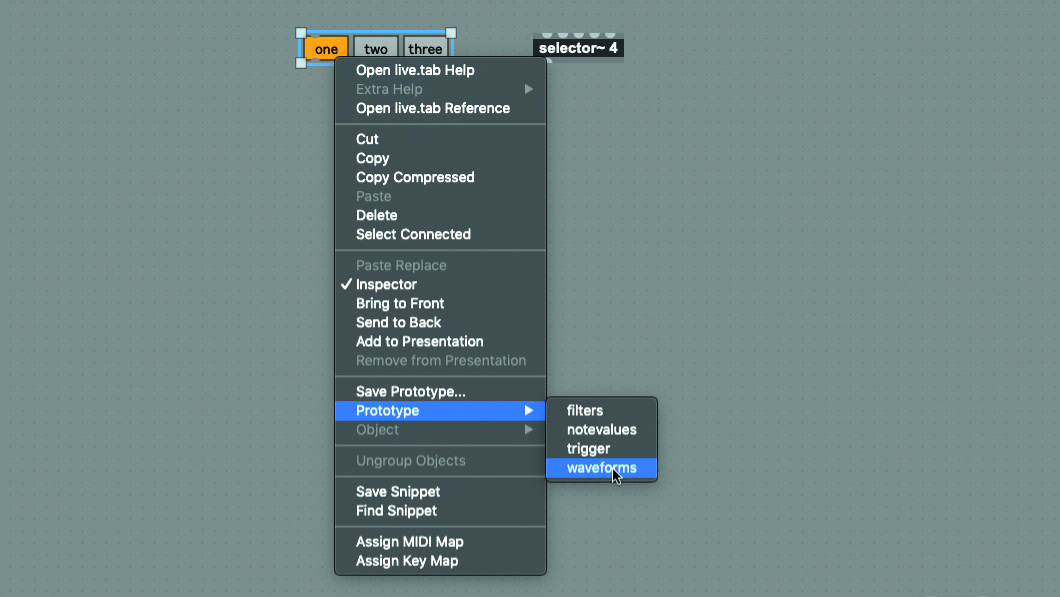
Step 9: The selector~ will let us choose which oscillator we hear. Its leftmost input receives an integer that indicates which of the four signal inputs should be passed to the output. We can drive this input with a “live.tab” object, so create one, name it “Osc Waveform”, then right-click on it and select “Prototype -> Waveforms” – this creates handy waveform buttons.
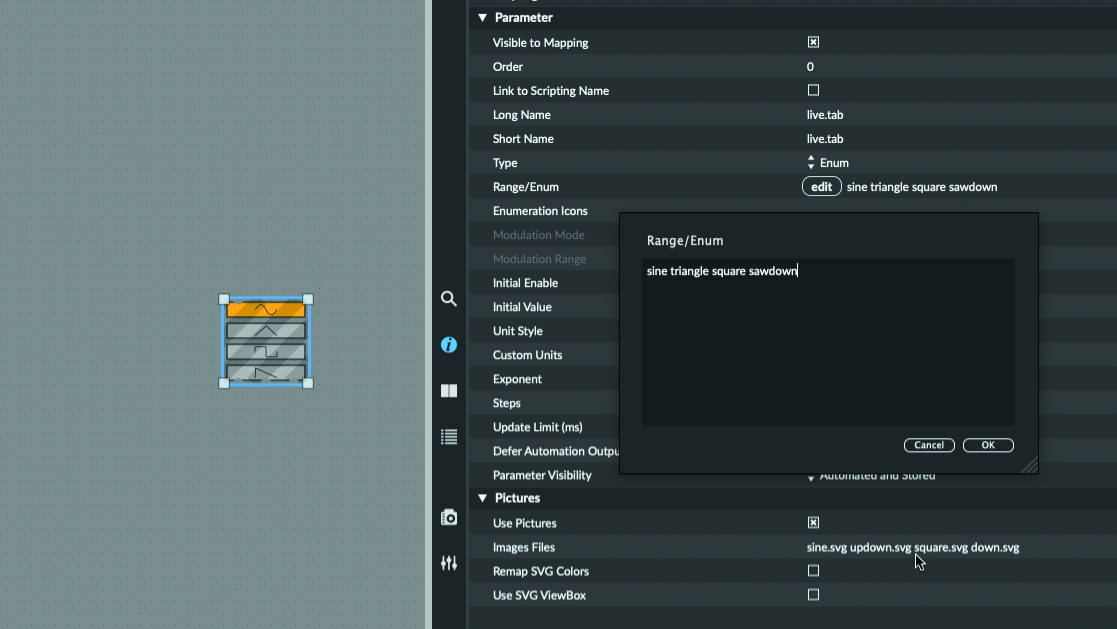
Step 10: There are more waveform buttons than needed. With the selector~ selected, go to the Inspector and click the Range/Enum field’s Edit button. Modify the list so it only includes the waveforms we’re using. Modify the list of filenames in the Image Files field as well, removing unused waveforms and reordering to match the entries in Range/Enum.
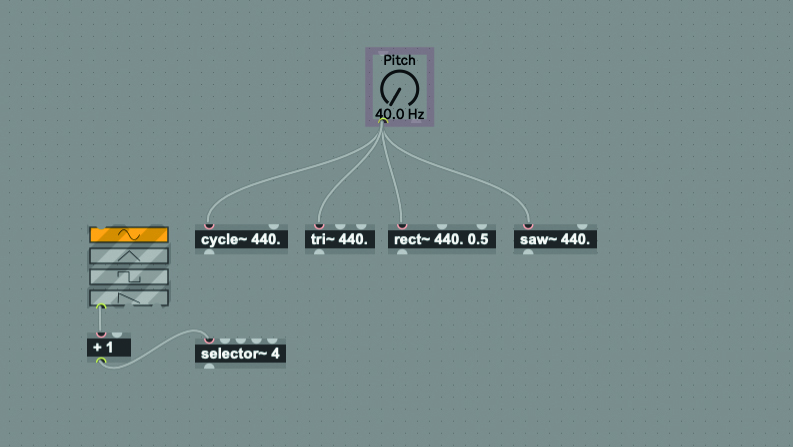
Step 11: The selector~ will block all signals if it receives “0” at its first input, but our live.tab is going to output “0” to represent its first choice, so we need to add “1” to this output. Create a “+” object with an argument of “1”, connect live.tab’s first output to its input, and its first output to the first input of our selector~.
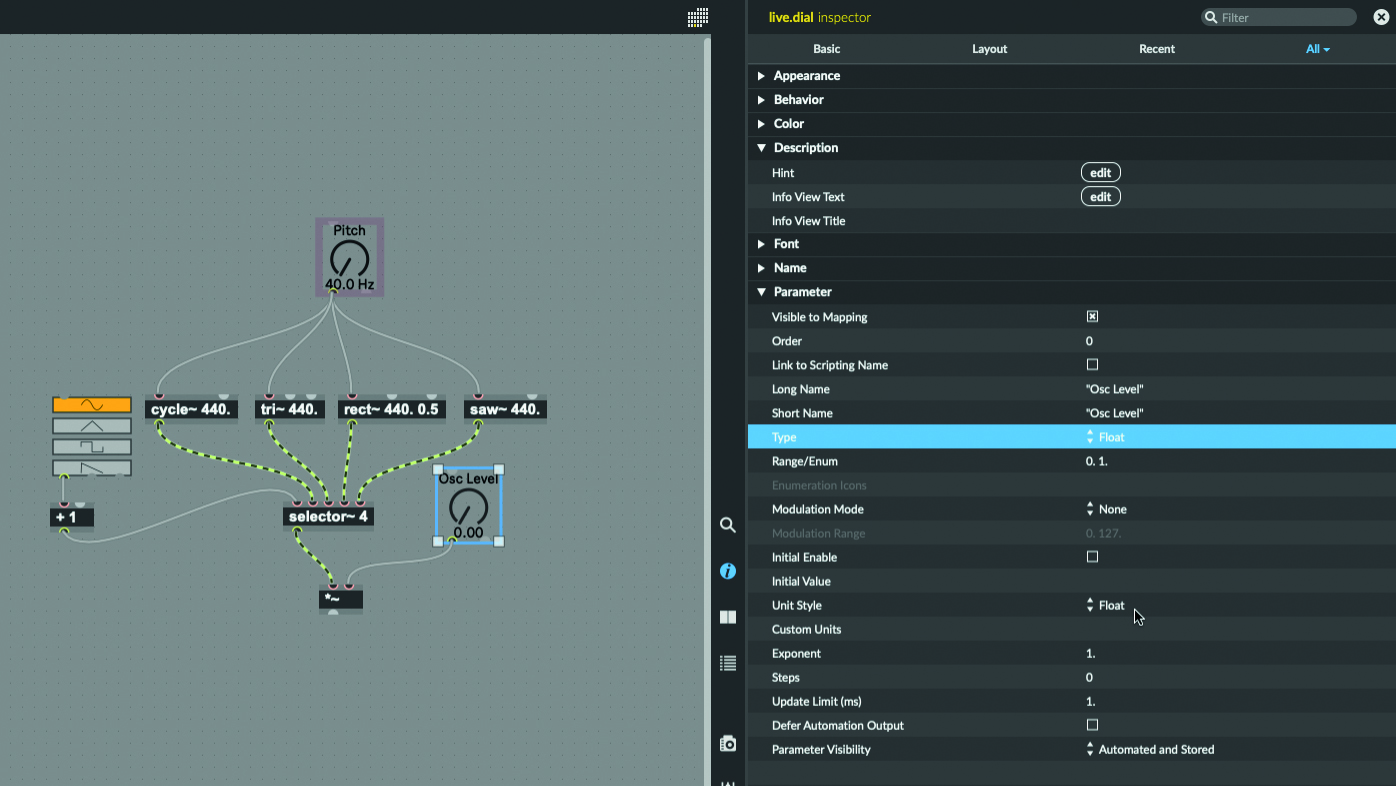
Step 12: Connect the oscillators to the remaining inlets on the selector~. Add a new live.dial, name it “Osc Level”, and configure it to output floats in the range of “0.” to “1.”. Create a signal, “*~” (notice the tilde), connect the selector~ output to multiplier’s first input, and the dial’s left output to multiplier’s right input. We can now control the oscillator level.
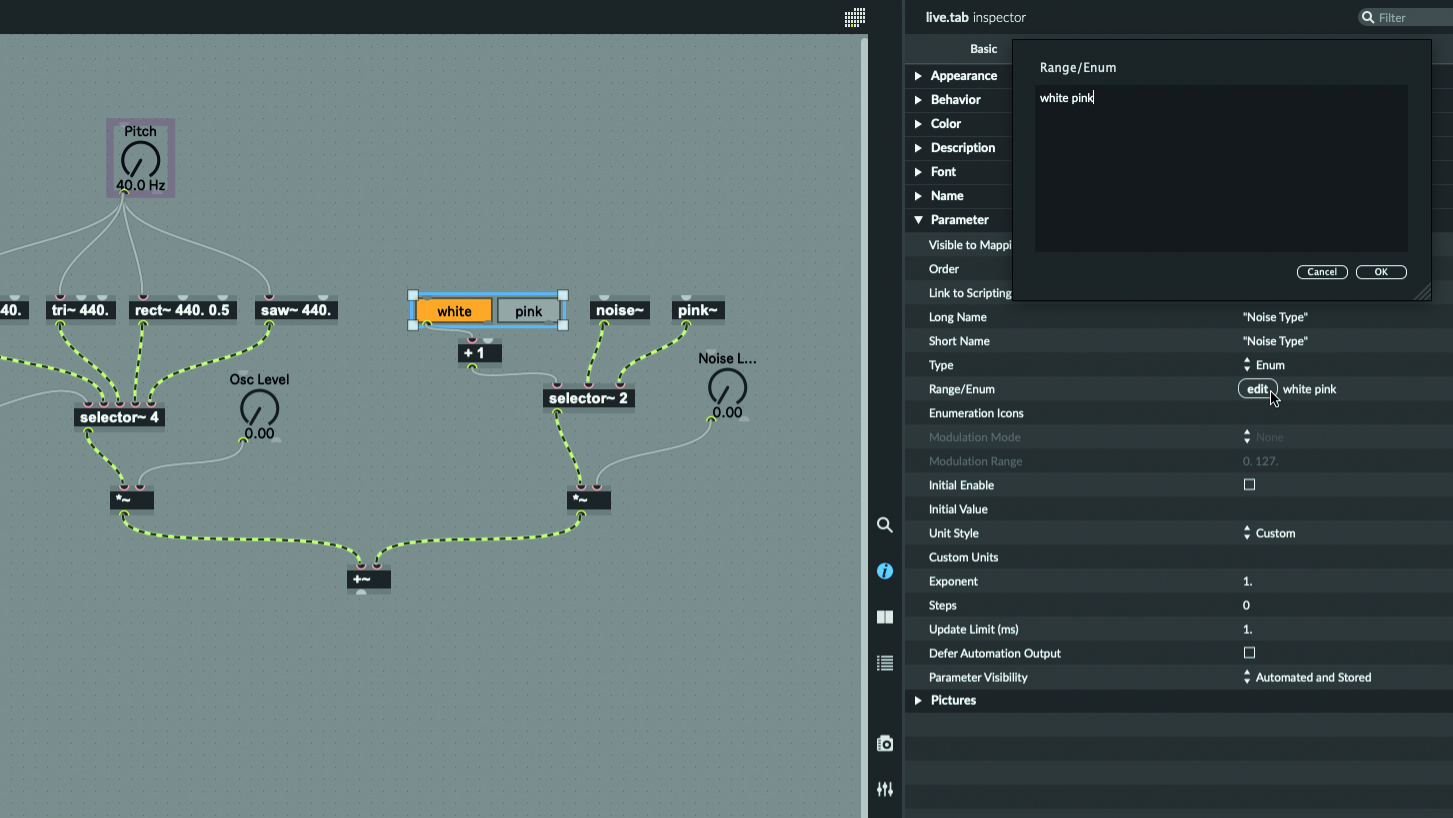
Step 13: Now we’ll create a noise generator to mix with the pitched oscillator. Create a “noise~” object and a “pink~” object, a “selector~” and “live.tab” to switch between them, and a level dial and signal multiplier to control the noise signal’s volume. Wire them all up, then create a signal add object, “+~”, and use it to combine the oscillator signal and the noise signal.
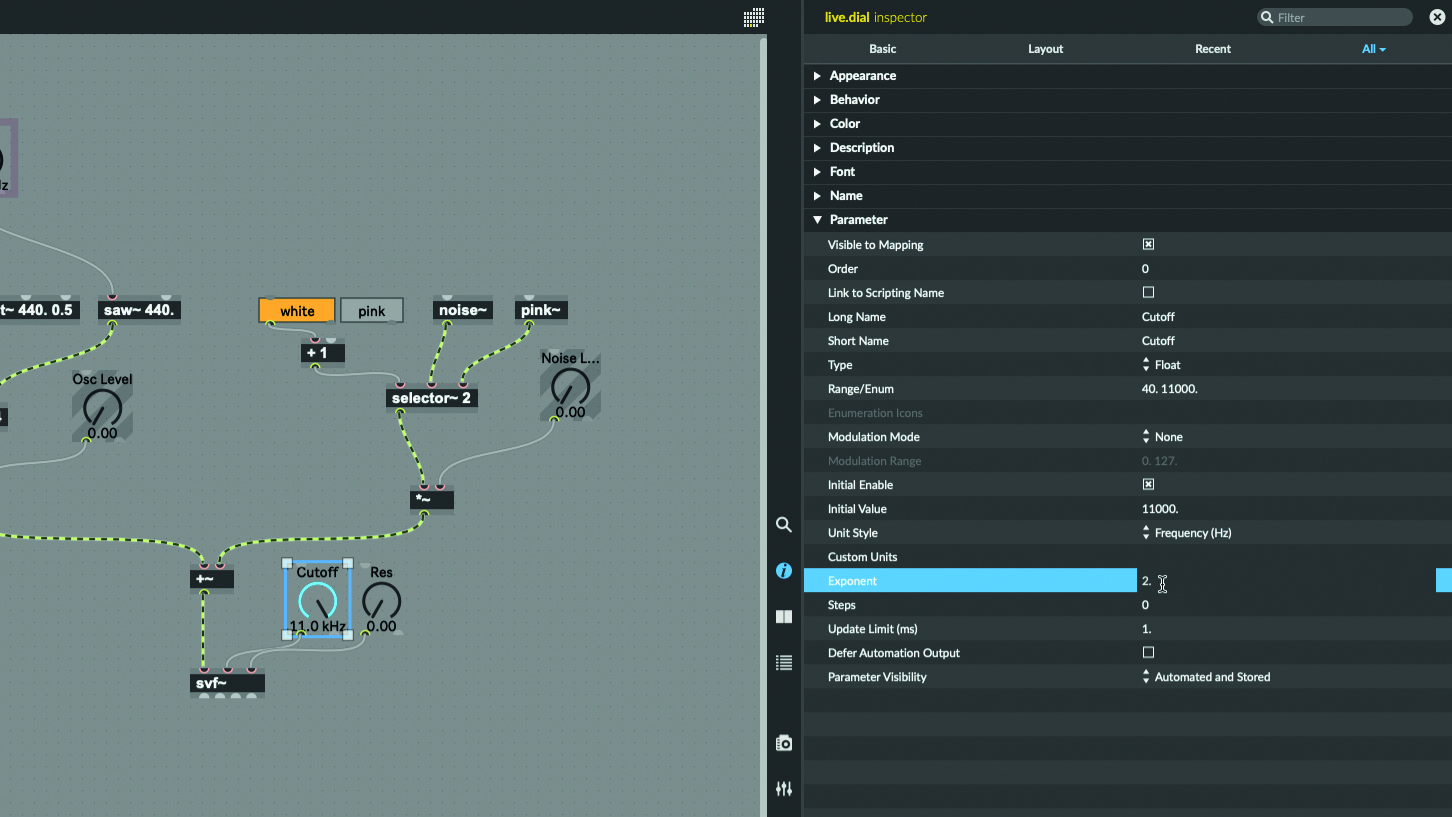
Step 14: Our combined signal needs to be filtered. Create a “svf~” object (ie State Variable Filter). Hold your mouse over each inlet to understand what signals or values they expect, then create “live.dial” objects to control the filter’s frequency and resonance. The maximum frequency value should be “11000.”, and the dial’s Exponent value should be “2.”. Wire everything up appropriately.
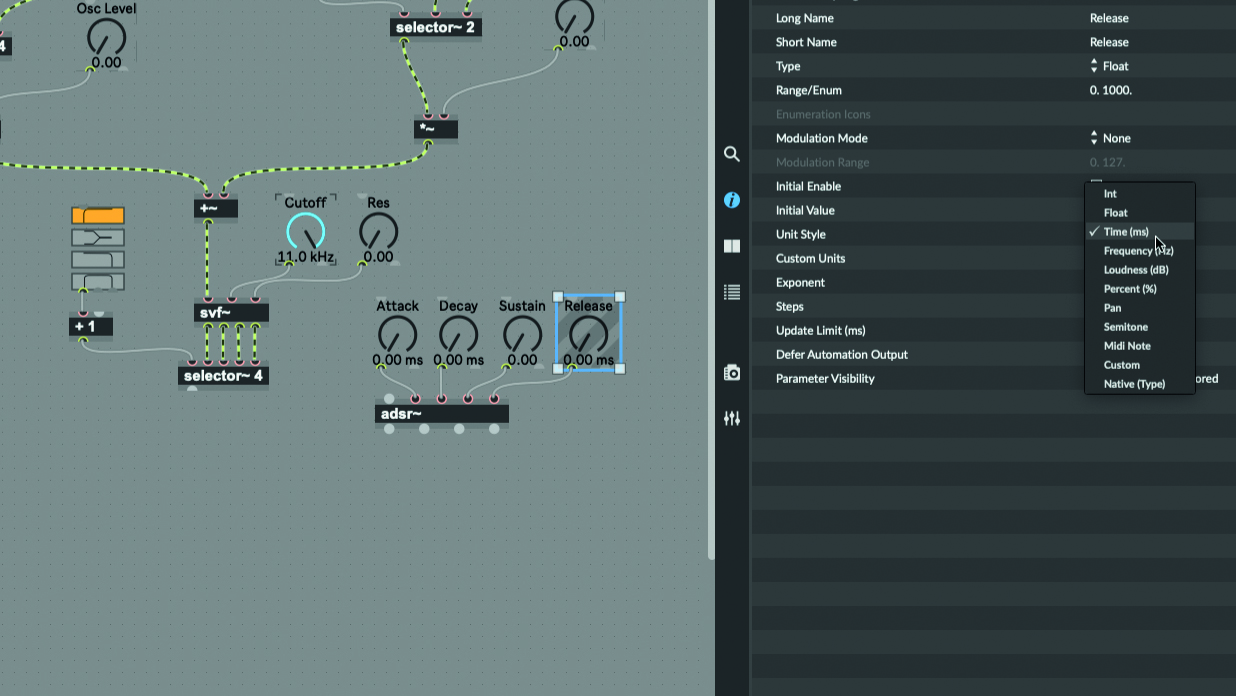
Step 15: Create a “selector~” and “live.tab” for controlling which filter output we hear. The live.tab has a prototype for filter shapes, so apply and adapt this just as you did for waveforms. Our filtered signal now needs to go through an amp envelope, so create an “adsr~” object and a set of four “live.dial” objects configured to control it.
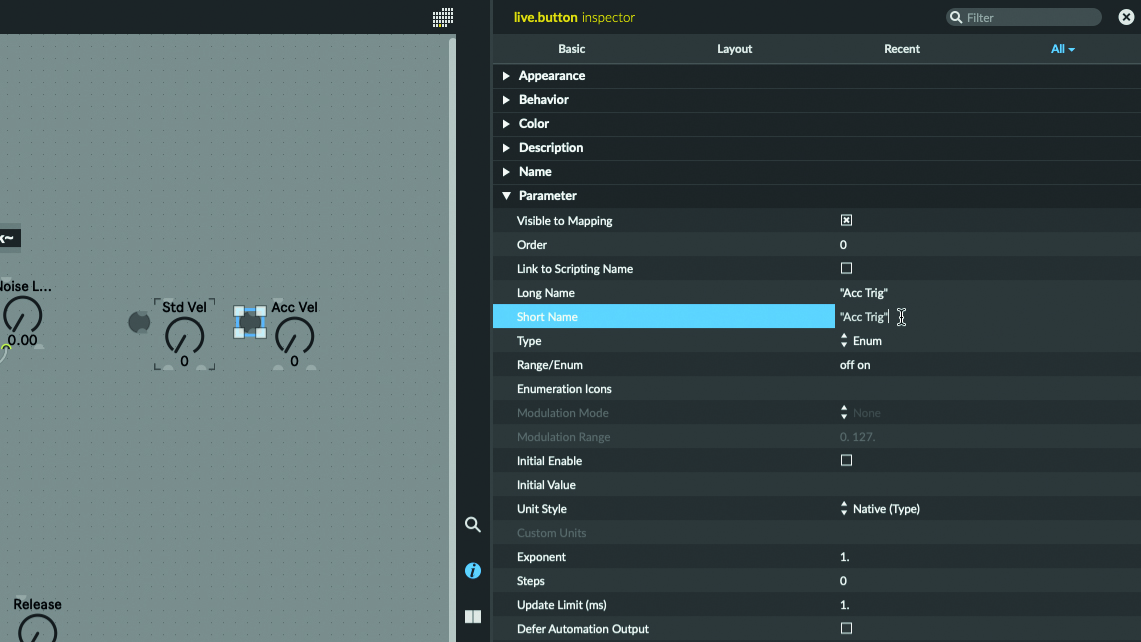
Step 16: Create a “*~” signal multiplier object and use it to combine the filter selector~ object’s output with the envelope’s output. We still need a way to trigger the envelope – create two “live.button” objects named “Std Trig” and “Acc Trig”, and two “live.dial” objects named “Std Vel” and “Acc Vel”. The dials need to output floats in the range “0.” to “127.”.
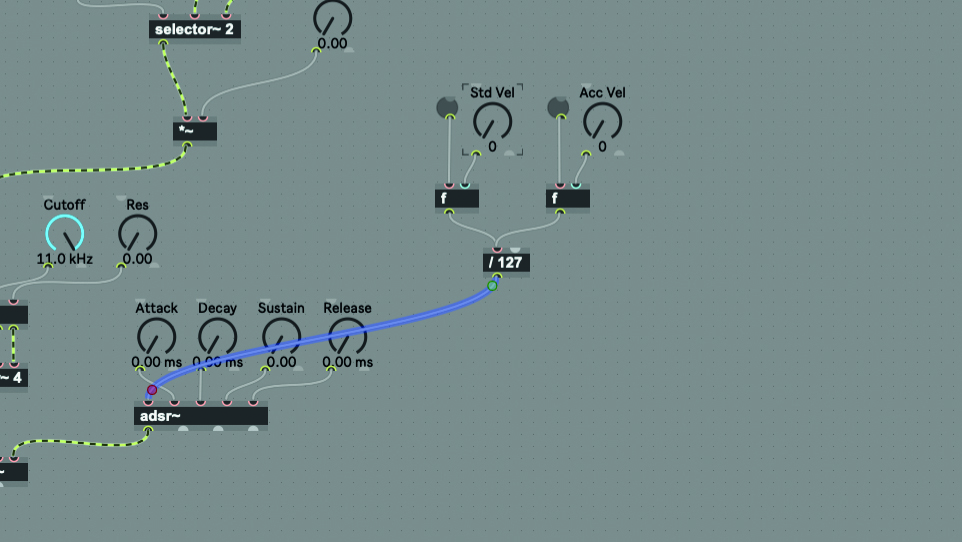
Step 17: Create an “f” object, which will output its stored value in response to a bang message. Connect Std Trig’s first output to f’s first input, and Std Vel’s first output to f’s second input. Repeat the process to add an “f” object for Acc Trig. Connect both f objects to a “/ 127”, scaling the value to a 0-1 range. Connect the divide’s output to the envelope’s first input.
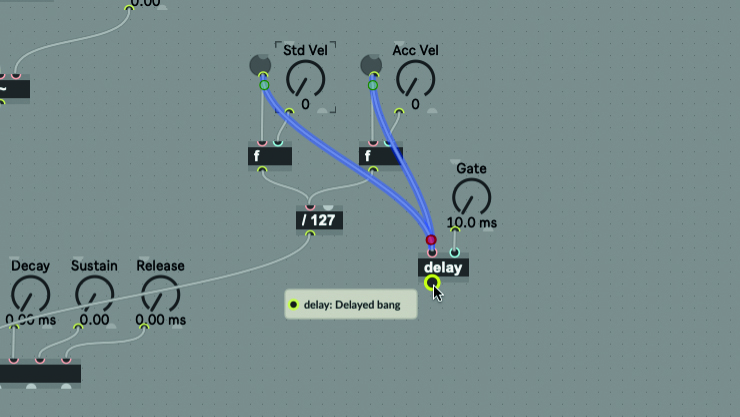
Step 18: We also need a way to send note-off messages to the envelope. Create a live.dial, name it “Gate”, configure it to output float values in the range 10 to 1000, and to display its value as milliseconds. Create a “delay” object, connect the dial’s first output to delay’s second input, and connect the outputs of both buttons to delay’s first input.
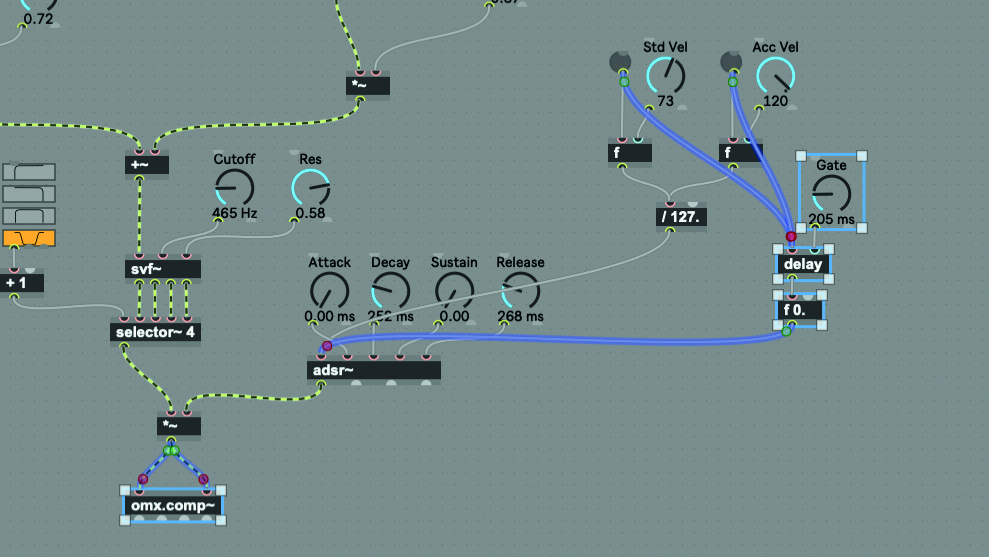
Step 19: Create another “f” object, with an argument value of “0.”. Connect delay’s output to this f’s first input, and connect its output to the envelope’s first input. A note-off message will now be sent to the envelope after the gate time has elapsed. Create an “omx.comp~” object, to prevent big peaks, and connect the env-controlled signal to both of its inputs.
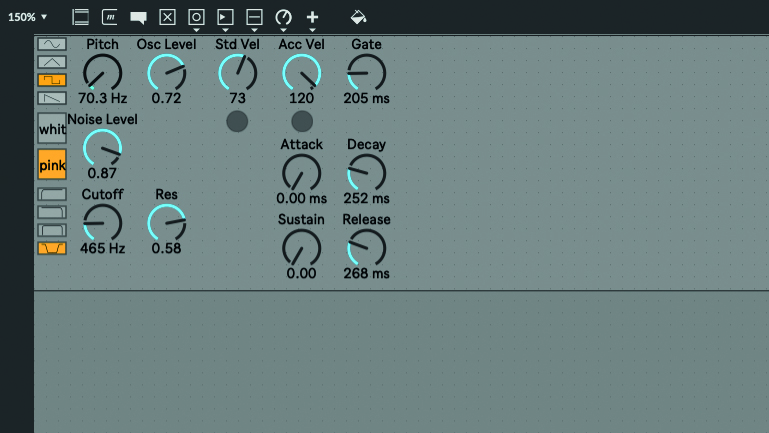
Step 20: Connect the comp object’s first two outputs to the plugout~ object’s two inputs – this sends the patcher’s sound back out to Live. Add all of the on-screen controls (ie dials, tabs and buttons) to the presentation, switch to presentation mode, and create a layout. Save and close your patcher, then test your synth in Live.
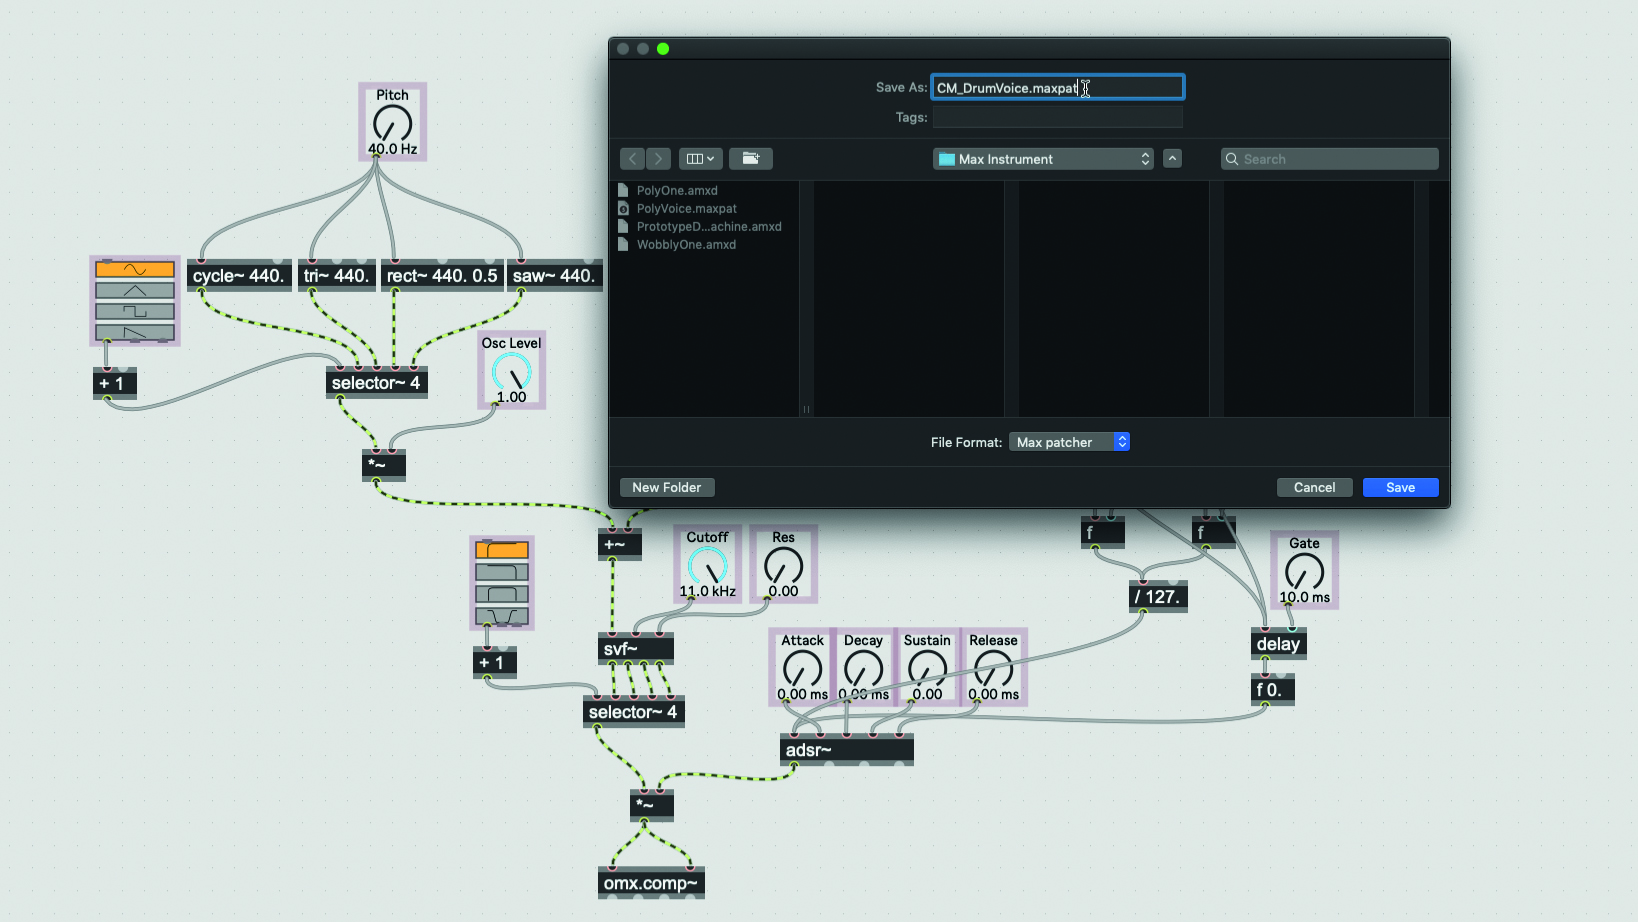
Step 21: Reopen your synth in Max once more. Our creation so far is just one voice of our drum synth, so we’ll wrap it up into a subpatch. Select and cut everything from your patcher other than the midiin and plugout~ objects. Create a new patcher and paste everything into it. Save the new patcher as “CM_DrumVoice.maxpat”.
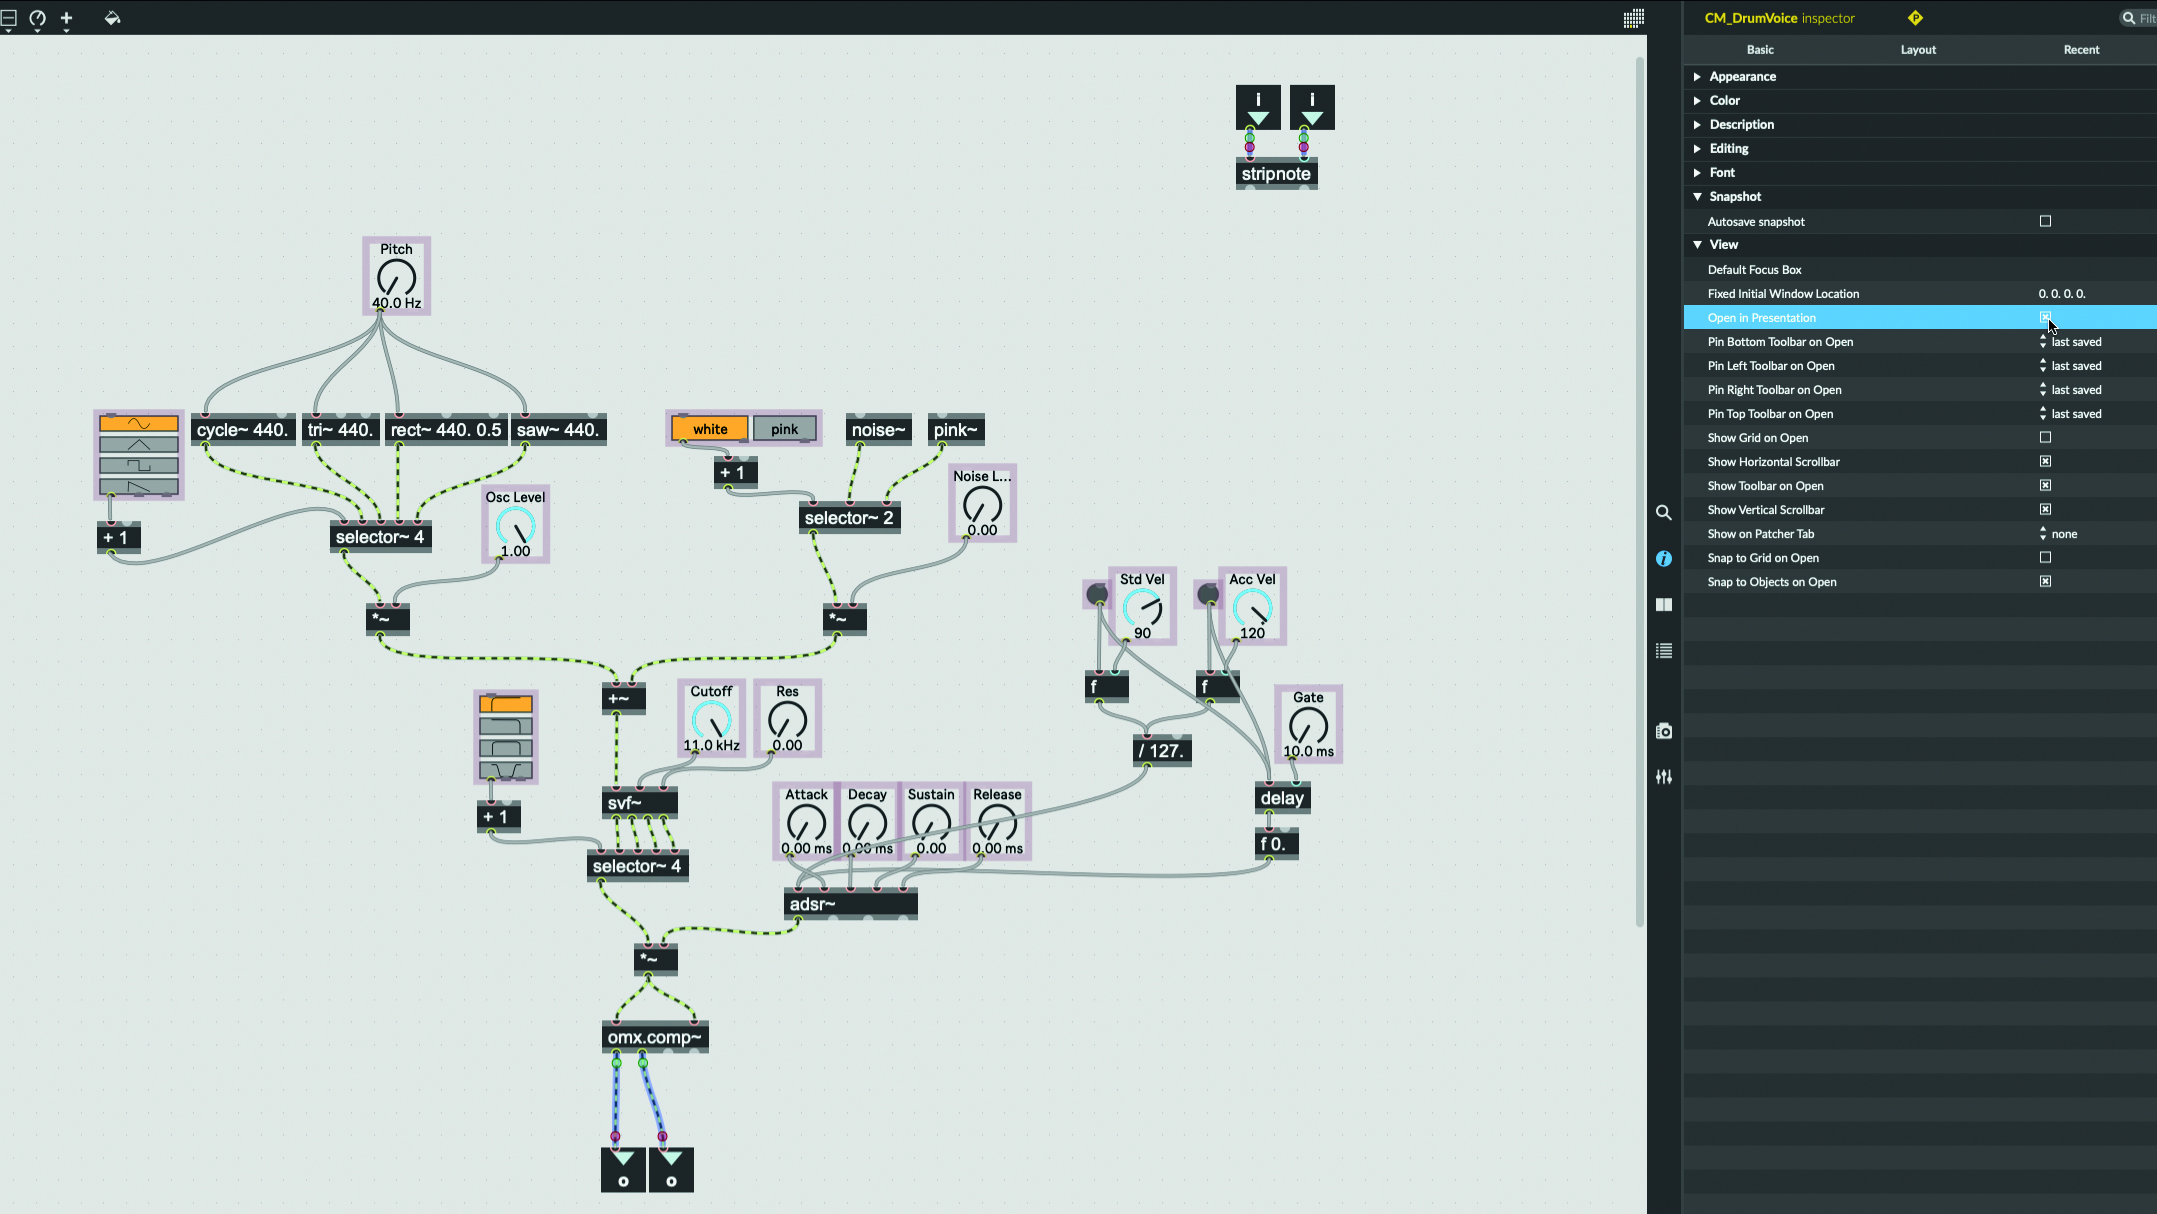
Step 22: Click the “P” icon at the top of the Inspector and enable Open in Presentation. Create two “inlet” objects to receive MIDI note and velocity data, and connect these to the inputs of a new “stripnote” object, which removes note-off messages. Create a pair of “outlet” objects and wire the omx.comp~ object’s first two outputs to these new outlet ports.
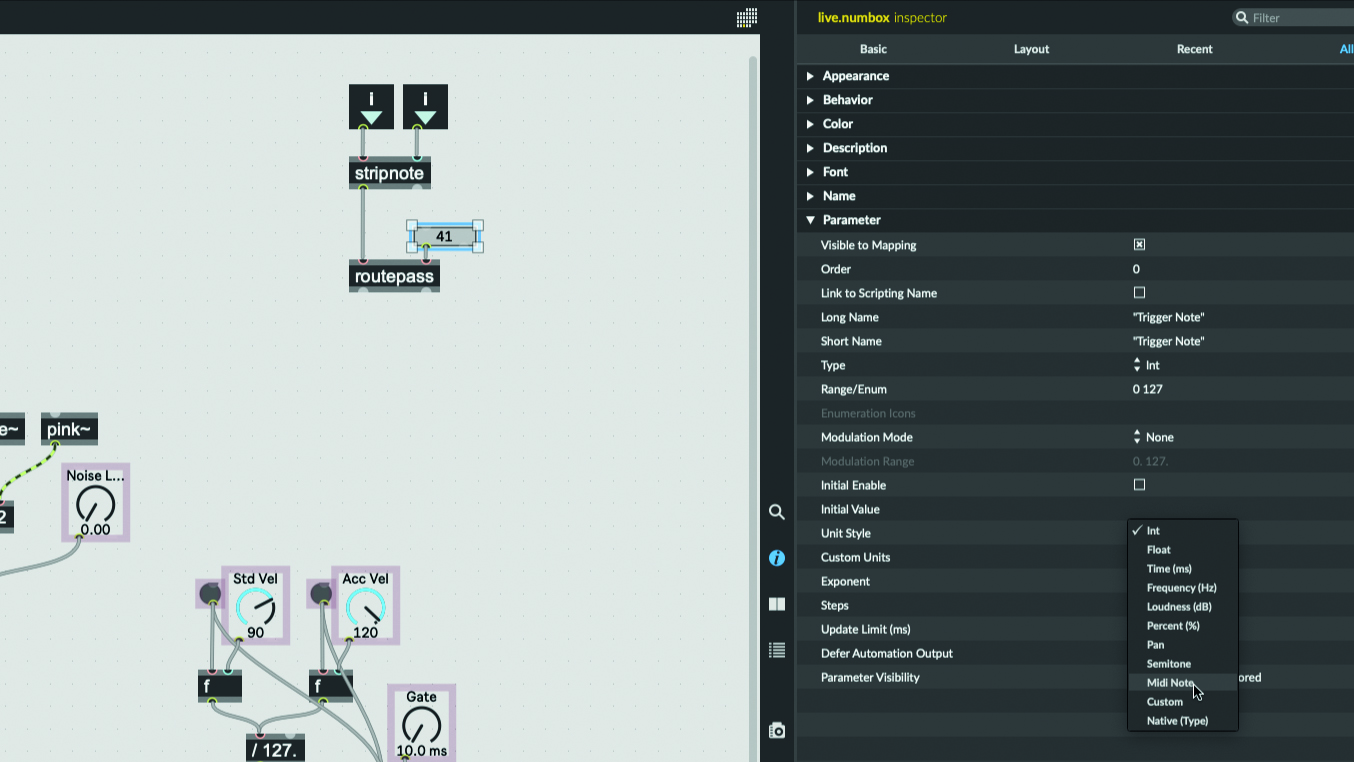
Step 23: Make a “live.numbox” object, name it “Trigger Note”, and configure it to output an integer in the range 0-127 and display its values as MIDI notes. Link the numbox to the rightmost input of a new “routepass” object, and link stripnote’s left output to routepass’ left input. Now, routepass will only allow messages past if they match Trigger Note’s value.
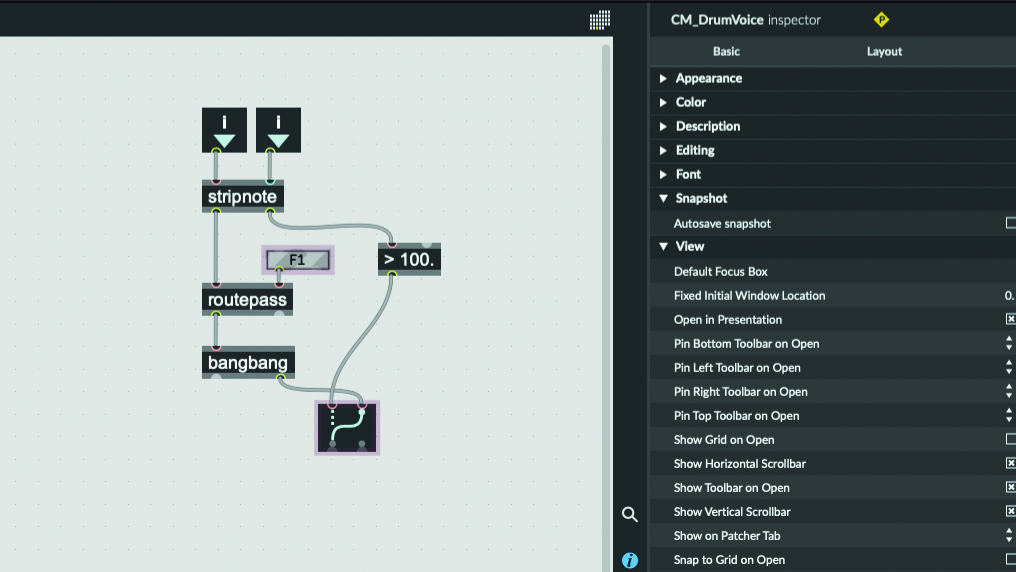
Step 24: Connect routepass’ left output to a new “bangbang” object – this will generate bang messages when it receives an input from routepass. Connect bangbang’s right output to the right input of a new “gswitch2” object – this will let us route the bang message. Create a “>” compare object with an argument of 100 and connect it between stripnote’s right output and gswitch2’s left input.
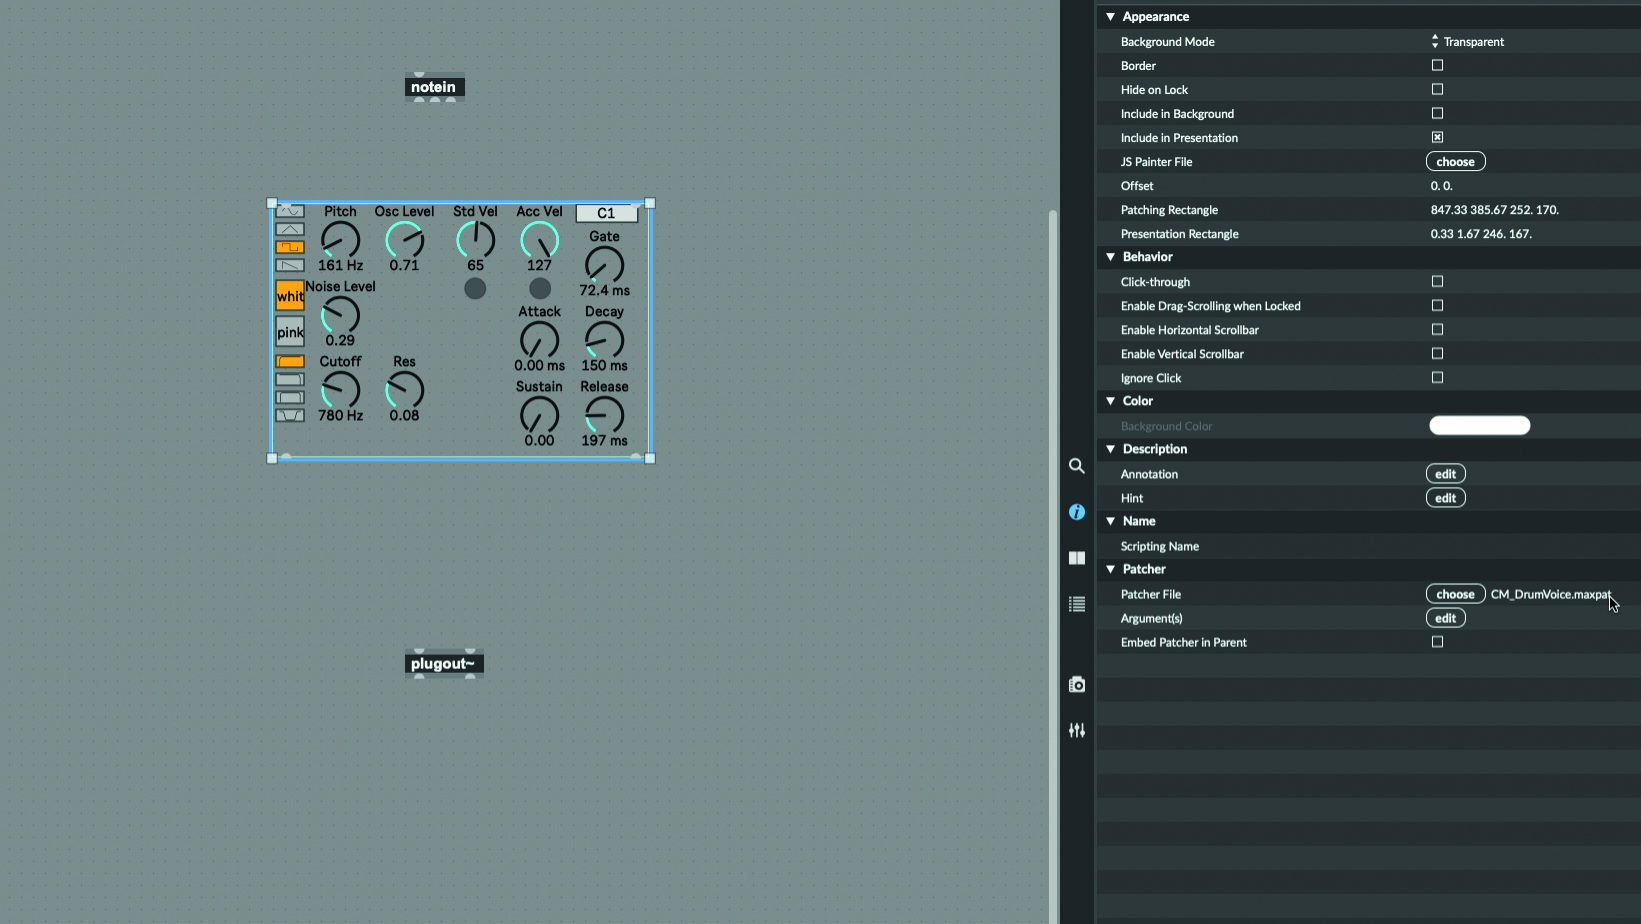
Step 25: Connect gswitch2’s left output to the Std Trig button’s input, and the right output to Acc Trig’s input. Save and close the subpatcher and return to the main patcher. Replace the “midiin” object with a “notein”. Create a “bpatcher” object and, in the inspector, click the Patcher File parameter’s Choose button. Browse to your subpatcher file and select it.
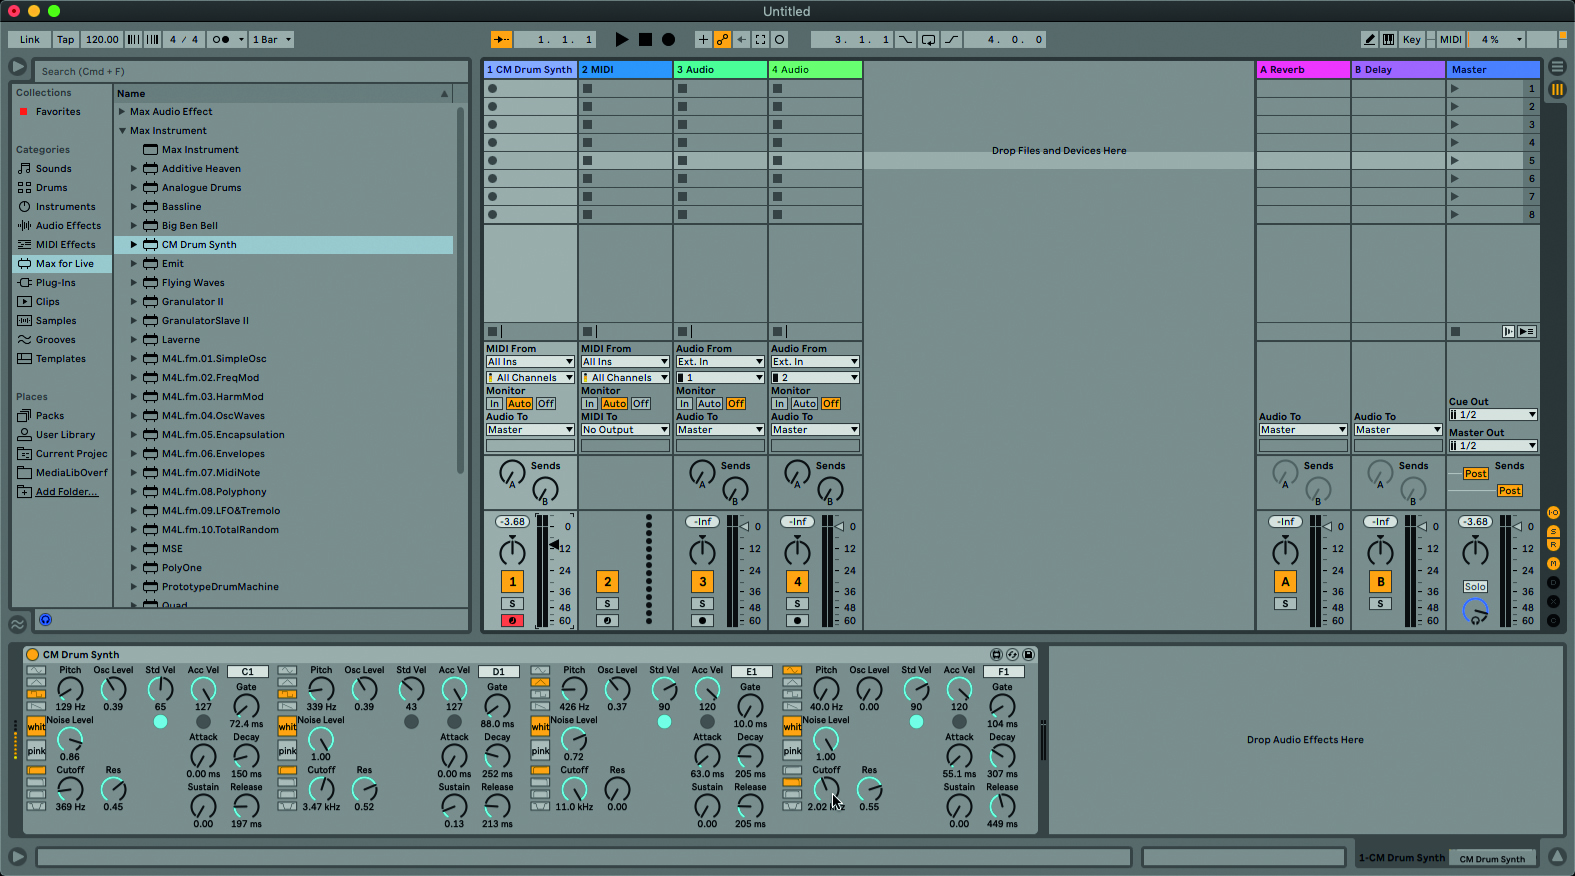
Step 26: Your subpatcher is now showing in the bpatcher object. Duplicate it three times and wire it in to the notein object’s outputs and the plugout~ object’s inlets. Add all bpatchers to the presentation, and position them. Save and close the patcher. Your drum synth should now be working in Live! To improve it, try adding envelope control to the pitch and filter.
Computer Music magazine is the world’s best selling publication dedicated solely to making great music with your Mac or PC computer. Each issue it brings its lucky readers the best in cutting-edge tutorials, need-to-know, expert software reviews and even all the tools you actually need to make great music today, courtesy of our legendary CM Plugin Suite.
