Note velocity is an element of music production that many of us take for granted, lumping it in with its invariably accompanying pitch messages as nothing more than the means for controlling individual volumes in a MIDI performance or programmed part. While governing the amplification of synths and samplers is, indeed, its most commonly served purpose, there's actually much more to this misleadingly modest spark of data than just that.
Here, then, is a quickfire collection of tricks and techniques to help you get more out of the modest MIDI velocity message, from tarting up drum rolls and crossfading synths, to performing vocal cut-ups and editing velocity more efficiently in your MIDI editor.
To read the full Velocity Secrets feature, pick up the September edition of Computer Music (cm233).

1. On a roll
When programming elaborate snare rolls, rather than endure the tedium of drawing in velocity values by hand, why not set them flat but automate a velocity MIDI plugin to do the job instead? With Live's Velocity MIDI Effect, you can automate the Out Hi or Lo setting, depending on where your note velocity is set; the Drive and Compand knobs for a different kind of control; or the Random dial if consistency isn't a priority. Logic Pro X's Velocity Processor plugin offers an even more playful set of parameters, including a pair of very handy sliders for Scaling and offsetting input velocity.
2. Extreme reality
Most of the time, multisampled instrument designers use velocity to make emulated drums, guitars, strings, etc, behave and sound like the real thing. That might just mean setting up multiple sample layers with velocity splits, so that different playing intensities trigger different samples rather than just modulating the volume of a single sample; or it could go deeper, with velocity controlling envelopes, filters and other parameters to achieve acoustic/electric realism.
If your multisampled piano or trumpet patch affords you access to its velocity assignments, get in there and usurp them for more creative purposes. Velocity-controlled sample selection? Mix the samples up at random and see where that gets you. Velocity opening a subtle low-pass filter on the high notes? Switch to a band-pass and connect the resonance to velocity as well! You get the idea…
3.Going live
It goes without saying that if you're looking to trigger a multisampled instrument with an authentic-sounding 'live' MIDI performance, the best way to do it is to actually record the part on your keyboard, e-drums or other MIDI controller. If that's not an option, though, or if your chops aren't up to it, you can still achieve a high level of realism and human variation using the drawing tools in your DAW's MIDI editor by turning off snap-to-grid and subtly varying the velocity from note to note. The latter can be done manually, or automatically by inserting a velocity plugin with its randomising function set to a narrow range.

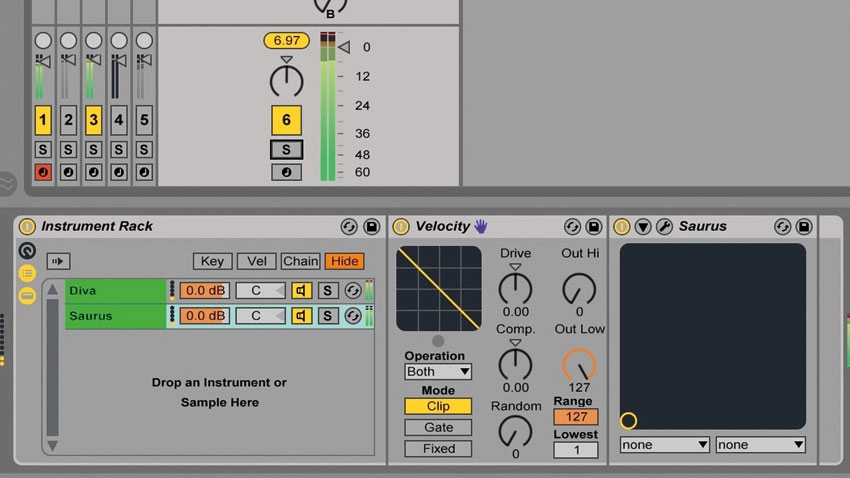
4. Two become one
Using an Instrument Rack and the Velocity MIDI Effect, you can quickly and easily create a velocity-controlled crossfading synth combo in Ableton Live. Make an Instrument Rack containing the two synths you want to mix, and make sure both are set up so that their amps respond to velocity in the normal way - ie, the sound gets louder as the velocity increases. Place Velocity plugins at the front of both chains in the Rack, and invert the mapping curve of one of them by setting Out Hi to 0 and Out Low to 127. Now, the volume balance of the two synths shifts with incoming note velocity, but the overall volume level of the Instrument Rack as a whole stays constant.
5. Typing pool
Almost all modern DAWs feature a 'musical typing' keyboard, enroling your computer's QWERTY keyboard into service for MIDI note entry. Of course, said keys are in no way velocity-sensitive, so two of them will be assigned to shifting the global output velocity up and down in steps of 20 or so. Although no one's ever going to pull off any kind of virtuoso performance using such a restrictive system, with practice you should be able to record simple leads and basslines with it, quickly flicking the velocity around between notes.

6. Get your groove on
Most DAWs these days feature preset and user-definable groove templates, enabling the timing and dynamics of live drum loops, classic drum machine swing settings and any other musical material to be imposed on MIDI and audio clips. With Live's Groove system, amongst others, you're handed independent control over the depth of (pre-)Quantise, Timing, Random and - yes - Velocity alteration applied. If your programmed drums are in need of dynamic movement, apply the groove of a sample you particularly like, but dial in the Velocity aspect only, giving you the 'vertical' variation but retaining your original timing.
7. Ahead of the curve
The standard velocity response curve is linear, with input matching output. One of the main functions of any velocity-altering MIDI plugin is reshaping this response curve in order to change the dynamic range of the notes passing through it - boosting the output velocity of gentler key presses, for example. If you find yourself using this feature a lot simply to adapt your soft synths to your particular keyboard playing technique, investigate the velocity curve options built into the keyboard itself - you'll likely be able to set an appropriate one up there permanently instead.
8. Filter freaks
While the default assignment of velocity to volume is fine for many synthesised and sampled instruments, more ear-pleasing results can often be had by assigning it to low-pass filter cutoff - either as well as volume or instead of it. The opening and closing of the filter will brighten the sound as the velocity increases, and dull it as the velocity falls, emulating the natural timbral change of a realistic instrument (eg, piano) being played at various strengths.
9. Work smarter
Investigate your DAW's velocity editing shortcuts, because it almost certainly includes several. For example, holding down the Cmd/Ctrl key and dragging a line with the pointer tool in Ableton Live's velocity editor creates a ramp, while dragging the pointer with Cmd/Ctrl+Shift held sets all encountered velocities to a flat level. Most other DAWs feature similar systems, and some even have dedicated Velocity tools for adjusting velocity by dragging up and down on the notes themselves.

10. Velocity-controlled vocals
You can use velocity modulation to jump playback around within a single sample - just the thing for jittery vocal cut-ups. All you need is a sampler with the facility to assign velocity to sample start point, such as NI Kontakt, Apple EXS24 or Ableton Sampler. Load your vocal sample, crank up the Velocity-to-sample-start mod depth and play your keyboard - the point at which the vocal starts playback will depend on how hard you hit the keys. As ever with this sort of thing, don't forget to disconnect velocity from the amp envelope or volume, or you'll find your vocal jumping around in level as well as start position.
