Every bit as iconic as their TB-303 and TR-808, Roland's TR-909 Rhythm Composer was originally designed as an affordable 'realistic' accompaniment drum machine for instrumentalists, but ended up being repurposed by forward-thinking dance music producers who fell in love with its powerful kick drum, high-impact snare and clap, sizzling cymbals, and characterful tom and percussion sounds.
Launched in 1984 - three years after the 808 - and sounding nothing whatsoever like a real drum kit, the 909 used analogue synthesis to generate its drum, rimshot and handclap sounds, and 6-bit samples for the hi-hats and cymbals. Just like the 808 before it, it was the 909's obviously electronic tones that secured it a place in music technology history, becoming the percussive centrepiece for just about every producer working in the nascent house and techno genres of the era. It also had the distinction of being the first MIDI-equipped drum machine ever made.
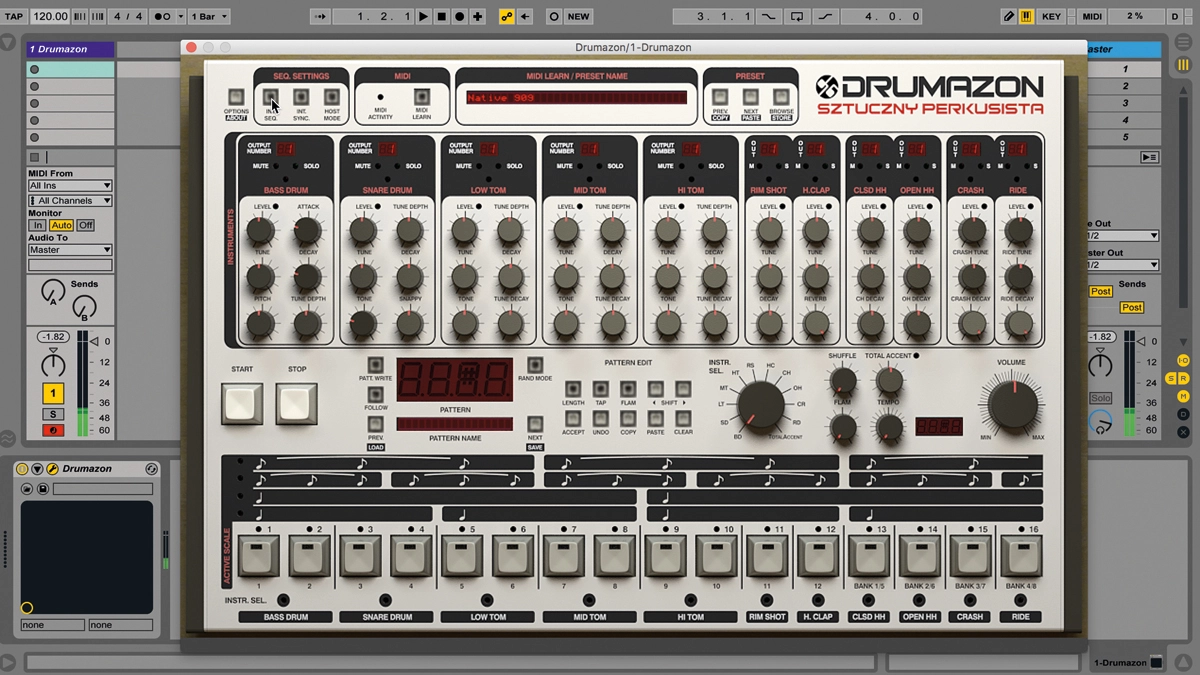
D16's software TR-909 emulation, Drumazon, give you every bit of Roland's classic box and more. In this walkthrough, we'll show you how to program your own beats into it using the onboard step sequencer.
To go even deeper with Drumazon, pick up Computer Music 226, which is on sale now.

Step 1: Let's program a pattern using Drumazon's internal sequencer. The Int Seq button at the left-hand end of the Control panel turns the sequencer on and off (when off, Drumazon is effectively just a sound module). We want it on, obviously. Hitting play in the host DAW, or Drumazon's own Play button, starts playback of the currently loaded pattern.

Step 2: The Int Sync button switches between host-synced playback and Drumazon's internal clock, the tempo of which is determined per pattern by the Tempo knob in the Drum Machine section. To program a pattern, click the Pattern Write button, then Ctrl/Cmd-Click the Clear button to erase the current one. Clicking Clear with no modifier just clears the pattern for the currently selected track.

Step 3: Now we have a blank pattern in which to program a groove. By default, a pattern is 16 steps long - hence the 16 Step buttons. To change the pattern length, click the Length button, then the Step button of the step that you'd like to be the last one in the sequence - the LEDs above the buttons show the pattern length. Click Length again to accept the change.

Step 4: Each of Drumazon's 11 channels houses a single drum sound and its own step sequencer track. To switch the Step buttons to a particular sequencer track, twist the Instrument Select knob or click the Instrument Select buttons at the bottom of the interface, holding Ctrl/Cmd to select multiple tracks. Now start playback and get programming!

Step 5: Clicking a Step button activates that step as a trigger for the selected drum sound or sounds. A second click upgrades it to a louder, harder accented note, and a third switches it off. More dynamic variation can be applied by selecting the Total Accent lane, which applies an additional volume boost on its active steps, of an amount determined by the Total Accent knob.

Step 6: Any step of any track can be turned into a flam - two quick consecutive hits - via a slightly convoluted method. With a channel selected, click Flam then activate the step to be flammed. The flammed step only lights up on the Flam track, with the step showing as empty in the track for the actual channel. The spacing between the two hits of all flams in the pattern is set by the Flam knob.

Step 7: The Shuffle knob dials in an offset for all even-numbered steps, creating an increasingly swung feel as it's raised, while the Copy and Paste buttons are used to copy sequences between tracks in the pattern. The Shift left and right buttons simply nudge the selected track a step - or the whole pattern with Ctrl/Cmd - in either direction.

Step 8: Hitting the Rand Mode button activates Random Mode. Select all the tracks you want to randomise and set the amount of randomisation to be applied to each by raising or lowering its Level knob. Click the Next and Previous buttons to step through randomisations of the patterns on all selected tracks. When you get a randomisation you like, Click Accept, or Undo to revert to your original pattern.

Step 9: The 'notation' area above the Step buttons offers four different step rates for the sequencer, including two triplet-style settings. Finally, Tap mode lets you 'tap' patterns in in real time, with the one or two buttons above each channel label entering steps for that sound. To name your pattern, type into the Pattern Name field; and to save it, Ctrl/Cmd-click the Next button.
