
In the ’80s, developments in music programming inspired a whole new way of writing and producing music. Drum machines, after steadily creeping into pop for a while, were suddenly everywhere, as were sequenced melodic patterns from indefatigable synths. Was this the death knell for homegrown, organic musicians as we knew them? Far from it.
Although emerging artists who embraced music programming tech at the time faced disapproval from bewildered forebears (and who doesn’t?), this evolution in music-making methodology only gathered pace from then on. Programming music used to require you to have some form of either analogue or digital hardware, but the wide world of computers and DAWs soon turned all that on its head. Today, almost every artist programs their music, mostly in a broader sense through the use of MIDI in a DAW, but also using dedicated software sequencers and arpeggiators that function in similar ways to the equipment of the past.
Most DAWs come with basic sequencers, which divide musical measures into a predetermined number of ‘steps’ and generate repeating musical patterns; and arpeggiators, which take the MIDI notes from a held chord (or single note) and play them as a rhythmical pattern. Many MIDI keyboards and controllers also have built-in sequencers that let you hijack practically any keyboard, synth module, or software and set about programming patterns.
In the context of your track, these patterns can either be as simple or as complex as you want them to be. Creating a repeating melodic pattern on a synth arpeggiator is as simple as holding down one key, but you can also wield immense control over how your programmed patterns unfold. You can even use sequenced multi-effect plugins to automate effects parameters in a pattern-based way, rather than relying on other methods like drawing automation curves.
The thing is, by programming patterns, melodies and loops, you’re freed from the responsibility of actually having to play those pesky notes in real time. It doesn’t matter if you’re not a nimble-fingered keyboard player – you can still have a synth arpeggiator pattern that crosses three octaves in your track, regardless of dexterity levels. Furthermore, safe in the knowledge that the sequence you’ve set up is progressing, space then opens up to experiment with mixing, dynamics and layering in other instruments.
This can be useful in a live environment obviously, but it also provides you with interesting creative avenues when noodling around alone. Working with MIDI, it’s easy to quickly write a riff and then have it played back to you through whatever instrument you have loaded. Can’t play an instrument? Innovative compositional plugins can keep your riffs between the guide rails.
Basic synth arpeggiation with TAL-U-No-LX

Step 1: Let’s take a tour of a basic synth arpeggiator, using TAL-U-No-LX. Switch on the module’s On/Off button. Hitting the Sync button synchronises your arpeggio with MIDI, while leaving it off means it stays free-running.

Step 2: There are three arpeggio modes: Down (pattern descends from starting note), Up & Down (pattern ascends and then descends) and Up (pattern ascends). The Range switch affects how many octaves the arp will pass through via these modes.

Step 3: Controlling the speed of the arpeggiator is done with the Tempo slider. With Sync enabled, the tempo is synced to a source at either 1/8, 1/16, 1/32 or 1/64. With Sync disabled, the tempo ranges from 1 up to 25Hz.

Step 4: Now that we know how it works, let’s create a busy synth pattern. Set the Range to 3 and the Mode to Up & D. Turn on Sync, and set the Tempo to 1/16. Hear how the pattern changes when chords are played.

Step 5: There are further features on the TAL-U-No-LX arp that enable smooth music-making and help it integrate in your DAW. You might want to cycle through patches using the arpeggiator, so the Lock button ensures your settings stay put.

Step 6: To go completely hands-off, you can click the Hold button, which causes your arpeggiator pattern to play continuously. Switching on Host when Sync is enabled syncs the arpeggiator to your DAW’s internal time, essentially quantising it.
Sequenced madness
The term ‘sequencer’ refers to music software or hardware that can record performance data and play it back in sequence. That might seem like a pretty simple definition, but innovation in the ever-evolving world of music production has meant it’s not all that simple.
The first sequencers appeared in modular synths in the ’60s, and you’ll find the fundamentals of that design in today’s models. Then came sequencers with expanded digital memory, with MIDI-outputting synths being used to control multiple devices. Digital sequencers were soon built into drum machines or keyboards.
When MIDI interfaces started to appear on computers, software sequencers were born. These applications evolved into what we now know as DAWs, and the many functions that exist within these types of software packages means they have outgrown that definition. You’ll probably find a sequencer in your DAW, and there are entire sequencer-powered synth and effects plugins out there that come with advanced controls.
Evolving synth sequences with Audiomodern Riffer
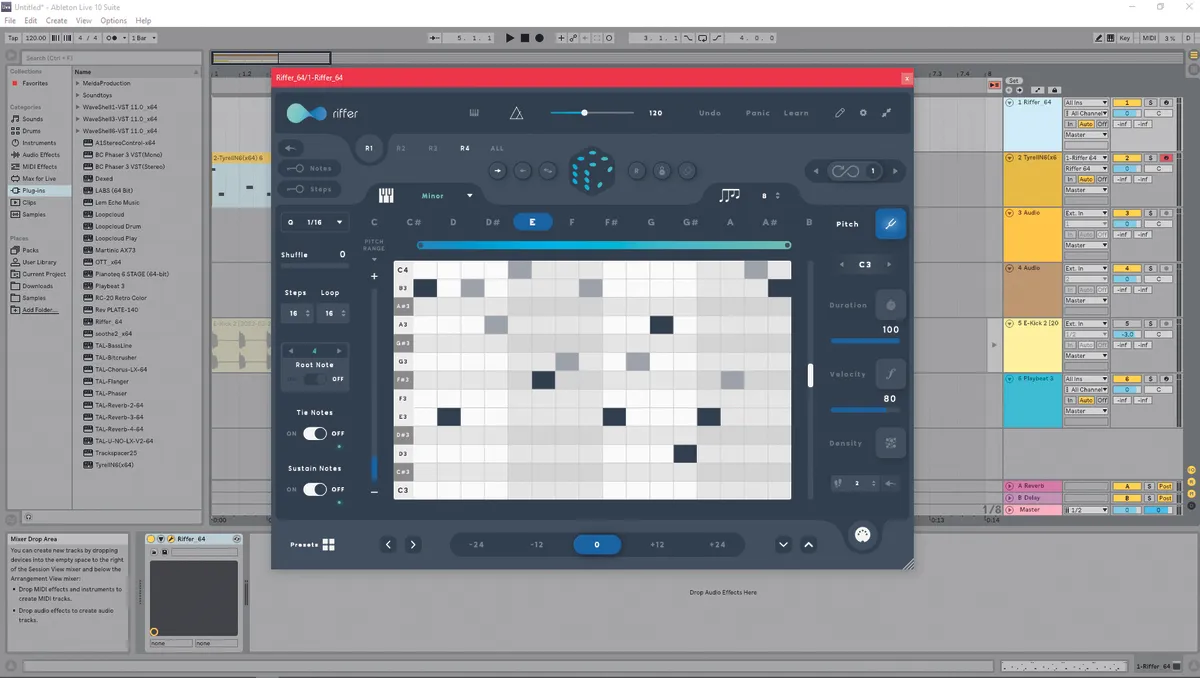
Step 1: Let’s create an evolving synth part using Riffer. First, select a key, and then set the number of steps to 16. Adjust the amount of notes to eight and hit the Randomize button until you get a pattern you like.

Step 2: For a bassline, switch to the second tab and adjust the key, steps and notes similarly. Before you hit Randomize, set Root Note to eight notes and turn it on. Toggle the Tie Notes switch and turn the pitch down two octaves.

Step 3: On top of that we’ll add randomised high notes. In the third tab, set the key and steps but stay at 16 notes. Set it to an octave above the first tab, and hit the Infinite button. Now the pattern will change every two bars.

Step 4: Remove unwanted rolls by clicking on Density, and removing the highlighted notes. Soften the intensity of the high notes in the sequence by clicking the Velocity button and reducing the range. Add a short delay to the track to fill in space.
Minimalist drum grooves with Audiomodern Playbeat

Step 1: Load up Factory Preset 01 and remove the generated pattern by selecting All and then hitting Reset. Draw in a simple four to the floor kick pattern on the first line, and remove any rolls by setting everything to 1 in Density view.

Step 2: Click line 6 for an FX sound. Set the step range from six to 12, and randomise the pattern until it feels right. In the Pan tab, set the minimum value to L50 and the maximum to R50. Now randomise for some stereo ear candy.

Step 3: Add hats in line 7, and set the steps to ten. Vary the hat by creating a pitch range from E1 to E4 and hitting Randomize. In the Density tab, add some rolls by setting the Steps to two and a three to eight range.
Commanding an advanced arpeggiator
We’ve already seen some of the basic functions of arpeggiators and how they can inspire you. But these parts of synths have been around for a few decades, and in the meantime, a succession of hardware and software makers have spent time pushing the envelope and improving the feature set available from an arpeggiator.

Native Instruments’ Komplete Kontrol is a great example of what a more modern, digitally based arpeggiator can do. Komplete Kontrol was designed to host any given Native Instruments synth, Kontakt or Reaktor instrument, and many by third-party developers as well. In doing this, NI had to make sure their arp features were up to the task, and with their Smart Play features, they’ve given both amateur and professional producers a ton of new ways to use the instruments they load into the software – whether they’re playing using a MIDI controller or the company’s Maschine hardware.
In the tutorial below, we’re going to give you a tour of Komplete Kontrol’s Smart Play features, showing you how you can make the most of them to create musical ideas or turn a track that’s getting a bit stale into a more interesting, feature-filled piece of music.
Komplete Kontrol software is required if you want to follow along to the letter here, but the features we’re discussing are commonplace on many of today’s soft synths and DAWs. You can access Komplete Kontrol’s Smart Play arpeggiator from within the plugin or the standalone software, from the three musical notes icon.
Going further with Komplete Kontrol Smart Play

Step 1: Find the Arp tab and switch it on. With an instrument loaded, play or program a chord and it will be turned into an upward 16th-note arpeggio. We can change the speed with Rate, and the Type between Up, Down, Up-Down, (as) Played, or Chord.

Step 2: From here, mess with Sequence and Swing to add humanisation. Swing lets you push arpeggiated notes off the grid and Sequence is a set of eight pre-programmed rhythms. These dials work alone or together and are better in moderation.

Step 3: The Octaves setting will repeat whatever you play over however many octaves you set it to, relevant to the Type selected. For example, in Down mode what you play is repeated in progressively lower octaves, and up mode in higher ones.

Step 4: Dynamic and Gate will allow you to shape the arpeggiated notes. Dynamic affects variation in velocity, accentuating or reducing differences, whereas Gate affects the effective lengths of the arp’s played notes.

Step 5: Behind the Advanced tab are more controls. Repeat lets you program how many times you want the arp to repeat each note. Inversion works like Octave, but will only move the bottom note up each repeat, creating a continuous ladder effect.

Step 6: Range lets you set the arp to only work over a given chunk of the keyboard, helpful when you want to play a bassline independent of the arp. Hold keeps the last chord played repeating, letting you automate parameters while it goes on.
What makes a great melody?
In general, good melodic ideas are based on either a chord progression or a scale. In practice, this means picking out a selection of chord tones (the notes that make up each chord) from a chord progression, or using the notes of the G major scale if the song is in the key of G major, for example. Major and minor scales usually contain seven notes, but you can write memorable melodies using fewer notes.

Songwriting basics: chord, melody and music theory tricks for DAW users
Although it might sound counter-intuitive, a great melody doesn’t always have to be that melodic either. Technically, melodies can also be monotone rhythmic patterns. Some hip-hop vocal melodies fit this category, as do a lot of hooks in dance music. If you can tap into a rhythmic feel that’s the kind of thing you might hum to yourself in the shower, you’re onto a winner.
Making better melodies and hooks in MIDI

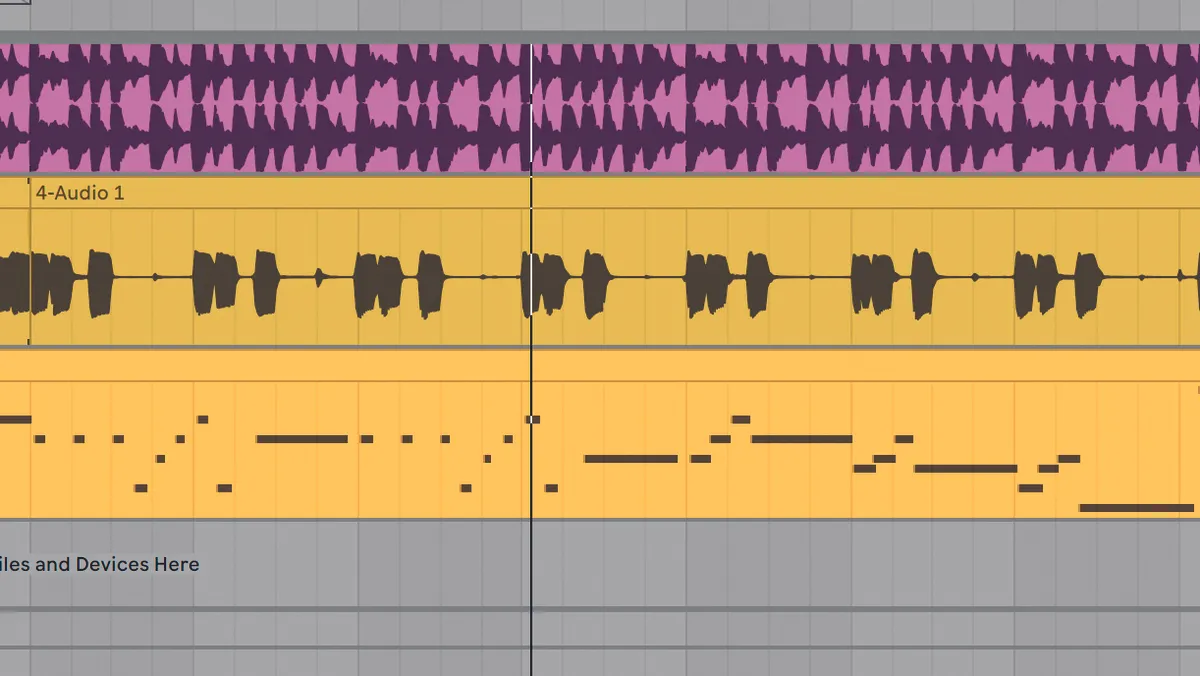
Step 1: Getting good at writing melodies takes practice, but there are a few techniques you can employ to make quick improvements. Let’s write a catchy melody over a simple eight-bar backing loop, with drums, bass and a pad.

Step 2: First, we’ll load up a synth plugin, Dexed, and choose a preset that will work as our lead sound. We’re looking for something warm and glossy, but with a brassy sound that will cut through and stand in front of the other sounds in the mix. We chose the Banks, T preset.

Step 3: Hooks generally benefit from repetition, both with individual notes and phrases, because it reinforces the musical idea in the listener’s brain. Our loop is in Ab minor, so let’s program in a phrase that uses the notes of that chord, but starts with a repeated Db, the subdominant of the scale.

Step 4: By making the notes of the riff very short, you draw attention to its rhythmic interplay, and how the melody interacts with other elements of the track. By extending the last note, the Db that we started with, we add much-needed contrast. This works with this particular patch, but might not with others.

Step 5: Now that we have a short musical phrase, we can repeat it to further reinforce the hook in the listener’s mind. This time though, let’s add movement and end the phrase on Bb instead of Ab. This is a ‘call and response’ melody, and suggests we’re progressing towards a musical conclusion.

Step 6: Repetition is great, but too much of it can make a melody feel boring and unimaginative. Let’s mirror the downward movement of our final note on each phrase by introducing a four note pattern, the center of which descends along the Ab minor scale towards the root note.

Step 7: We’re getting towards the end of the eight-bar loop, and we need to tie things together with a flourish. Writing good melodies is about being aware of what’s going on around you, so let’s complement the bass guitar fill that ends the phrase.
Step 8: Letting the hook play out over 16 bars, you can hear how the melody sets itself up to repeat. If we wanted to transition into a verse or bridge, we could pick a note that works within the next section harmonically, and let it trail out by automating the volume or reverb send.

Step 9: When balancing your lead sound’s frequencies, consider the other elements that are present in the track. If there’s a lead vocal in the center of the mix, tailor your lead instrument so that it’s thinner, and sits further out in the sides. If it’s the main focus, then give it weight and thickness.
Three tools for creative sequencing
1. Sugar Bytes Factory

Price: $150 | Buy
With four sequencers, Factory from Sugar Bytes is a modular synth with endless sound design possibilities. By using the 16-step sequencers as sources for the plugin’s modulation matrix, you trigger the envelopes, LFO and Arp for heavily modulated, rhythmic patterns.
2. Audiaire Nuxx

Price: $45 or $5.99 pcm | Buy
A powerful multi-FX processor with a dedicated parameter sequencer and 30 effects types. Each effect parameter can be modified in its own independent sequencer lane, on one screen.
3. MixedInKey Captain Plugins

Price: $99 | Buy
Five interconnected music composing plugins that can help you to write hooks and melodies. Each plugin intelligently syncs to the others in the chain, matching the key and following chord changes, and you can use other third party VST plugins as sound sources.
