How to start a podcast: a beginner’s guide to podcasting
A step-by-step guide to launching your first podcast – from podcasting equipment and how to record, to where to host your pod
Want all the hottest music and gear news, reviews, deals, features and more, direct to your inbox? Sign up here.
You are now subscribed
Your newsletter sign-up was successful
The phenomenal growth of podcasting has largely gone under the radar. Yet recent news that music-streaming platform Spotify has signed Joe Rogan, the comedian, MMA commentator and podcaster, to an exclusive deal which – depending on which figures you read – makes him the highest paid broadcaster in the world. This shows that podcasting is now a very serious business. You’re probably familiar with podcasting already, but do you know how to start a podcast?
The oft-used line is that it takes 10 years to become an overnight success. Thankfully, the relative simplicity of creating podcasts means with the right ideas, techniques and gear, anybody can do it. In this guide we’ll show you the steps to take, and offer some advice on how to start a podcast for yourself. Best of all? It’s actually much easier than you might think…
Getting started
Choosing a podcast topic
The first, and most important, part of starting a podcast doesn’t involve microphones, or catchy jingles. Before you even draft your first script, you need to start with one question; what is the big idea? Podcasting is a speech-driven platform so, as with any form of creative output, be that music, film, television or writing, you need to have a clear grasp on what it is you’ll talk about. We all have our own specialist knowledge areas, so choose something you know inside out. It could be Ukrainian folk music from the 1960s, or obscure wood carving techniques, or even a place to read out that murder mystery novel you’ve been writing since college.
Ask anybody in the media and they’ll tell you the importance of knowing your audience. This means knowing the topics they want to explore, the questions they’d ask, the language they’d use and jokes they’d find funny. Starting off with a vague notion of appealing to everybody is a sure-fire way to fall flat. If anything, a podcast is the perfect place to go super niche. Pick a subject you know and are enthusiastic about and everything else is just technical detail, which can be learned along the way.
Creative elements for your podcast
With your topic sorted, and a clear idea of the types of content you’re going to produce, you can start to think about the finer details. For the more creative among us, this is the fun part. After all, a good podcast is about more than just the talking. You’ll need to think about what music you’ll use throughout, for example. This will tend to fall into two main parts; jingles and beds. Jingles are the short, recurring musical ‘stabs’ that indicate different elements of the podcast. You could have a main jingle you play at the start of the show, and then another when you move between the different segments. Regular features might require different introductory signals, and jingles offer the perfect way to set the tone.
Music beds, on the other hand, are those passages of audio that play quietly underneath the speech, often when the presenter is introducing what will be covered. These need to be relevant to the show and its audience, and are mixed to be quiet enough so they don’t distract from the speech. In practice, music beds add a sense of rhythm and movement to the proceedings.
You’ll also want to consider the visual identity of your podcast. Although podcasting is a speech and audio platform, your channel will be seen in a visual sense before anybody hears a word of it, so you will want to stand out. This takes the form of logos, graphics, colours and fonts, so a degree of aptitude with Photoshop will come in handy. Again, keep things on brand with your topic and audience, and try to visualise how it’ll appear in your social media feeds.
Want all the hottest music and gear news, reviews, deals, features and more, direct to your inbox? Sign up here.
Making your podcast slick
So, you’ve got your topic, and know roughly where the conversation will go. It’s time now to nail down the smaller details. For this, we’d recommend creating a plan of sorts, or at least a basic format for your show. A great place to start is some kind of running order, listing out the topics you want to discuss and the amount of time you want to allocate to each. You may or may not want to script certain sections; this has the benefit of meaning you don’t lose your way, but if you rely on scripts too much the audience may find it slightly wooden. Writing down a set of bullet points offers a good balance between two extremes, keeping you on point but also allowing you to adlib when the situation calls for it.
The length you decide on is purely personal, and would be linked to your overall plan. Different subjects require differing levels of detail, so certain topics would warrant a fast-paced 20-minute show while other, more complex areas, may warrant a deeper exploration.
The way in which you speak has a huge impact on your podcast too. Listen to any professional broadcaster, newsreader or presenter and you’ll notice there are certain techniques they use to ensure they are heard clearly, and that the audience understands them. The pace, or cadence, of your speech is crucial, as is your intonation. Clearly, some people have speaking voices which are better suited to broadcasting than others, but with a bit of practice you can inject character and expression into your delivery, which listeners will notice.
Having guests is a great way to add variety and flavour to your show. Perhaps you invite people on to be interviewed, or maybe you have regular co-presenters. This makes for a more enjoyable listen, as presenters will bounce off each other and take the conversation in different directions. Having relevant in-jokes or recurring punchlines pays off in the long term too, as the community will come to recognise them and associate them with your show but again, don’t make them too staged.
- Store your audio on one of the best external hard drives
- Be seen and heard with the best vlogging cameras
- Best field recorders: top portable recorders for capturing sound on-the-go
If you’ve invited someone on to be interviewed, be sure to do your preparation beforehand. A list of suggested questions, with follow-ups, will bring the best out of both sides although it’s a good idea to run through the questions with your interviewee beforehand so they aren’t put on the spot. Unless, of course, that’s what you’re going for…
Finally, the frequency you publish new episodes is important. Aiming to publish a new podcast every week is great, but requires a certain level of commitment, and your audience will expect you to keep to it. That said, keeping a regular flow of new content is a sure-fire way to build a community. Be realistic about how much you can do; better to under-promise and over-deliver here.
Podcasting: rules of engagement
While a good podcast will allow the presenter relative freedom to explore a subject the way they want to, it does help to have some guidelines in place. Rather than restricting the presenters, they offer some direction of certain things you don’t do. This could be something as simple as whether you permit swearing or cursing on the show, or any specific subject areas you want to steer clear of for legal (or other) reasons. True crime podcasts, for example, may find themselves limited over things they can and can’t talk about. Ongoing legal cases are a strict no-go; you don’t want to find yourself in front of a judge charged with contempt of court for jeopardising an active case, after all…
Another area to keep in mind is around the use of copyrighted music; the simple advice is don’t, unless you have an army of lawyers on hand to clear samples. There’s plenty of high quality, royalty-free audio available on the net. Audiojungle is a good place to start here.
Podcasting equipment
If reading this has convinced you to give podcasting a go, you’re likely wondering what kind of podcasting equipment you’ll need to get started. Clearly, the style of pod you’re aiming for will dictate the types of gear you’ll need, but there are some sure-fire must-haves that everybody, from the total beginners right up to the professionals, will have. Let’s take a look at some great options for podcasting equipment.
Podcasting microphones
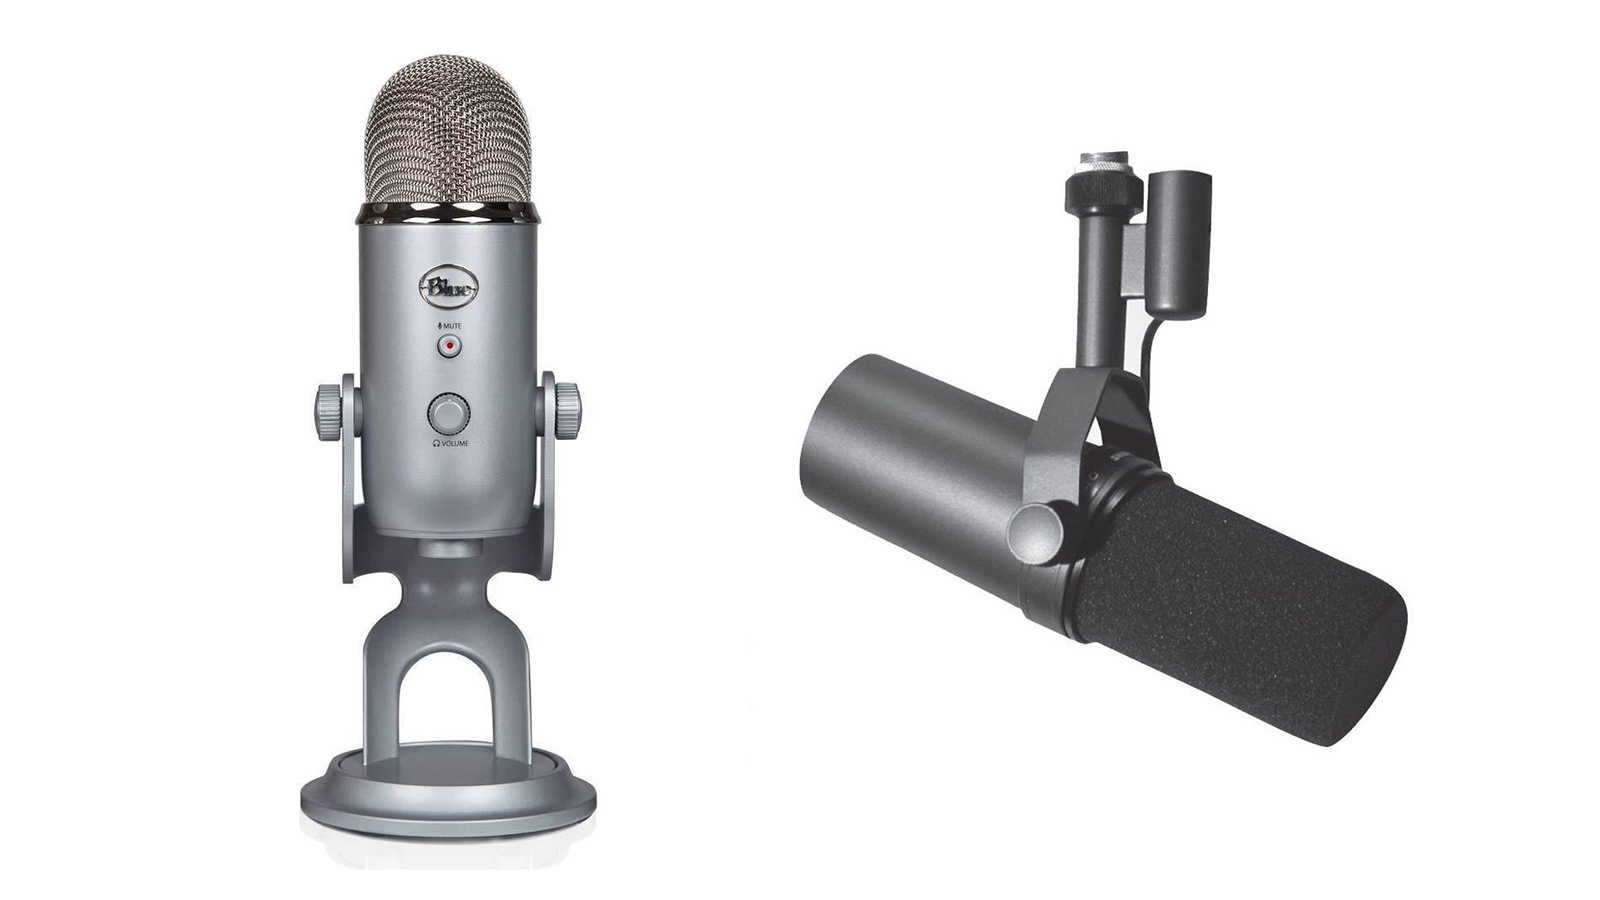
Clearly, for a speech-driven form of media, you’re going to need a microphone. Mics come in all different shapes and sizes, all offering slightly different possibilities. For podcasting, however, we’d point you in the direction of a good quality, well-made condenser mic. A popular option is to use USB condensers, on account of their simplicity, but professionals might prefer the flexibility of dedicated broadcast microphones.
For beginners… Blue Yeti
Famous in online video streaming circles, the Blue Yeti microphone offers the ultimate in USB plug-and-play simplicity, combined with a surprising amount of functionality like multiple pickup patterns which make it useful in a number of situations. We also liked the way it comes either with a desk stand, or a desk-mounted arm, giving it that professional vibe.
For Professionals… Shure SM7B
Larger setups, involving multiple guests, will probably be better served with better quality studio microphones; for us, it’s hard to look beyond the Shure SM7B which, despite being a dynamic mic, has an amazingly rich, warm sound which is perfect for speech. Look at many pro-level podcasters and you’ll see Shure SM7Bs leading the way.
- Explore more of the best podcasting mics
Mic screens
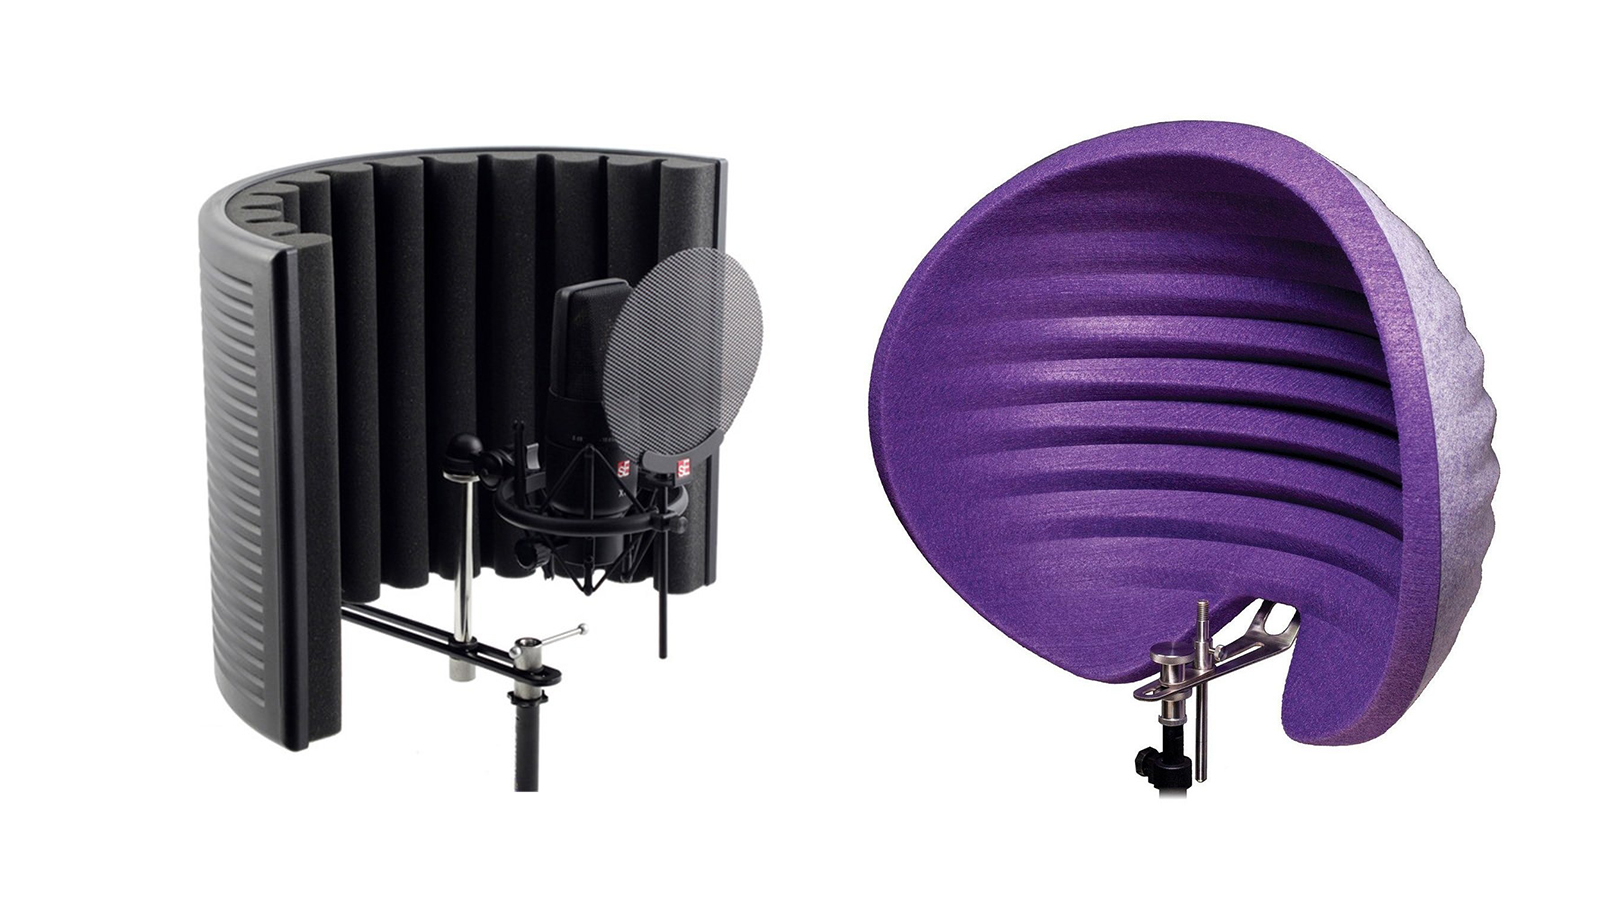
If you’re recording in your kitchen or bedroom, you are at the mercy of all those extra sounds a typical house will make. That could be doors shutting, or the reverberation of a large room, or simply cars driving past while you’re recording. While noises of this type can’t be completely mitigated against, you can protect your sound by employing a portable vocal booth. These shut off the area around the microphone and make sure your recordings are clean and ready for processing.
For beginners… sE Electronics Reflexion Filter X
The sE Electronics Reflexion Filter X is a cost-effective, lightweight tool designed specifically for isolating a vocal source from its environment. We liked the portable nature of it, and we’ve always found sE gear to be well-made and reliable.
For professionals… Aston Microphones Halo
British brand Aston Microphones is building a great reputation for creating some of the best sounding condenser mics to reach the market in ages. The Aston Halo continues this progress, with its unique shell-shaped designed and felt surface doing a tremendous job at directing speech to the right place while filtering out anything that’s not desired.
Mixers for podcast recording
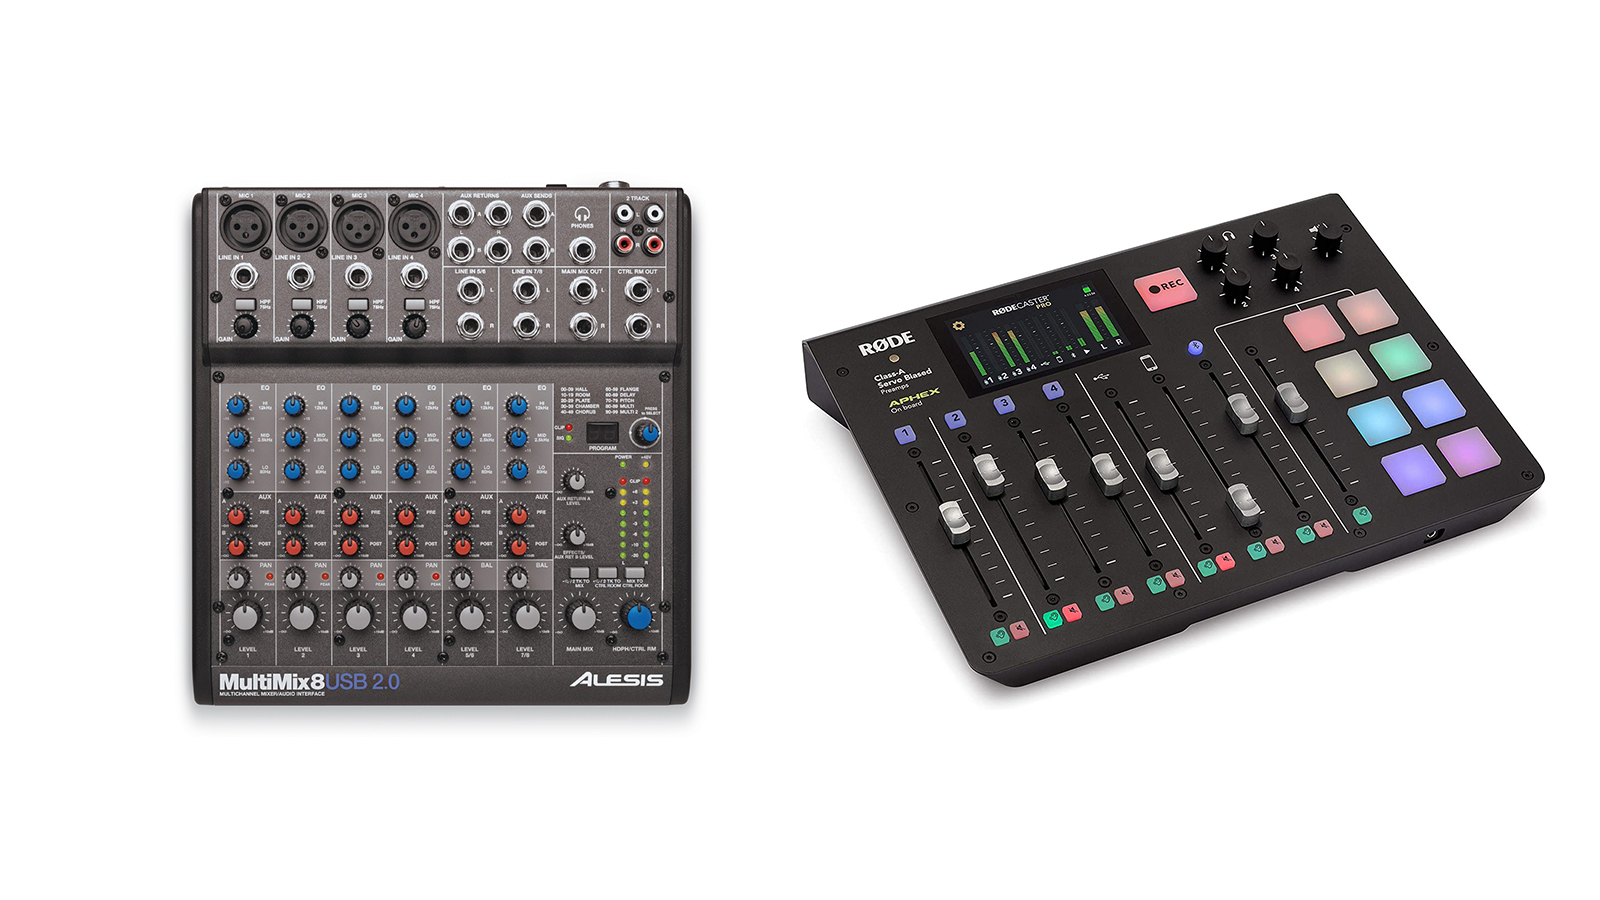
If you’re using multiple audio sources, be that microphones or music players, then you’ll need a way to balance the audio to ensure it sounds the way you want it to. If you’re recording four mic sources, and one of them is noticeably louder than the others, then unfortunately that is all your listeners will hear. A mixer solves this problem by acting as the central hub in the studio. You feed all your different sources into it, mix them together so the sound is balanced, and then output it to your recording software.
For beginners… Alesis MultiMix 8
For beginners, a simple mixer like the Alesis MultiMix 8 would be perfect. It features four XLR microphone inputs, and a further four standard jack inputs for other audio sources, and also boasts USB connectivity for recording direct to PC.
For professionals… Rode RodeCaster Pro
For more advanced podcasters, the Rode RodeCaster Pro is a superb tool, combining a number of podcast-specific features like programmable one-shot pads and onboard recording, with enough mic inputs and faders to ensure your finished pods sound great.
- Podcasting essentials: the best podcast mixers
- The best home studio mixers for all budgets
Podcast recording software
If you’re recording into a PC, you’re going to need a software tool to help you piece together the finished recordings. It’s also through software that you can add effects, or polish your audio to make it more professional. If you’re already the user of a digital audio workstation (DAW) like Ableton Live or Cubase, then you’ll be familiar with the process. Different software options will offer different tools, but the fundamentals are generally transferable from one to another.
For beginners… Audacity
As a free, open-source audio production tool, it’s hard to look beyond Audacity for beginners to learn their craft. Audacity contains all the tools you’ll need, and is intuitive enough that you can pick up the basics in no time at all.
For professionals… Adobe Audition
While home studio users may be more familiar firing up their existing DAW, as a tool for editing broadcast-ready audio, Adobe Audition is the clear winner. It offers plenty of specialist tools that allow you to clean up noisy recordings, and its multi-track environment makes producing your shows a doddle.
Read the full Adobe Audition review
- Get creative with the best laptops for music production
- Listen carefully with the best headphones for music production
Hosting
Where to host your podcast
We’ll cover the actual process of recording your podcast in greater detail below, but once you have your finished audio file, you’ll need to find a way to get it live on the airwaves. Unfortunately, it’s not as simple as saving your finished file and it appearing magically on Spotify or iTunes. While those services, and others like them, are the tools your audience will use to listen to the show, you’ll first need to find a place to host them.
It’s worth exploring which podcast hosting platform is right for you. There are plenty of options here, ranging in price and capability. For beginners, a simple free service would offer you the ability to host your audio file, create an RSS link so people can subscribe, and offer enough bandwidth so listeners can stream without any audio problems.
Once you start looking to paid hosting platforms, your options increase significantly, along with the capabilities.
- Buzzsprout is one of the best known, offering a free service (with a few caveats, notably that your files are deleted after 90 days) along with various tiers offering extra functionality or the ability to store more audio files.
- Platforms like Captivate, PodBean and Libsyn are all trusted alternatives, and manage the entire process of publishing your shows on the big platforms so it’s worth exploring the one that suits your needs best.
- Alternatively, the Spotify-owned Anchor promises unlimited storage and a tonne of premium features like one-click distribution, monetisation and analytics for free
Finally, as your podcast empire grows, monetisation will become important. It figures that if you’re creating this amazing content, then you should take a slice of the advertising revenue that comes with it, right? Each of the hosting platforms suggested above offer support for this process, either through advertising revenue or through premium, i.e. paid-for, subscription modelling.
Inspirations
The best music podcasts right now
Fans of music production, recording and performing aren’t short of options when it comes to podcasts. From gear reviews and interviews, through to weekly shows from high profile professionals, there is plenty out there to get the creative juices flowing. Here’s some of our favourites.
Song Exploder As far as podcasts go, Song Exploder has to be one of the best uses of the medium. Each episode sees an established name take apart a track of theirs, bit by bit, explaining the stories of how they were conceived, crafted and produced. A bit like having to stand up in the front of the class and explain yourself, only with the biggest names in music talking about their best-known tracks. Genuinely fascinating for any music fan to hear.
Pensado’s Place Dave Pensado is a Grammy-winning mix engineer who’s worked with the likes of Michael Jackson, Beyonce and Elton John, so his words carry some weight. His weekly show, co-hosted with Herb Trawick, covers what happens in the studios of the world’s best-known performers. From the types of equipment favoured at the top, through to hints and tips to achieving great sounds, Pensado’s Place is a must for producers of all levels.
Unstoppable Recording Machine We love the Unstoppable Recording Machine pod, presented by Eyal Levi, because of the depth it goes into. Eyal is a candid host, blending the right amount of questioning and curiosity with a desire to keep things interesting for listeners.
Home Studio Corner Home Studio Corner is a more specialist podcast, offering specific help and tips to improve your capability as a producer. From breaking down individual techniques and skills, to explaining step-by-step how to achieve certain results, Home Studio Corner should be a mandatory subscription for home producers.
Punk Rock MBA Our final recommendation isn’t related to the actual production of music, as such, but it does offer superb analysis and thoughts on the business side of the music industry. Presenter Finn McKenty offers great insight into the inner-workings of being in a band, and his style and format is perfectly suited to his audience. Pro tip; Finn’s LinkedIn profile regularly breaks down the process of making his pods, from choosing the right artwork for your social posts to avoiding certain common pitfalls. Well worth investigating.
Recording guide
How to record a podcast
So, you’ve got your big idea. You’ve planned it all out, have your running order locked down and have a pile of shiny new recording equipment all ready to go. What now? Well, it’s time to start recording. Here, we’ve detailed out the steps you should take to take your ideas from the sketchpad and out of your head, and turn them into cold, hard audio files you can share with the world in our guide to recording your first podcast.
1. Setting the scene
The first task is to arrange the area that will act as your studio so you have everything you need within arm’s reach. That means setting up your laptop or recording device within eyeline, and then arranging your microphones so they are in front of anyone who will be talking. Hook your mics up to your mixer, and fire up the software you’ll be using to capture the audio.
Now, it’s a case of fine-tuning. Have anybody who will be talking speak in their normal voice; a good trick here is to ease them in by starting a completely unrelated conversation, and covertly using their responses to tweak levels. Some people naturally talk louder than others, so be sure to balance out levels and be mindful of clipping, where the sound is louder than the microphone can handle, as this will result in recordings which are nigh-on unusable.
2. Setting the software
With your hardware all set up, you’ll need to carry out the same housekeeping within your software. Using Adobe Audition as the example, make sure you have your audio routing set the way your mixer, USB microphones or audio interface require.
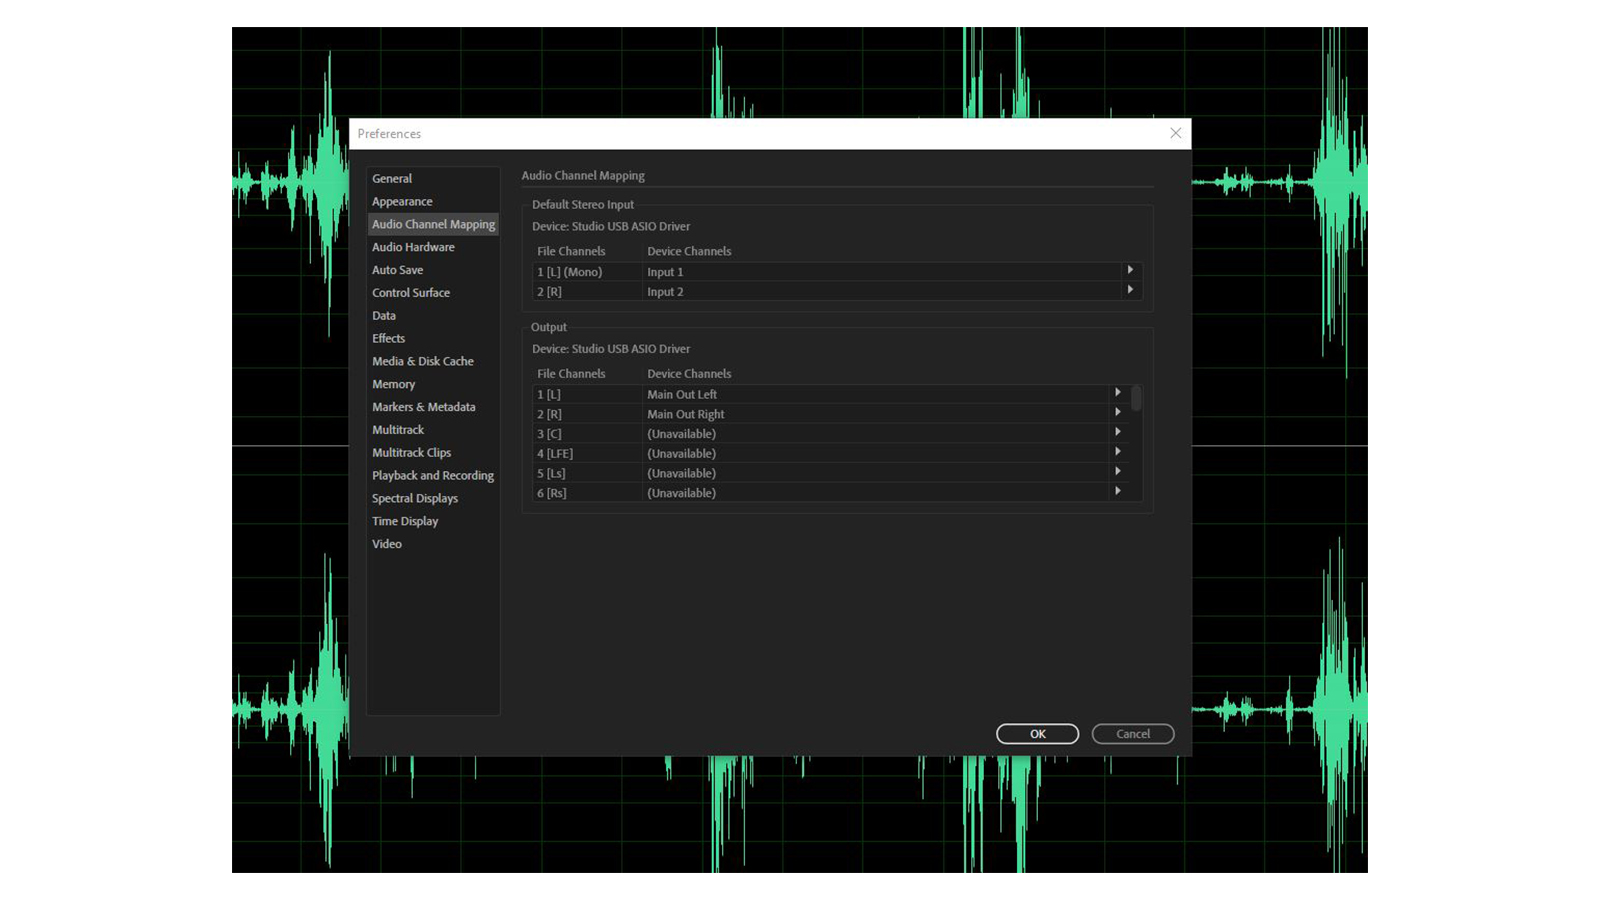
In the example above, we’ve set Audition to use our Presonus Studio audio interface, and have inputs one and two receiving signals from two microphones connected to the interface. For monitoring – listening back to our recordings – we have the two outputs set to send the audio to our studio monitors, and our headphones for live monitoring when recording.
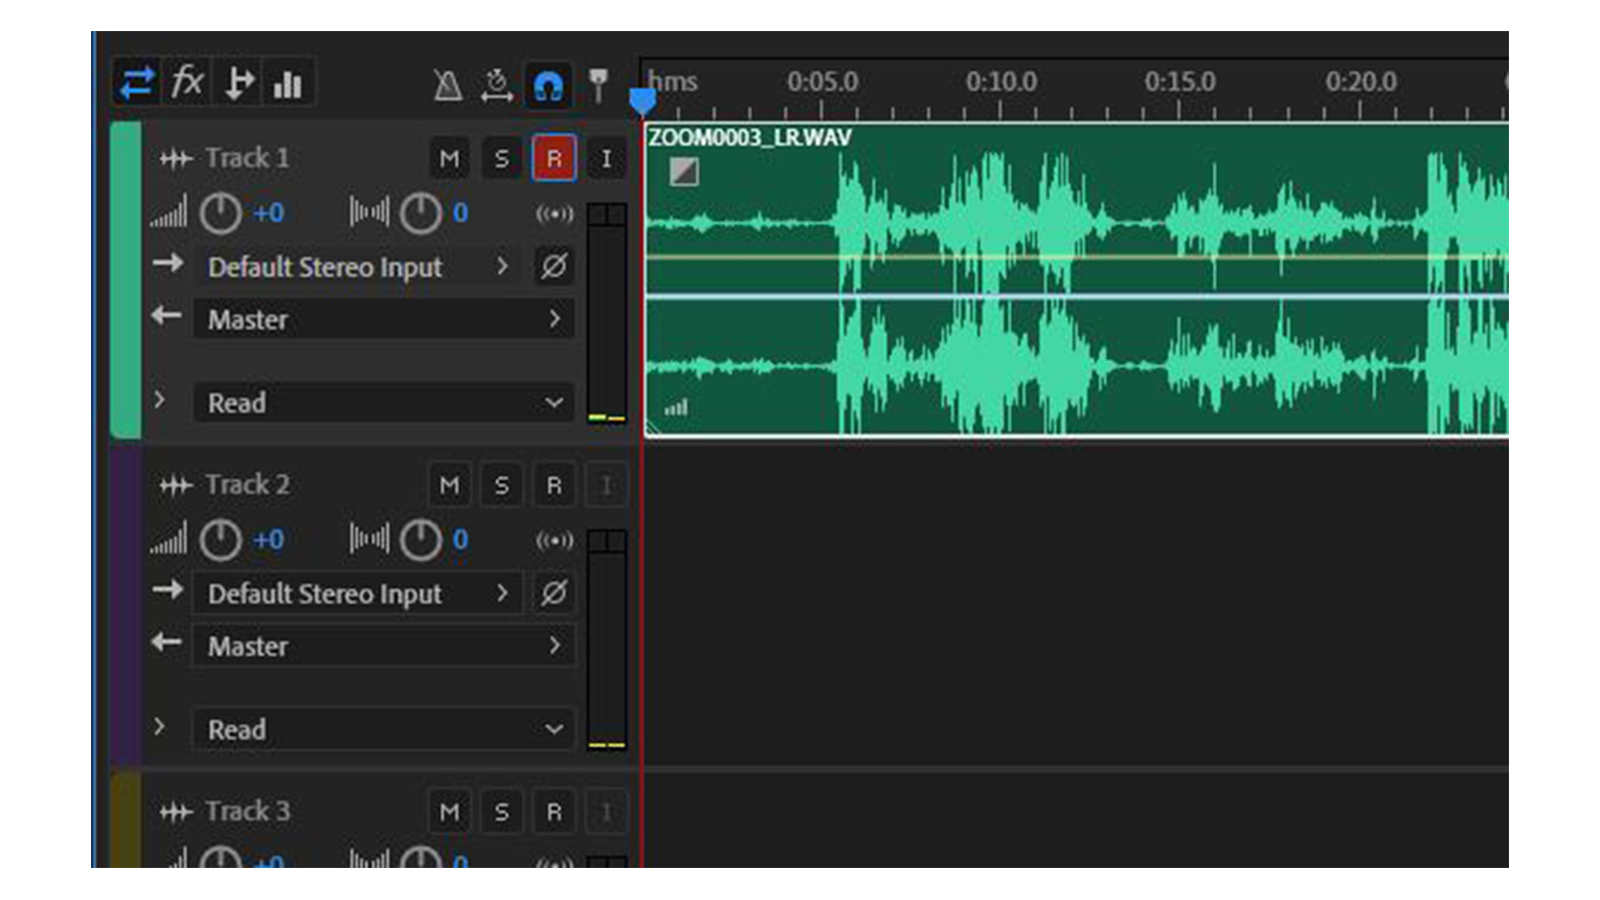
Now the audio routing is set up, you can ‘arm’ the individual tracks to record. Recording in most audio software applications is a two-step process; you tell the software which tracks are receiving the audio by arming them. Look for the little ‘R’ button to choose which tracks you want to record, then hit the master record button to start the process. Congratulations! You’re now recording…
3. Editing your podcast
With your audio hopefully now residing nicely within the software arrangement window, you can start the process of editing. Editing is the process of cleaning, or enhancing, audio using the tools available within the software. If your recording features multiple voices, it’s good practice to either lower the volume – or remove completely – parts where a specific person isn’t talking as this removes any background noise and allows the listener to focus entirely on the subject.
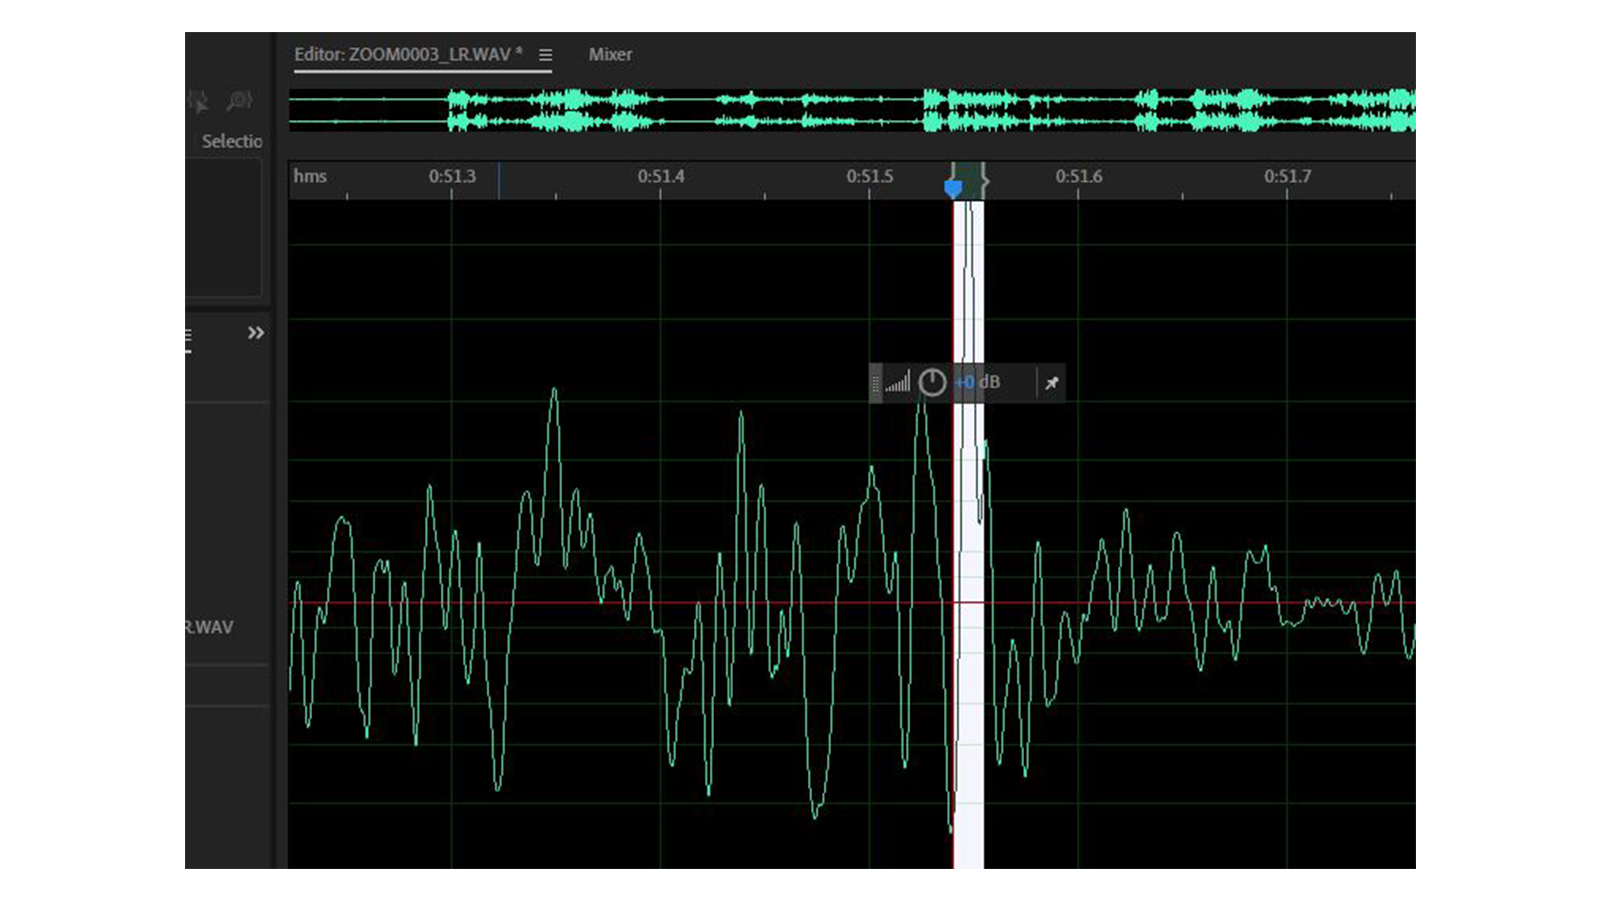
Look for peaks in the wave file too; in the example above the audio clips slightly in the part we highlighted. In Audition, you can lower the volume of parts like this quickly and easily using the Clip Gain function, making it ideal for doctoring plosives or sibilance. Be careful using this too liberally though; the human voice is a dynamic thing and is naturally quieter or louder depending on the context. Attacking your audio file with too broad a brush can make for a harrowing listening experience afterwards…
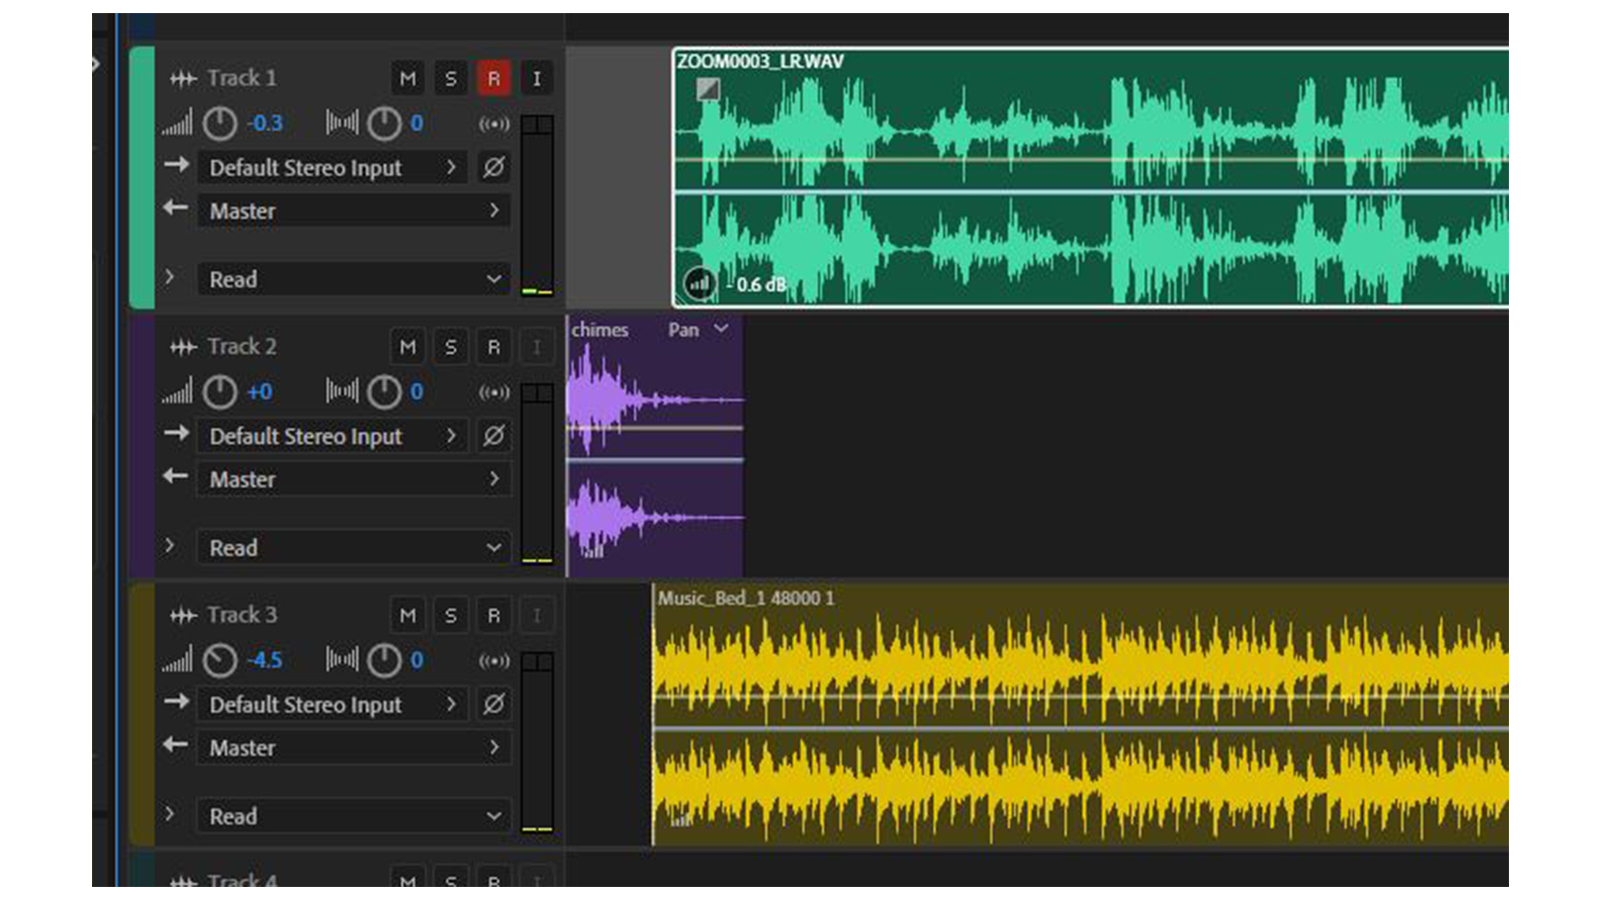
Now, you can start to import the other elements. In the example above, you’ll see we have a short jingle on the second row, and then a music bed on the third row. The music bed has had its levels reduced in the mixer, so it doesn’t compete with the main speech track. Think of this part as musical building blocks; you simply drag the audio files into the arrangement window, and move them where you need them. You can also chop, slice and rearrange here to your heart’s content.
To add a final polish to the sound, we add compression and normalisation. In Audition, this is called Dynamics Processing, and the ‘Classic Soft Knee’ preset does the job we’re after perfectly. Be careful though; overusing compression makes your voice sound like it’s coming from a goldfish bowl. The final step is normalisation, which attempts to level the sound across the whole track. Again, this can prove quite drastic so it’s always worth checking your entire mix once you’ve completed the normalisation.
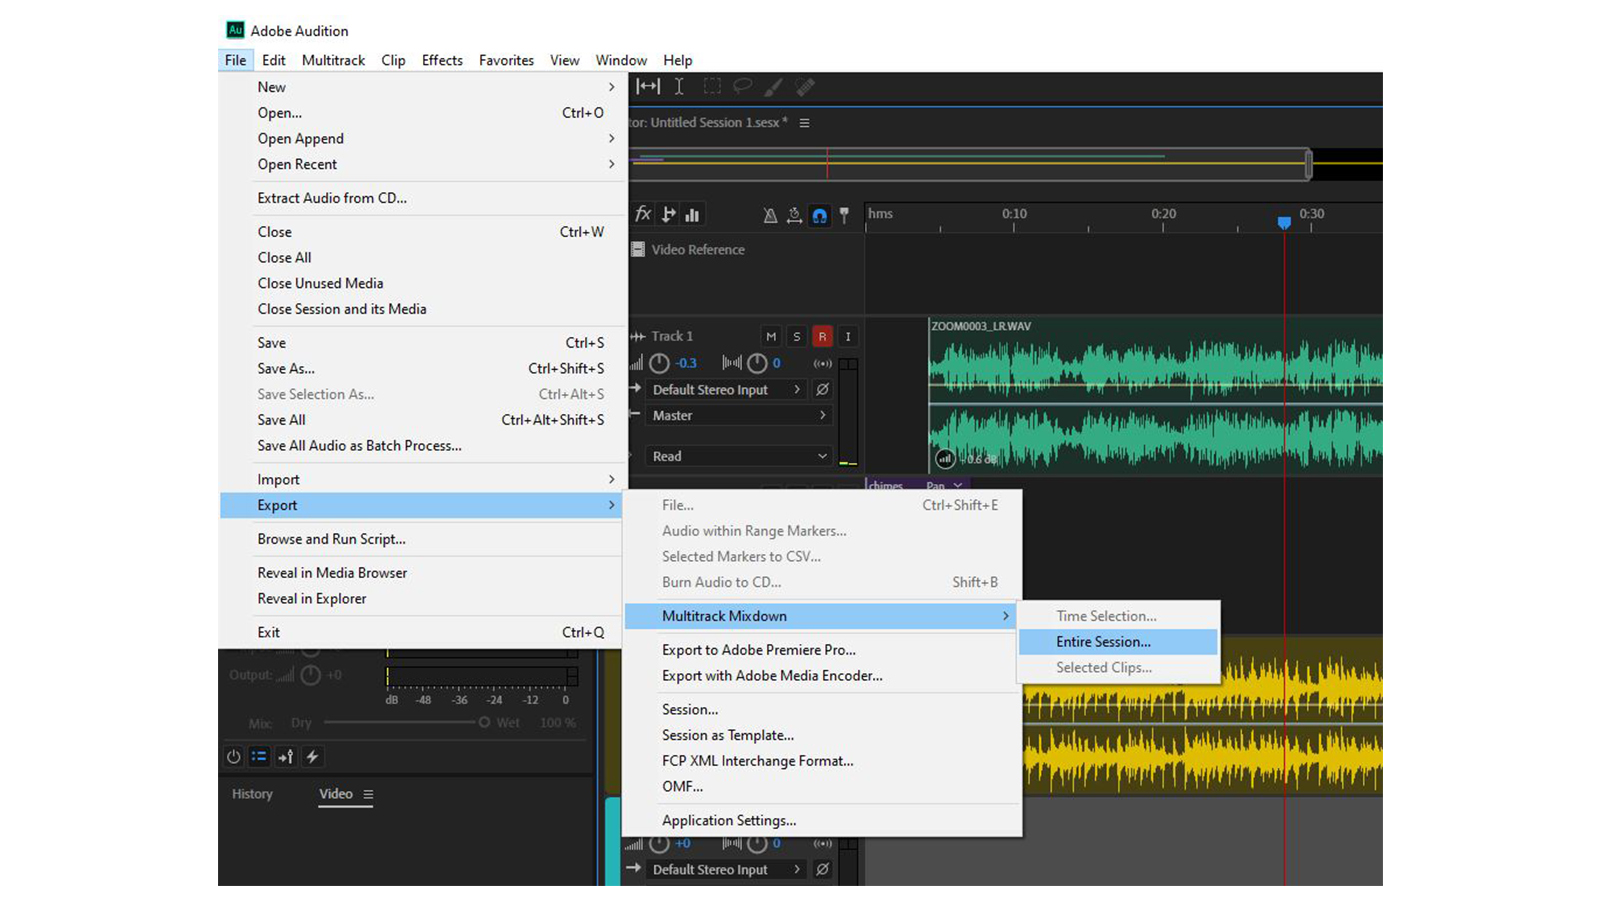
4. Exporting your podcast
So, the audio is recorded, arranged and polished, and you’re ready to export. This part is simple enough; first tell the software to create a mixdown of your multitrack session – as seen above – which ‘bounces’ all the individual files into one master file. Then simply hit export in the File menu and you’re good to go. Congratulations, you now have your very own podcast and are ready to take the world by storm! Good luck!
Chris Corfield is a journalist with over 12 years of experience writing for some of the music world's biggest brands including Orange Amplification, MusicRadar, Guitar World, Total Guitar and Dawsons Music. Chris loves getting nerdy about everything from guitar and bass gear, to synths, microphones, DJ gear and music production hardware.
