
Not so long ago, significant updates to Ableton Live seemed to be few and far between. There was a full five years between the release of Live 9 and Live 10, and a four year gap since the release of Live 8 before that.
The announcement of this latest version comes just a little over two years since Live 11 hit the market, and we’ve already had a significant ‘point’ update in the meantime, which added a new synth, Drift. That all comes on top of a new version of Push and Ableton’s first iOS app, Note.
Live 12 introduces some new concepts to the DAW, including generative MIDI creation tools, a tuning pool and a new ‘scale awareness’ function
You’d be forgiven for assuming that the speed at which it’s arrived might mean that Live 12 lacks much in the way of radical new features, but in fact this latest update marks one of the most significant shake-ups in years. This is due, in part, to changes to Live’s UI – which has famously remained strikingly similar for most of the DAW’s life – that overhauls both the browser workflow and the interaction between elements like the clip launcher, arranger and mixer.
Live 12 also introduces some new concepts to the DAW, including generative MIDI creation tools, a tuning pool and a new ‘scale awareness’ function. Oh and there’s a whole new synth, an update to the much-love Granulator, and a new, multi-faceted distortion effect too
5 big workflow changes for Live 12
MusicRadar's got your back Our team of expert musicians and producers spends hours testing products to help you choose the best music-making gear for you. Find out more about how we test.

1. The new browser requires some prep work

Upon opening Live 12, one of the most obvious changes is the redesigned browser. Gone are the old folders within each category – which broke, for example, Audio Effects down into Delays, Dynamics, EQ, and so on. These are now replaced by a system of filters that aims to help you find sounds or devices by type or characteristics.
As well as searching by name, each browser window now has a Filters section at the top, which allows users to refine the list based on things such as sound type, format and characteristics. Clicking the Edit tab next to these filters allows you to assign tags to anything in the browser, either using the pre-existing list and categories, or ones you create yourself.
It’s worth making use of these tags. While the new browser works nicely for Live’s stock content and official Packs from Ableton, it has little to help you navigate your own library of sounds and third-party plugins – at least not without doing a little prep work first. The first thing we’d recommend doing is adding ‘type’ tags to your plugins – eg, ‘synth’, ‘delay’ ‘EQ’ etc – to help you quickly find groups of similar tools.
After this, it’s worth turning to your most commonly used sample packs and assigning any tags you think could be relevant, such as sound type – eg, ‘loop’, ‘one-shot’, ‘drum’, ‘bass’, ‘lead’ – as well as potentially tagging sound by characteristics such as musical key or general tone descriptions. While doing this does require a fair commitment of admin time, it will really help you get the most out of Live’s new browser.
Now, with sounds tagged up, it’s also possible to save browser filter combinations to the library sidebar to create automatically updating groups of sounds, devices or plugins. For example, under the All tab, you can filter sounds by ‘Loop’ and ‘Drum Pattern’, then hit the ‘+’ icon above the list of results to create a new sidebar shortcut. This will list anything tagged with these two characteristics, whether it’s part of Live’s stock library, a Pack or your own folders (assuming you’ve added tags). The list will automatically update as new sounds are tagged with these characteristics.
One final sound-finding feature worth investigating early on is Live’s new Similar Sample tool. This can be accessed in the browser or directly via some instruments, such as Drum Rack. It allows users to browse through a list of ‘similar’ samples that Live generates based on the qualities of the audio files, and isn’t bound entirely by tags. Similar Sample works particularly well with drum sounds, allowing users to quickly swap out single elements or entire kits to see how it affects that beat.
2. In Live 12 you can access the mixer from anywhere

One small but significant change to Live’s workflow for v12 is that the mixer can now be accessed in either of Live’s views – Session and Arrangement. The keyboard shortcut to show/hide the mixer (Cmd + Option + M on Mac, or Ctrl + Alt + M on Windows) allows you to pull up the mixer as needed, wherever you’re currently working.
Using the hide/show controls at the bottom of the UI, it’s also now possible to display the contents of a clip at the same time as a device chain.
3. Scales are far more important now

You could already make use of predefined scales in Live 11, but they’ve become far more flexible and important in Live 12.
There are now two places in the DAW where a scale can be defined. The first is the global scale setting, found in the transport bar next to BPM. This defines the overall scale for a project, and will dictate the scale automatically assigned to any new MIDI clips.
Scales can now also be set for individual clips in their respective menus, however, which makes it possible to change the playback scale within a single track or composition.
Live 12 adds a ‘scale awareness’ function to a number of its devices. What this does is lock the harmonic output of various tools to generate only notes or overtones that fit the scale of the MIDI clip in use
These scales are now considerably more important to Live’s workflow too. As with previous versions of Live, setting a scale for a MIDI clip can help when programming notes on the piano roll or playing an instrument using a MIDI controller. However, Live 12 also adds a ‘scale awareness’ function to a number of its devices. What this does is lock the harmonic output of various tools to generate only notes or overtones that fit the scale of the MIDI clip in use.
Tools that feature this function include the MIDI effects, such as the arpeggiator, but also instrument devices such as the new synth Meld, where some oscillator and filter modes can be set to be ‘scale aware’.
Some functions in Live, such as oscillator tuning and the new generative MIDI tools, will operate in ‘scale degrees’ rather than semitones once a scale has been assigned. This means that the tuning of notes will move up and down by intervals in a scale rather than one note at a time.
This all means that by assigning different scales to different MIDI clips, it’s possible to make scale of key changes within a performance or project, and have any relevant MIDI effects or other scale aware devices change to match the new clip. You can also use a MIDI Clip’s ‘fit to scale’ function to quickly try existing Clips or Patterns in new scales or keys.
4. You can now generate ideas directly within MIDI clips
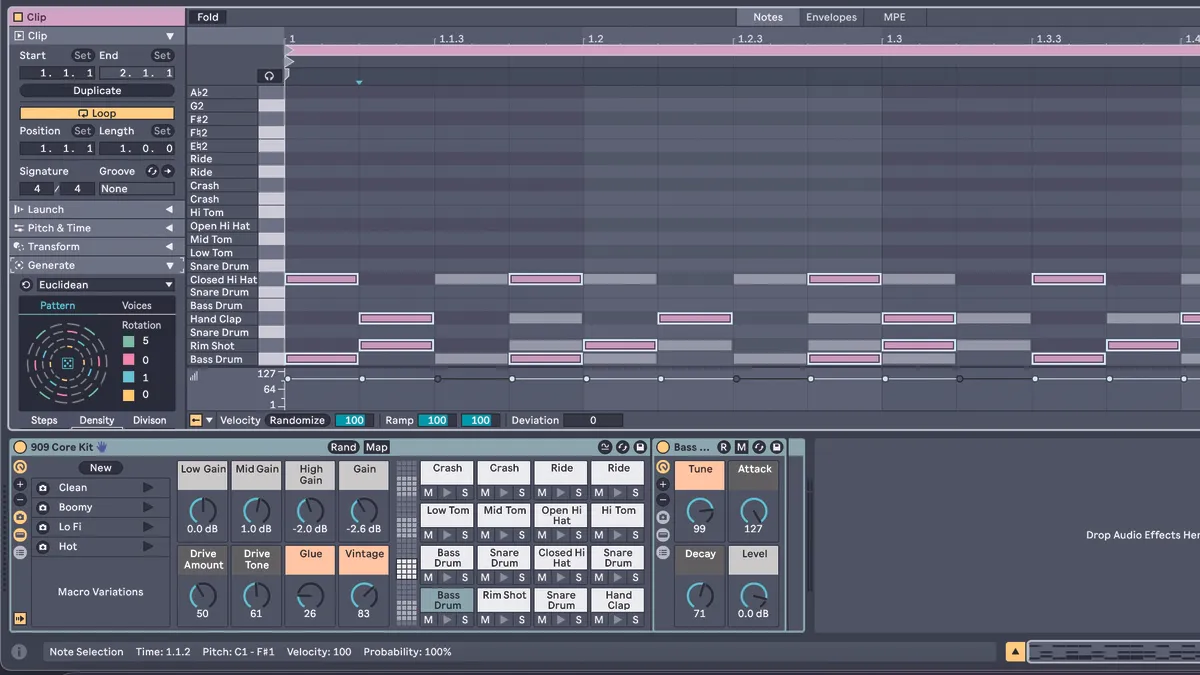
Live’s MIDI clips have been massively enhanced with a set of new creative tools that can generate and transform patterns. These fall under two new tabs found within the MIDI clips themselves. The first of these offers a suite of generative tools that can create MIDI patterns in completely empty clips. Broadly speaking, these each have intended uses, but they can be manipulated in order to perform multiple functions.
Live’s MIDI clips have been massively enhanced with a set of new creative tools that can generate and transform patterns
Rhythm is a pattern-focused generator ideally suited to creating drum sequences. Seed is a randomised pattern generator best for melodic lines. Shape is a monophonic generator which will create riffs based around a user-defined shape, and is a great tool for lead and basslines. Stacks is a chord generator that will fill a MIDI clip with a variable set of chord shapes.
The second tab focuses on transformation tools, which will elaborate on or alter your existing MIDI. These cover a variety of creative functions that will shift the arrangement, pitch, timing and expression of MIDI notes. It’s worth noting that by selecting individual notes in a MIDI clip, it’s possible to transform only selected parts, rather than the entire clip.
Suite owners will also discover that some Max For Live tools – notably the Euclidean rhythm generator and Velocity Shaper – can now be accessed directly inside MIDI clips.
The Pitch and Time Utilities menu has had some useful enhancements too, our favourite being the new ‘Add Interval’ function, which can be used to generate harmonies and chords from existing MIDI notes.
5. Live 12 now has a tuning pool… which shouldn’t be confused with Scales

Live 12 has added a lot of enhancements that open up its accessibility and broaden what can be done with the DAW. One notable change is the ability to work with non-Western and non-traditional tunings – something that has been notably absent compared with some other applications.

5 things you need to know to get the most out of Ableton Live 12
These are accessed via a tuning pool, which looks and acts like the existing Groove Pool. Here, users can drag and drop a variety of non-traditional tunings onto a project which will affect all clips and devices. It’s also possible to edit and import tunings yourself.
What’s important to note is that tunings and scales are not the same thing. Scales in Live are based on the 12 notes in familiar Western tunings. While applying a scale can lock out some of those notes, you’re still working within the same 12 pitched notes.
Applying a tuning will change the frequency and relationship between notes themselves, meaning you’re no longer working with those same 12 pitches. Applying a tuning will lock off the scale function, which helps to avoid confusion.
3 stages of Live 12's new Roar distortion tool
Roar is Live 12’s new effect device. It’s a multi-stage distortion tool, although thinking of it as just a distortion would be doing the device a disservice. Roar can apply up to three stages of distortion or saturation, which can be arranged in serial, parallel, split across different frequency bands, applied to the mid/side elements of a sound, or applied to a feedback loop.
The inclusion of this feedback loop, along with a versatile mod matrix and built-in compressor, means Roar can perform a variety of functions from multiband dynamics control to delay-like creative effects. It’s a great tool for adding gel to group tracks, but the many modulation sources also mean it’s ideal for creatively transforming elements and adding movement. Let’s take a look at its key elements…
1. Input section

As well as setting the routing for the effect, the input has Drive and Tone controls, which are handy for setting the balance of the sound as it’s applied to all of the distortion stages. Modulating these can radically change the balance of the effect.
2. Shaper curves

These dictate the style of distortion applied. The amount control alters the depth of the effect. Bias and filtering alter the tonality of the distortion. Bias makes a sound more or less inharmonic. Switch the filter between post- and pre-distortion to change the harmonic quality of the effect.
3. Feedback

The feedback loop functions like a delay, looping some of the output back into the input with syncable timing. A band-pass filter is applied to the feedback loop, which helps prevent extreme frequency spikes. The Width control alters how extreme or subtle this filtering is.
6 things to know about Live’s new synth Meld
1. It’s bi-timbral, and you can link the two layers

Rather than simply having two oscillators, Meld has a fully bi-timbral signal path, meaning each oscillator feeds into its own distinct filter and amp section, with its own modulation tools. You can, however, treat these two sections – labelled A and B – more like a traditional two-oscillator synth, by using the link icon to couple its filter and amp section together.
2. The oscillators can do digital textures and analogue warmth

Meld’s oscillator modes run from bread-and-butter virtual analogue tones to digital modulation and textural generators like rain or ‘bubble’ sounds. Look out for modes with the Scale Aware icon (b#). This means that, when scale awareness is activated, the output of the osc will produce only harmonic content that fits with the scale set in your current MIDI clip.
3. There’s masses of modulation

Press the arrow at the top of Meld’s device UI to open the full modulation matrix. Making use of Meld’s modulation potential is key to unlocking the synth’s distinctive character. The Cross Modulation section is particularly powerful, as it allows for elements of one synth engine to be affected by the output of the other. You can also use the copy utility in the top-left corner to duplicate routings between the two engines.
4. LFO effects can enhance the sound

There’s a lot of complexity with Meld’s LFOs. Along with rate controls, LFO 1 has a Slew and Fold parameter to warp the LFO shape. Here we also have an LFO FX section with two shaping effect slots that can radically alter the LFO output. These can create complex modulations – at slower rates they’re great for unpredictable textures. With the rate cranked they’re great for abrasive modulated oscillator tones.
5. Filters can be effects too

Each of Meld’s two filters has a range of modes, which aren’t limited to standard filtering duties. These include a variety of combined filter and effect modes, offering distortion, bitcrushing, phasing and several tonal effects, including comb filters and resonator effects. As with some of the oscillator modes, the tonal filters can be set to be ‘scale aware’ in Meld’s settings menu and locked to match your selected MIDI scale.
6. MPE and tunings

Much like Live’s Drift, Meld has been designed with the DAW’s MPE capabilities in mind. As well as offering a variety of expressive presets, the multiple dimensions of MPE expression can be routed as modulation sources in the matrix – a handy tool for automation even if you’re not using an MPE controller. This also means Meld works well for experimenting with the non-western tunings in Live’s new Tuning Pool.
