14 essential Ableton Live 8 power tips
If you want to really know the software, read this

The wait is over - Live 8 is available and being used in studios and on stages around the world.
If you haven't tried it yet, may we suggest you go and read the MusicRadar review to find out why you should, but if you're already in the thrall of Live 8, keep reading to find out how you can tap into more of its enormous potential.
Our 14 power tips come from an Ableton expert, and are designed to get you up to speed with the best of the new Live features as quickly as possible.
• For many more Ableton Live guides go to our massive learning hub: Learn Ableton Live and Ableton Push: music production tips and tutorials
1. Raw loops
When you're browsing for and auditioning looped samples in the Browser window, Live will default to Re-Pitch warp mode and audition the sample at the current tempo. This will change the tuning of it, so if you want to double-check something at its original pitch, hit the Raw button to hear it unwarped.

2. Group channels
If you're performing a Live show with multiple channels used in each of your tracks, you no longer have to negotiate a vast Session view that requires scrolling through far more tracks than your screen can handle. Simply group all of the channels used in each song and minimise all but the currently required song into one group display channel - you can even trigger Scenes using this technique.
3. Sort out your zooming
Choose your interface zoom level wisely. When you're working in the studio, it's all very well opening up the Preferences and zooming in or out at your leisure, or leaning in and squinting myopically at the tiny typeface that results from having 30 simultaneously visible channels, but do you really want to do either of those things live on stage? (Clue: no, you don't.)
Want all the hottest music and gear news, reviews, deals, features and more, direct to your inbox? Sign up here.
4. Use Looper with care
When using Looper, be careful not to fall into the trap of keeping your timing clinical or over-rigid. Like any instrument, it requires practice, but once you've used it for a while you'll strike the right balance between accurate timing and satisfying live feel.
5. Warp correctly
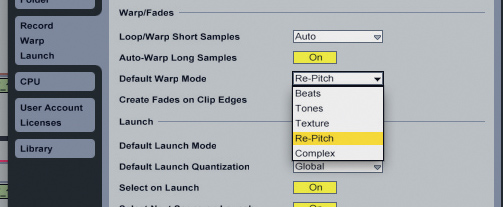
With so many warp modes now on offer, whenever you're importing a large collection of samples, be sure to go into the Preferences and alter the Default Warp Mode. If some of the samples are tonal and others are percussive, it's usually much quicker to import them in groups, altering the default for each group.

6. Disarm Looper
When using Looper live - to record the sound of a crowd, say - you can always disarm recording on that channel until it starts looping. You can then audition the part first and still have it come in within one bar.
7. Pitched percussion
The Corpus instrument can be used to add bell-like resonance to things like drums, which you can then manually tune. But you can also tell Corpus to take an incoming MIDI signal and use that to determine the notes the resonance plays at, thereby tuning drums - or anything else you're processing - via MIDI input.

8. No Auto-Warping for DJs
If you're a DJ warping a number of tunes, you might want to turn off the Auto-Warp option in the Preferences to circumvent Live 8's new warping system, as it often puts in transient markers that you simply don't need for 90% of electronically produced dance music.
9. Looper as scratcher
DJs looking to add the perfect scratch flourish to a track or recorded set can use Looper to do it, without having to worry about chopping up five minutes of scratching overdubs. Just set up a Looper and use a footswitch to engage it, then drag the takes you want to keep into a new clip slot.
10. Use fades
Often when editing audio - particularly stereo audio, where the left and right channels might not have zero-crossing points in exactly the same place - you'll get some unpleasant clicking noises. However, Live 8 now has an option in Preferences to add a 4ms fade to the start and end of all new clips to get rid of this. Always be aware of the current state of this option, as sometimes you might not want it to be active.

11. Highlighting channels
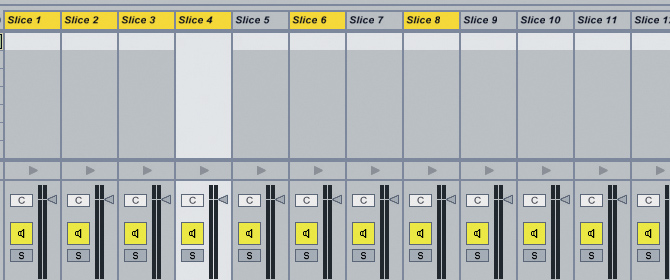
If you want to raise an element in your mix that's already near peaking, simply highlight all the channels except the one you want to raise. Changing the volume (amongst other parameters, including Pan, Solo and Arm) on one will change all of those selected, too. So, for that volume change, simply pull them all down together, then raise the Master.

12. Collect And Save
When you download a shared Live set from the Ableton site, make sure you choose to Collect And Save it to a new location, as all downloaded audio parts will be placed in a cache folder, which Live will periodically clean out automatically (so it doesn't take up too much space on your drive). If you haven't saved the parts manually, they'll be gone.
13. Make the most of Limiter
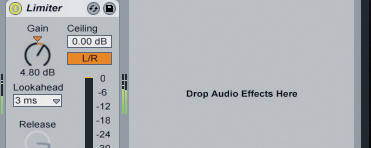
When using the Limiter, always be sure to have it in the right mode. In L/R mode, the processing for each of the two channels is handled independently, but in Stereo mode, if there's a large peak on either channel, both sides will be limited. This latter option is usually the best one for complete tracks as L/R can affect the balance and stereo field.

14. Map your grooves right
If you're using Live's new groove-mapping feature, it's very important to make sure you get the warp markers exactly right. You want the sharp parts of the beat - the transients. Be wary of loops that have a little bit of sound (perhaps an earlier layered sound) between the individual hits.
For a detailed guide to the new features in Live 8, check out the June issue of Computer Music (CM139), which is on sale now.
Liked this? Then try:
Hands on with Ableton Live beta
Sign up for our free weekly newsletter
The free MusicRadar newsletter serves up the week's biggest artist and product news stories alongside exclusive tuition and gear reviews. Sign up here!
Follow MusicRadar on Twitter
Get instant updates and bonus content plus chat with the team. Start here!
Computer Music magazine is the world’s best selling publication dedicated solely to making great music with your Mac or PC computer. Each issue it brings its lucky readers the best in cutting-edge tutorials, need-to-know, expert software reviews and even all the tools you actually need to make great music today, courtesy of our legendary CM Plugin Suite.
