
An arpeggiator is a device that splits the notes from a held keyboard chord into individual steps and cycles through them, in user-defined or random directions. The term originates with the arpeggio, which is a name for the same thing, played on a traditional instrument such as a piano or guitar.
This principle is very effective, and was a key part of 80s synth performance, as the originators of synth pop used the arpeggiator presets that were built into their keyboards, or available through hardware sequencers – an arpeggiated pattern makes instant magic for monophonic synths. An arpeggiated synth with a TR-808 together become an irresistible hypnotic melodic machine, reaching peak 1980s!
Many modern synth plugins include arpeggiators – like LFOs, they’re all over the place, which is just how we like it. In our world of software, things get even more interesting when we use these arpeggiators alongside other MIDI effects – ultimately we can create mobile and evolving musical patterns even if we’re indulging in one-finger keyboard playing… and that’s before we throw in any automation possibilities!
In this short walkthrough, we’ll use Apple’s Logic Pro X Arpeggiator and Drum Machine Designer to create some serious 80s-style synth melodies.
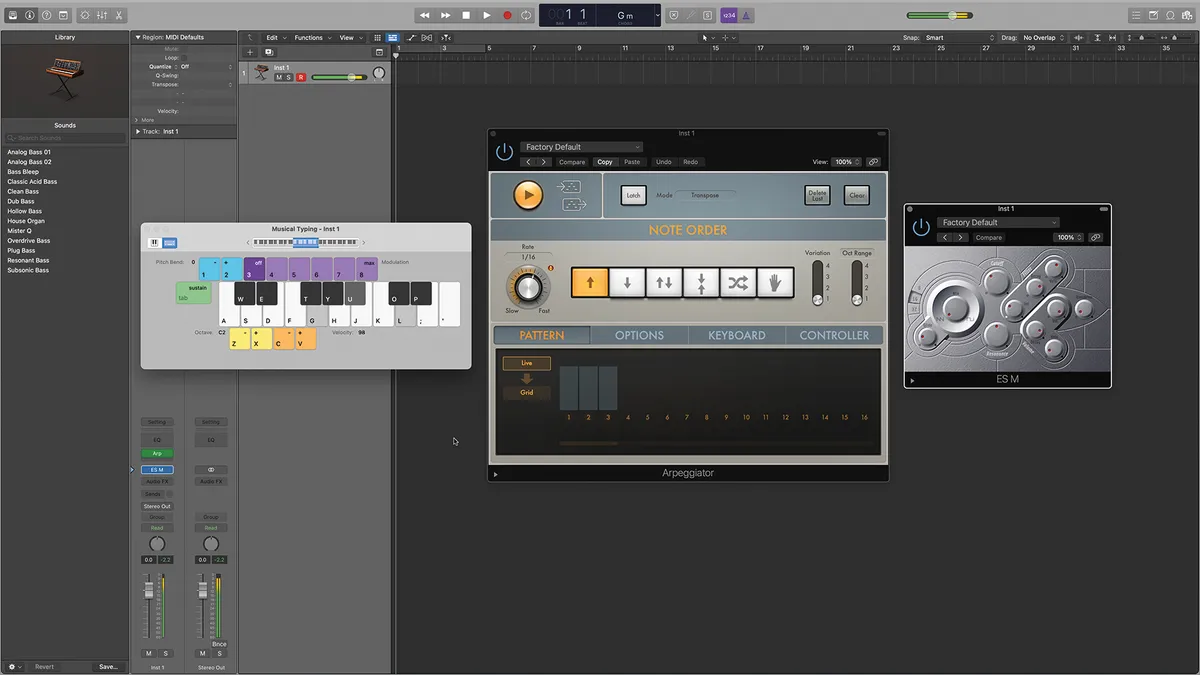
Step 1: Launch Logic Pro X and load the ES-M monophonic synthesiser. The default setting will do for this exercise. In front of that, in the same track, add the default Arpeggiator MIDI effect. Now when you hold down a chord, you’ll hear each note play in order, cycling round indefinitely.

Step 2: Go to the Logic Pro Library and under Drums, load the Drum Synth Kit. Then go Window/Open Step Sequencer, and draw in a beat. It doesn’t have to be fancy, just a kick, snare, and some hats to get us going. Start that playing, enable cycle to loop it.

Step 3: Play some notes on the synth and you’ll hear that it’s synced to the project tempo, via the arpeggiator. Try changing the Rate value – a slower value like 1/8 will make it less frantic and more melodic. Try out the note order buttons and the Variation control – they will all make a difference.

Step 4: The Oct(ave) Range control will push the arpeggiator into higher pitched, more melodic territory. Below that are four tabs where various arpeggiator parameters can be set. In the Options tab, Note Length and Random are very effective, for example, adding small ‘glitches’ to enliven repeating patterns.

Step 5: Add the Chord Trigger MIDI effect to the track, in front of the Arpeggiator. Now when you play even a single note, the Arpeggiator will play through all the notes in the chosen chord – try some of the Chord presets. Try the Octave Range control again to extend those arps!

Step 6: Finally, let’s add Logic’s Delay to the track. This adds another dimension to the arpeggiator patterns. If you want to dig deeper with the delay action, try Delay Designer, or Tape Delay, which will add a more ‘vintage’ mood. Keep the beat running as you try all of these techniques.
