Waves MultiRack was designed to provide a platform for running Waves plugins in a live context. Its software processing replaces traditional outboard hardware processing and effects: MultiRack serves as a virtual rack “shell” through which Waves plugins are run (as of this writing, MultiRack does not support third-party plugins, however, the company has just released an API for third-party developers, so expect expanded support soon), and the virtual rack provides hardware inputs and outputs that interface with your audio gear.
There are two ways in which to integrate Waves plug-ins with your live sound setup: MultiRack Native and MultiRack SoundGrid. Operationally the two systems are very similar, but the architecture of the systems is quite different, so let’s examine each one.
MultiRack Native
MultiRack Native uses your computer’s CPU to provide the processing required for Waves plug-ins, so plug-in count and system latency depend on the speed of the CPU and the sound driver in use. When using MultiRack Native, connect your computer to any ASIO- or Core Audio-compliant audio interface, and the inputs and outputs of that interface show up as I/Os in MultiRack. To use MultiRack Native you’ll need a Mac or PC for the host, MultiRack Native software to control the plug-ins (available from Waves for $500), Waves plugins, an audio interface or mixer/interface, and a USB key to manage authorizations.
Setting up MultiRack Native is very easy. After installing the software, visit MultiRack’s Preferences, and under System Setup choose your audio device, sample rate, and buffer size. We’ll have more to say about those parameters later, but for starters set the buffer size to 128 and the sample rate to 44.1 kHz. Click Apply and you’re ready to go.
When MultiRack opens, you’re greeted with an empty rack. You can load that rack “manually” (no screwdriver required) or open a session template from the MultiRack File menu. The onscreen message “Double Click To Add Rack” says it all. You can add up to 64 racks per session, each with a maximum of eight plug-ins. Every rack that you add has an input and output “rail”; clicking on the rail opens a menu that shows the available audio I/Os (mono or stereo). Alternatively, choose Auto Route All Racks via the Audio menu. At any time, you can switch a mono rack into stereo or vice versa. Clicking the + sign in a rack opens a plug-in menu (see Figure 1).

Once you’ve got those basics down, it’s all about the application. We’ve used MultiRack with a MOTU Traveler audio interface to process input channels on older analogue mixing consoles. The Traveler has eight analogue I/Os that can patch into just about any desk. (Most analogue inserts employ a single TRS connector for send and return, the TRS end of the input cable is plugged into the console and the other end of the cable breaks out to two ¼-inch TS connectors that connect to the input and output of the processor. Some analogue consoles actually have separate ¼-inch send and return jacks for the channel inserts, in which case separate cables can be used for input and output.) As far as the console is concerned, the “effect” in this case is the Traveler, but it’s really serving as MultiRack’s A/D and D/A. The Traveler I/Os are routed within MultiRack so that input to rack 1 is fed from Traveler Input 1, and output of rack 1 is fed to Traveler Output 1. Additional I/Os are assigned in a similar manner. In Figure 1 you’ll see six of the eight racks used in this configuration, with each rack dedicated to a Traveler I/O. This arrangement enabled us to run our favourite plug-in EQs and compressors on any analogue desk, and believe us; some of those older desks had terrible onboard EQ!
MultiRack Native can be incorporated much more elegantly when using mixers that also function as audio interfaces. Take for example the PreSonus StudioLive 16.4.2AI (see the June 2014 issue of Electronic Musician for a complete review): The StudioLive 16.4.2AI features 16 analogue mic inputs, but since it also functions as a multichannel recording interface, it provides 16 digital direct outs and 16 digital returns via FireWire (actually, more, but that’s another story). Now here’s a dirty little secret: The 16.4.2AI’s mic inputs always feed the digital direct outputs, even when you set the channel input to digital return or when you mute the channel (though you won’t hear it through the main house mix bus).
Take a look at Figure 2, which shows the preferences window of MultiRack. In the background, you can see a rack that was created for a live show using the StudioLive 16.4.2AI. MultiRack has been set to use the PreSonus FireStudio driver. The rack is filled with plug-ins for kick, snare, toms, etc. What you can’t see is that the StudioLive’s input select switches are set to “D))”, the digital returns via FireWire. The mixer receives its channel signal from the FireWire return, which in this case is the output of the MultiRack, including all of your favourite plugins. Now you have the channel processing from the StudioLive plus the plug-ins patched via MultiRack. Awesome!

MultiRack SoundGrid
MultiRack Native has certain limitations, namely that CPU horsepower will dictate the number of plugins and system latency. This is the raison d’étre for MultiRack SoundGrid, Waves’ audio network and processing platform. SoundGrid employs standard Ethernet hardware to stream audio and moves the plug-in processing to a dedicated DSP server, yielding lower latency, higher channel count, a more stable environment, and recording capabilities via the network. Audio is streamed from the audio interface card to the server, processed with Waves plug-ins, and streamed back to the card. Implementing a MultiRack SoundGrid system is a bit more involved than a Native system, requiring a computer to run MultiRack SoundGrid software, a SoundGrid DSP server, SoundGrid I/O interface, network switch, CAT 5e/6 cables, and a USB key for authorizations.
Serve it up!
SoundGrid DSP Servers come in several packages and price points. As you move up the chain, SoundGrid servers support a wider range of sample rates, higher amounts of onboard RAM, and more advanced CPUs, the latter two contributing to decreased latency and the server’s ability to run more plugins. It should be noted that even at the entry level—the SoundGrid Compact Server—up to 34 plug-ins can be used, with less than 2ms of latency. To ensure maximum system stability, Waves recommends using one of the network switches that the company has tested and approved for reliable use with SoundGrid: the ProSafe GS108v3 8-Port Gigabit Switch from Netgear or the HP 1410-16G (J9560A) 16-Port Switch from Hewlett Packard.
InT’YerFace
SoundGrid interfaces are available for Yamaha, Allen & Heath, or any console supporting coaxial or optical MADI I/O. Waves’ WSG-Y16 expansion card is compliant with Yamaha’s mini-YGDAI card format, so it can be used with just about any Yamaha digital mixer from the 01V96i up to the CL-Series (including the venerable PM5D). Each WSG-Y16 supports 16 channels of SoundGrid I/O, and up to four WSG-Y16s may be loaded into Yamaha consoles with multiple card slots—yielding up to 64 channels of plug-in processing(!).
When installed in a Yamaha 01V96i mixer, the WSG-Y16 can be combined with a SoundGrid Compact or SoundGrid Impact Server to create a small-scale, portable live sound system that runs Waves plug-ins. The Compact Server reduces latency to less than 100 samples while the Impact reduces it to around 50 samples (both at 48 kHz). Since the Yamaha WSG-Y16 routes audio via Ethernet, it must be connected to the network switch, along with the SoundGrid Server and computer.

When setting up the SoundGrid network for the first time, you’ll need to check on a few things. Look at the setting for Local LAN Port under Preferences>General. If Local LAN Port is set to None, you’ll see the message “SoundGrid network not found.” When you change to the correct port, the message changes to “SoundGrid network found.” While you’re in there, take a look at the Plug-In Manager tab and make sure the box is checked to select the authorized Waves plugins that have been installed. Next go to the MultiRack Audio menu>SoundGrid Inventory and confirm that all of the system components appear. In Figure 3, you can see that the SG Driver, WSG-Y16, and MultiRack all appear as I/O devices. Last, under the Audio menu, check SoundGrid Connections. MultiRack should appear as a Source to the WSG-Y16, and the WSG-Y16 should appear as a Source to MultiRack, thus enabling bidirectional connections (see Figure 4). When you open the input or output rails in the rack, the correct connections appear.
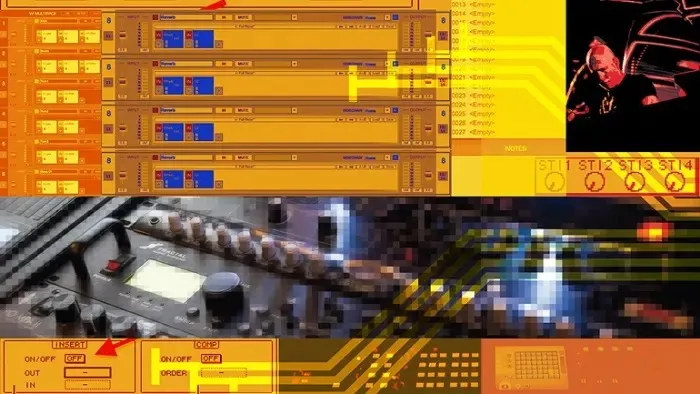
At the 01V96i you need to address a critical parameter or all of your efforts will be for naught. Each input channel has an insert that must be (a) turned on and (b) set to the correct I/O. These settings are accessed in the 01V96i’s insert page by pressing Ø/Insert/Delay in the Display Access section, and then F2 underneath the display. (Follow the red arrow in Figure 5). The On/Off button must be set to On, and the insert Out and In must be set to “SLOT X,” where X is the channel of the WSG-Y16 you wish to use to process the channel. To avoid confusion, make every effort to set the card slot numbers to match the channel number (i.e. use Slot 1 out and Slot 1 in for input channel 1). Once these parameters are set, the channel audio will be routed out of the WSG-16Y to the network, picked up by the SoundGrid Server, processed with the Waves plug-ins of your choice. and returned back to the WSG-16Y.

Tips and Tricks The sequence of processing is critical to your sonic success. If you revisit Figure 2, you’ll notice three plug-ins on the kick drum channel: C1 Gate, CLA-2A Limiter, and API 550A EQ. Audio flows from left to right, so the gate is first in the signal flow, followed by the limiter, and then the EQ. This order is very deliberate. Gating removes unwanted leakage from the kick microphone and keeps it from being processed. If you limit or compress before a gate, dynamic range is reduced, making it more difficult for the gate to do its job. (A gate needs to detect a difference between loud and soft sounds in order to shut out the soft sounds.) The EQ is last so if the limiting action of the CLA-2A changes the high-frequency response, it can be corrected. If you use EQ before a limiter or compressor, your EQ settings may cause the compression to become frequency-sensitive.

When creating racks to process drum channels use copy and paste for faster setup. Start with a channel and create a chain such as the one shown in Figure 2 for Tom 1 (C1 Gate>API 550B EQ), select the rack, choose Duplicate Selected Rack from the Edit menu as many times as you have tom channels, then change the titles and I/Os for the duplicates.
Don’t plug in a reverb on every tom and snare channel. It wastes too much processing power and makes changing the reverb a clumsy affair. (For example, if you decide to modify the reverb decay time for the toms, you’ll have to change the decay parameter on every channel.) Instead, dedicate an input to one rack for a reverb. The 01V96i allows you to assign a Slot Out—in this case, a channel of the WSG-16Y—to any Aux Send (on the 01V96i: Display Access>Patch>Out Patch), so raising the Aux Send on a tom channel routes it to a reverb inside MultiRack. The output of the reverb can be routed back into the 01V96i on any channel (01V96i: Display Access>Patch>In Patch). If you patch the Slot to one of the Stereo Return Inputs in the 01V96i, you save a microphone input (see Figure 6). Aux Send 5 in the 01V96i is patched to Slot 11 out. Slot 11 feeds the MultiRack reverb rack. RVerb is plugged in, followed by Q2 for EQ, and the output of the rack is routed to Slot 13/14. (This rack is mono in, stereo out.) Inside the 01V96i, Slot 13/14 is patched into Stereo Input 1. Now you have Waves reverb in your 01V96i.

Tips Regarding Latency
In SoundGrid Inventory, you’ll see settings for Network Latency and Driver Latency. In general, higher numbers yield higher latency and better performance; lower numbers yield lower latency and decreased performance. A network latency of 96 samples when using the Compact Server results in a barely-audible 2ms roundtrip between the Compact and WSG-Y16 card. (Note that the lowest settings of 40 and 56 samples are supported only by Waves’ Impact, SGS1, and SG Extreme servers.) If you find that system response becomes sluggish, try increasing the latency settings. Latency settings in SoundGrid seem to be much less critical than those in Native, no doubt due to the workload on the CPU.
Another important consideration regarding latency is the relationship between channels that form a group such as drums. In our session, we had different quantities and types of plug-ins on various drum channels, which could cause latency between those channels. For example, the kick channel might be slightly delayed relative to the overhead channels. You’ll know this when you hear it: a slight flanging or comb filtering type of sound. The solution is to create a group for these channels inside MultiRack and use group latency compensation, which can be found under Audio menu>Latency Group Properties. Choosing Auto for the group latency setting automatically time-aligns all channels in a group.
Similar techniques can be applied using other mixing consoles with MultiRack Native or SoundGrid. In any case, the ability to incorporate Waves plug-ins with your live rig is a big advantage and a lot of fun.
