
We’re going to take a tour of one of the great new features that comes with Apple's Logic Pro X 10.5 DAW: Sampler.
This is a bigger and more feature-packed version of Quick Sampler, although they share many of the same characteristics. Learn this one and you should be good to go with Quick Sampler, too.

Step 1: Open a Software Instrument track and select Sampler.

Step 2: Now we’re going to load some audio into Sampler. There are several ways to do this but, for demo purposes, we’re going to drag a guitar sound we have on an audio track into the Zone area as shown. You may need to open the Mapping module and here you will see your sample on note C1, which is the key on your keyboard that will activate it.

Step 3: You can edit the audio in the Zone window or spread the sample across the keyboard range so that more keys play it (polyphonically if you wish). In order to have the sound play the correct time, rather than faster up the keyboard or slower down, press the Follow Tempo button as indicated.

Step 4: So now we have the audio file in and mapped across several keys. However, the root note is currently C1, but we’re not quite sure if that’s correct. We can get Logic to analyse the original sample and map it into the correct position on the keyboard by selecting the Automap Using Pitch Detection option from the Zone drop-down menu.

Step 5: Now you can see that Logic has identified the root sample as really being E1 rather than C1 and mapped it accordingly. (We’ve zoomed in and cropped the range). This is one of the best Sampler features as you can take a simple sample – say a classic synth sound – and easily make an entire ‘instrument’ out of it by mapping it across your keyboard.

Step 6: Now you might want to edit how your sample fades in and out. You can do this via the pencil icons which default to the sample start and end points. Drag them either way to fade in or out. Alternatively use the Modulators section and the Env Amp 1 option to adjust the attack and decay times as shown.
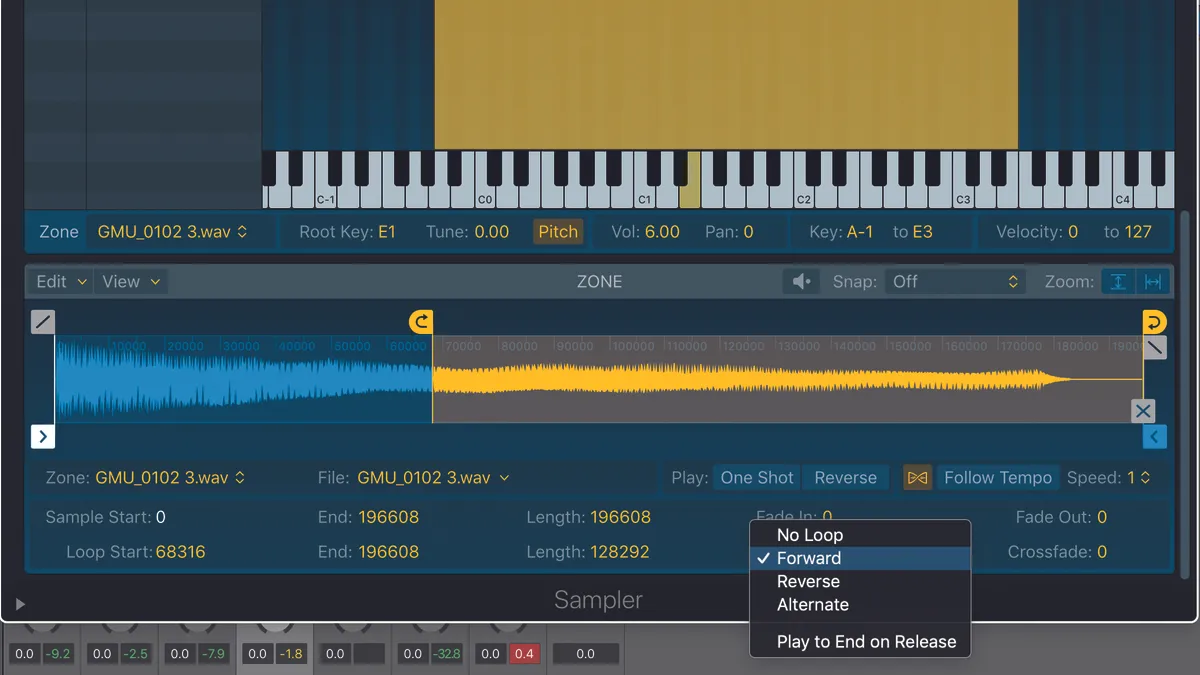
Step 7: Looping is just as easy. Select the Mode drop-down menu at the bottom of the screen which will say ‘No Loop’ and select Forward. You will then get a loop start and end icon which you can adjust. This will loop the contents forwards. Reverse does it backwards, while Alternate bounces betwixt the two.

Step 8: There’s so much more you can do in Sampler, like exploring the Synth section. Here, for example, we’ve applied Filter 1 to our guitar sample, and are now modulating the filter frequency with a random value to get a dynamic squelchy sound with loads of movement. Lots to experiment with here!
