
The mics deployed and their precise placement in and around the drum kit can have a massive impact upon the resulting recordings.
So, while there are no hard and fast rules, here we'll look at some of the most popular options for getting quick and easy results.
1. Choose the right mic: dynamic

First is the dynamic mic, which will often be used on the snare, bass drum and sometimes on the toms. A dynamic mic functions just like a speaker, only in reverse, with the movement of the diaphragm in turn moving a coil in relation to a magnet, creating an electrical signal.
This mic is good for picking up mid-range and is sturdy enough to take the occasional miss-hit. Most dynamic mics use a cardioid pattern, which means they reject sounds coming from behind them while also boosting bottom-end when placed close to the subject.
2. Choose the right mic: condenser
The other type of mic that is frequently used is a condenser mic which, unlike the dynamic mic, needs power sent to it from the desk or pre-amp. This 'phantom power' is sometimes available on individual channels of a desk, though it can be sent globally to all mics without affecting other dynamic mics.
This power supplies a small amplifier inside the mic that increases the signal picked up by the movement of a diaphragm, this time a capacitor. Condenser mics also tend to be more sensitive than dynamic mics because of the low mass of their moving parts but usually have built-in pad switches (10 and 20 decibel increments) to enable them to handle the levels us drummers are capable of delivering.
3. Bass drum miked inside: miking the bass drum from the inside has the advantage of isolation, weight and definition
One problem often encountered when miking the bass drum comes if the drum is fitted with a full front head. In this case, placing a mic in front of the drum will work, but it can lack the definition and isolation of placing a mic inside the drum (as above).
But, there are a couple of options…

4. Bass drum miked outside: using two out-of-phase mics in front of the bass drum will capture the ambient sound of the front head
Firstly, miking the batter side of the drum will have more definition, while adding a second mic in front of the drum 'out of phase' (more on this shortly) will capture the ambient sound of the front head. However, the pay off for having the mic outside of the drum is more bleed from the rest of the kit and less attack than if it were placed inside.

5. X/Y overhead miking: two mics placed directly above the kit captures the stereo image with no phasing problems
There are really two main options here, an X/Y (or coincident) pair or a spaced pair. The X/Y configuration involves placing the two overheads directly above the kit with their capsules next to each other. This is a good way of capturing a stereo image of the kit with no phasing problems, as the sound of the kit reaches both mics simultaneously.

6. Spaced pair overhead miking: spreading the overhead mics further apart captures a wider stereo image of the kit
For a wider stereo image, spreading the mics apart as a spaced pair is more effective. However there is now a risk of phase cancellation - where the signal from the source reaches each mic at different times, thereby cancelling itself out. We can check for phase cancellation by taking two channels and using the pan control to sum them to mono. With one fader up as the other is blended in, the sound should remain full
with good bottom-end. If out of phase, the two channels will sound hollow when heard together. The solution is to either move one of the mics until this improves, or reverse the polarity of one mic. In the digital domain the waveform can be inverted after it is recorded for the same effect.

7. Snare miking position #1: a snare is miked from the top, with the mic pointed to the centre
If given another mic and channel, the next drum we would want control over would be the snare. The snare would usually be miked like the toms, from the top, three fingers away and at the edge of the drum and pointing at the centre. The three-finger rule can help keep the mic away from unwanted harmonics from the edge of the head and hoop, while aiming it at the center helps capture the stick sound at its point of impact.
Moving the mic away from this point will introduce more 'air' or ambience into the sound and moving it closer, if using a dynamic mic, will introduce low-end as a result of what's called the 'proximity effect'. This can be useful to a point, however if you get too close, the proximity effect will render sound unnatural or unusable.
A dynamic mic is usually the mic of choice here and, surprisingly, the relatively cheap Shure SM57 wins over more expensive alternatives thanks to its ability to capture the mid-range and handle the high SPLs (sound pressure levels) a loud 'two and four' backbeat is capable of delivering. On the subject of miking the snare, if you are playing a cross-stick part, as well as turning the stick around to play with the butt end, pointing the mic at the point where the stick hits the rim can help capture a stronger sound.

8. Tom miking: you can get a more defined tom sound by bringing the mics lower
With a four-mic set-up, neither of our overhead options, although giving a natural representation of the kit and clear cymbal sound, will give much definition from the toms. So one final overhead option is to bring the mics down low. This approach is more effective on smaller set-ups such as four- or five-piece kits which, with a mic
looking at the kit between the hi-hats and first tom and another looking over floor tom towards the ride cymbal, both set equidistant from the snare and bass drum, will give a fuller sound than with the mics above the kit.
In the case of the toms, you'll also hear their sympathetic overtones ringing away as other drums are hit. When miking the toms, the choices are varied - the most popular being dynamic mics or small condensers. However, depending upon the budget, large diaphragm condensers can sometimes be used.

9. Hi-hat miking: hi-hats should be miked using a small condenser mic placed 2"-3" away
If we have channels left, the next part of the kit we would mic would probably be the hi-hats. These would usually be miked using a small condenser mic from above, 2"-3" away and sometimes pointing away from the kit. The proximity effect has to be taken into consideration here - get too close to the cymbals and they will take on a gong-like quality. This can be EQed out but is best avoided. Another thing to avoid is placing the mic so that it faces the point where the air escapes from the hi-hats (also a good reason not to have a fan pointing right at the kit on hot gigs).

10. Snare miking position #2: A second mic below the snare will capture the sizzle of snare wires
Some people like to also mic the bottom of the snare. This can work well when blended in with the top snare mic, as it helps to capture some of the sizzle and pop of the snare wires. To do this, one of the mics should have its phase reversed.

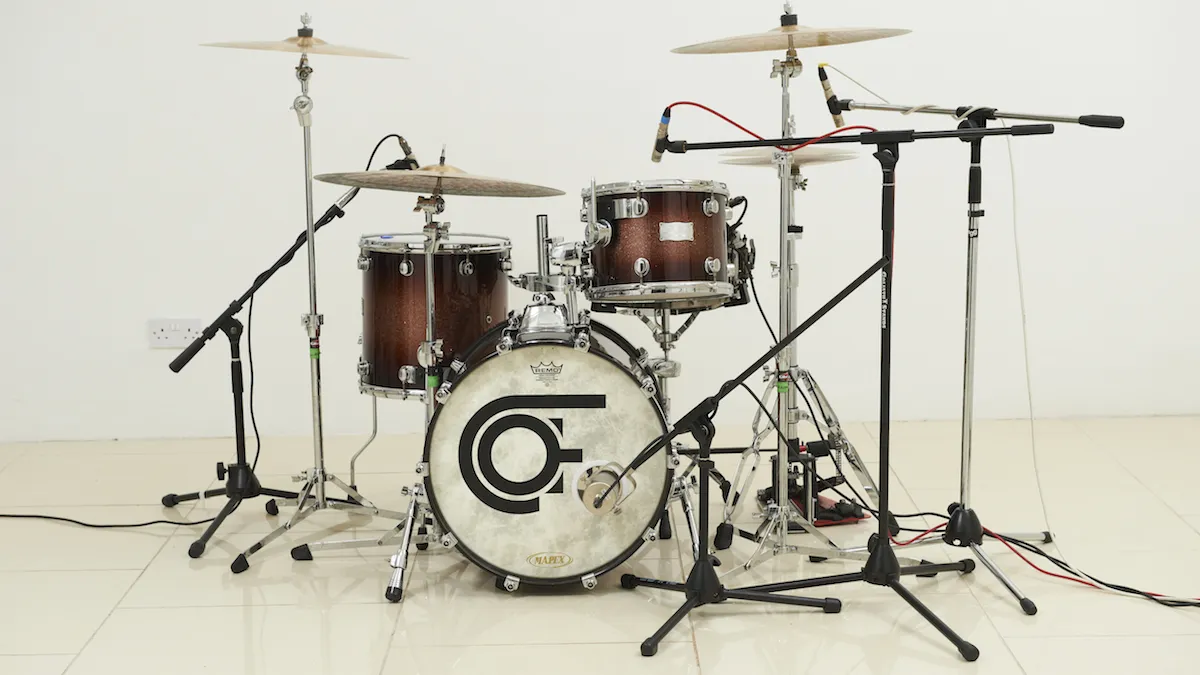
11. Room miking behind the kit: the four-mic set-up
If recording in a nice-sounding room and you have the luxury of spare mics and channels, putting up room mics can provide some useful natural ambience, which can really bring the sound of the kit to life when dialled into the mix.

12. Room miking front: a large condenser mic in front of your kit is a logical place to start
If you are recording in a smaller, not so nice sounding room, a single ambient or room mic set a few feet away from the kit can also be used to create artificial ambience using reverb, but more of that later.
13. Try a sub mic for the bass drum
One additional mic that can make an enormous difference to the drum's sound is a sub mic for the bass drum, and although there are ready made products out there for this purpose such as the Yamaha sub-kick, a driver from an NS10 speaker (though any mediumsized speaker should work), will achieve a very similar effect for a lot less money.
Mounted on some kind of stand and with a microphone cable connected with no ground and plugged into a regular channel with the phase reversed (simply re solder the '+' and '-' the other way around if you can't 'flip' the phase on your desk), this speaker will work as a huge dynamic mic and add serious low end to your bass drum sound.
