We've long been fans of Reason's flagship synth Thor, so were delighted to see it arrive in iOS form earlier this summer.
While we've often waxed lyrical about our love of Thor's semi-modular design and excellent analogue-inspired feature set, the synth's wavetable oscillators are a powerful feature that often gets overlooked.
In the two step-by-step guides below we use Thor to create a classic modulated wavetable patch and, while we're at it, a classic PPG-inspired choir sound.
By the time we're through, you'll have a clear understanding of what makes a wavetable synthesiser such a brilliant alternative to plain ol' analogue instruments.
So let's fire up the Mighty Thor and see if we can stir up a storm.
This guide is part of Sound Essentials, which continues each month in Computer Music. Grab the October issue (CM 195) for loads more tutorials, guides and software reviews.
Recreating a modulated wavetable sound in Thor

Step 1: We'll start by firing up Reason and creating a Thor device (or you could simply call up Thor on your iPad, of course). Use the Edit menu to access the Reset Device command. This will initialise the instrument's patch (alternatively, in the app version, simply open us the Init patch). Currently it's just a raw analogue sound. Click or tap the arrow in the top-left of the oscillator to choose the Wavetable oscillator.

Step 2: Wouldn't you know it? The default wavetable in the Wavetable oscillator is yet another analogue sound! No matter, we know what we want. Click or tap on the Table Select display to open the list of available wavetables. Select Mixed Waves 1 - this one contains a diverse range of waves and will be good for the typical PPG sound.

Step 3: Now, I want you to play and hold a note, while at the same time gradually turning the Position knob. You'll hear the waves fading from one to the other. The PPG couldn't actually do this with a full wavetable; it jumped abruptly from one wave to the next. We can better simulate this effect by turning off the X-Fade function.

Step 4: Now try playing and holding a note while turning the Position knob. Wow! That's a very dramatic effect - and a bona-fide classic one at that. Let's take a look at the Routing matrix; nothing is assigned at the moment. Let's select ModEnv as the Source for the first slot, and Osc 1 » Pos as the Destination.

Step 5: Got it? Okay, next let's set the Amount to a full 100. This will tell Thor that the position in Oscillator 1's wavetable should be modulated by the Modulation Envelope to the fullest allowable amount. Go ahead and play and hold a note. There's the classic PPG "gargle"! Now just to make some minor adjustments.

Step 6: Finally, increase the Mod Envelope's Attack to 550ms and its Decay to 13 seconds. The Release should be 6.7 seconds or so. While you're at it, increase the Amp Envelope's Release to 5 or 6 seconds and activate Thor's built-in Delay for some added sweetening. Beautiful! Save that patch and then reset the device to begin again.
Setting up a classic PPG choir patch using Thor

Step 7: Now, as promised, we'll create a variation on the elusive PPG choir. This one is based on a slightly customised version of a factory patch residing in the PPG Wave 2.2. We'll need to call up the Wavetable oscillator again, only this time we'll select the table called PPG 27 Formant.

Step 8: Reduce the OCT value to 3 and set the Position knob to 85. We'll once again want to de-activate the X-Fade function. Set the Amp Env's Attack to around 17ms and push its Decay and Sustain up to the max. Set the Release to a little over 2 seconds. It sounds a little better than last month's attempt, but it's still not there.

Step 9: Let's tweak the filter a little. First, reduce the Frequency to around 360Hz or so. Set the Resonance to 16. Push the KBD knob up about halfway. This will cause the sound to get brighter as higher notes are played. Set the Filter's Env knob to about 33. The Filter mode should be set to 24 type 1.

Step 10: Set the Filter Envelope's Attack to around 2ms and crank the Sustain up to the max. Set its Release to 8 seconds. Now, let's go to the Routing matrix. Set the first slot's Source to Voice Key » Note (Full Range). Set the Destination to Osc 1 » Pos and the Amount to 100. We're getting close!

Step 11: Next, in another slot, set ModEnv as a source and Osc 1 » Pitch as its Destination. Set the Amount to 22. Now let's look at the Mod Envelope. Push the Delay to around 1.9ms. Set the Attack to under 1ms. The Decay should be 120ms or so and the Release should be set to 4 or 5 seconds. Get it as close as you can.
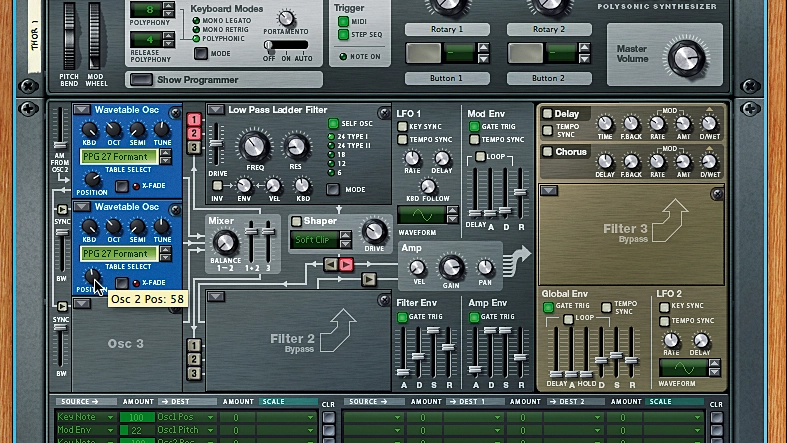
Step 12: Now some final tweaks. We bump up the Table Position of Osc 1 to 91 and add another Wavetable oscillator at a low level to fill out the sound a little. This second one can have slightly different settings and mod amounts, but should have the same wavetable. Ah, now there's that classic PPG choir sound!
