The biggest new addition to Live’s arsenal of devices in version 10 is a powerful but intuitive two-oscillator wavetable synth capable of generating a limitless array of basses, leads, pads, FX and other sounds.
Let's take a tour…
For much more on making music with Ableton Live 10, pick up the February 2018 edition of Computer Music.

Step 1: Wavetable is Live 10’s brand new two-oscillator wavetable synth. A wavetable oscillator houses a collection of individual waveforms, which you can scan through using the wave position slider.

Step 2: Fans of popular wavetable synths such as Xfer Serum might be disappointed to hear that you can’t import your own wavetables; but there are tons of preset wavetables - choose them from the dropdown list. 11 categories are available, containing everything from aggressive timbres and realistic instruments to more vintage tones, formant growls and weirder ’tables.

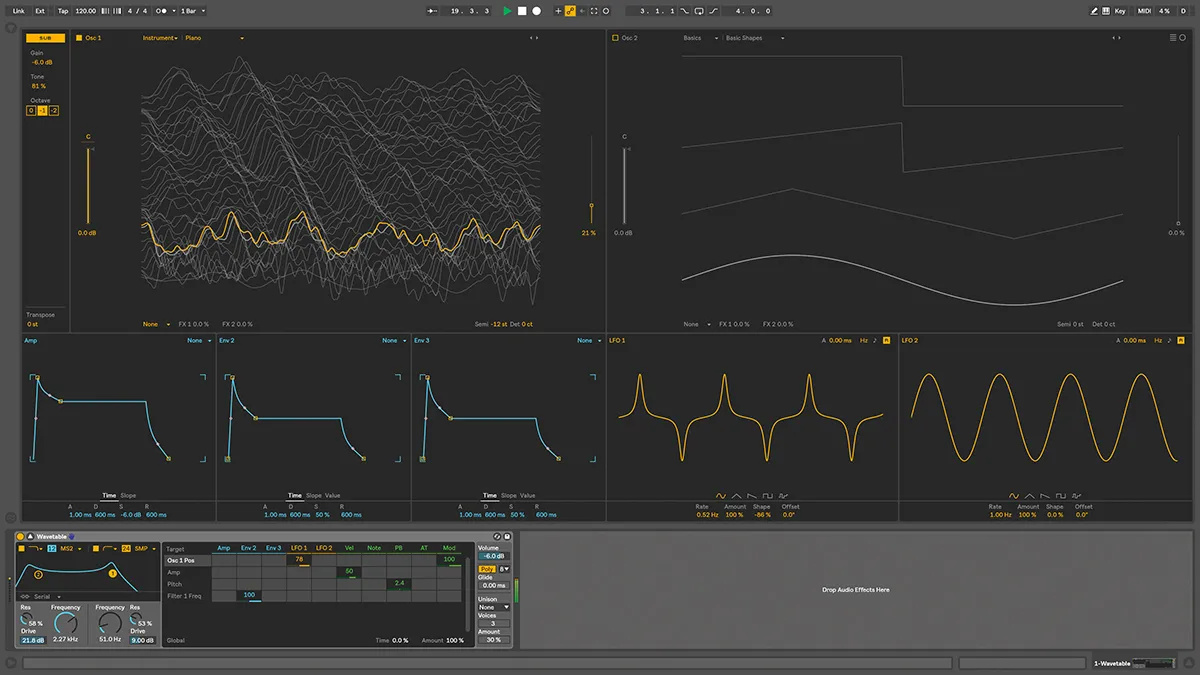
Step 3: Just like EQ Eight, Wavetable’s interface can be expanded by clicking on the arrow toggle button, then dragging the top edge up to stretch it into full-screen mode. Like all modern wavetable synths, Wavetable offers a visual 3D representation of your wavetable and the current ‘playhead’ position. Click the upper-right visualisation switch to change the views to circular displays.

Step 4: Semitone and Fine tuning controls sit under the display, which we’ll use to pitch our oscillator down an octave. Each wavetable oscillator also houses a Sub oscillator, with controls found in the top left of the oscillator section. Handily, you can raise the Tone amount to dial in harmonics and saturate the sub oscillator, for more bottom-end girth.

Step 5: Any synth needs a decent filter… and Wavetable has two! A pair of multimode resonant filters, in fact. Just like with Auto Filter, Sampler and Simpler, Live’s new synth features switchable analogue-modelled filter algorithms designed by DSP wizards Cytomic.

Step 6: Modulation is assigned via the Mod Matrix. Sources go along the top, and destinations are listed vertically up the left side. The last parameter you touched will appear in the destination list. To apply modulation, drag up or down the box where source and destination intersect. We’ll apply positive modulation to the Wave Position via LFO 1, and use Env 2 to modulate Filter Frequency.

Step 7: For modulation sources, Wavetable features three envelopes and two LFOs. There are five LFO shapes: sine, triangle, saw down, square and sample-and-hold. You can Sync the LFO to host tempo, and Shape the LFO waveform to skew the modulation curve in interesting ways. Our jagged sine shape is nicely rhythmic.

Step 8: Wavetable’s three identical ADSR envelopes should be familiar to anyone synthesist. The first governs amplitude, and the other two are freely assignable. As well as featuring Time, Slope and Value settings for creating custom shapes, the envelope can be looped via the top-right dropdown menu.

Step 9: You can apply one of three oscillator effects, operating at waveform level. FM is a frequency modulation-style effect; Classic is essentially pulse width modulation and osc sync; and Modern is like the Classic mode, but uses phase distortion. In the Unison section, you can set the number of unison Voices, one of three Types, and the Amount of intensity, which changes with the different Types.
