
Creating your own effects sounds gives you unprecedented control over their timbre and length. Simply changing the modulation rates and waveforms provides you with new variations so the effect remains interesting throughout your arrangement.
For this tutorial we’ll design a dynamic FX riser that increases its intensity over time. This is achieved by using two LFOs, one of which is modulating the other’s rate.
When it comes to waveforms, most can be a suitable choice for designing FX sounds. We deliberately chose a sawtooth for its rich harmonic structure for this feature, but it’s also available across multiple subtractive synthesisers.
Our tool of choice is Arturia’s Pigments as it offers creative modulation options. These include the ability to modulate unison voices, spread and phase position of the wavetable. Also, being able to adjust the curve shape from linear to exponential is a very useful option.
Bandpass filters work wonders with FX, allowing the producer to target a specific frequency range and control its energy. This will play a big role in developing the sound we are creating today.
The final piece of the puzzle will be adding effects such as a delay and flanger. These effects will increase the stereo image of the sound as well as introducing additional movement and sonic interest.

Step 1: The first step is to load Arturia Pigments – or similar subtractive synth – into your DAW. Then click Menu and New Preset. This will initialise all of Pigments’ parameters to its default state. If you play the keys on your MIDI keyboard you should only be hearing a raw, unaffected sine patch.
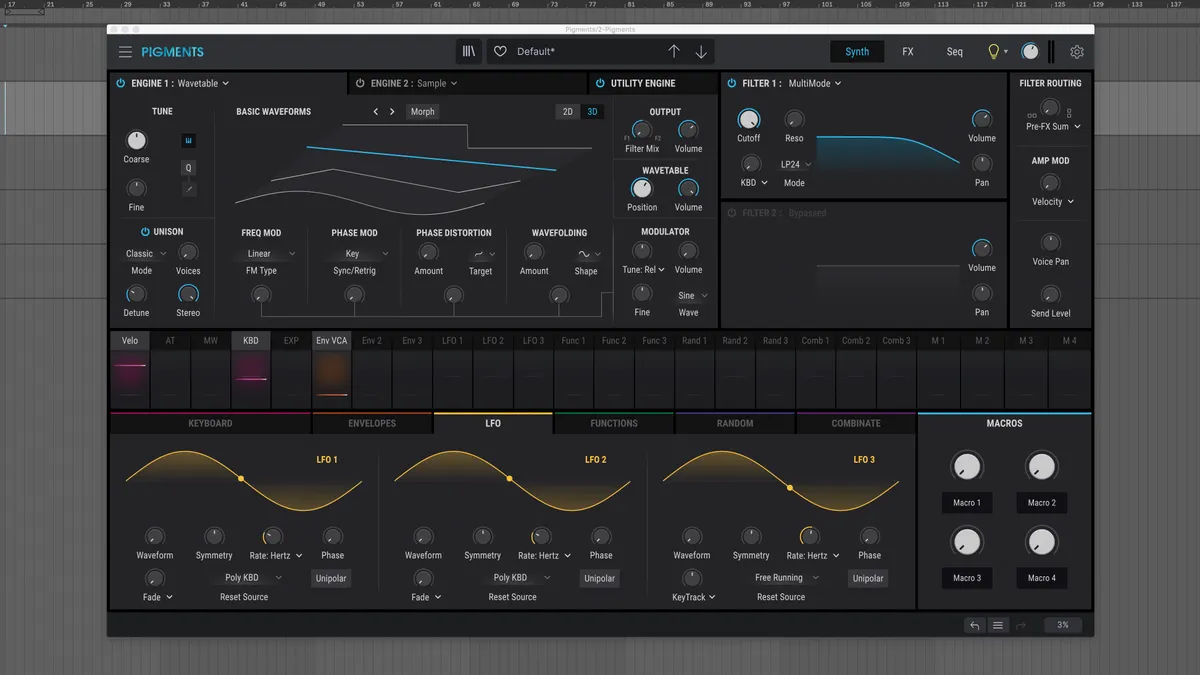
Step 2: First, make sure your oscillator engine is set to Wavetable. Click Morph to disable its morphing function. This will enable us to pick the precise sawtooth waveform using the Wavetable Position parameter. We could’ve selected the analogue engine for the basic sawtooth, but wavetable synthesis gives us access to additional sound sculpting.

Step 3: The core sound of this FX patch is a dynamic pitch movement over time. The first modulation assignment is LFO to Tune Coarse. Click on LFO 1 and increase the Tune Coarse modulation amount to 0.30. The rate of LFO 1 can stay at its default setting.

Step 4: Next, LFO 2 will be used to control the speed of LFO 1. This is how the complexity of the patch is generated. We want a gradual increase of LFO 1 rate which requires a ramp up LFO. Set LFO 2 to Unipolar. Symmetry to 1.00, Triangle waveform selected and phase to 180º.

Step 5: The LFO 2 rate is currently set to Hertz. We can sync the LFO to the project BPM. This will allow us to achieve a precise duration of bars for the length of the effect. Set LFO 2 Rate to Sync Binary. Click on LFO 2 and increase the LFO 1 Rate modulation amount to 0.40.

Step 6: Let’s set up an envelope to control multiple parameters and further enhance the FX patch. Set the attack to slow, around eight seconds. We want the modulation to increase as time progresses. This can be further emphasised by transforming the curve shape to exponential. Set the Attack Curve to 2.72.

Step 7: Now that we have the Envelope curve set up we can start to assign it to various destinations. Let’s set the filter by choosing a bandpass mode BP12 in the mode selector menu. Increase the resonance to 0.55 and lower the cutoff position to around halfway. Click on ENV 2 and increase the Filter Cutoff modulation amount to 0.33.

Step 8: To expand sound in the stereo field, increase the voicing and stereo amount of the unison. We can program these parameters so the changes happen over time. Set Unison Stereo to 0% to make the patch start in mono. Then click on ENV 2 and tweak the Unison Stereo modulation to 1. Click ENV 2 and raise the Unison Voices modulation to 0.20.

Step 9: We can make use of the additional wavetable parameters that’s at our disposal to further develop the sound. Make use of the same ENV 2 and assign it to the Phase Mod Sync/Retrig, dialling in an amount of 0.80.

Step 10: Delays are always a safe choice to help smooth out your FX patches. For this sound we stuck with the stock delay in Pigments, increasing the Dry/Wet to 25% and increasing the Stereo Spread to 0.054.

Step 11: Another effect worth looking into is a flanger. Not only for its distinct character but also the intensity and movement that it imparts. Dry/Wet increased to 54% and feedback dialled in at 84%.

Step 12: Lastly, its a good practice to export your synthesised FX patches as a WAV or AIFF loop. This makes it easy to quickly reuse the same sound in your new projects without loading up unnecessary CPU power. You now also have the option to reverse the audio sample for a different type of effect.
Pro tips
Chorus noise FX
White noise is often used for rise, fall or impact FX. A lot of the time it can sound plain and too harsh. To combat this, apply some chorus effect: this helps soften the transients, increases the width and adds subtle movement.
Using a flanger on your delay
In order to create some additional movement to your delay lines, add a flanger on your delay return channel. Try setting the flanger rate to slow for a longer, shifting effect.
