Cleaning your acoustic drums and cymbals is a matter of pride – nothing says ‘I don’t care’ to the rest of the band, and to any other drummer around, more than an unloved drum set. But your play-at-home electronic drum set can look just as sorry for itself, and can quickly appear more worn and uninspiring to play after just a few weeks or months of neglect. It’s pretty hard to get enthusiastic about playing a dusty e-drum set covered in stick marks, and mesh heads that show blood, sweat, tears and who-knows-what-else stains.
We often get asked ‘how do I clean my electronic drum set’. E-kits feature a lot of components and tech which are integral to their operation, so it's understandable to feel trepidatious when it comes to giving them a clean. To help out we've called on our pals at Roland for some expert advice. So, whether you've just got a new set, or you have an older e-kit in need of some love, if you follow the methods and use the products recommended in this guide, you'll be able to spruce up your gear, worry-free.
This guide, compiled by Roland’s Global Strategic Product Marketing Manager Jules Tabberer-Stewart, will get your kit looking pristine, back in order, and renew your love for playing it. Here’s his advice…
Basic dos and don’ts

Before we get into what products to use for cleaning your electronic drums and how to clean them, there’s a few fundamental things to note. Just like the feeling that a clean car drives better or goes faster, you’ll fall in love with playing your electronic kit all over again once it’s clean and set up perfectly. Looking after your drums will also help protect your investment in case you decide to upgrade and sell them on.
Your objective is to clean the kit gently, without damaging anything, so take it step-by-step and take your time. We’d recommend a routine of cleaning little and often – it’ll save you time in the long run. Another thing to consider within maintenance are module updates, pad positions and cable connection checks – our modules can be updated, just like the software in your phone, bringing new functions or bug fixes. These are available on roland.com.
It’s also worth checking that cables are inserted correctly and the correct cables are connected to the right inputs. Finally, are pads firmly in place and fitted with the correct accessories such as felts and pivot mounts? This will also help your drums play smoothly and enable you to get the most from them.
Here’s three things you should do when you want to spruce up your e-drums:
- Backup and power off. Most kits and settings in your e-drums can be backed up to a USB key or SD card. Create a backup of all the settings first (just in case you need to restore or reverse an accidental settings change), then power the kit off before cleaning.
- Move the kit to clean it. It’s not just the kit itself, but all the dust and stick debris that can accumulate behind the kit and around it that you need to get to. Lift and move the rack and even consider taking pads off of the stand, one-at-a-time, to get a really satisfying, deep clean.
- Use the opportunity to tidy the cables. With some black electrical insulation tape, you can hide all those unsightly cables that you didn’t sort out when you first built the kit (when you were impatiently keen to get playing).
And, here’s things to avoid when cleaning your e-drums:
- Don’t use water. It may sound obvious, but electricity, electronic equipment and water do not mix. It’s okay to use specific liquid cleaning products in tiny amounts (read on for what to use)… but don’t expect to use a bucket and sponge to soak your pads clean!
- Don’t use abrasives. Rubber, painted metals, chrome, plastics… all of these materials will be permanently scarred if you use a scouring pad, abrasive, gritty or industrial cleaner fluids, or anything that can mark a soft surface. You need to use soft cleaning materials.
- Don’t ignore any damage. If you spot something that’s damaged, broken or may cause an issue, continuing to play the kit without sorting it will lead to breakages and more damage, and lost practice time and frustration. If you spot something that needs attention, you can order a spare or maybe get it repaired. Talk to your local drum shop for advice, or to order spares.
What you will need

Here’s a quick list of things that make cleaning your e-drums quick and easy, and will leave them in great-looking condition.
Essentials:
- Microfibre cloths. Don’t be tempted to go for cheap, yellow furniture dusters, old t-shirts or rags. Microfibres will lift the dirt better, and can be washed for use again.
- Furniture polish. Regular, domestic, multi-surface household furniture polish will leave your kit smelling clean and looking shiny. You can even purchase specialist furniture polishes that are ideal for home electrical items like TVs. Don’t use anything with oil or wax in it, such as ‘made for wood’ polishes.
- A soft bristled, one-inch paint brush. This will help you get into all those areas that are hard to reach, or where dust really settles in.
For that extra touch:
- General purpose liquid household cleaner or dishwashing liquid
- A soft-bristled, hand-sized scrubbing brush
- Glass spray, or cellphone/mobile phone screen cleaning spray and a specific screen cleaning soft cloth
- Automotive rubber and dash detailer, such as Meguiar’s Natural Shine Vinyl & Rubber Protectant, Autoglym Vinyl & Rubber Care, or Armorall Protectant for vinyl, rubber and dashboards
How to clean e-kit cymbal pads

It’s easier to start cleaning from the ‘top’ (the higher-up components) of your kit and work your way down – so, begin with the cymbals first. It’s worth removing the cymbals fully from the cymbal arm to give them a really thorough clean.
Rubber and plastic e-cymbals easily mark, but these blemishes are usually temporary and can be cleaned off (or at least minimised) by using a silicone-based rubber dressing. Generally, most domestic multi-surface furniture polishes contain silicones, which make them suitable for the job of bringing rubber and plastic back to a shine.
If by chance you have metal e-cymbals, we would recommend you give them a simple dust off and nothing else - just focus on the rubber edging for cleaning. If you really must clean the metal surfaces, refer to the manufacturer’s advice.

To clean your rubber/plastic cymbals, begin by applying a small amount of polish (just a short press of the trigger) to the microfibre cloth. Don’t spray the polish directly on the cymbal, in case it leaves a stain. Choose an inconspicuous area of the cymbal (such as the underside edge) and gently work in the polish by rubbing the microfibre cloth over the surface, turning the cloth to leave a smooth, satin finish. If all looks good, proceed to clean the whole surface of the cymbal in the same way.
If you’re going for the best finish, this is where the automotive rubber and vinyl detailer comes in handy, and will do the best job of all. As you did with the polish, follow the same process; apply product sparingly to the cloth and not the cymbal, test on an inconspicuous area first, then repeat the process over the rest of the cymbal if all is good. Finish with a clean microfibre cloth for a super-smart sheen.
This is a good moment to mention the relevance of the microfibre cloth – traditional yellow household dusters leave fibres on the surface of the rubber when the polish dries, ruining the finish. A clean microfibre cloth leaves no trace, just a smart, clean finish.
How to clean e-kit snare and tom pads

There are mainly two types of electronic drum pads – rubber pads (or sometimes silicone), and mesh-head pads. Regardless of the type of pad, it’s best to remove the whole pad from the rack before cleaning.
Rubber pads can be cleaned in much the same way as cymbals – spray polish (or your automotive rubber and vinyl detailer) onto a clean microfibre, and not the rubber pad itself. Work into an inconspicuous area to test, then repeat over the surface of the pad.
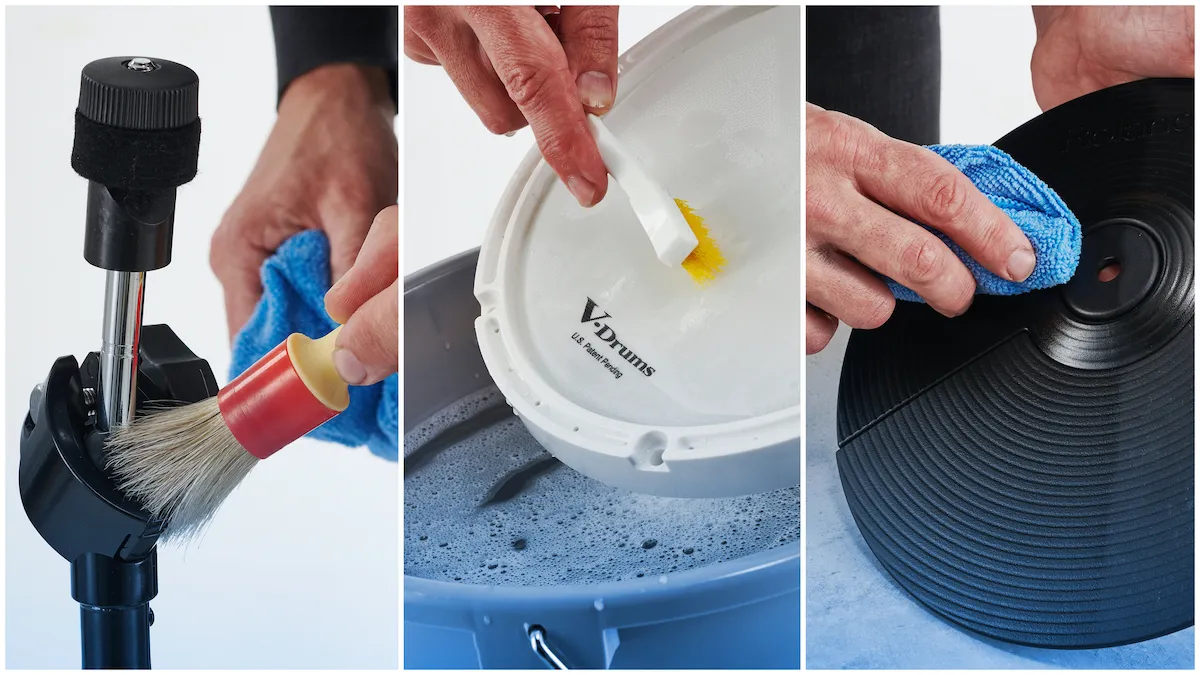
Mesh-head pads are a little more involved when it comes to cleaning. Start by removing the mesh head from the pad totally. Roland V-Drums are the original mesh head e-drums pad, with many other e-drum manufacturers following suit – we’re describing the Roland method of head removal here, but other e-kit mesh pads will likely work in the same way.

Undo all tension rods and carefully remove them (putting washers and rods in a container to keep them safe), before lifting the hoop off, and then removing the head. Use a microfibre cloth to wipe away the accumulated dust and stick debris from the hoop and the mesh head, being very careful not to touch the inner working electronic parts from around the pad frame. Once the worst of the dust is removed, now take a fresh microfibre, apply some polish or rubber and vinyl detailer to the cloth (not the pad) and gently wipe it over the surface, turning the cloth for a dry and clean finish.
If your mesh head is fairly clean already, you can reassemble the pad by putting on the head, then the hoop, and then re-inserting the tension rods.
If your mesh head is stained or really grimy, read on for how to clean them before reassembling the pad.

PRO TIP - When re-tensioning the mesh heads, just like with an acoustic drum, make sure the tension at each rod is even by applying an equal number of turns to each one. Make the head tension of the snare pad the highest tension, then tom 1 a fraction looser, tom 2 looser again, and so on. As each pad has slightly higher tension than the next, you will have a stick feel similar to playing a 10 inch tom, 12 inch tom, and 14 inch floor tom of an acoustic kit.
How to clean e-kit mesh heads

Roland mesh heads are made of a proprietary material, and are very hard wearing, so will withstand a clean with water. But, the pad won’t! So, be absolutely certain to remove the mesh head from the pad completely before cleaning it, and definitely do not get the pad itself wet or near any water.
Once the head is removed from the pad, we’d recommend running a sink of warm, not hot, water with just a little dish washing liquid in. Take a brush, such as a soft nail brush, and dip that into the soapy water. Use the wet brush to agitate the surface of the mesh head that has been removed from the pad, and you should see the grime come away, leaving a clean white surface. Don’t use excessive hand pressure when scrubbing, go steady. Don’t be tempted to soak the heads, as the metal hoop can corrode in water.
Definitely do not get the pad itself wet or near any water
The head can be rinsed in fresh, clean water after scrubbing, but it needs to be thoroughly dry before being refitted. Leave the heads to air dry in a warm (but not hot) place that’s out of direct sunlight, like a laundry airing cupboard or warm room for 24 hours, and make sure there is no water around the hoop area before refitting to your V-Pad.
Not all mesh heads are the same though – they can likely be cleaned using a similar method to that recommended by Roland V-Drums, but check manufacturer guidelines for your kit before proceeding.
How to clean an e-kit kick pad

Kick pads for e-drums come in a number of configurations – rubber, cloth and mesh, mostly.
To clean, remove the kick pedal from the kick pad, then use a cloth to clean the pad and the pad frame/tower. Mesh kick pad heads are removable, so can be cleaned using the same method as described for mesh heads. Rubber kick pads can be cleaned in the same way as cleaning rubber tom pads.
For kick pads that use a cloth playing surface, the cloth pad itself just needs a simple wipe with a damp (not wet) cloth, while the rest of the tower can be cleaned using the same polish or rubber and vinyl detailer and a microfibre cloth.

The kick pedal in particular is always a trap for dust and dirt, so while the kick pedal is removed, give the pedal board, under the pedal board, and the chain a good wipe down with a damp cloth.
How to clean your e-drum module/brain

When it comes to cleaning the drum module itself, extra care needs to be taken. The electronic components inside are sensitive, as too are the external controls and dials.
Start by backing up your module and its settings before you begin – most drum modules can be backed up to an SD card or USB, following the manufacturers instructions in the user manual. This will mean that all your settings and sounds can be restored easily, if needed. Once the module is powered off, remove the module completely from the stand.
The plastic screen is a sensitive area of the module that is easily scratched by cleaners and cloths. You need to avoid using a cotton or microfibre cloth on the screen, or you’ll create swirl marks which will reflect in the light when you look at the screen. The best way to clean the screen of the module is to use the kind of screen cleaning fluid and soft cloth that’s used on smartphones and tablets. If you don’t have any of that to hand, just use a clean, damp cloth that has a fine texture and use light, and not firm pressure, or use household glass spray and a soft paper towel.
The rest of the module’s external shell can be cleaned using household furniture polish or automotive detailer, but being careful to spray onto the cloth and not the module itself to avoid getting fluids in the switches or inputs and output jacks.

If you have sliders/faders that are covered in dust, you can use a fine paintbrush or a cotton bud to wipe out any dust and debris.
It’s worth taking a moment to check that the module is running the latest version of software by checking the manufacturers website for any updates. You might need a USB cable, or an SD card or USB flash drive to be able to install any update. Just make sure you back up your data and settings, before performing an update.
How to clean your e-drum rack/stand

The final part of the kit that will need a clean is the stand itself. All of the clamps and intricate areas of piping and thumb screws are perfect for harbouring dust and debris. This is where your dry, clean paint brush will come in handy.
Start by removing the cable loom from the rack, and then wiping down the stand with a microfibre cloth, getting it into all the areas around the pad clamps to wipe away dirt and dust. Also give the cable loom itself a careful wipe to rid it of trapped dust.

If you have areas of the stand that are really grimy and hold a lot of dust, take out your paint brush and work it into the areas, which should start to bring out and wipe away any long-established dust in and around the detailed parts of the clamps.
Putting the kit back together

Once all the components are clean, reassembly is the last step (check out MusicRadar's article on how to set up an electronic drum set for a detailed look).
Put all of the pads back onto the mounting clamps and set them in the correct position first. Next, fit the module, and connect the cable loom to the module. Now, connect each cable to the appropriate pad, making sure you follow any labelling and also ensure that the cables are connected in such a way that the wires don’t criss-cross or obstruct one another. This will make tidying the cables easier.

Next, use some black electric tape to secure the cable loom to the stand itself. It’s often easier to start by working in the area furthest from the module (i.e. crash 2, tom 3 or 4 and the ride), and gradually work your way toward the module, taping any cables to the stand and cymbal arms as you go. Make sure you leave enough cable slack around the cymbals for them to swing and sway – if the cable is too taped tight, the cable may pull out of the pad as you hit.
Finishing touches
For finishing touches, think about a dedicated drum mat or carpet, or ways to suppress noise or vibration such as Roland’s dedicated Noise Easters for V-Drums, that fit under the pedals to minimise noise to people below you as you drum.
Keep cleaning regularly, and it should avoid the need for a long cleaning session down the line. Your electronic kit should now be clean, up to date, in fine working order and ready to enjoy with fresh enthusiasm - just like the day you got it.
- How to clean you piano keys, step-by-step
