9 vital vocal processing tips
Make much more of your vocal takes and avoid a few pitfalls with these tricks and techniques

Want all the hottest music and gear news, reviews, deals, features and more, direct to your inbox? Sign up here.
You are now subscribed
Your newsletter sign-up was successful
Recording, arranging and processing vocals isn't meant to be an easy task, what with them being central to the vast majority of tracks that feature them; but with our guidance, you'll be off to a flying start.
For much more on vocal production, grab the May 2018 edition of Future Music.
1. Build your own harmonies
The notes sung as backing vocals are often at different pitches to the lead. They’re usually ‘harmonising’ notes, which are pitches from the chord playing in the backing track, to increase the impact of the lead.
If you’re new to vocal recording, suggesting harmony parts with a vocalist in the room can be intimidating. Using plugin tools like Melodyne or Auto-Tune to create harmonies can be a great way to melt the ice and take the pressure off. If you don’t like the sound your ‘generated’ harmonies produce, you can always use them as a guide vocal for your singer to replace.
2. Keep an eye out
Check your recorded vocals through a frequency analyser when EQing. You might find that there are bass frequencies present that you just don’t need (in which case, use a low shelf or high-pass filter), or identify exactly which frequencies are producing sibilance. Using your ears is best, but double-check with your eyes too.
3. Go to the extreme
Vocals make great source material for heavily processed textures. Transferring vocal takes into your sampler lets you trigger single notes or phrases a few tones or entire octaves away from the original pitch, for double or half-speed treatments. Timestretching is great, too, either for deliberately sound-designed warps or using settings so extreme that new textures are imagined. Paulstretch is a great programme for this. And if ‘regular’ samplers aren’t mashing up your vocals enough, any plugin that allows for granular resynthesis is good. These break sounds into tiny blocks (‘grains’) before putting them back together in creative and unexpected ways.
4. The natural look
Don't automatically ‘over-tune’ your vocals. We’ve heard extreme, hyper-tuned vocal treatments so many times before, and while there might well be a time and place for them, don’t make them the default choice.
Want all the hottest music and gear news, reviews, deals, features and more, direct to your inbox? Sign up here.

5. Comping vocal takes
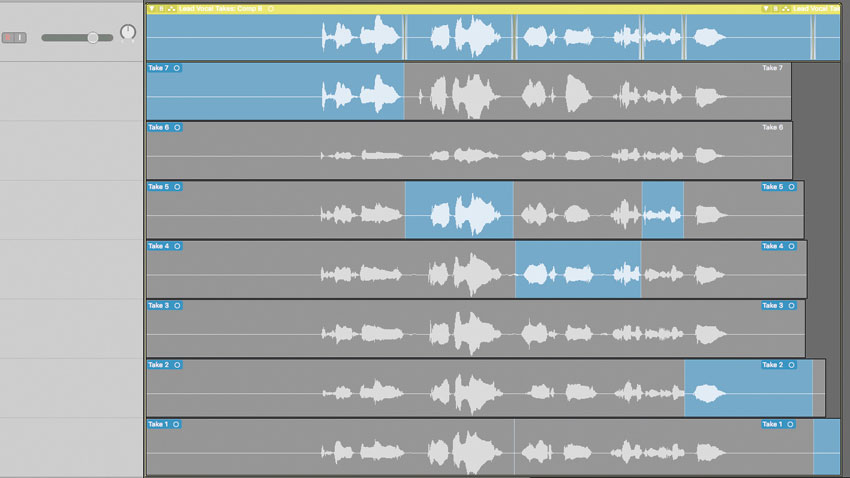
When recording, it’s standard practice to capture several takes of all vocal parts. The first may be little more than a warm-up, serving to familiarise your singer with the track and give you a chance to set vocal recording levels. In subsequent takes, however, some parts will be strong, while others won’t be as well delivered, so recording multiple performances allows for a singer to cover the whole track in a number of passes.
The process of comping a vocal refers to taking the strongest phrases and individual notes and consolidating them to create a single performance. The ways in which DAWs handle comping vary, so find time to discover exactly how yours works. If you can become quick at this process, carrying it out while your vocalist is still in the studio or making a cup of tea can be a real benefit, as you can get them to re-record any unsalvageable sections.
6. Words of encouragement
When you’re writing lyrics, take your time and think carefully about what you're saying and the manner in which you're saying it. Make your songs mean something and try to avoid resorting to clichés.
7. Caution, vocal reversing
From secret messages to ‘playing backwards’ effects, there’s a strange appeal in reversing vocal files. Be wary, though, as you may need to do a little admin before you incorporate such sonic trickery into your track. Some DAWs don’t automatically create a new audio file when you copy and paste a section of audio. So, let’s suppose you’ve chopped locators around a phrase or word to be reversed and copied it to create a ‘backwards version’ before the ‘forwards one’. Make sure you save that duplicated region as a new audio file before you reverse it, otherwise the original file will play backwards too.
8. Keep it down
Don't make your vocals too loud. It’s easy to set vocal levels higher than they need to be. Remember: while they might be the most important element in your mix, they’ll often sound better when properly balanced with the backing track.
9. Reversed reverb
As well as the reversed vocals discussed above, reversed reverb can also be fantastic for short ‘one shots’, or as a spacey treatment to accompany a larger section of a vocal track. Here’s a quick guide…
First, duplicate the vocal part and save it as a new audio file. Second, reverse this vocal file. Third, send it to the auxiliary reverb you want to use. Fourth, solo the reverb so that it’s playing alone, with no part of the source file audible. Then, capture this solo reverb as a new audio file. Lastly, drop this new file onto its own audio track and reverse it. Place it so that the reverb ‘anticipates’ the original lead vocal part.
Future Music is the number one magazine for today's producers. Packed with technique and technology we'll help you make great new music. All-access artist interviews, in-depth gear reviews, essential production tutorials and much more. Every marvellous monthly edition features reliable reviews of the latest and greatest hardware and software technology and techniques, unparalleled advice, in-depth interviews, sensational free samples and so much more to improve the experience and outcome of your music-making.
