Cockos's Reaper offers a serious amount of DAW power at a very affordable price, so it's no wonder that it's become a real word-of-mouth favourite.
What's more, because we're all stuck at home, Cockos is currently offering free temporary licences for Reaper, which are valid until the end of June.
If you're new to the software, or just want to brush up on your skills, here are 20 tips that'll help you to smooth out your workflow.
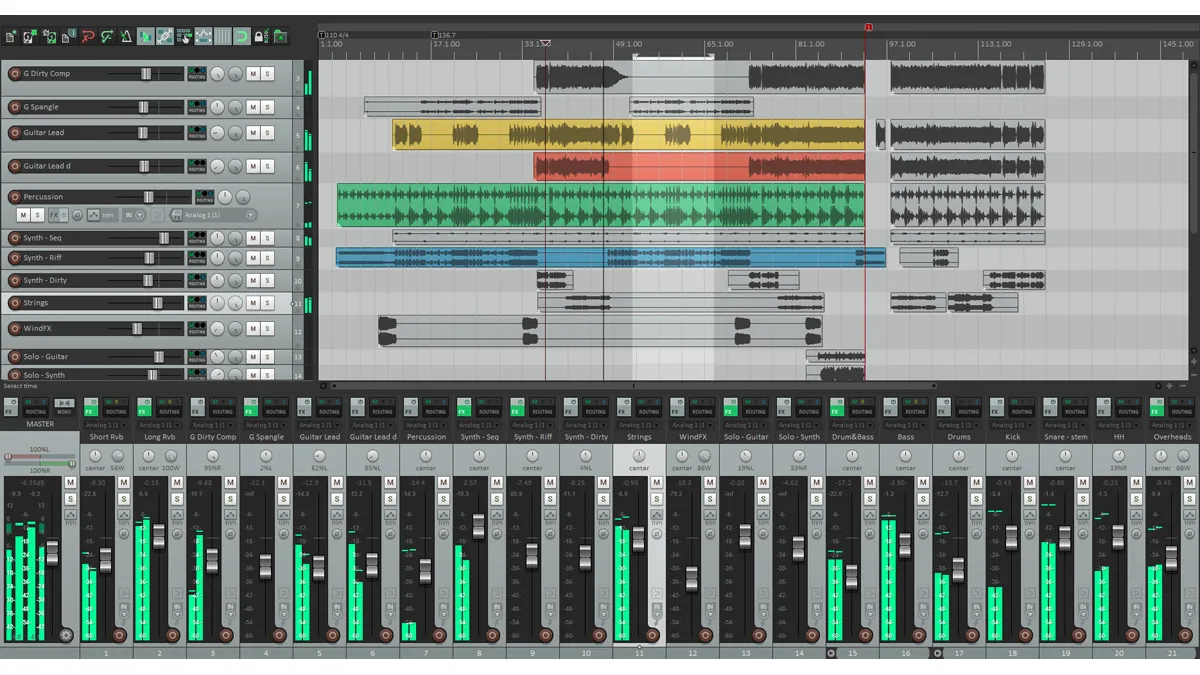
1. One track to rule them all
There’s only one type of track in Reaper: any track can handle MIDI or audio clips, or video, or even all at once! A standard track can be configured as an effects send, a subgroup, or even a VCA master. It can handle multichannel audio, or complex sidechaining setups, or parallel processing chains.
2. Route master
You can route anything almost anywhere in Reaper. Clicking the routing button for a track shows a list of current sends and receives, and enables you to create more. But it’s often easier to just drag the routing button from the source track to the destination, then configure it via the popup. The default post-fade setup is ideal for effects sends.

3. Layers within layers
Reaper’s approach to subgroups is great: simply drag a selection of tracks onto a blank track to create a folder, which is also a subgroup. Folders can be nested, so top and bottom rack tom mics could be combined in a ‘rack tom’ folder, inside a global ‘toms’ folder, which is in turn contained within a ‘drum kit’ folder.

4. Mid/side and more
Mid/side setups can be converted into stereo with no need for any plugins: drag both Mid and Side tracks into a Stereo folder track. Then uncheck Master Send in the routing window for the side track, and add two sends to the stereo track: one to channel 1, and the other to channel 2 with the polarity inverted.
5. Old-school faders
If you like to work with VCA-style fader behaviour, select all the tracks you want to control, then right-click and choose Track Grouping. Pick a group you haven’t used yet at the top, and, optionally, name it. Then check VCA Slave below. Now create a new track, open the grouping options for that track, pick the same group, and check VCA Master.
6. All together now
Track grouping can be used for a lot of other purposes. Try selecting all your drum kit input tracks, and checking both Record Arm Master and Record Arm Slave. Now, arming any one of your drum kit tracks will arm them all, so you won’t ever realise you forgot to record the ride channel halfway through a take!
7. It's never too late
If you’re partway through a take and you notice that a track isn’t armed when it should be, don’t panic: simply arm the track in question, and it will pick up recording from that point along with all the others. With a bit of luck, the band will never know!
8. Next-level soloing, part 1
Solo In Front is an awesome feature, which you can enable from the Options menu. With it active, soloing a track just turns down the rest of the mix, rather than muting it completely. This is great for editing, when you need to hear subtle details, but still want some context for ensuring the part is in tune and/or in time.

9. Next-level soloing, part 2
You can take this further by opening the Actions list and searching Solo In Front Dim. This parameter sets the amount of attenuation applied to tracks that aren’t soloed, and it can be linked to a MIDI controller, so you can assign a hardware knob to ride the mix up and down behind your soloed tracks, like on a large format console.
10, Aaaand… Actions!
Actions are key to Reaper’s enormous power and flexibility, and you’ll need to get comfortable with them if you want to become a true power user.

Step 1: The Actions list, available from the Actions menu, lists every function Reaper is capable of, and its search function is indispensable! Actions can be assigned to hot-keys or MIDI controllers, or combined into complex Custom Actions, which can then be used just like regular Actions.

Step 2: From the Options menu, choose Customise menus/toolbars, then click the dropdown at the top to choose any menus, context menu or toolbar for customisation. You can delete, rename or add functions from the Actions list.

Step 3: Your customised toolbars can be embedded in the arrange page or MIDI editor, docked in a tabbed docker, or floated freely in their own window. Spending a little time customising Reaper to suit your workflow can pay real dividends in speed and efficiency.
11. Rendering regions
Want to render several different sections of the same project at the same time? Create a Region for each section, and name them if you want. Set the Bounds to Project Regions instead of Entire Project at the top of the render dialog. If you include the $region wildcard in the file name field, the resulting filenames will include the region names.

12. Enter the Matrix
You can expand on tip 11 by choosing Region Render Matrix for the source. The Region Matrix (above) lists regions along the top and tracks down the side, so you can choose which tracks to render as stems for each region. File names can include sub-directories, so $region\$track will name files after the track, and save them in subfolders named after the region.
13. So much monitoring
The Monitor FX chain is available from the View menu. This sits outside your projects, running between the master fader and the interface. If you use room correction plugins or EQ to flatten your monitoring, this is the place to load it. it also enables you to put, for example, a collection of metering plugins on the chain, ready to be displayed on a dedicated monitor for signal analysis.

14. Get yourself connected
Reaper also provides a Routing Matrix, which shows all inputs, outputs and tracks, and lets you manage routing assignments between them. Click to create a new connection, Alt+click to delete, or right-click to change settings. This can be daunting at first, but will save time when you’re assigning 72 inputs to 72 tracks for a big tracking session!

15. Matrix reloaded
In a similar manner, the Grouping Matrix allows you to manage all your track grouping assignments. If you want to set up multiple VCA assignments, or other complex grouping setups, this window will save time and furnish you with an overview of all your assignments so you don’t get lost.
16. Crash and burn
Reaper is remarkably stable, but can be crashed by plugins. If a project won’t load because a plugin keeps crashing, try opening a copy of the project file in a text editor. RPP files are ‘human readable’, so you can search for the problem plugin by name, and delete it, along with its parameter list, thereby rescuing your project.
17. Join the queue
Got lots of rendering to do? Don’t sit there and watch it: add it to the render queue instead. When you’re ready, go to File > Open Render Queue to see the list of jobs, hit Render All, then go for lunch, or go to bed, or do something more productive while Reaper crunches through the numbers.
18. Extension appeal
SWS extensions add functionality to Reaper. They’re free (though donations are accepted) and are an essential add-on for advanced users. Want an Action to normalise selected clips to -23LUFS? SWS has that – and a lot more – covered.
19. Objectification
Click a clip’s FX button to load effects directly onto it, as opposed to the whole channel. This object-based approach can be very powerful and efficient - you could load, for example, a synth and a chain of effects directly onto a MIDI clip!
20. Image conscious
Reaper can export still-image videos, with audio quality optimised for YouTube. Here’s how…

Step 1: Import your mastered WAV file into a fresh project. It’s often best to stick to 44.1kHz sample rate, as per YouTube’s recommendations; not 48kHz as is more common for video. 24-bit is fine, though unlikely to be noticeably better than a properly dithered 16-bit file.

Step 2: Drag in your still image file, drop it on a fresh track, and drag the edges out so that it runs for the same duration as the song. You can add multiple images, or video clips, but unfortunately, crossfading them doesn’t work - it’s hard cuts only.

Step 3: In the Render dialog, set the Sample Rate to 44.1kHz, then select the Output Format as video (ffmpeg/libav encoder). Set the Container Format to MKV, video codec to MJPEG, and the audio codec to either 16- or 24-bit PCM, to match your source WAV file.
