Traktor Pro: a beginners' guide
Getting your Traktor motor running
Introduction
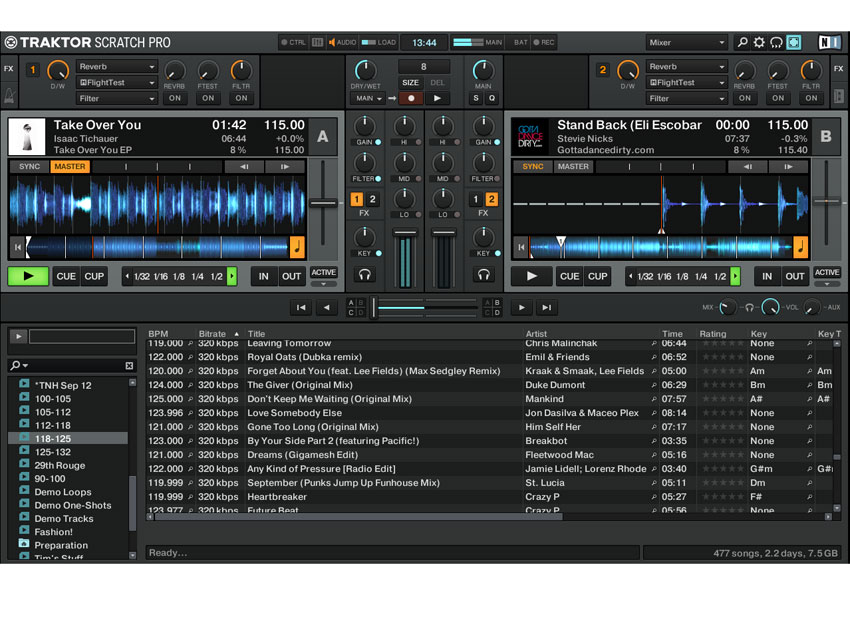
DJ Expo 2013: Native Instruments’ Traktor Pro is one of the industry standards when it comes to DJ software. It’s flexible and powerful and can be a complete performance tool in its own right.
Just as importantly, it’s also incredibly stable and offers a large selection of plug-and-play hardware for all budgets. And when you’re ready to step into the booth, Traktor integrates with high-end Pioneer equipment already installed in most clubs around the world.
For beginners, Traktor can be overwhelming. Its customisable nature can lead to confusion and new users can spend hours learning functions they may not even need. Feeling comfortable with your tools is vital for live performance, so we’re here to guide you through Traktor, its layout and some basic mixing methods.
In the mix
Traktor allows you mix up to four tracks together, and includes a mixer and effects section. Of course, there’s a lot more the software, but it’s a good idea to familiarise yourself with the basic layout before you attempt to master it all - we can come back to the more creative and unique-to-Traktor functions later.
For the sake of this introduction, we’re going to assume you want to mimic a traditional DJ setup of two decks and a mixer and are going to control the software with a MIDI controller. A MIDI controller is a piece of hardware that sends signals to Traktor, controlling different aspects of the software from a slider, knob, button or jog wheel. This is the most common setup for beginners.
The browser
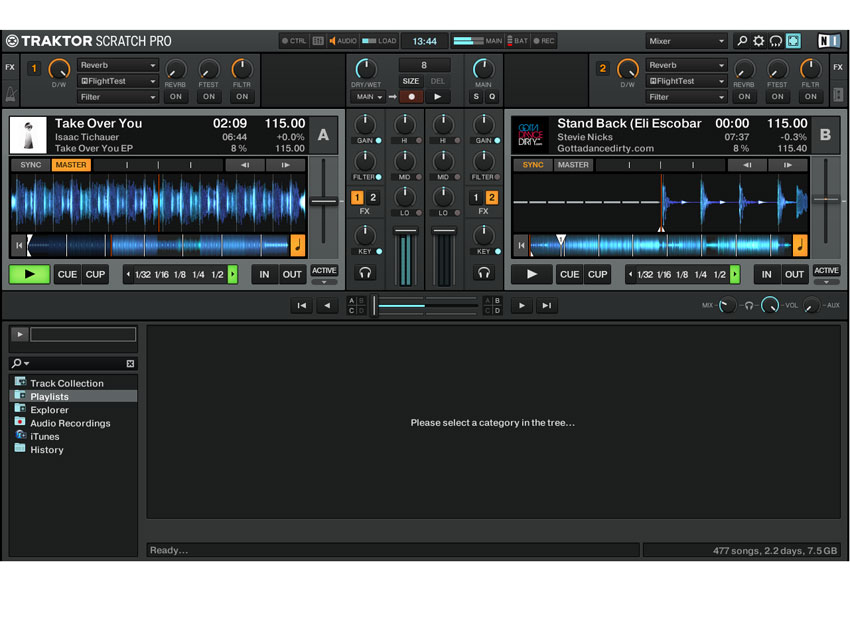
Traktor’s Browser section is where you view your track collection, any custom playlists you’ve made or imported, your hard drive and any connected USB devices, your track history and your iTunes library, including iTunes playlists.
It’s important to organise your playlists and browser in a way that makes it understandable and accessible in the sweaty darkness of the DJ booth. The ‘Track Collection’ section is where every track that’s been imported to Traktor is displayed.
Import some tracks from iTunes or your hard drive by right-clicking them and selecting Import To Collection. Once they’re imported their BPM and key can be analysed automatically, if it’s set up in the preferences.
Pro tip: Traktor maps your QWERTY keyboard to its certain functions by default. This can cause problems when using the Search function. If you’re not going to use the keyboard shortcuts it’s a good idea to disable them in Prefs. Click on the cogwheel in the top right of the GUI, go to Controller Manager and under Device name select Generic Keyboard and change the In Port to ‘None’.
The decks
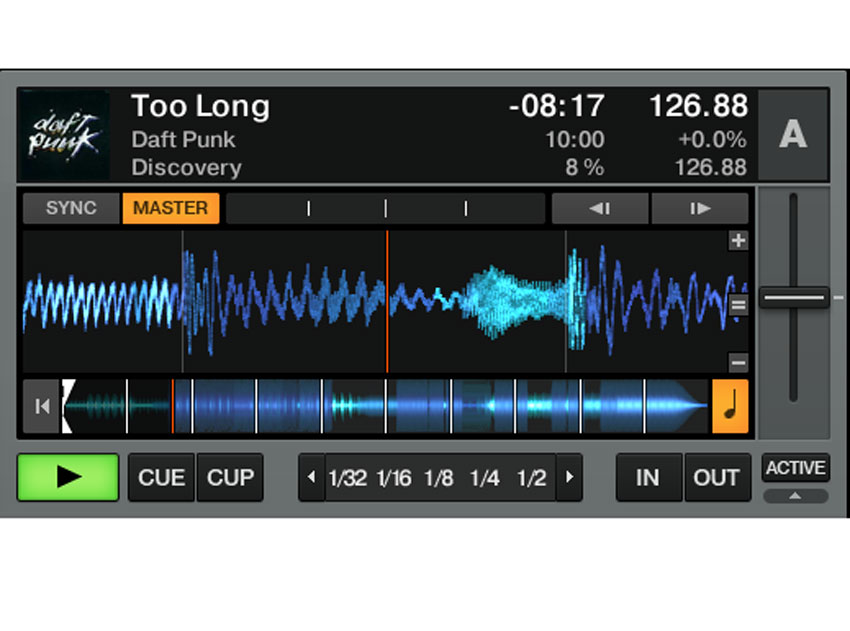
Although Traktor is capable of up to four decks of multiple types, we’re going to stick to two Track Decks for now.
Each deck features transport controls for play, cue and cup, automatic and manual loop options, pitch fader, pitch bend, sync and master buttons and track information, all of which is customisable.
Load a track into deck A by dragging it from the Browser or by right-clicking and selecting Load Into Track Deck A. The coloured waveform allows you to see frequency response as well as volume at a glance - the brighter the colour, the higher the frequency.
Pro tip: You can change all the track information displayed above the waveform in the preferences. Go to Prefs and select Track Deck from the menu. Here you can change what info is displayed in the top, middle and bottom rows, depending on your needs.
Sync
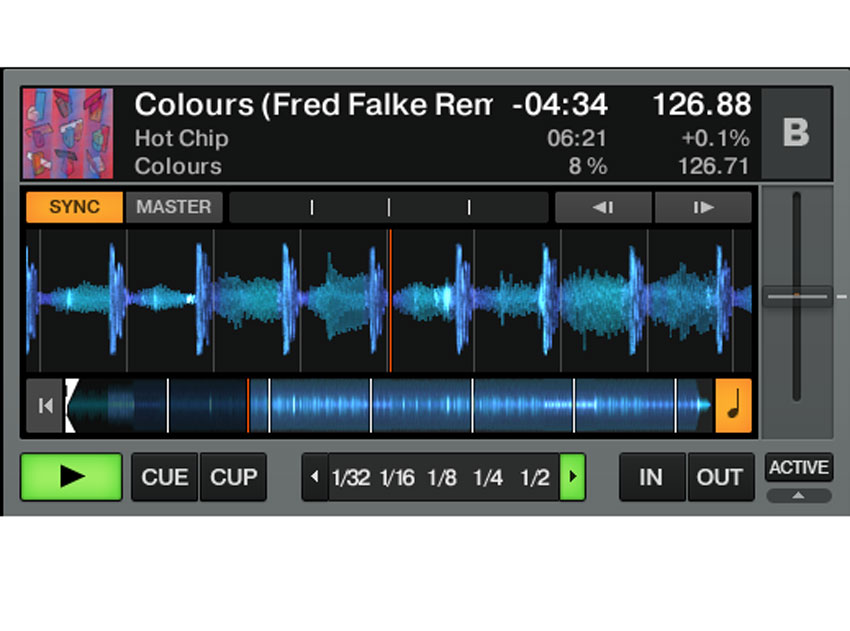
Traktor’s Sync is based around a Master and Slave concept. The tempo of the Master deck dictates the tempo of all other decks that have Sync activated.
Not only is the tempo synced, but the transport is also synced meaning once you press play, Traktor will adjust the start point so the decks are always in time.
Load a track into Deck B and press play. Traktor will automatically assign it as the Master. Press Sync on Deck A and you’ll see the tempo fader is greyed out. This deck’s tempo is now slaved to the Master deck - Deck B.
Pro tip: If you like the idea of using sync to align the tempos of two decks, but don’t want the transport to be synced or quantised, there is a MIDI command called ‘Tempo Sync’ which can be custom mapped to a controller button or QWERTY key. This will match the tempos of each deck without turning on the sync function.
The mixer
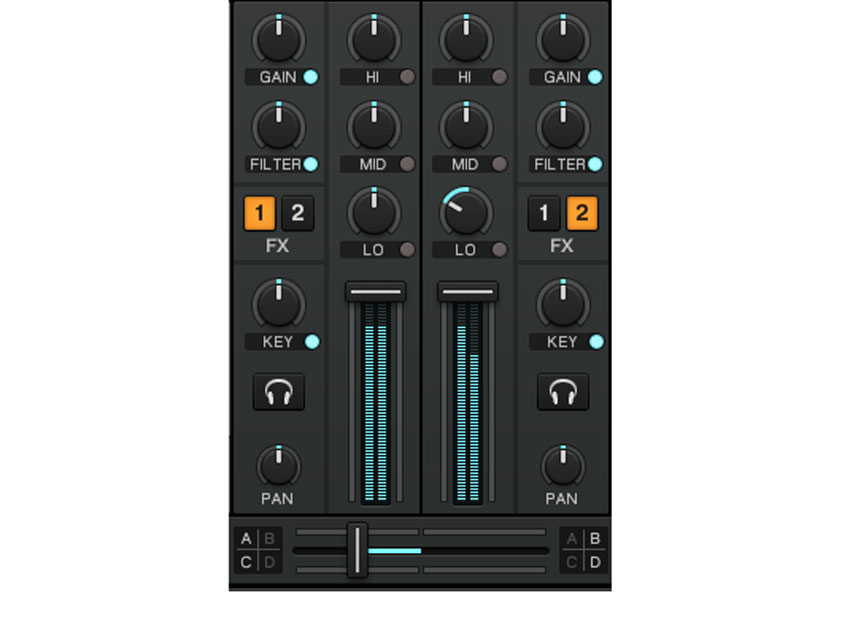
Now you’ve got two tracks playing in sync it’s time to look at the mixer section. Traktor’s mixer is fairly simple and mimics a standard two-channel approach.
As well as Gain and a one-knob Pioneer-style filter (left is low-pass, right is high-pass, centre is off) there’s an EQ with kill options, a Key knob to transpose a deck and headphone cue on and off.
The EQ is three-band meaning there are volume knobs for low, mid and high, but it can be changed to four-band in the preferences, splitting the mid section to a Lo-mid and Hi-mid option, mimicking Allen & Heath’s Xone mixer range.
Pro tip: Traktor’s crossfader curve can be adjust in the Preferences. Click the cogwheel again and click on Mixer. There you can adjust the crossfader curve from smooth to sharp, as well as set the auto-crossfade time and the EQ type.
The effects
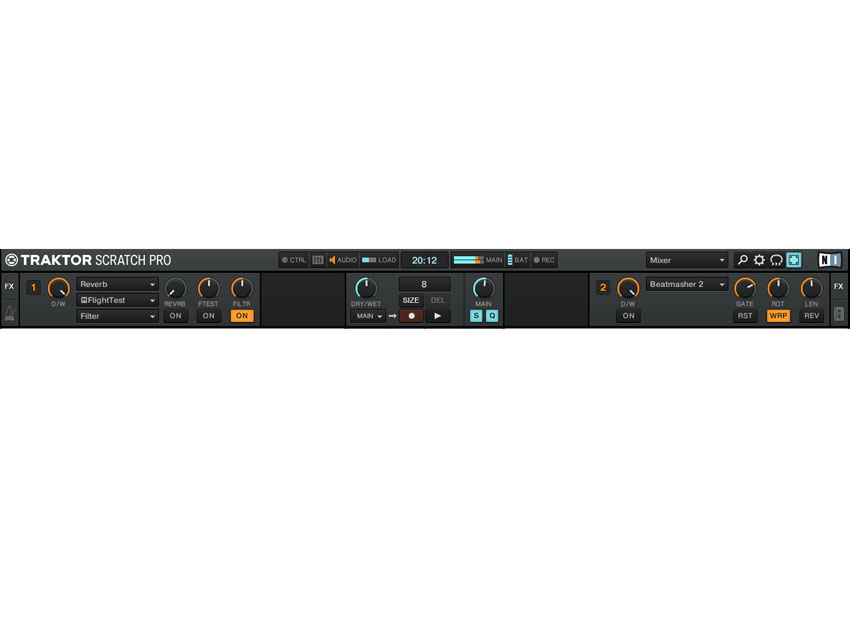
Traktor offers a flexible effects section, with up to six potential effects active at the same time. Each deck is assigned to an FX section using the 1 and 2 buttons below the filter knob in Traktor’s mixer.
Hover over the orange ‘1’ in the FX section above to get a drop-down menu with important options. Single offers one effect with three parameters to play with, while Group offers three chained effects with one parameter each.
Once you’re happy with your effects you can save a snapshot of the current chain, which will then become the default. The D/W knob stands for Dry/Wet and controls how much of the effect is applied to the incoming signal.
Pro tip: Traktor recently introduced a ‘post-fader’ option. This essentially means that any spatial effects such as delays and reverbs will continue to be heard, even if you drop the volume of the deck to zero or crossfade 100% to another deck. This can be handy for hard cuts and creative delay effects.
Cue points
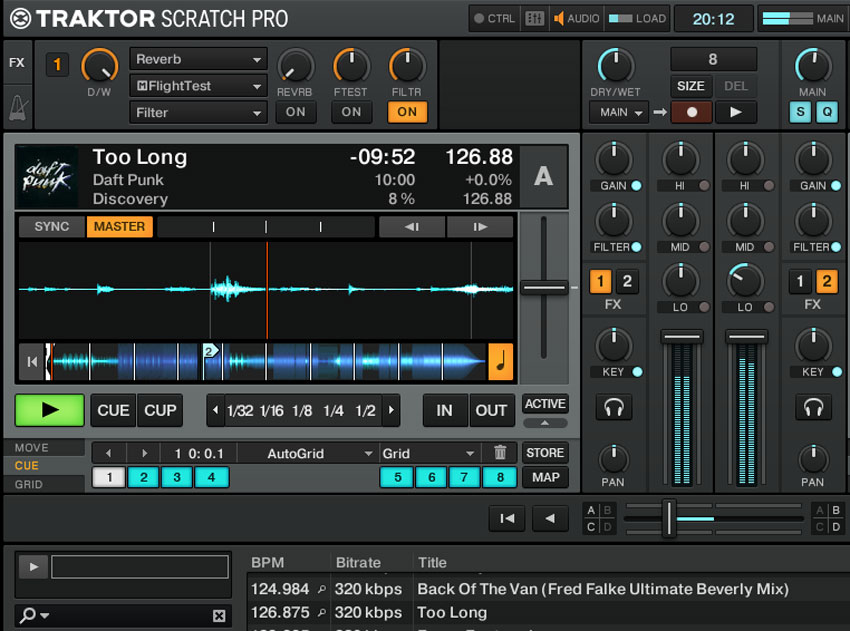
Cue points are custom-set markers that allow you to instantly jump to any part of a track. Traktor allows you to store eight of these and you can access them by expanding to the Advanced Deck view by pressing the down arrow below the loop Active button.
While the deck is playing, simply press any of the empty cue slots from 1 through to 8 to set a cue point. Once a cue is active, it’ll turn blue and pressing it again will return the track to that marker. Snap, quantise and flux mode will all affect how this works so let’s take a look at those next.
Pro tip: There are a number of types of cue points: Fade In/Out sets the point you’d like that track to fade in and out when using mix cruise mode, Load sets the point where you’d like that track to start from each time it’s loaded, Grid adjusts the markers Traktor has set depending on the grid cue position and Loop automatically creates a loop when the cue is triggered.
Snap, Quantise and Flux
Snap automatically adjusts cue and loop points so that they lock to the grid of the track.
When Quantise is enabled, Traktor will automatically adjust the playback of a cue or loop to be synced with the master deck.
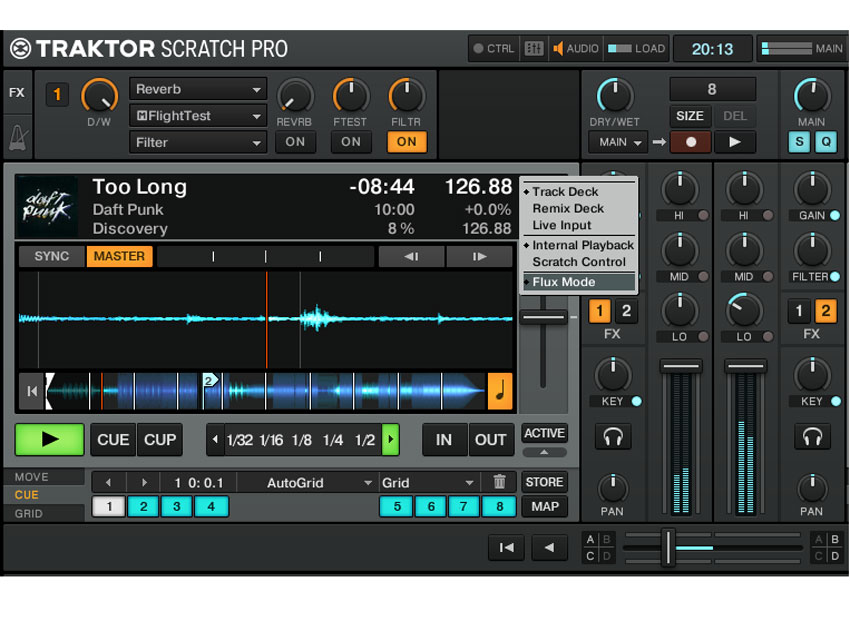
When a cue point is activated and Flux Mode is on, the track will continue to play ‘underneath’ so that when the cue point is released, the track continues from where it left off.
Quantise and snap can be turned off and on using the Q and S buttons while Flux Mode is activated by clicking on the A or B icons and selecting it from the drop-down menu.
Pro tip: While it’s handy to have these options, it can be frustrating if you’re trying to set a cue point on a vocal or something that’s not aligned to the beat. It’s a good idea to map these functions to your controller so you can hot-swap between them depending on your needs.
The grid
Most of the time, if you’re DJing modern music, Traktor will automatically align the grid correctly. There are times though, when Traktor gets it wrong and you have to readjust the grid yourself.
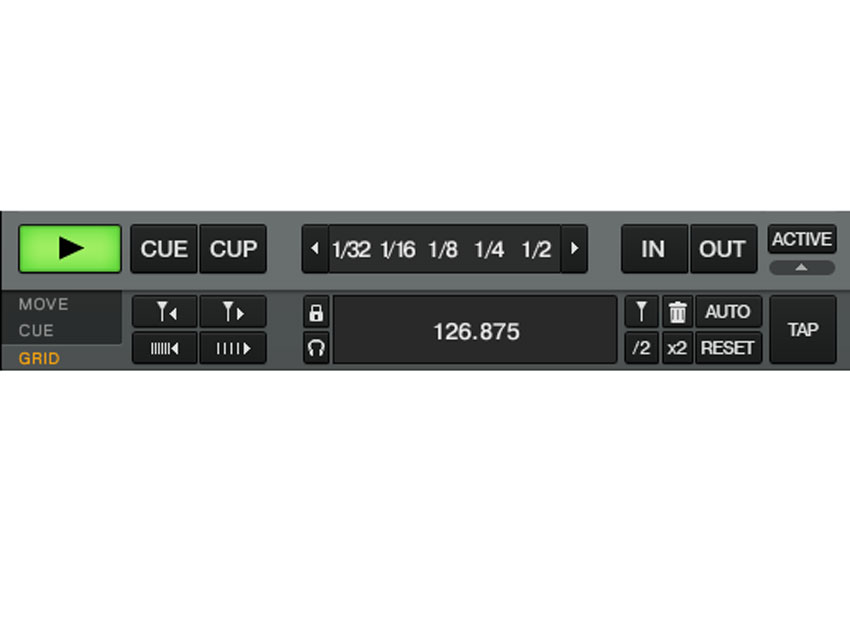
Reveal the advanced deck options and click on the Grid tab. Here you can create and delete grid markers, fine adjust the bpm, tap tempo, reset any changes and move the grid markers currently in place.
Use the waveform zoom to make your grid adjustments as accurate as possible - this is accessed via the plus and minus symbols to the left of the pitch fader.
Pro tip: If you use Traktor DJ for iOS, you can use your iDevice to re-align grids and sync the result via Dropbox. Getting hands on with a touch-screen device is much easier than using the much smaller and complex controls in Traktor Pro.
Cueing your tracks
Once you’ve got your tracks playing in sync, cue points and loops prepared, it’s time to consider the audio output.
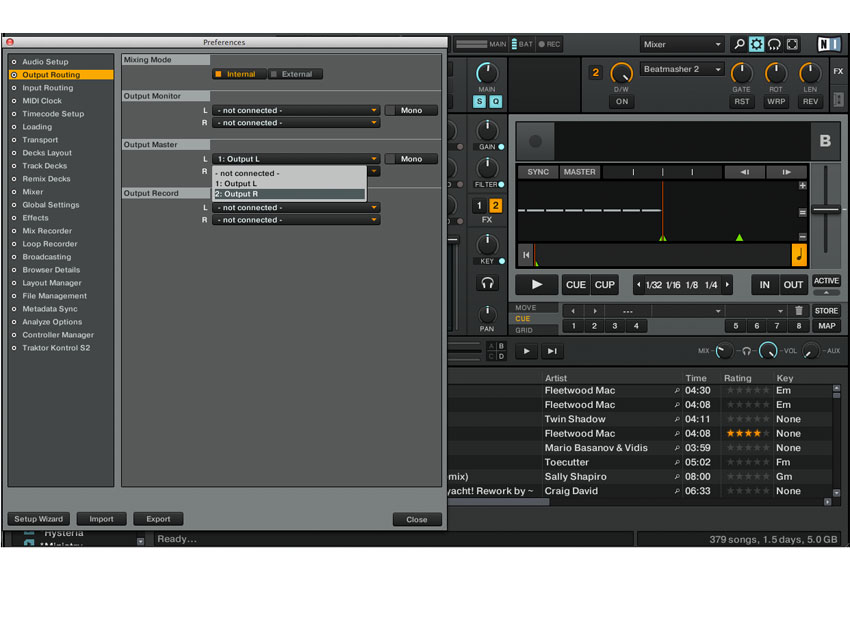
In order to cue up a track and hear its audio, you’ll need a sound card with at least four outputs - two for the stereo master output and two for the stereo cue output. Open Traktor’s Preferences and select Output Routing.
Using Internal Mixing Mode, assign the output channels and monitor channels for your soundcard. Consult the manual of your soundcard to correctly assign the Output Monitor to the headphone output.
Pro tips: If you’re using an external mixer such as a Pioneer DJM, you can use External Mixer mode to send individual deck outputs from Traktor into a channel on the mixer. This way you can use the mixer’s crossfader, volume faders, effects and so on. Click on ‘External’ mode in the Output Routing settings to set this up.
Controllers
So now your audio is going to all the right places and your tracks are analysed, loaded and synced, it’s time to get hands-on with Traktor.
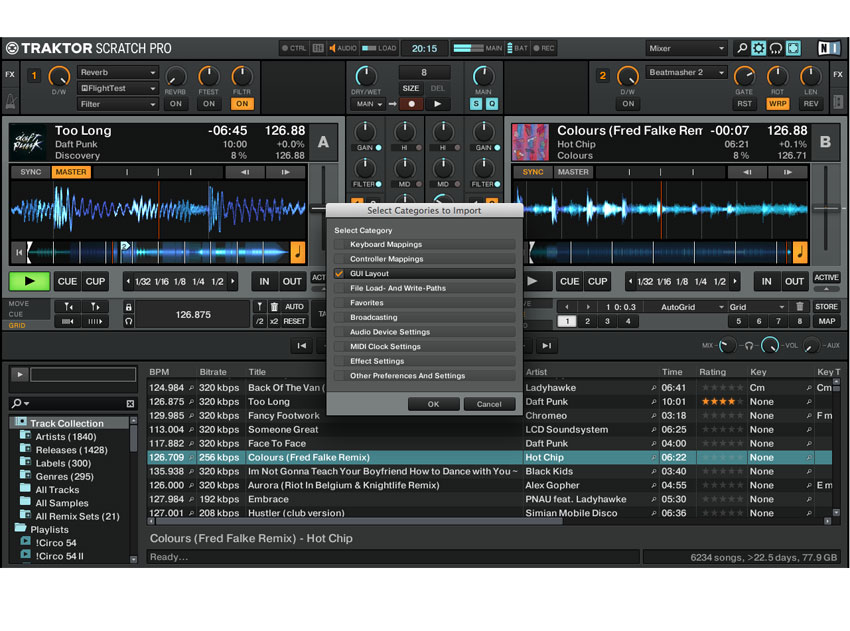
For any controller that’s not made by NI or ‘Traktor Ready’, it’s necessary to load a .tsi file into Traktor. This is a mapping file that will automatically assign Traktor’s functions to the hardware controller.
These can be downloaded from the manufacturer’s website and are loaded in to Traktor by choosing Preferences and clicking the Import button at the bottom of the window.
Some TSI files will import MIDI mapping only, while others will adjust Traktor’s GUI automatically to closely match the layout of the hardware.
Pro tip: Every element of a controller mapping can be customised. Go to Traktor’s Preferences and select Controller Manager. There, you can view the list of mappings, and change them to your needs - perhaps adjusting some shift functions for easier accessibility of often-used controls.