Thank to its low-latency Core Audio API, iOS is still by far the most capable phone/tablet-based music-making platform out there, and since its launch some incredible instruments and effects have been made available in the App Store. In the early days of iOS, however, there was no easy way to use these amazing apps together.
In 2013, iOS 7 introduced a new system for enabling disparate music apps to communicate with each other, called Inter-App Audio, but up to that point, the third-party app Audiobus was the only cross-app signal routing game in town.
Launched in 2012, Audiobus took iPad music-making a sizeable step forward, finally enabling us to route audio between compatible applications (developers had to build compatibility into them) via a straightforward interface that delivered all the necessary functionality without making the process overly time-consuming or complicated.
Routings were established by simply selecting an input app, an effect app and an output app - the last of these typically being a DAW capable of recording audio. Suddenly it became possible to capture the sound of iPad instruments without resorting to using a physical output or offline export, and to use effects on sources other than the microphone input.
Now there are dozens of compatible apps available on the App Store, and Audiobus itself has been updated to version 2.
Boasting an improved, even more intuitive interface and the ability to chain multiple effects together, among a host of other improvements, Audiobus 2 has secured its place as an absolute must-have for any iOS musician, and in this exclusive guide we'll show you just how quick, easy and effective it is to use.

Step 1: Before you start, it's best to avoid any unnecessary confusion by quitting all apps that are running on your iPad. To do this, press the Home button twice in quick succession, then swipe each app upwards to dismiss it. When you're done, press the Home button again.

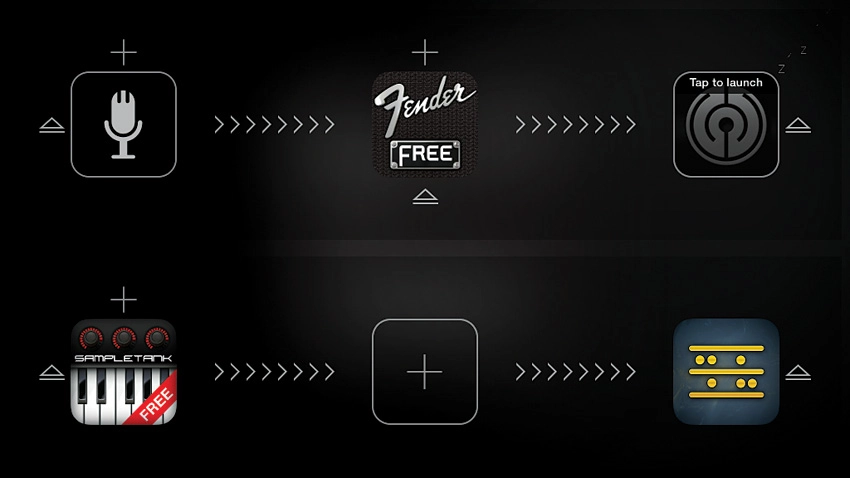
Step 2: Open Audiobus 2. It features three slots (Input, Effect and Output) in which other apps are hosted. We'll start with something simple: recording an instrument's output onto an audio track in BeatMaker 2. Tap Input and a list of available sources will appear, including the iPad's microphone and all of your compatible apps.

Step 3: Tap the instrument app you want to use. If you don't have a suitable one, try IK Multimedia's SampleTank Free. The selected app's icon appears in the Input slot, accompanied by floating Zs indicating that it's currently 'asleep'. Tap the Input slot to load the app. When it's finished loading, Audiobus 2 will pop up again.

Step 4:Now tap the Output slot and select the app you want to record to - we're using the excellent BeatMaker 2. Select your app, then tap the Output slot to launch it. When Audiobus 2 reappears, the arrows between the apps will flash to show that an audio connection is active.

Step 5:Tap the Output slot to swap to BeatMaker 2, then tap the New Project button, then the Home button at the top-left corner of the screen to remove the Studio window. A SampleTank track has been created automatically, and is armed for recording. On the right-hand side of the screen is an Audiobus 2 tab, which you can use to quickly swap between the apps and perform other functions.

Step 6:Tap the SampleTank icon to open its menu, then the topmost icon to switch to it. SampleTank loads a drum kit by default, which you can play using the virtual keyboard. To record your playing, tap the BeatMaker 2 icon on the tab, then the Record button. Play along with the metronome, then tap the Record button again when you're done.

Step 7:Now tap the top icon to return to BeatMaker 2. It'll still be playing, even though we've stopped recording, so tap the Stop button in the transport bar. You'll see that BeatMaker 2 has recorded the audio output from SampleTank onto the SampleTank track.

Step 8:You can record into another app without getting rid of your existing routing, or, indeed, set up a second routing that's completely independent of the first. This functionality requires an in-app purchase, information on which will appear the first time you run the app. Tap the Audiobus button and the Swap button to return to Audiobus 2, then the + icon at the top right of the screen.

Step 9:This adds another routing signal flow above the first. This time, let's run the iPad's microphone through an effect and into a DAW's sampler. Tap the Input slot and select the System Audio Input. We'd advise plugging your headphones in at this point to avoid feedback between the iPad's speaker and microphone!

Step 10:Tap the Effect slot to bring up a list of available effect apps. If you don't have any installed, try IK Multimedia's AmpliTube Fender Free. Tap the Effect slot to launch the app. When Audiobus 2 reappears, tap the Output slot. You could select BeatMaker 2 again, but let's try something a little different. This time we select NanoStudio.

Step 11:Tap the Output slot to load the app, which will complete the audio routing. You'll now be able to hear the microphone input through your headphones, with a big reverb on it courtesy of the AmpliTube Fender app. You can add another effect to the chain by pressing the + button above the existing effect. Tap the Effect slot to open AmpliTube Fender and adjust its parameters.

Step 12:When you're done tweaking, swap to NanoStudio and create a TRG instrument. Tap the Edit button, then hit the Record button to bring up the Record page. Press the Rec button and NanoStudio will begin to record the processed mic input. Clap, then tap the Stop button, and the waveform of the sound you just recorded will appear, ready for editing and playback. Nice work!
