You may have noticed that a certain musical flavour can seem really fresh and give you that distinct "whoa - this is the future" impression, only to sound laughably dated just a year later. Dance music trends in particular can be rapidly fleeting, and it's incredibly hard to predict whether a new sound you hear represents the general direction that the style is going in, or is just a passing phase.
It's usually important to sound current, but it's preferable to sound current in your own way, which requires some creativity and forward thinking. Then again, past trends often return and sound fresh again… only to sound old again soon after. At the crux of freshness is novelty. The challenge with crafting novelty is that it's easy to be novel and crap, but not so easy to be novel in an exciting way.
Stylistically, most fresh styles were born out of the fusion of two or more pre-existing genres. If you're looking to do something new with your musical ideas, our recommendation would be to search further afield for influences to bring into your style.
In this walkthrough, we'll focus specifically on putting more freshness into your music by processing a vocal. Click here to download the audio files you need for this tutorial.

Step 1: Of course, you can always blindly follow trends, but then you'll be at least one step behind the trendsetters! Instead, there's more artistic potential to be had from formulating a 'modernising' process that'll hopefully offer exciting and refreshing options no matter what the flavour of the moment is.

Step 2: One way to achieve the impression of newness is to take a sound we're used to hearing in the real world and process it in a way that makes it seem synthetic. For this example, we'll use the most familiar sound there is - the human voice - but you could just as easily apply these tricks to other real-world instruments/recordings.
The human voice

Step 3: Simply making the voice brighter with EQ might make it seem less real-world, but bright vocal recordings have been commonplace for decades, so the novelty has worn off. Perhaps we can find a way to affect the tone of the voice to produce interesting artifacts. This is where you'll have to get creative with plugins.
Boosting high frequencies

Step 4: Wavesfactory's TrackSpacer is a dynamic EQ plugin that analyses a track via its sidechain and then applies the opposing frequency curve to the track it's placed on. If we feed a copy of the same sound back into the sidechain, though, TrackSpacer will linearise the frequency curve of the original sound in real time! Activate TrackSpacer's sidechain input.

Step 5: Now we'll drag a copy of the sample onto a separate track, and route its output into TrackSpacer's sidechain input. Now, as we experiment with TrackSpacer's big Ratio dial, the voice's frequencies flatten out (this can be a useful trick for mixing purposes too, by the way). It's nice around 45%, but it loses a lot of power, since TrackSpacer only cuts frequencies.
Flattened-out frequencies

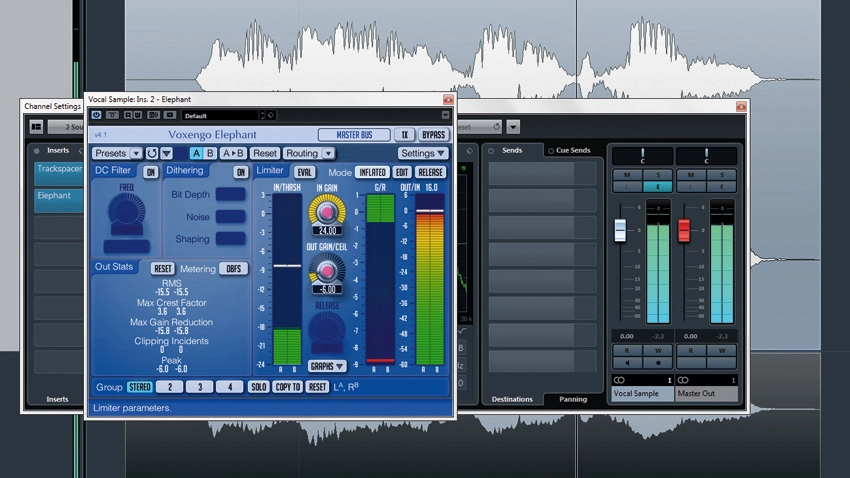
Step 6: Voxengo's Elephant limiter is perfectly capable of levelling out audio in a transparent fashion, but we're going to use the Inflated mode - which has a soft knee - and intentionally drive the In Gain up to +24dB to cause obvious crushing artifacts. Lower the Out Gain to -6dB so it doesn't get too loud. The voice certainly doesn't sound natural anymore.
Squashed with Voxengo Elephant's INFLATED mode

Step 7: Formant shifting can make vocal textures sound less natural, especially if you automate the amount over time. The results vary from one formant plugin to another, so it might be worth trying a few to see which best suits the material. SoundToys' LittleAlterBoy is tasty on this vocal sample with the Formant parameter reduced by around 2 semitones.
Formant shifted with SoundToys' Little Alter Boy

Step 8: As an interesting side effect, this formant algorithm adds a little stereo width to our originally mono sound, but let's render the voice back out to a mono file so that we can further explore ways to add an otherworldly stereo image of our own design. Mute the old channels and duplicate the new mono version so that we can pan them hard left and right.
Bounced to mono

Step 9: Simply hard-panning identical audio tracks doesn't result in any stereo information, but the more different we make the waveforms, the wider the effect will be. Use plugins that make subtle differences to the sound, like KiloHearts' Disperser, which heavily shifts the phase of the incoming audio, blurring it in time.
KiloHearts' Disperser added to left channel

Step 10: Add a mono delay plugin to the unaffected channel via a send. Having the vocal in wide stereo and the delay in pure mono suggests an acoustic space that doesn't exist in reality. You'll have to play with the timing settings and set the level to suit whatever you're working on. It sounds quite interesting, but there's more we can do to futurise it…
Mono delay added to unaffected audio

Step 11: Assuming you'd be using these kinds of effects in a piece of music, you can take it further by giving the vocal sample a new role. In this case, we'll turn the vocal into an end-of-section fill, in place of a drum fill. Lo-res timestretching algorithms can produce interesting and unfamiliar textures. we'll use Tantra, the rhythmic multieffect plugin by Dmitry Sches.

Step 12: You might instead choose to go through the timestretch algorithms offered by your DAW, but from the Default preset on Tantra, all we have to do is activate Run and Smooth in the Glitch section, then tweak the Buffer Size and Scale to come up with engaging granular patterns.
Granular effect with Dmitry Sches' Tantra
