It's fair to say that, unlike some other popular DAWs, sampling functionality came quite late to the Cubase system. In some respects it remains somewhat underdeveloped. This may be as a way of protecting sales of HALion, Steinberg's flagship sampler, though the Cubase forums still buzz with the hope that a simple all-purpose sampler might be included at some point.
However, there are some ways of mapping, manipulating and playing your own samples without resorting to third-party applications or plug-ins in Cubase. HALion Sonic SE, despite some interesting tweaking and processing capabilities is aimed at the playback of ready-rolled presets. Luckily Groove Agent SE, though laden with a plentiful supply of factory kits, is also able to host user-created samples. As the name suggests, its workflow is largely dedicated to beat creation, though it can be pressed into service for more all-round and MPC-like functionality.
Here we show you how to make merry with drum loop samples for some interesting results.
For more on the art of modern sampling, check out the Autumn issue (FM310) of Future Music now.

Step 1: Import a drum loop. If it's not at the project tempo, use one of the élastique algorithms to stretch it. The élastique Pro Tape algorithm has the least audible artifacts, and is closest to sampling off vinyl. If the tempo is stored with the file, it will stretch automatically. Otherwise, enter the correct tempo in Pool window or use the Sizing Applies Time Stretch pointer.

Step 2: Double-click the audio to enter the Sample Editor. Head to the Hitpoints tab and use the Threshold slider to adjust which beats are detected. Sometimes dropping the Threshold drastically but increasing the Minimum Length (between samples) delivers best results. Problem areas can be adjusted manually by engaging Edit Hitpoints. Once you're happy press Create Slices.

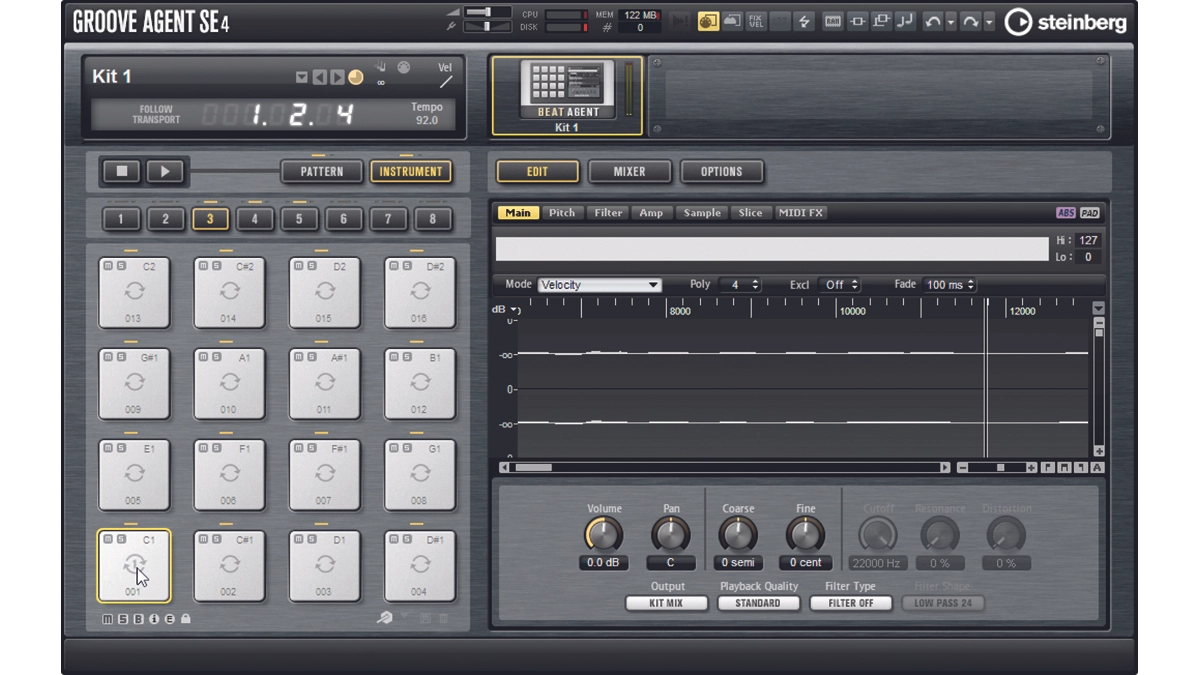
Step 3: Load an instance of Groove Agent SE. By default it opens with an empty Beat Agent kit in place. The Create Slices function from before created an Audio Part containing a bunch of neatly sliced drum hits. Drag this to one of the GA SE pads (we recommend the bottom left pad mapped to note C1), and you have each of the slices assigned to a different pad (key).

Step 4: Clicking a pad switches the display to show the controls for that pad. By default you can adjust parameters on a per pad basis. If you're feeling ambitious, you can even layer up to eight samples per pad and edit them at the per-sample level.

Step 5: In the Pattern Pads, when importing the drum loop slices, Groove Agent SE also created a pad dedicated to playing back the full groove. This plays a MIDI file that triggers the individual pad slices in their original order. You can tweak this via the Performance parameters, or delve deeper by editing the pattern as a Cubase MIDI track. Drag the pad containing the pattern to the Project window.

Step 6: Once the pattern is back in Cubase, the notes can be rearranged, quantised and deleted. In Groove Agent SE, explore the Main tab in Edit. Switch Playback Quality to Turntable for a more lo-fi sound. This can be emphasised by using the Bit Red option under Filter Type and increasing the Distortion parameter while lowering the cutoff. Also, explore altering pitch and adding a fade-out.
