Logic Pro's monster synth: The ultimate guide to Alchemy (Part 1)
Logic's most formidable stock plugin combines additive, granular and spectral synthesis with a host of powerful features and effects. Join us on a guided tour
Want all the hottest music and gear news, reviews, deals, features and more, direct to your inbox? Sign up here.
You are now subscribed
Your newsletter sign-up was successful
In 2015, Logic Pro updated to version 10.2.0. This was a substantial update that added numerous features, bug fixes and more. Arguably, however, the most significant addition was that of the Alchemy software synthesiser.
Alchemy was already a thing, having been developed by Camel Audio and sold as a cross-platform VSTi. Presumably, Apple acquired it, gave it a cosmetic overhaul and incorporated it into Logic Pro as a stock software instrument. Frankly, this was a major coup, as it gave Logic Pro an extremely powerful edge over competitors, as it’s uncommon to have such a powerful VST instrument bundled with a DAW, let alone one as cost-effective as Logic Pro.
Fantastic (stock) plugins and how to use them: Logic Pro Compressor
But what makes Alchemy so special? Well, unlike a great many software synthesisers, it doesn’t rely on commonplace subtractive synthesis techniques. Nor does it rely on FM, wavetable, or analogue modelling. What makes Alchemy so distinctive and powerful, is that it combines additive, granular and spectral synthesis into one neat package that yields a tonal range unlike most methods of synthesis.
Furthermore, whilst it’s an incredibly deep and complex instrument, its user-interfacing is something of a masterclass in accessibility, allowing experienced and new users alike to get a lot out of this instrument.
If you’re a Logic Pro user, chances are you’ve stumbled upon Alchemy, and maybe used it via some preset patches in the Library. However, understanding its workflow methods and architecture will allow you to customise and design sounds far beyond what’s present in the Library Presets.
In this article, we’ll explain what granular, additive and spectral synthesis are, and how to get the most out of them in Alchemy.
What is additive synthesis?
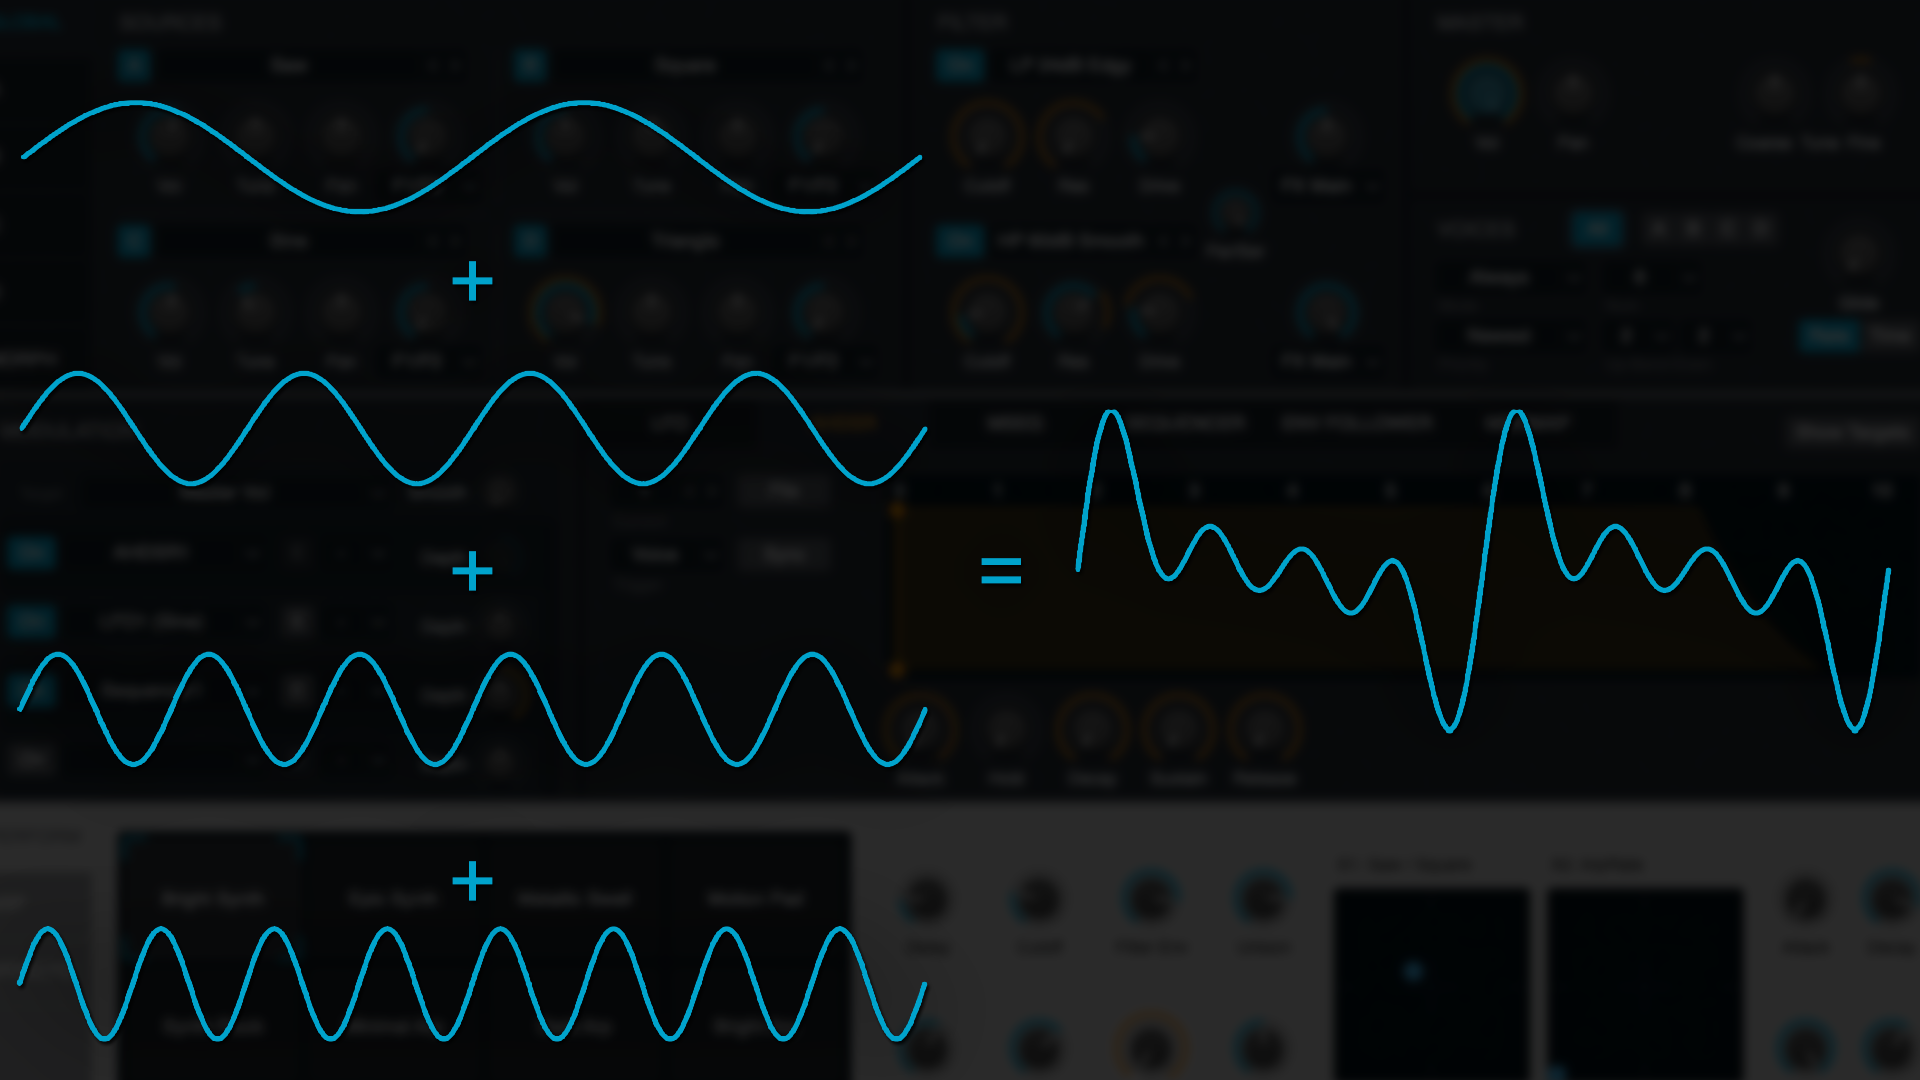
In simple terms, additive synthesis is the creation of tones and timbres by blending multiple (different frequency) sine-waves together. This is in fact the form of synthesis most closely aligned with natural, acoustic sounds.
Want all the hottest music and gear news, reviews, deals, features and more, direct to your inbox? Sign up here.
Whether it’s an acoustic musical instrument, a human voice, footsteps, the sound of leaves rustling, the chirp of a bird, etc; all acoustic sounds are complex combinations of many different sine-waves, all resonating at the same time, to induce distinctive, identifiable overtones.
In its simpler forms, additive synthesis can often sound similar to frequency modulation (FM) synthesis (think Yamaha DX7). However, in more recent times, we’ve witnessed additive synthesis become highly advanced and provide the principle backbone to some of the industry’s leading modelling technology (such as Modartt and Haken Audio - which create synthesised sounds often indistinguishable from the acoustic sounds their modelling).
What is granular synthesis?
Granular synthesis was invented by Iannis Xenakis (the brains behind stochastic synthesis) and is based on the principles of sampling. Unlike conventional sampling (which aims to capture entire pitched notes or waveforms of pitched and percussive sounds), granular synthesis takes snippets of samples, between 1 and 100 milliseconds in length. These snippets (referred to as 'grains') are randomized and layered upon one another, often with volume, pitch, speed and phase manipulations.
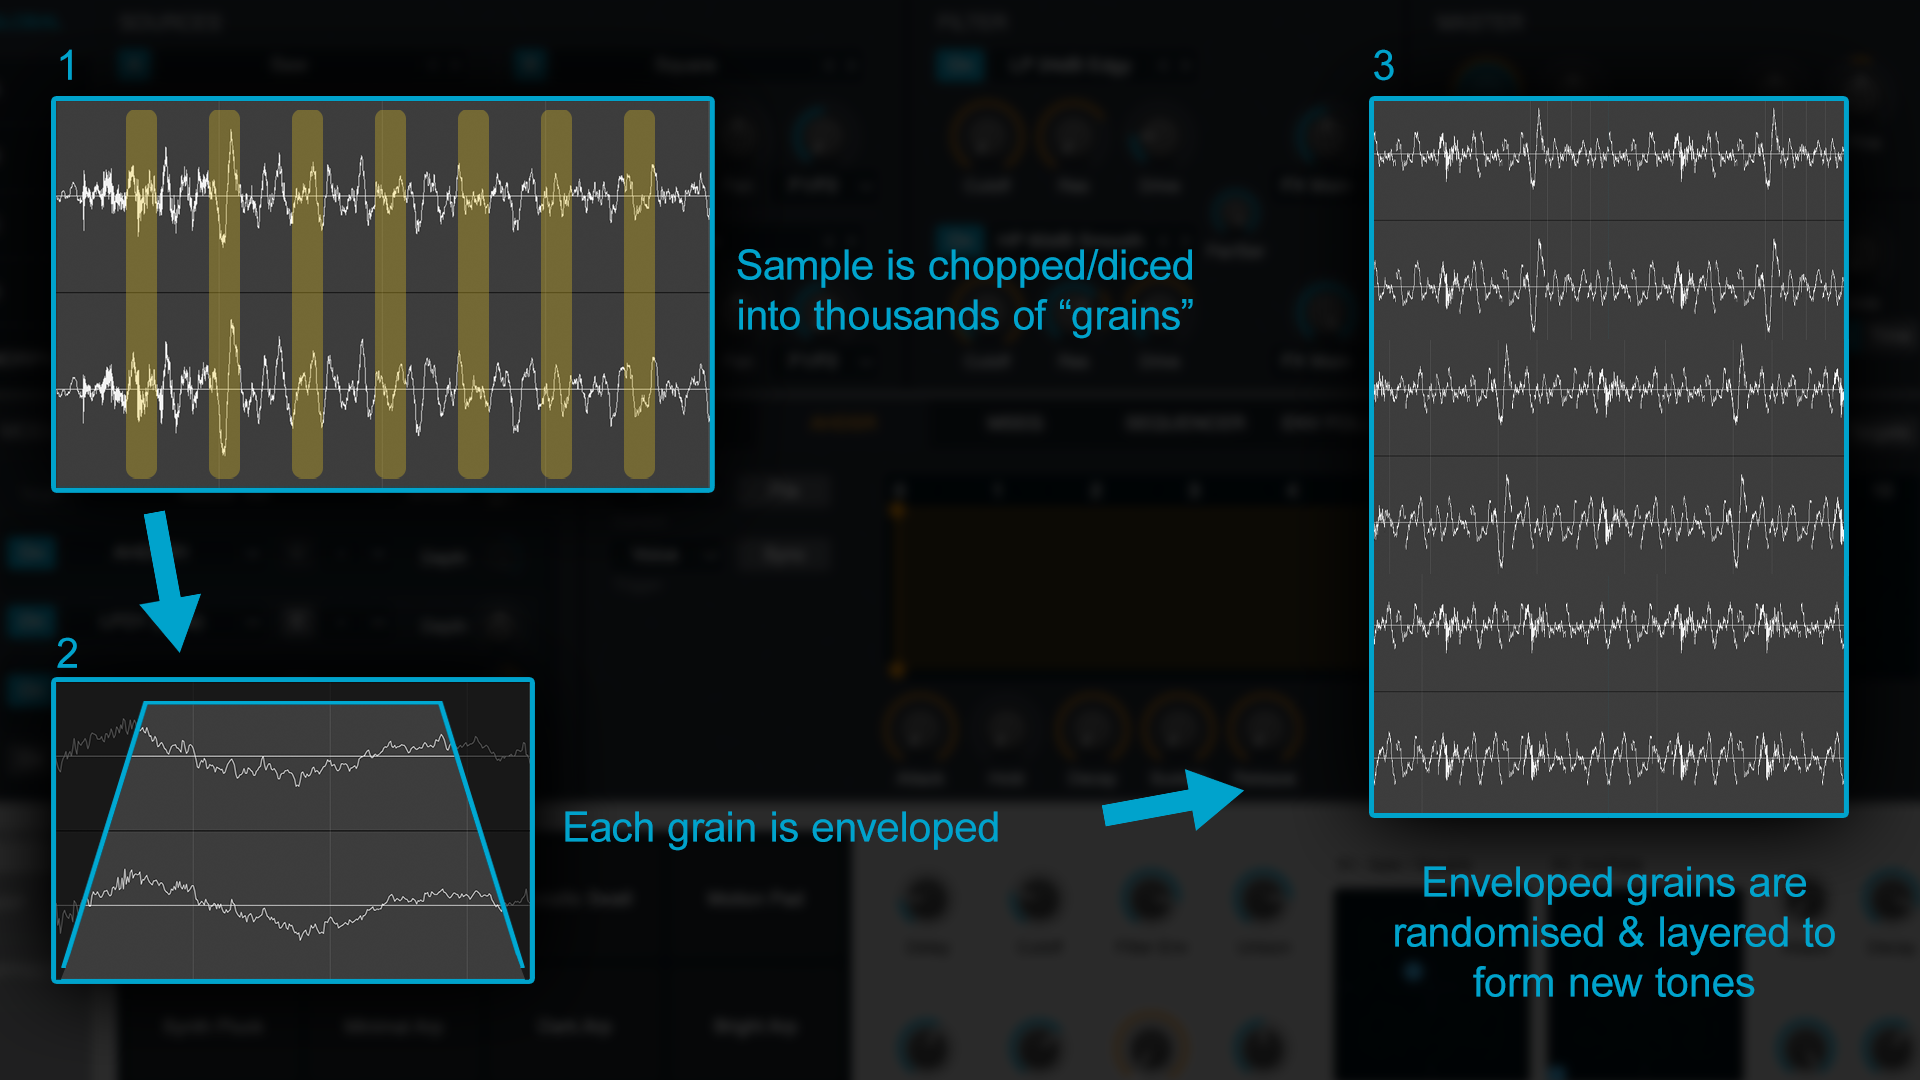
The resulting effect is often bizarre, highly textured tones, with tangible, (somewhat) identifiable characteristics, that whilst familiar sounding, are hard to pinpoint exactly what the source sample was.
It’s an abstract and difficult thing to explain, but let’s say, for example, your granular synthesis sample source was an acoustic guitar. Whilst the end sound might not resemble an acoustic guitar in any way, there would nonetheless be fragments of the brassy/bronze-like string plucks nested within the sound, albeit in a broken, warped and fragmented way, providing an acoustic, organic, real-world quality to an otherwise otherworldly sound.
What is spectral synthesis?
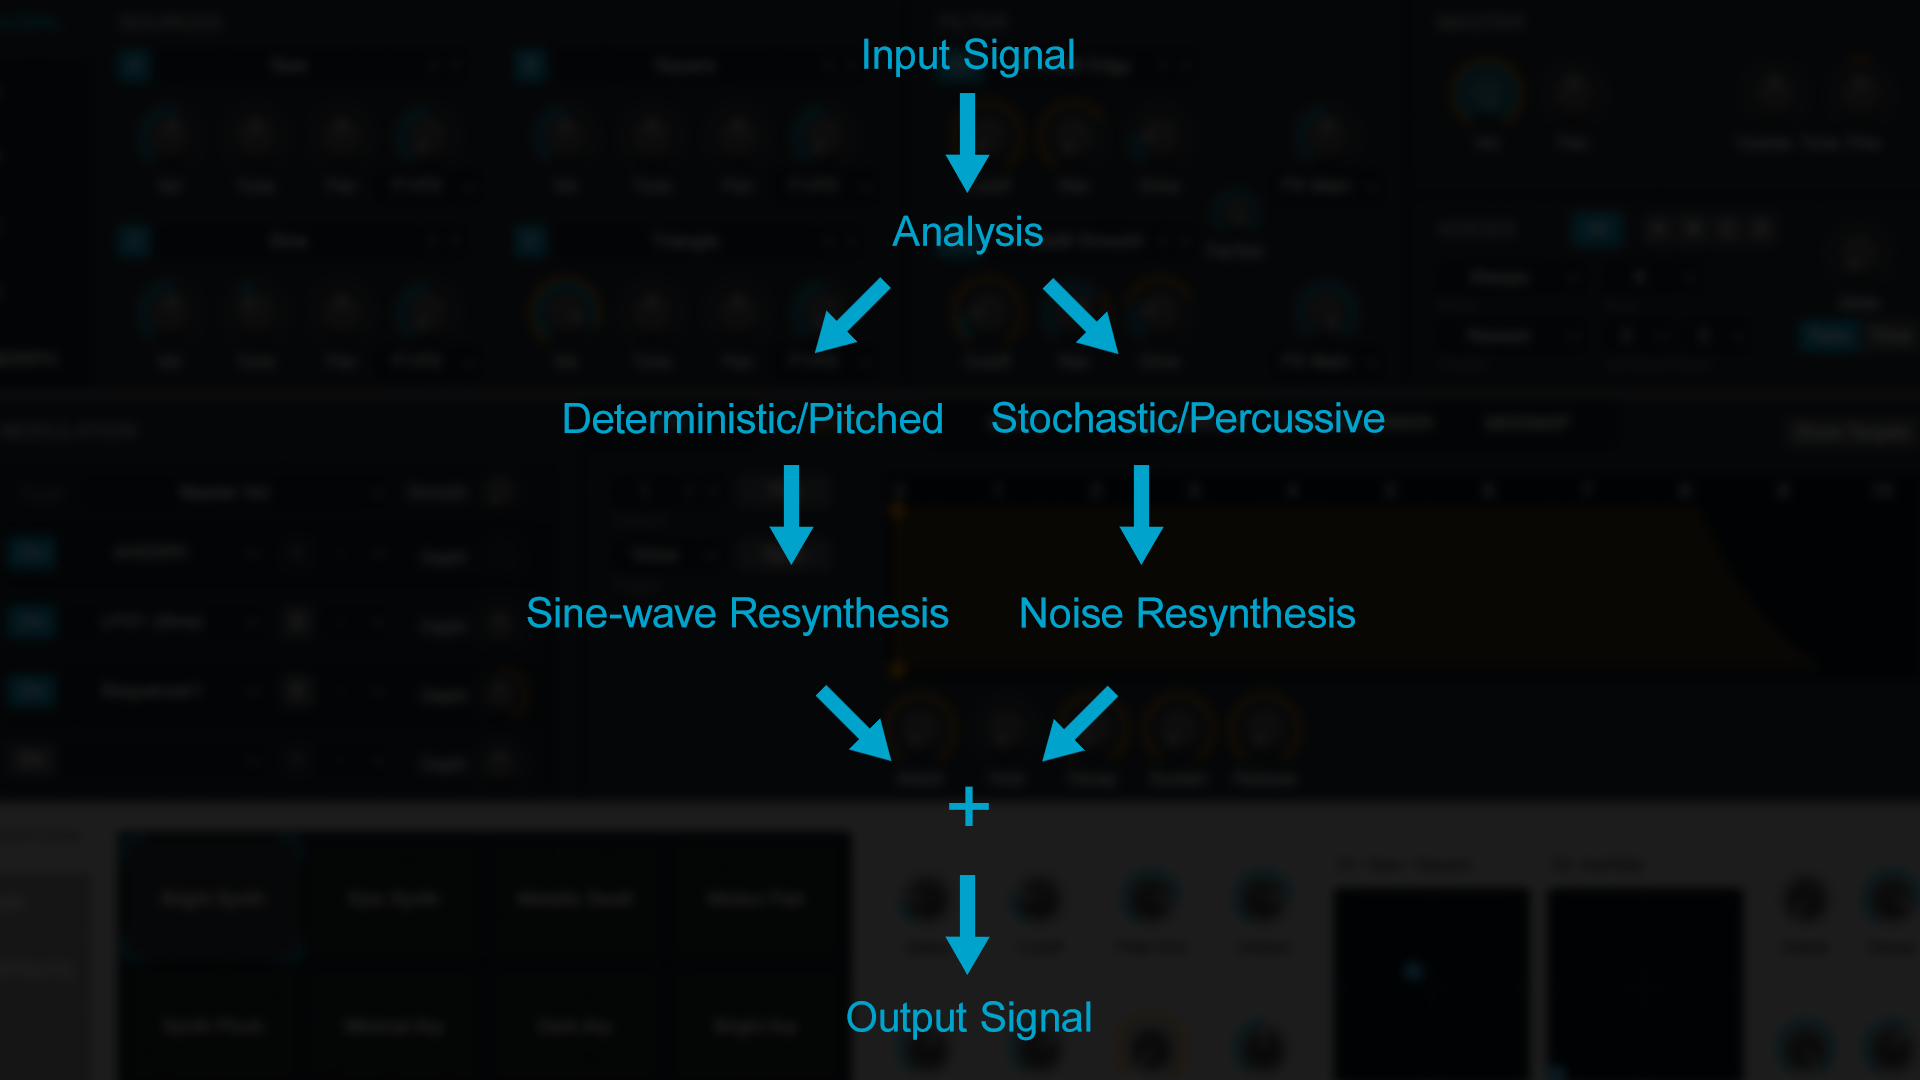
Put simply, spectral synthesis is a form of modelling; in fact, it’s often referred to as spectral modelling synthesis. In many respects, it’s not that different from vocoding, in that it analyses the amplitudes and frequencies of an input signal and recreates it by means of oscillators.
It is however, significantly more complex (than a vocoder), as it separates out the deterministic (pitched) and stochastic (percussive) aspects of the sound, replacing the pitched elements with sine-waves and percussive elements with white noise.
OK, with these (not so) basics covered, let’s have a look at Alchemy’s workflow and how to utilise its complex array of layers, effects, and more.
Signal flow
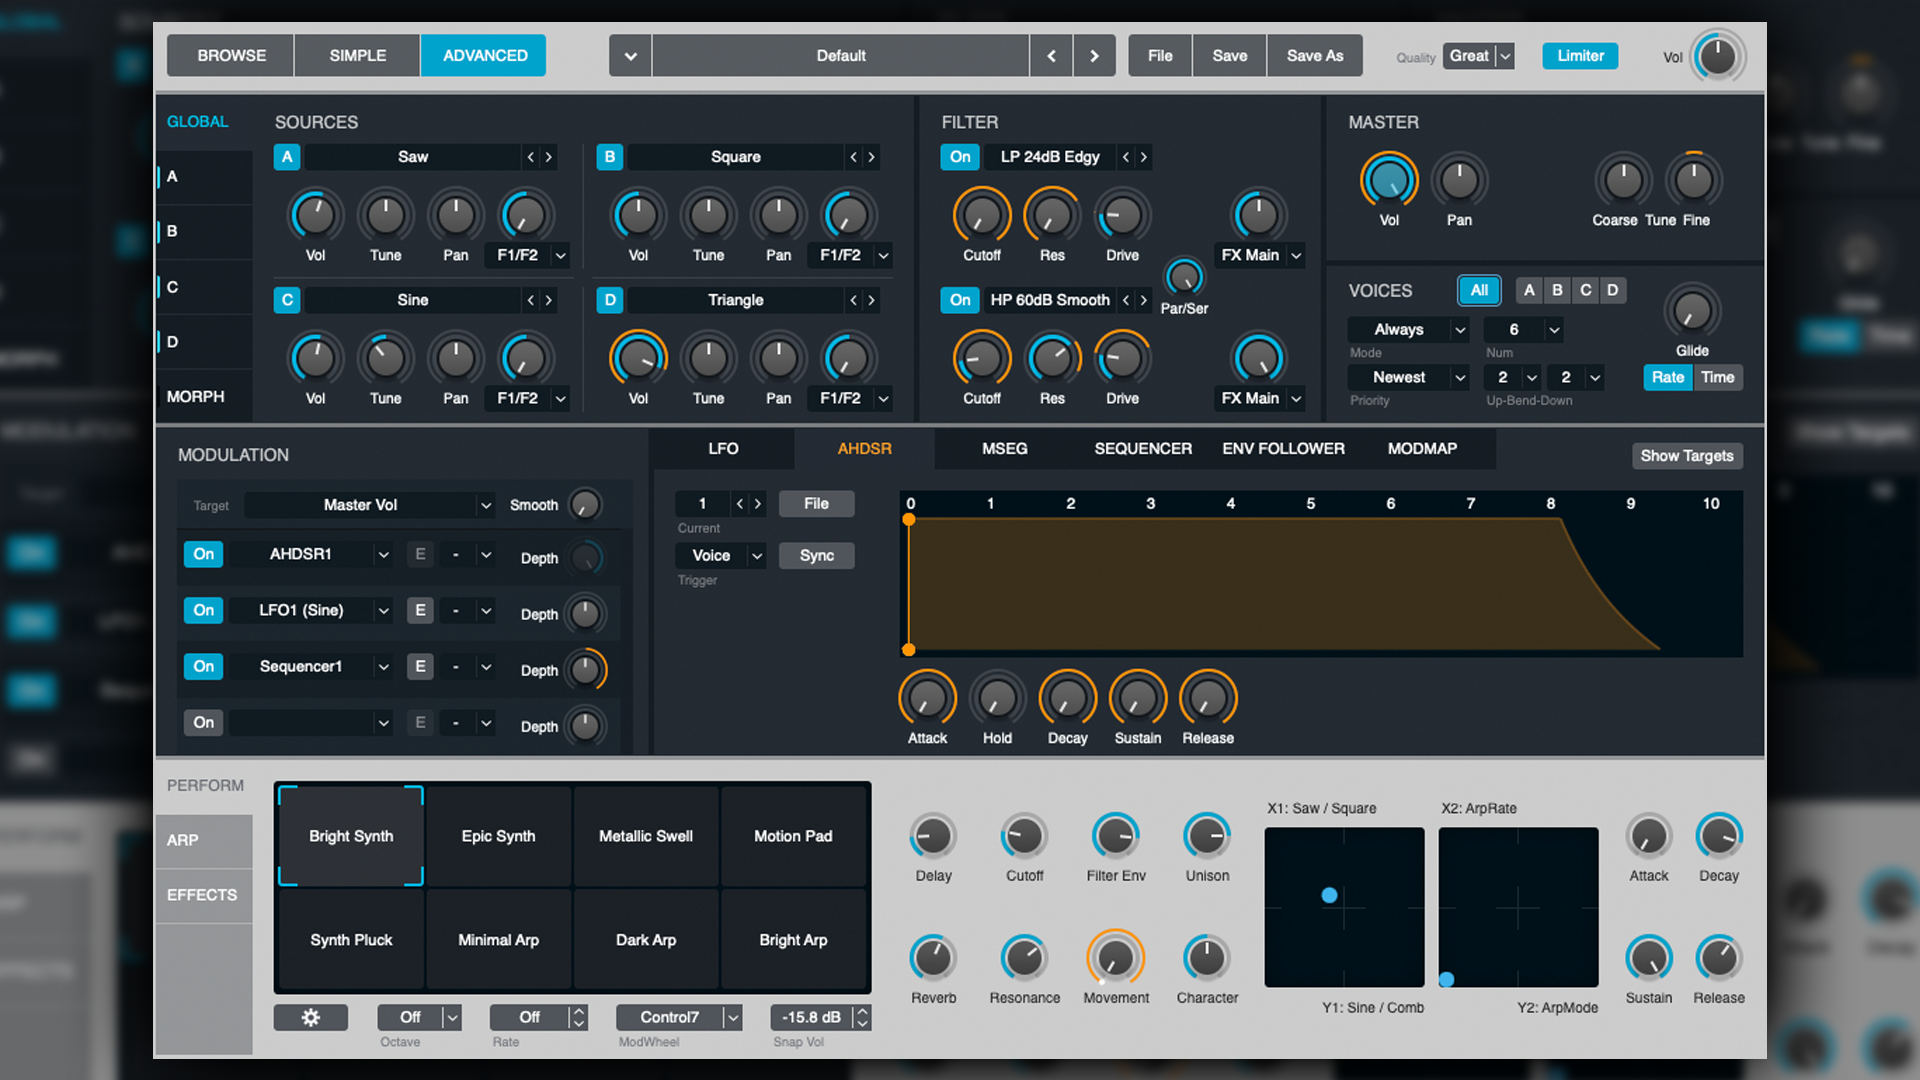
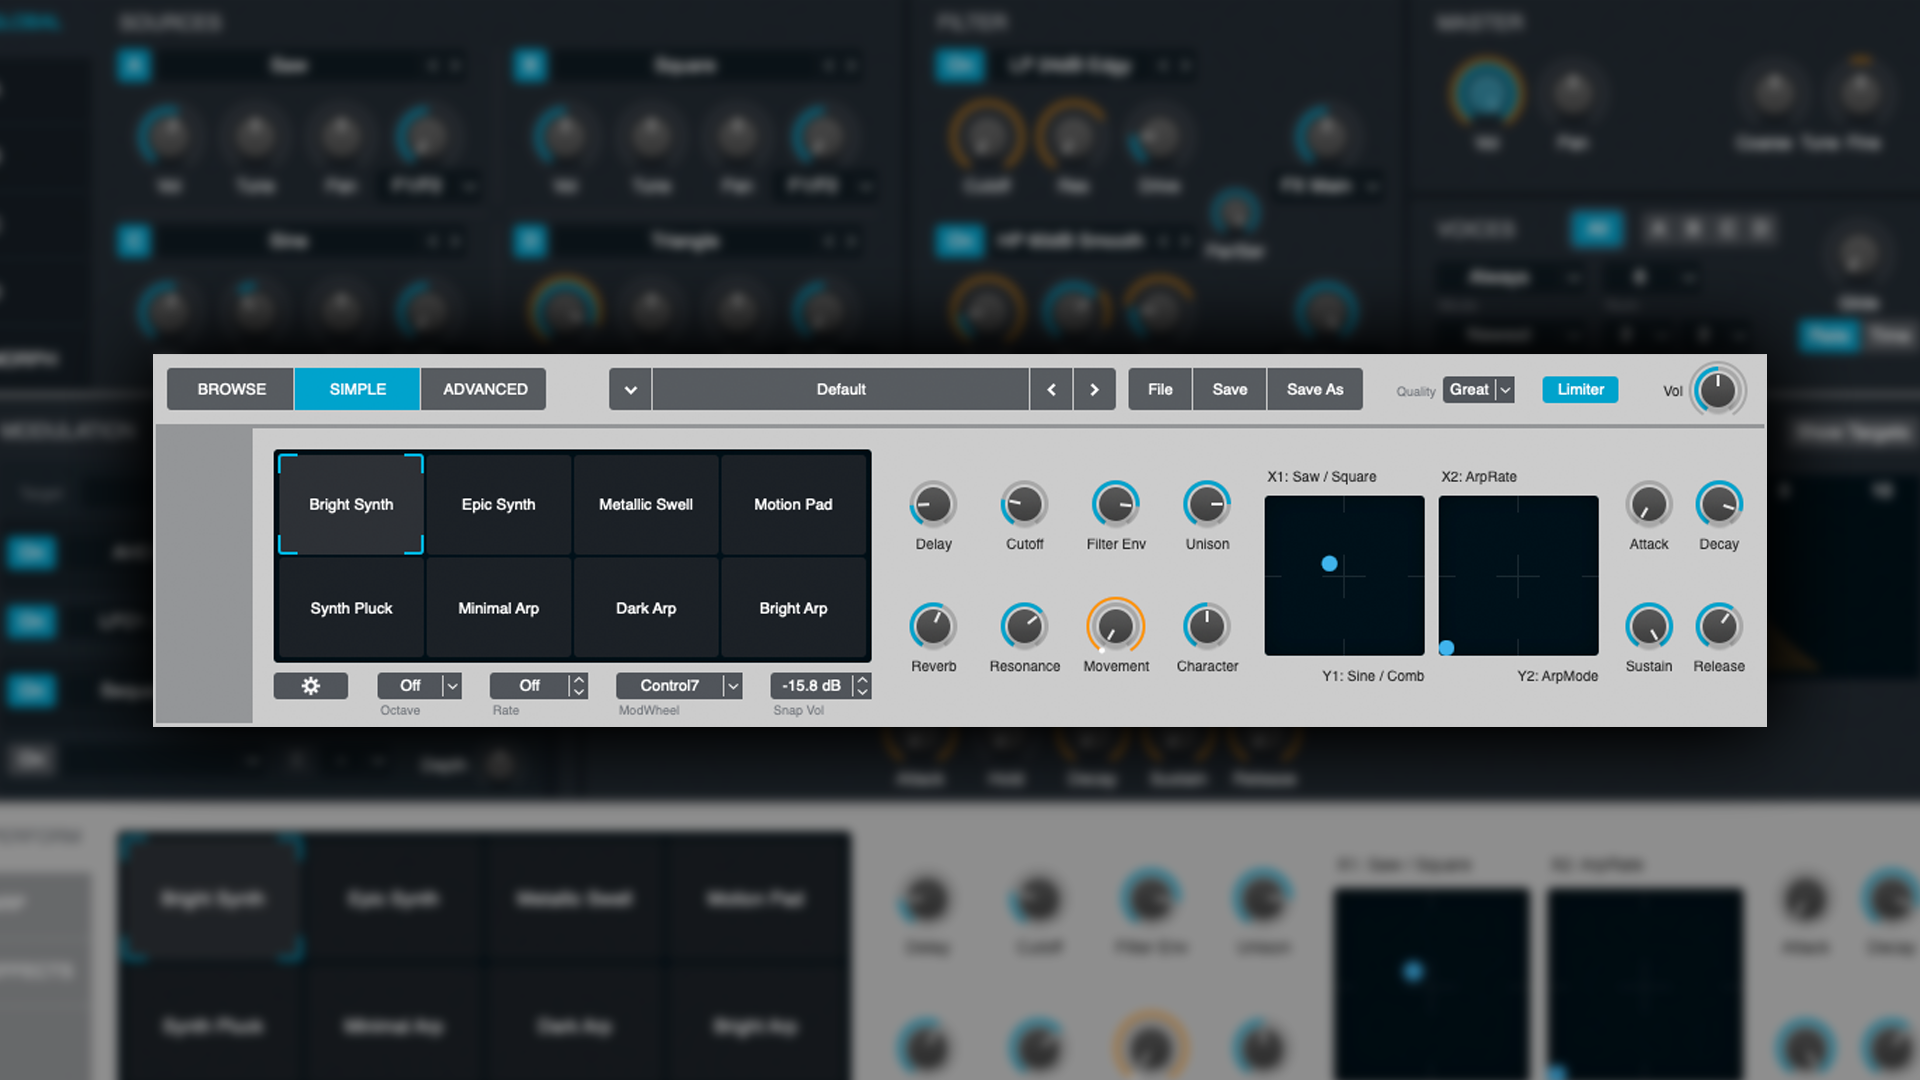
Upon opening Alchemy, you’re presented with Browse mode; the Simple view coupled with a preset browser. Its preset browser is very well organised and extremely comprehensive. Couple this with the Performance parameters at the bottom and you’ll more often than not have all you need.
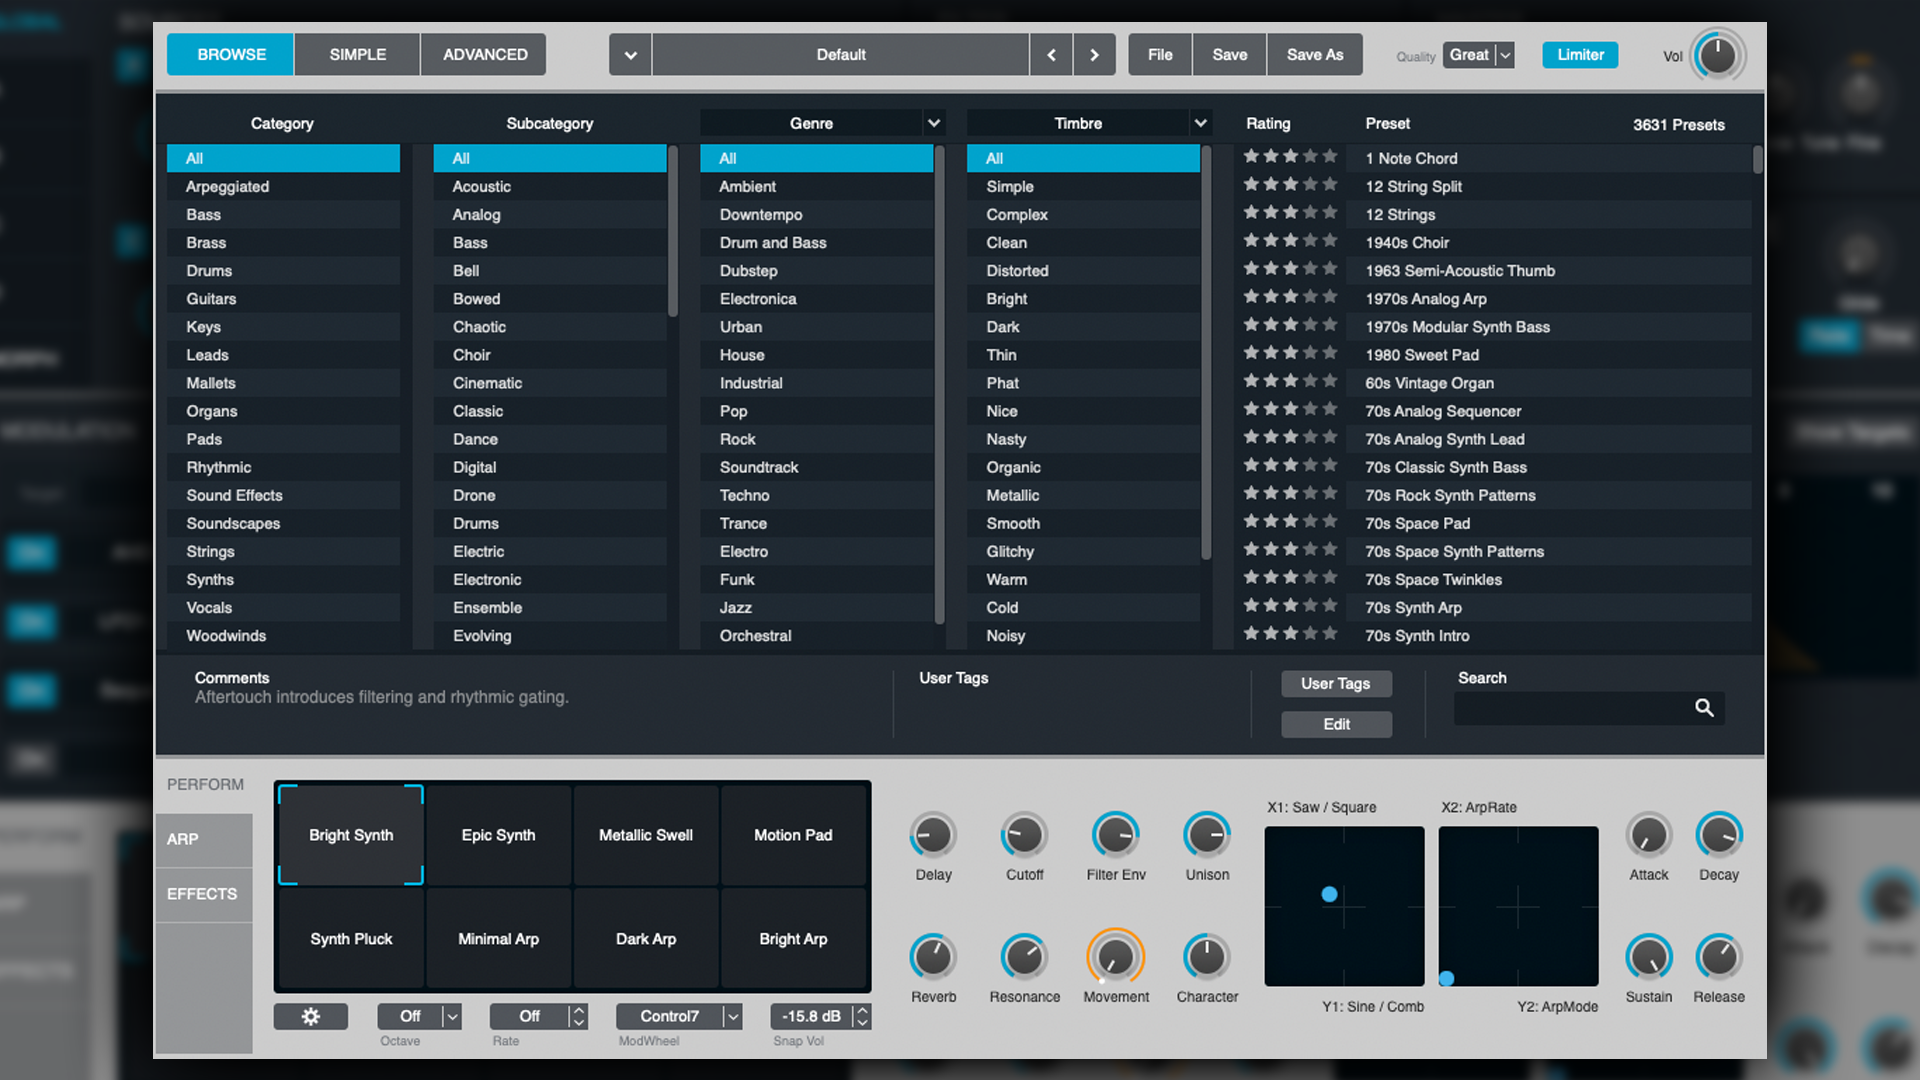
The performance parameters offer a superbly intuitive Snapshot matrix adjuster (more on this later), which, behind the scenes, is controlling a range of custom parameters to shape the tone according to the descriptors. However, if you want to peek under the hood and further customise the sounds, you can select the Advanced option to reveal all of the controls.
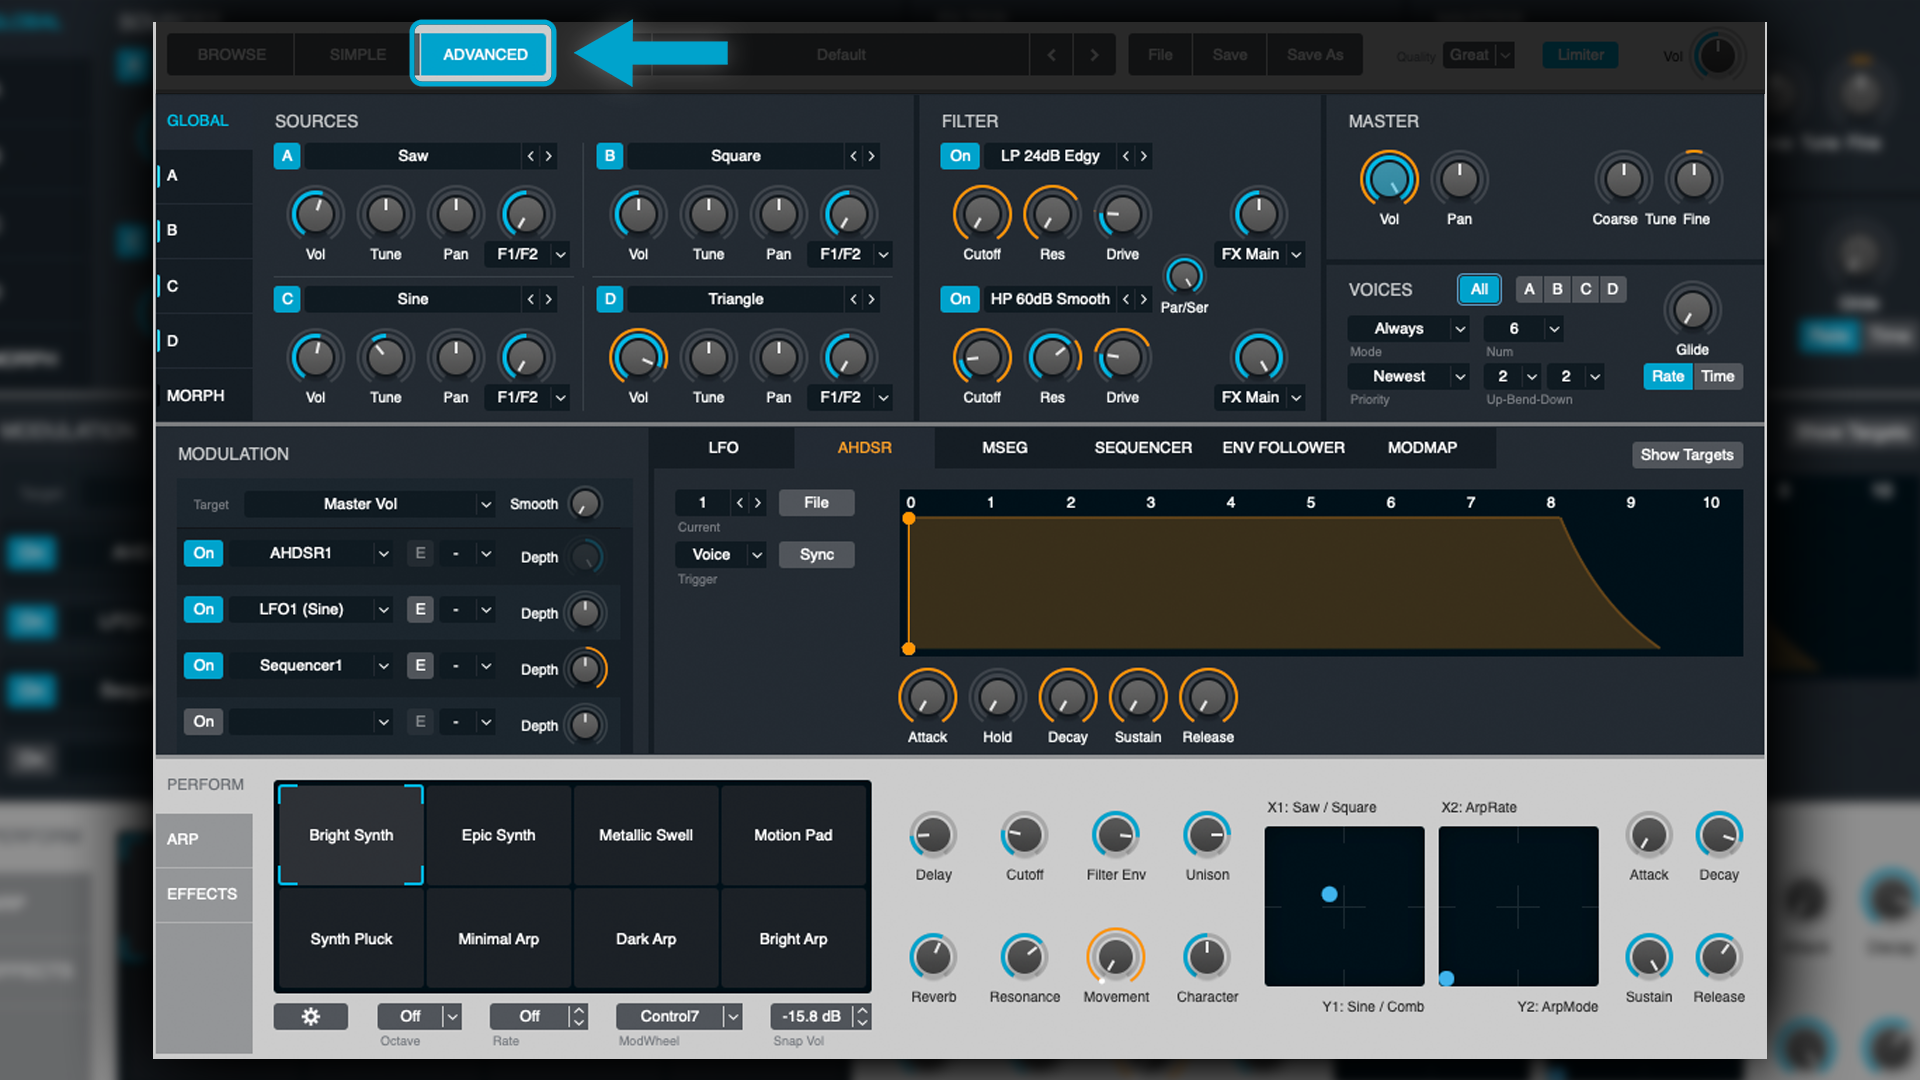
In the top left, we have the four Sources (more on those later) outlined under Global, each with their own volume, pan, tuning and FX send options.
Next up is the Filter, which (like Logic’s ES2) offers two filters which can be configured in either series or parallel. There is a plethora of analogue filter models to choose from, with numerous low pass, band pass and high pass options, as well as quirky and unusual filters such as comb, formant and notch.
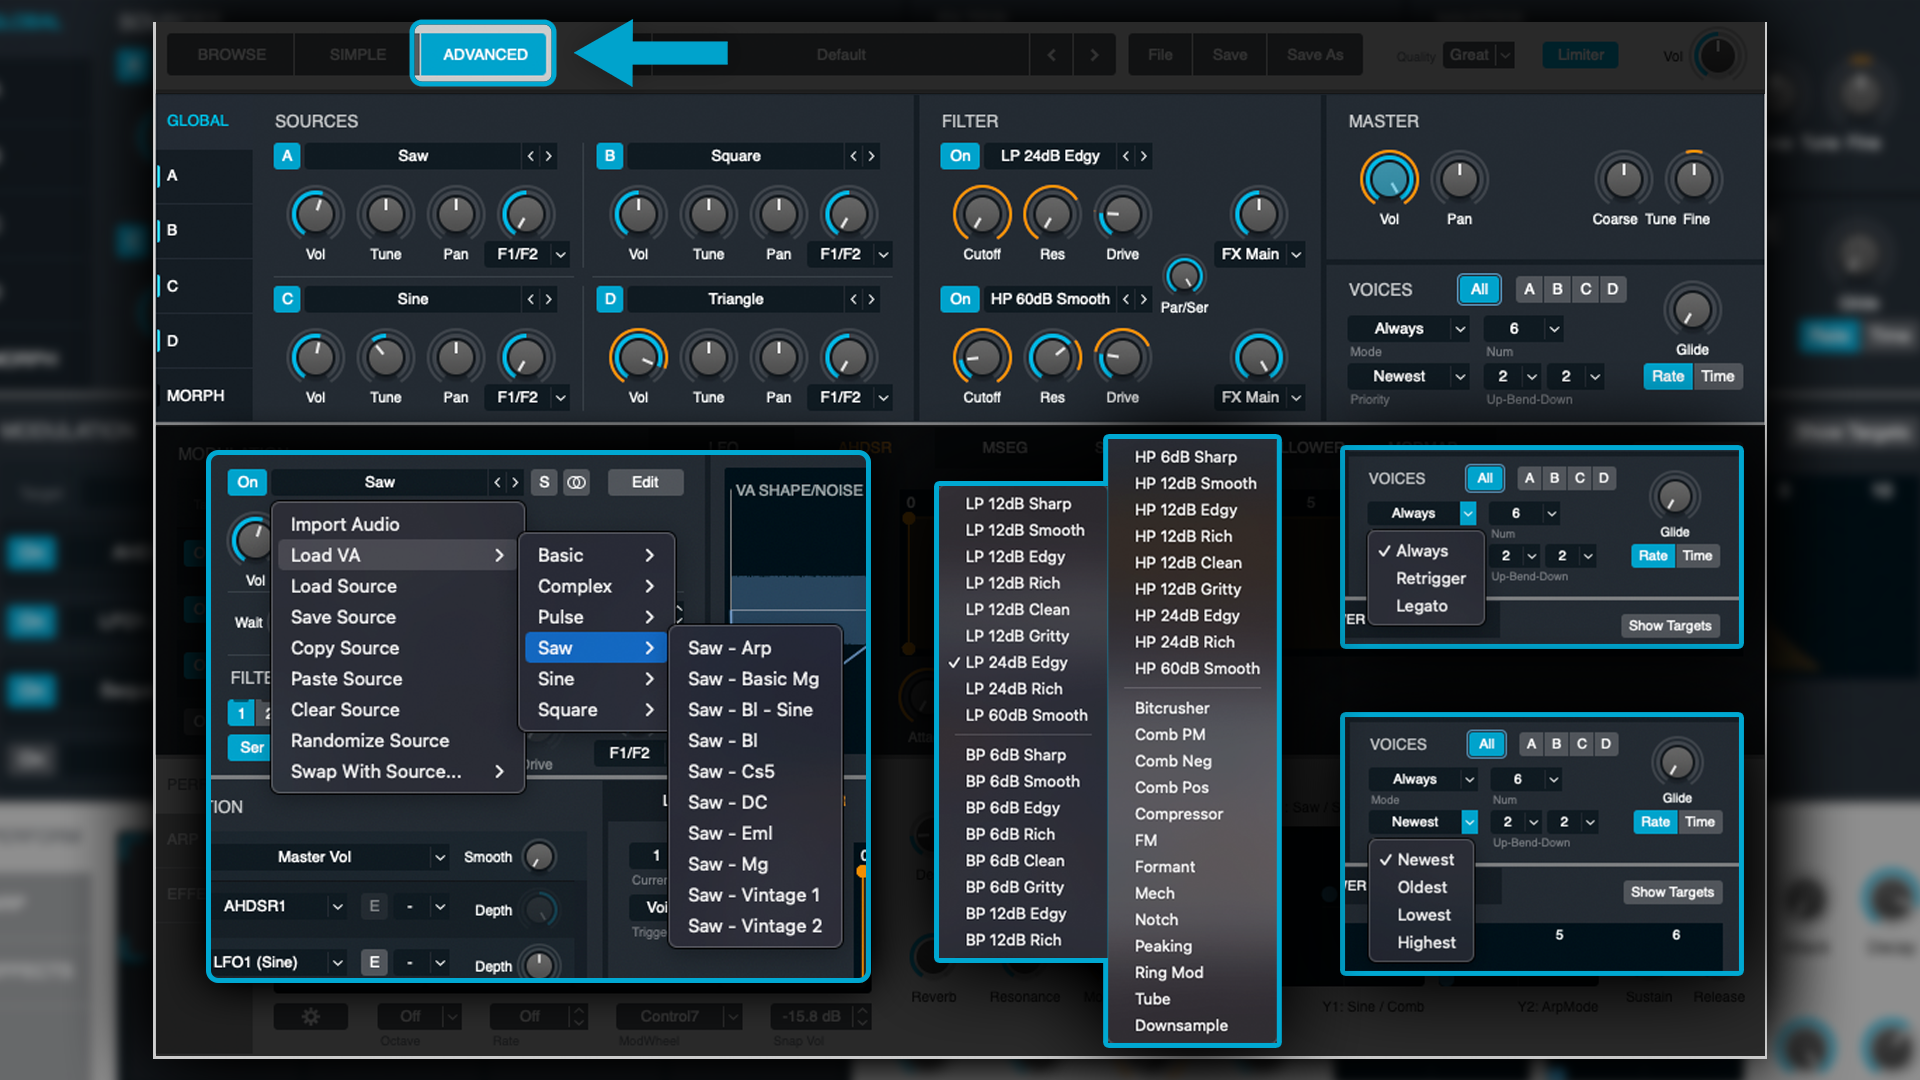
The filter parameters are fully controllable via the modulating matrix and assignable as either global or specific to an individual source.
In the top-right, there is the Master and Voices section, which hosts the usual parameters; Volume, Pan, Course/Fine Tune, number of Voices, Glide/Portamento, Mono/Poly, etc.
Sources
For now, think of the Sources as your oscillators or tone-generators (or perhaps even samplers). We can utilise up to four Sources. There are close to 100 oscillator wave-shapes to choose from for each Source (a bit like a wave-table synthesiser), or you can upload your own samples into a Source.
From here, you can dial in various types of synthesis, selectable on the right-hand side. Note that depending on the Source, not all types of synthesis are available (more on this later).
Additive
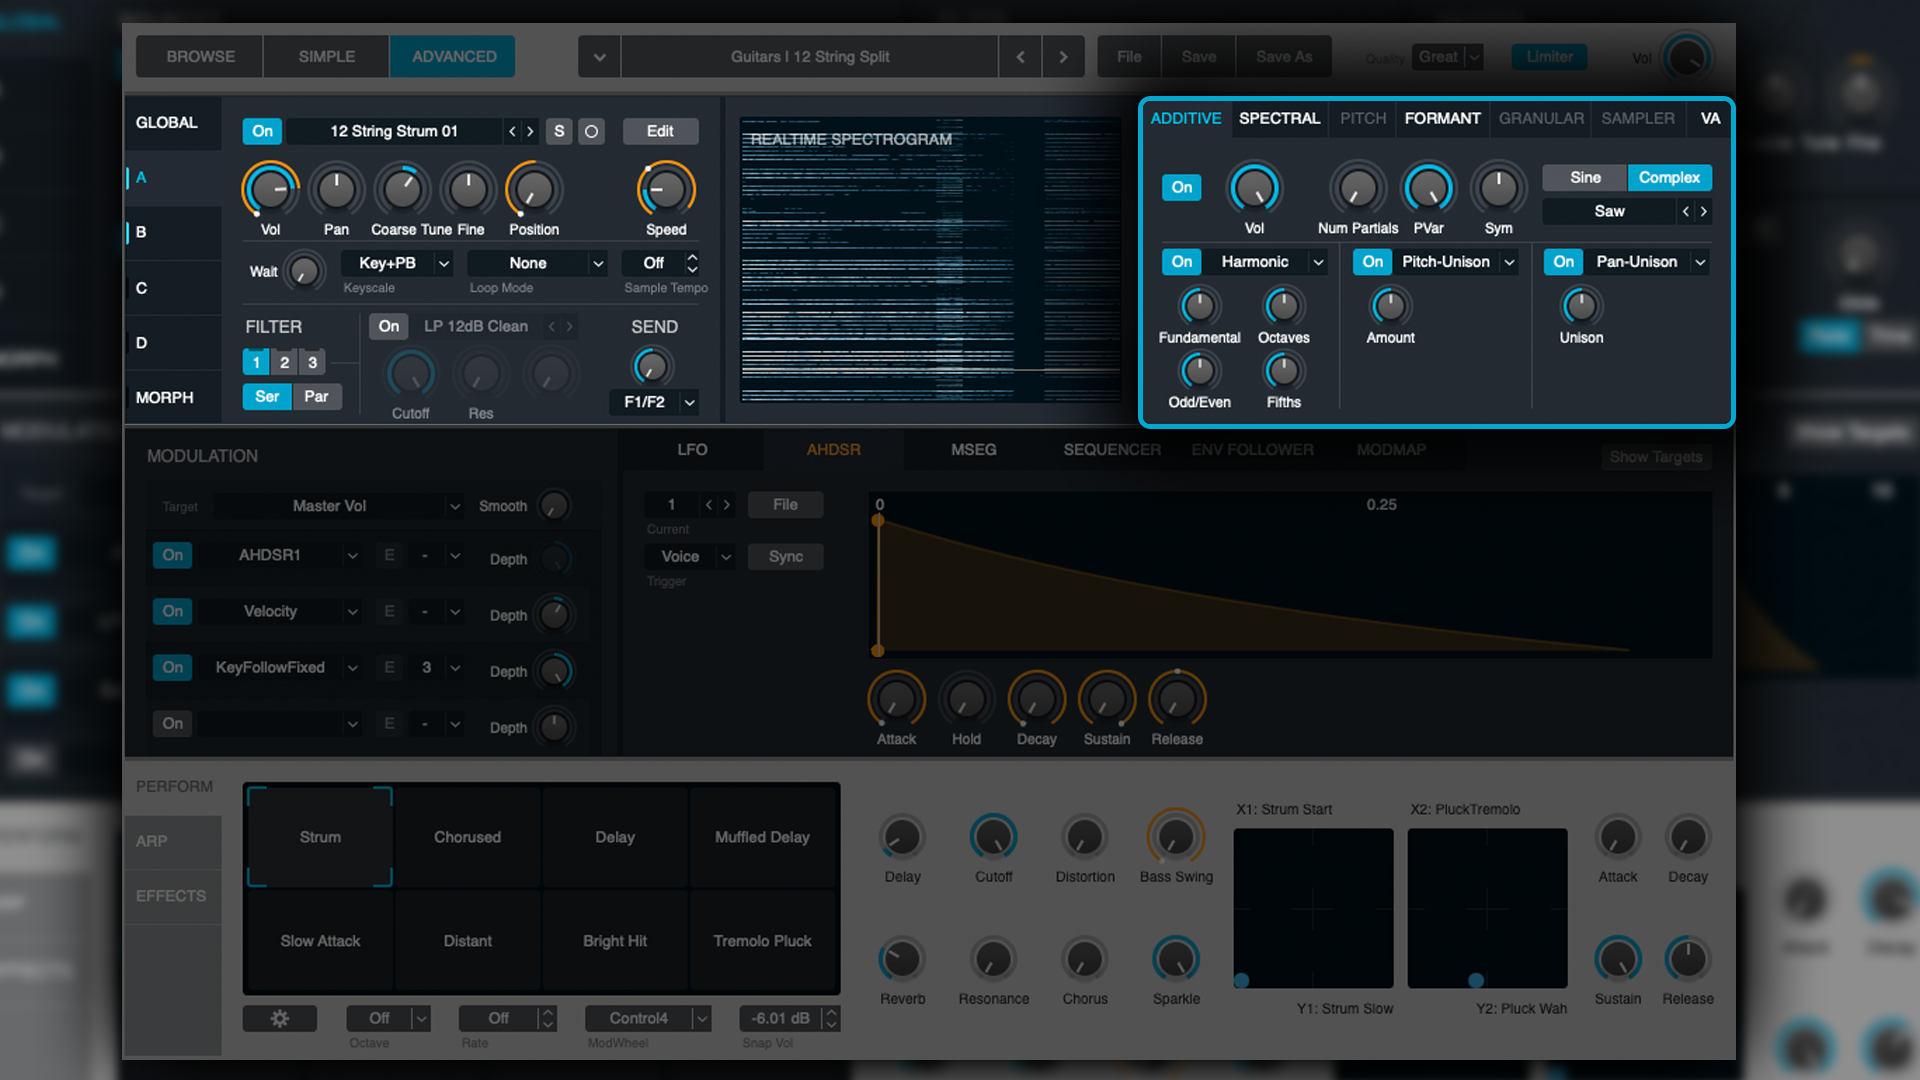
As mentioned above, the Additive synthesis is the blending/layering together of waveforms. This section therefore provides us with a choice of wave-shapes to “add” to our signal.
You can adjust the number of Additive Partials (the more you add, the more varied the tone becomes). You can also alter the pitch of the partials to induce dissonance and/or characterful overtones. Lastly, there’s the symmetry of the waveform, which alters the length of the first or latter half of the waveform, further altering the harmonic content.
The 'additions' don’t stop there however. The Additive section also allows for amplitude, pitch and other effect controls, which will only apply to the Additive waveform partials, but can nevertheless be extremely influential.
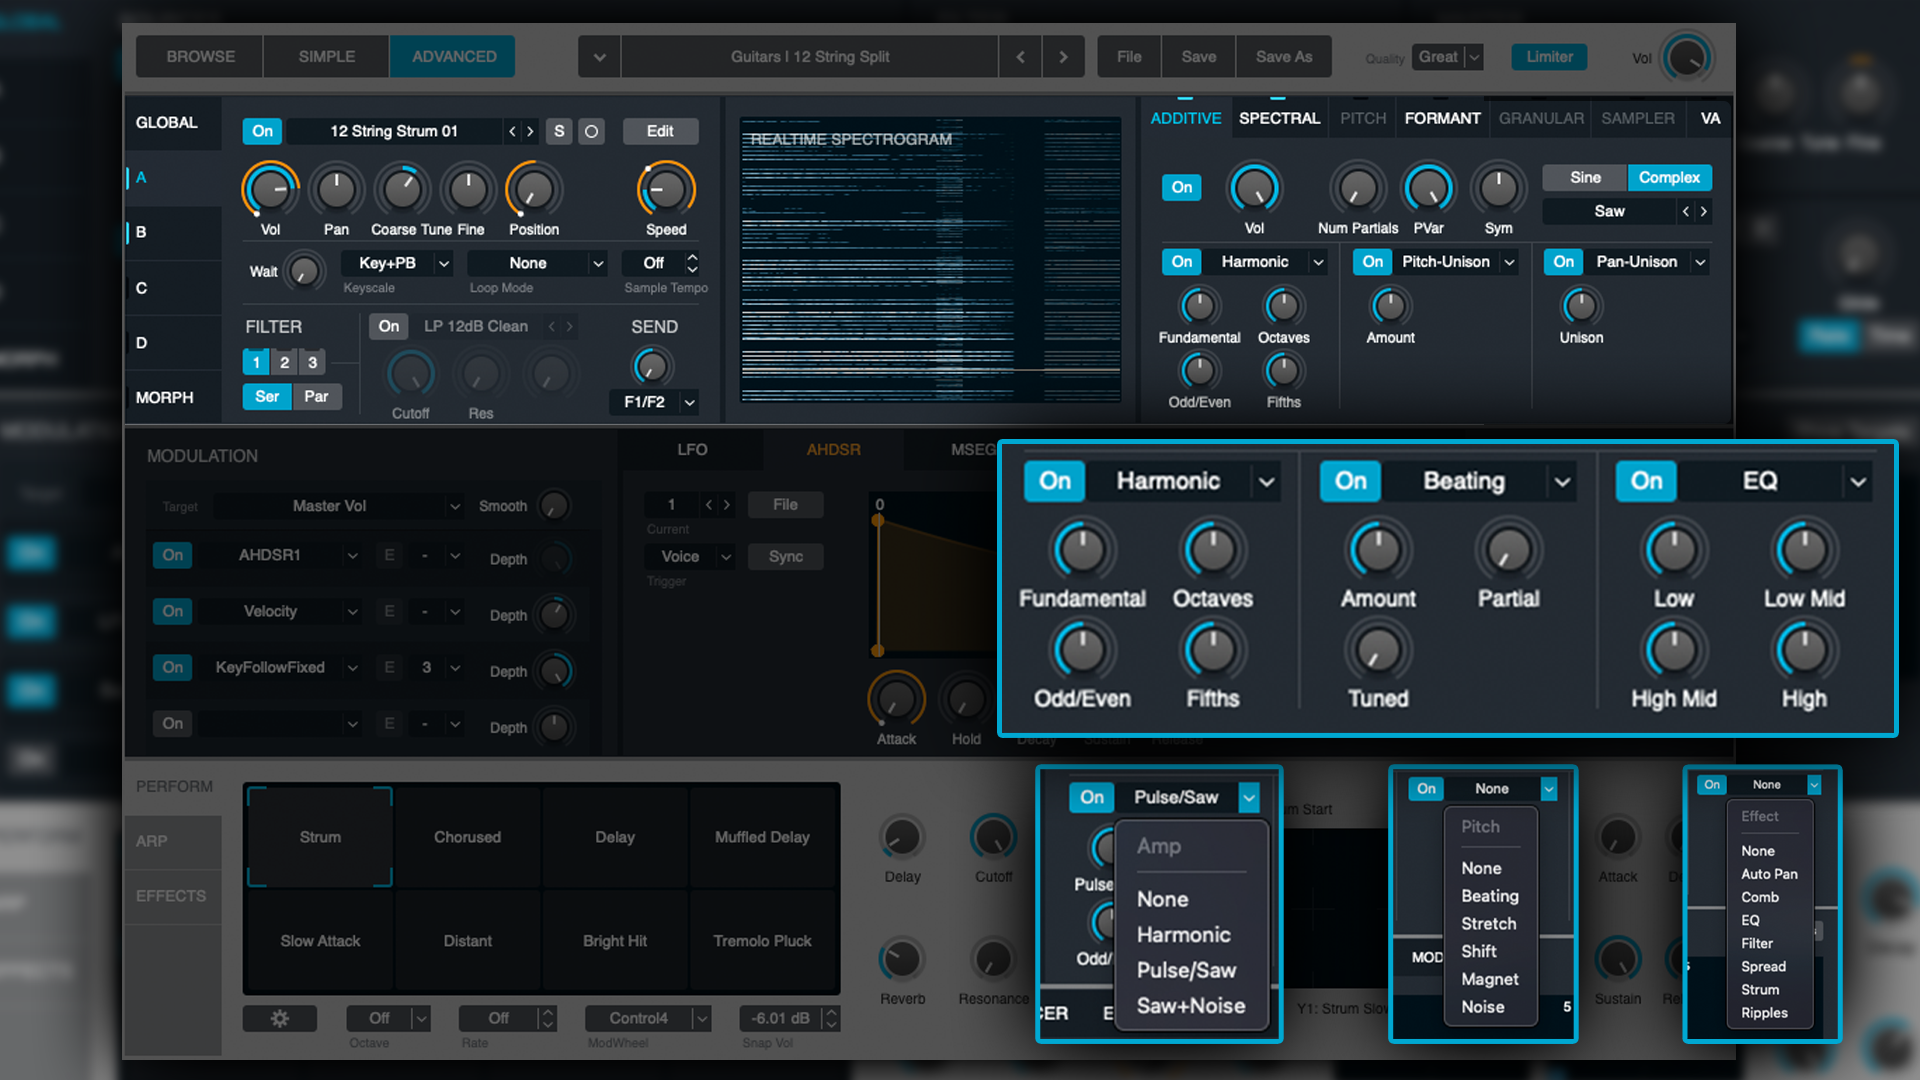
Let's run through some of the parameters available in this section and explain what each one does.
Amplitude:
- Harmonic - allows you to adjust the amplitude of Additive partials based on tuning the fundamental frequency
- Pulse/Saw - scales the amplitude of the Additive partials to make the higher frequency partials less prominent (softer/quieter)
- Saw+Noise - applies Saw and Noise waveforms to the amplitude of the Additive partials
Pitch:
- Beat - detunes Additive partials to create tonal beats
- Stretch - sharpens the upper Additive partials and flattens the lower Additive partials
- Shift - moves the tuning of all Additive partials, thus breaking their harmonic relationship with the Source pitch
- Magnet - shifts the tuning of all Additive partials towards a specified pitch
- Noise - applies noise waveforms to the pitch of the Additive partials and can often be rather chaotic
Effects:
- Auto-Pan - modulates all Additive partials from left to right
- Comb - applies a comb filter to the Additive partials
- EQ - applies EQ controls to the Additive partials
- Filter - applies a high-pass/low-pass filter to the Additive partials
- Spread - enhances the stereo-spread of the Additive partials
- Strum - applies amplitude modulation to the Additive partials in a way that’s reminiscent of guitar strumming
- Ripples - applies sine-wave amplitude modulation to the Additive partials in a way that create a rippling effect
Spectral
This mode is only available when you’ve imported a sample as your Source (as opposed to selecting from one of the many waveforms). As outlined above, much like a vocoder, the signal is analysed and modelled using sine waves and noise. This is then summed with the Source signal.
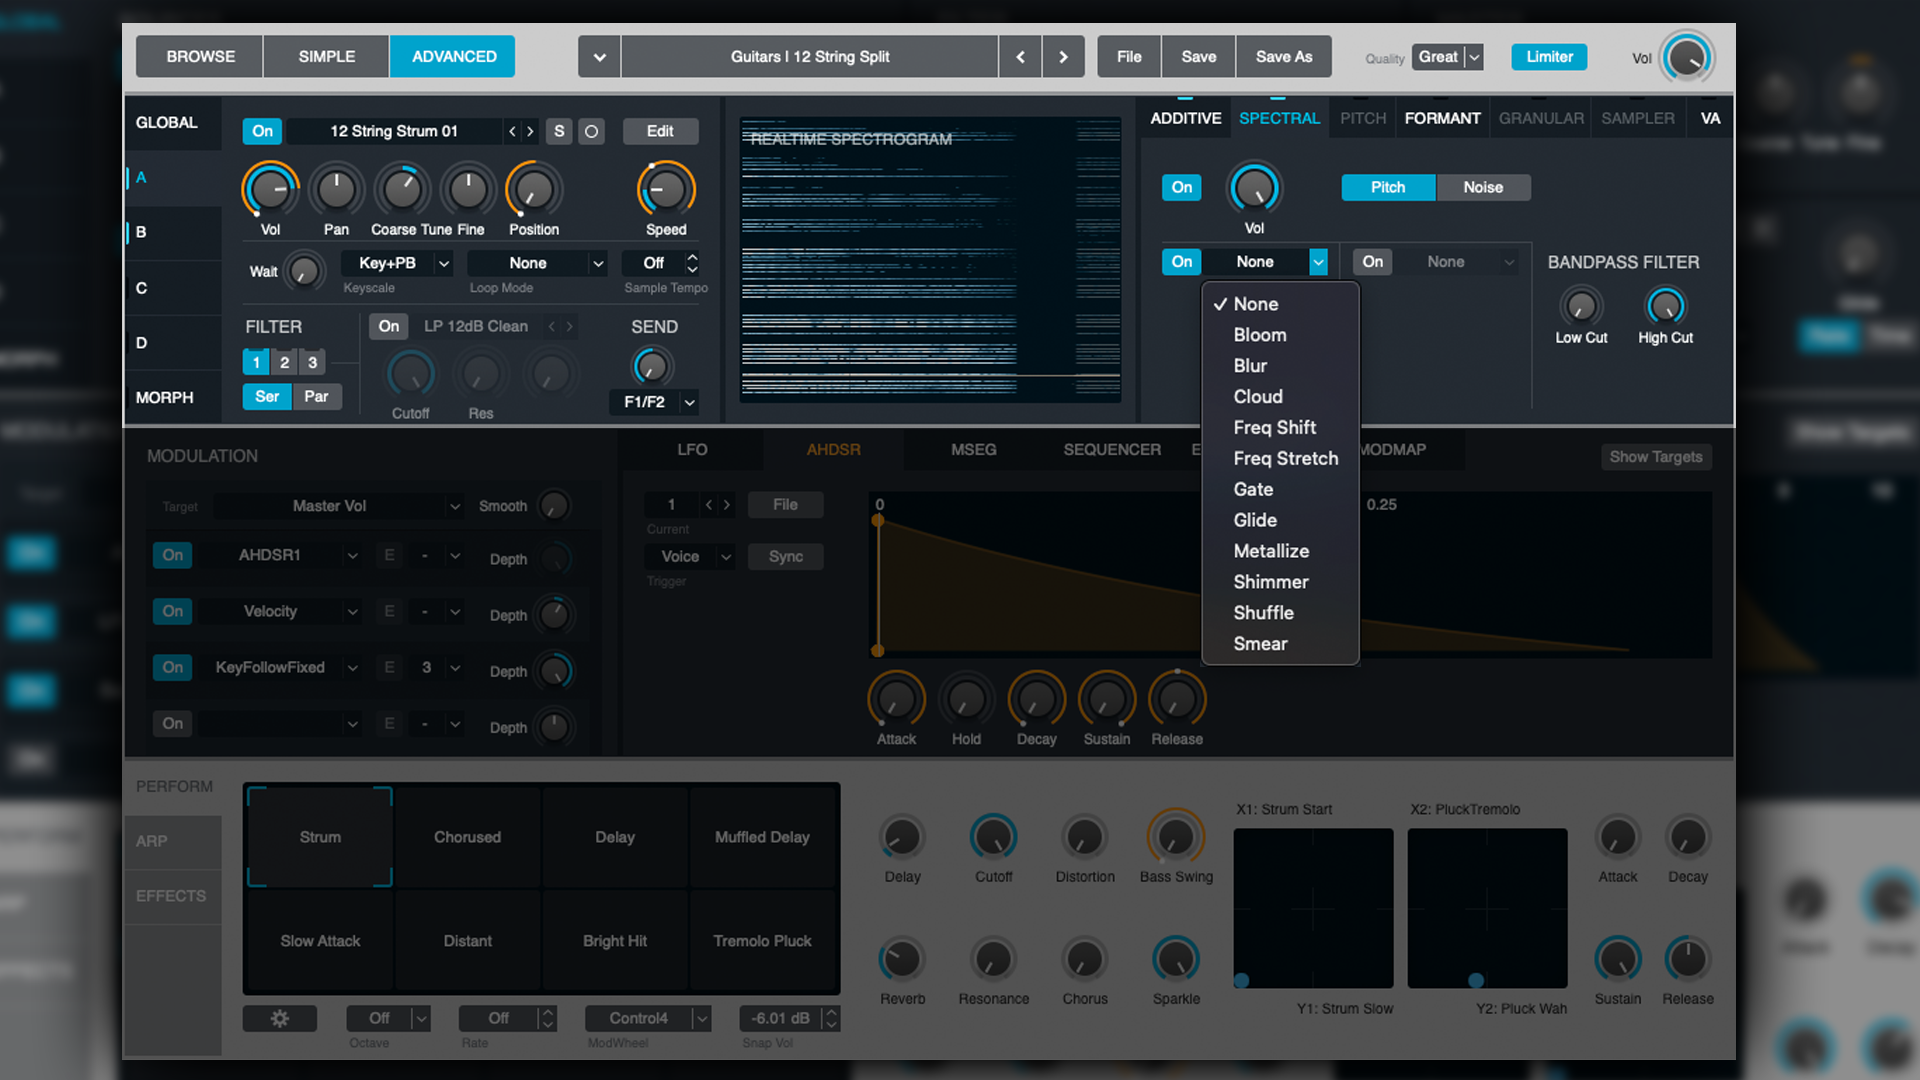
Like the Additive section, there are numerous variables and parameters to shape and alter the influence of the Spectral Modelling. Alongside the self-explanatory volume, and high-pass/low-pass filter, there are two assignable effect slots, with an interesting selection of Spectral-specific devices. Let's run through some of these.
- Pitch/Noise - Switch between sine wave and noise Spectral tones
- Bloom - produces a burst of Spectral frequencies based on the source sound. There can be lag or pre-delay to this effect, as it requires a great deal of calculation and processing
- Blur - blurs or reduces the clarity and distinction of the Spectral tones
- Cloud - creates a cloud or blanket of Spectral tones that can have a chorus-like effect
- Freq Shift - moves the Spectral tones around the frequency spectrum, drastically altering their characteristics
- Freq Stretch - creates inharmonic, sometimes dissonant Spectral movements
- Gate - essentially a noise gate, but can be utilised like Tremolo (on the Spectral tones)
- Glide - creates an upwardly moving frequency shift within the Spectral tones (another potentially laggy effect)
- Metallize - essentially a comb filter, but the results are typically rather metallic sounding
- Shimmer - sweeps Spectral tone frequencies at a desired speed, often creating upper harmonic overtones of interest (similar to how shimmer-style reverbs work)
- Shuffle - a randomiser of Spectral tones that can be extremely strange and interesting (especially on the Noise option)
- Smear - a smoother alternative to the Blur effect mentioned above (achieved by averaging the differences between harmonics during Spectral blurring)
Pitch
Pitch mode is a feature specific to imported samples at the Source. Its primary use is to auto-tune the Additive partials and/or Spectral tones, keeping them closely aligned with the triggered notes.
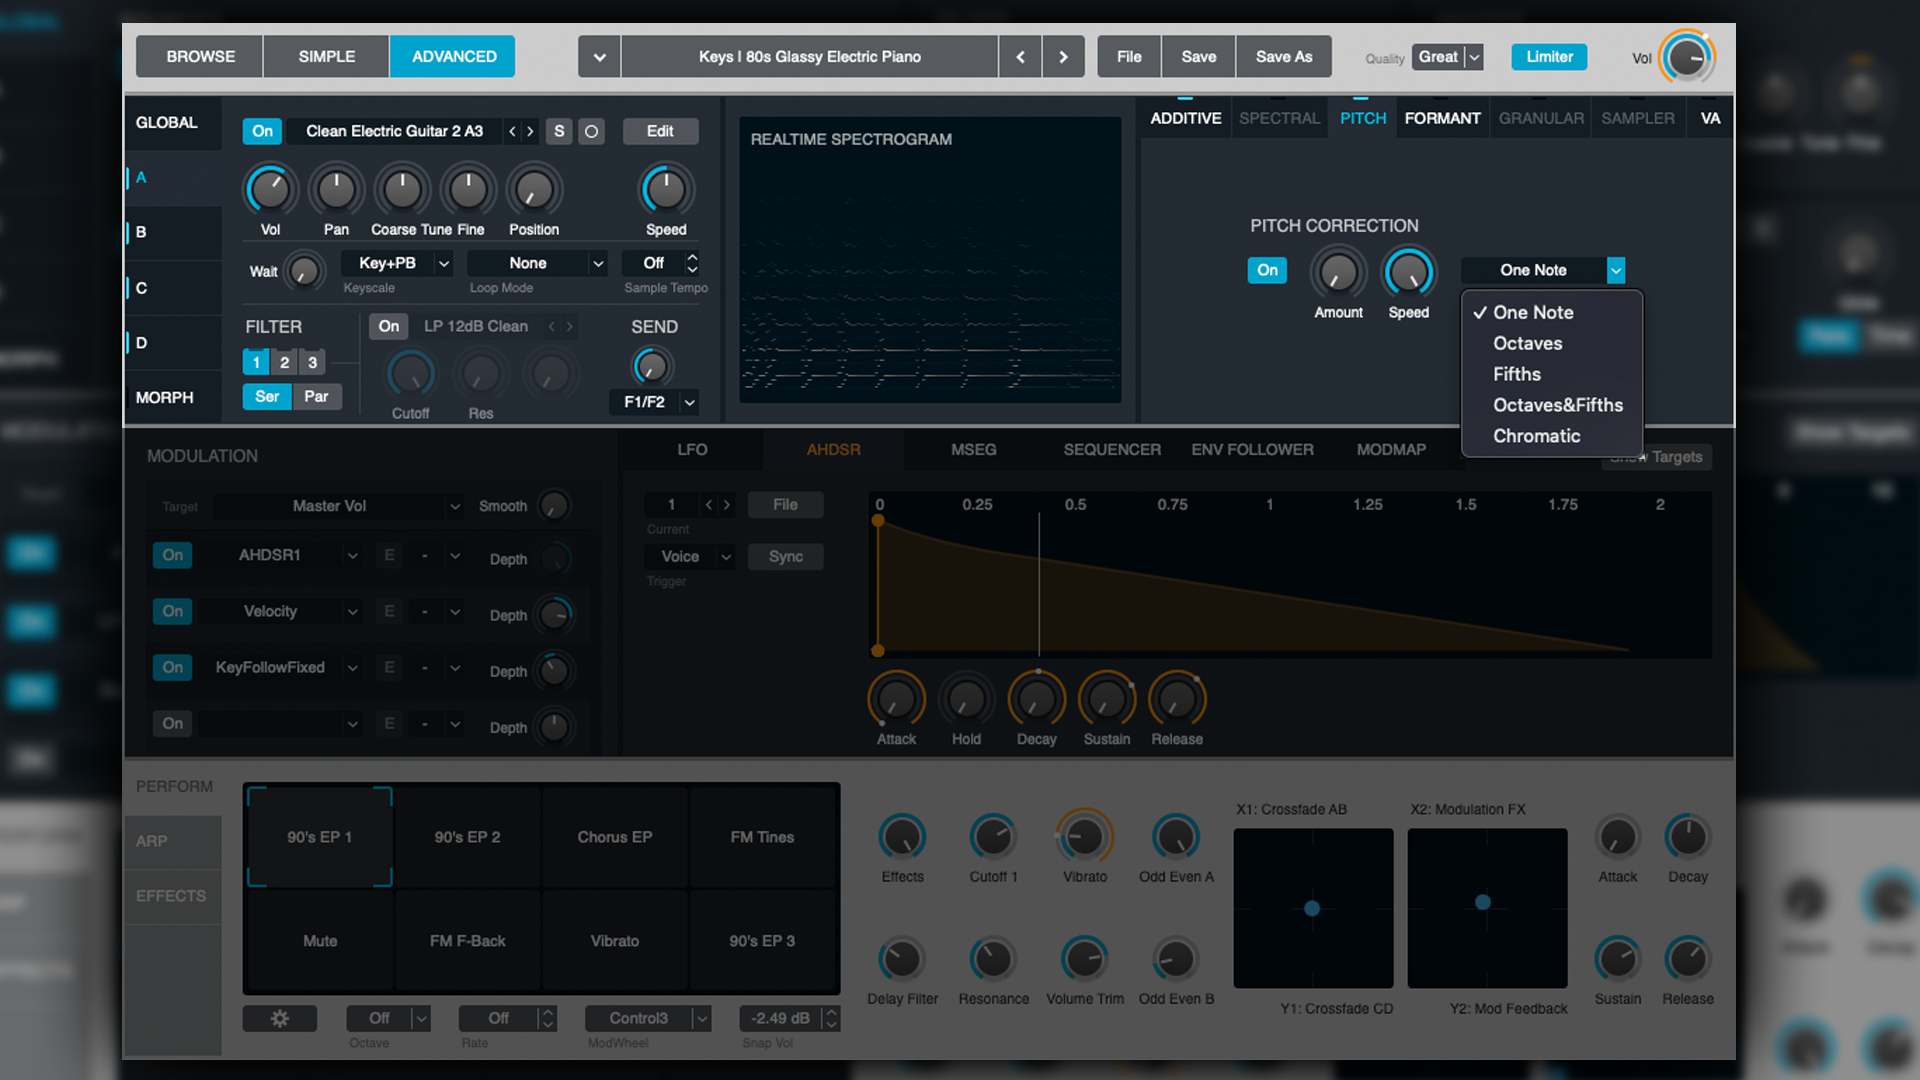
This part of the synthesiser is typically disabled by default, however, I imagine it might be useful if your partials or overtones are getting a little unwieldy and dissonant.
Formant
Like Spectral and Pitch, the Formant mode is only available when you’ve imported a sample as your Source. The Formant filter scales the amplitude of Additive partials and Spectral tones over time, to better mimic the behavioural characteristics of acoustic instruments.
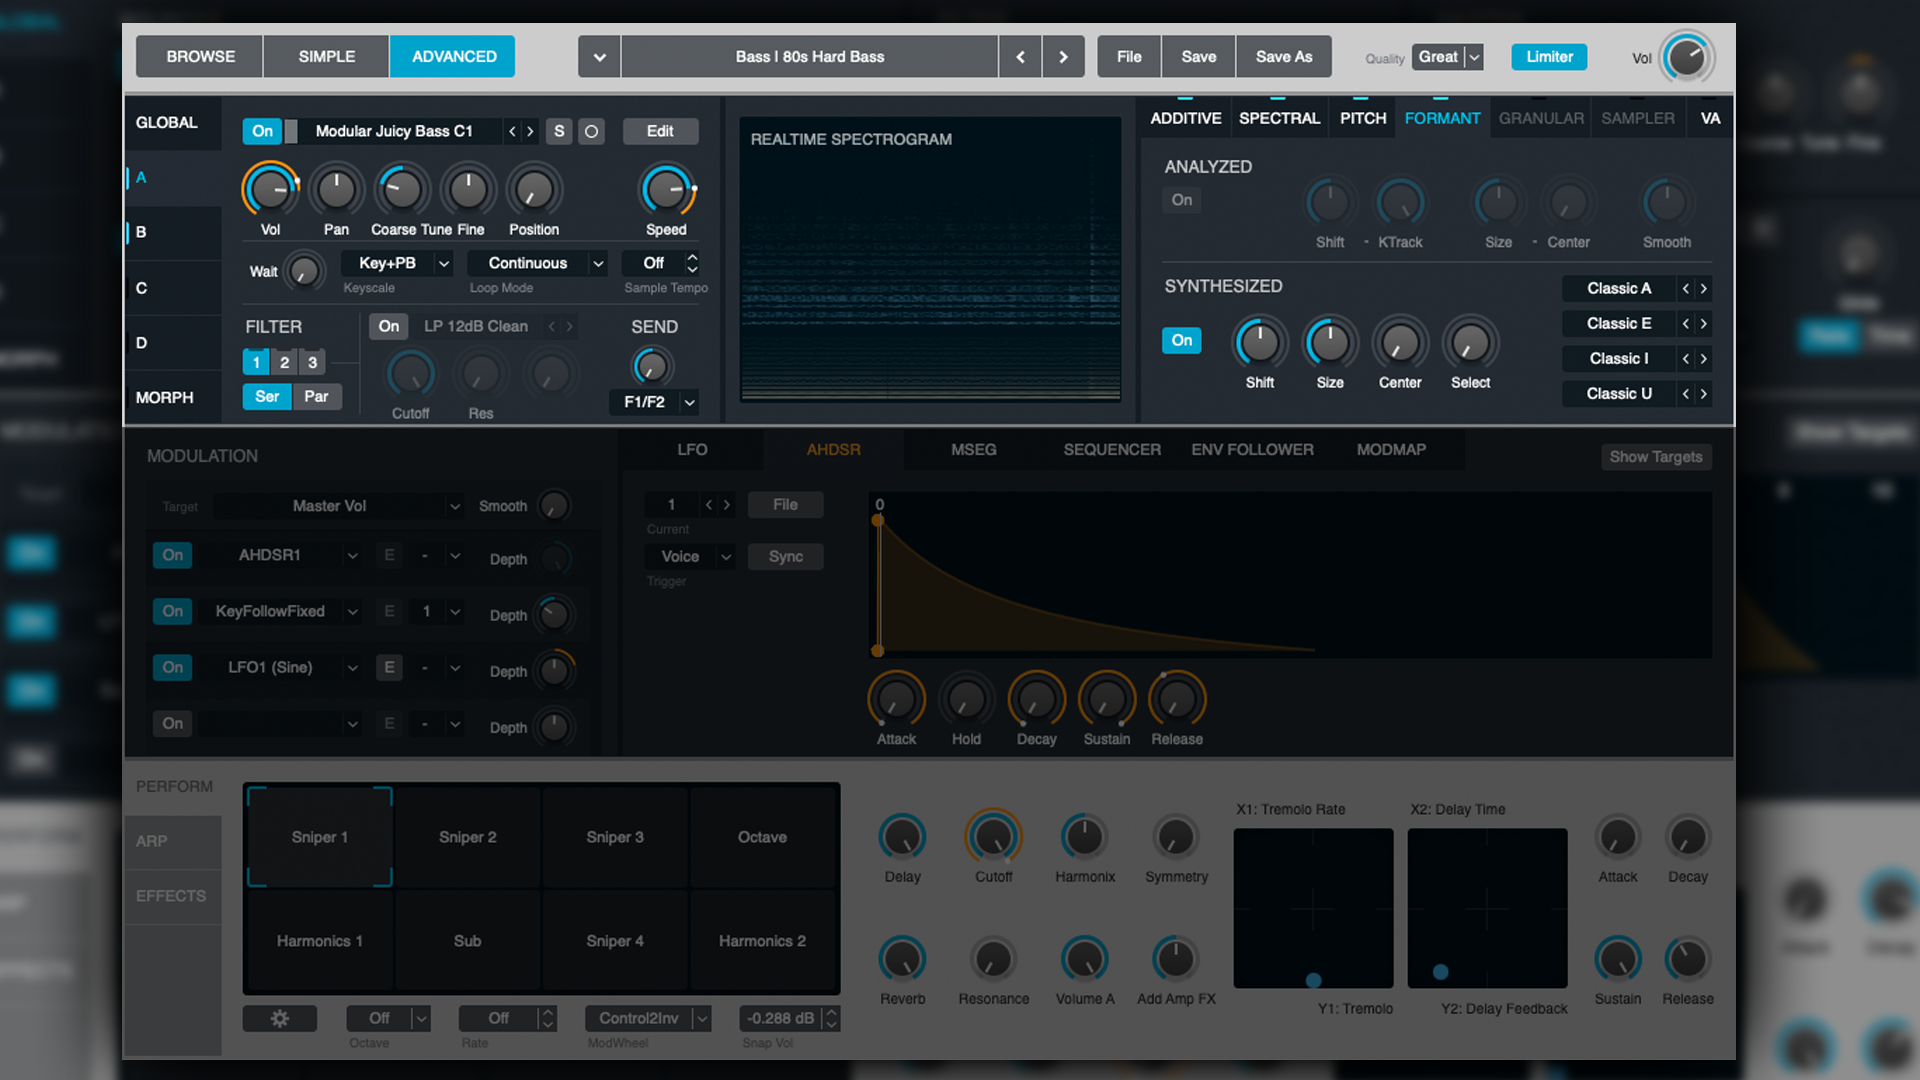
This section in particular is where you can bring distinctive character and eerily organic feeling elements to your tones. It’s divided into two sections: Analyzed and Synthesized. They largely do the same thing, however Analyzed is only available if you enabled Formant Analysis upon sample import.
- Shift - moves the formants in semi-tone/half-tone intervals - the higher the setting, the brighter and more shimmery things get
- KTrack (Analyzed only) - very similar to key-tracking on a normal filter, enabling lower notes to have less top end detail and higher notes to have more clarity
- Size - creates the illusion of bigger or smaller tonal space (somewhat like stereo widening)
- Centre - sets the frequency which the Formants will gravitate towards (the Centre knob has no effect when the Size is set to 100%)
- Smooth (Analyzed only) - smooths the transitions or changes between Formants
- Select (Synthezised only) - move/blend through the filter types (explained below)
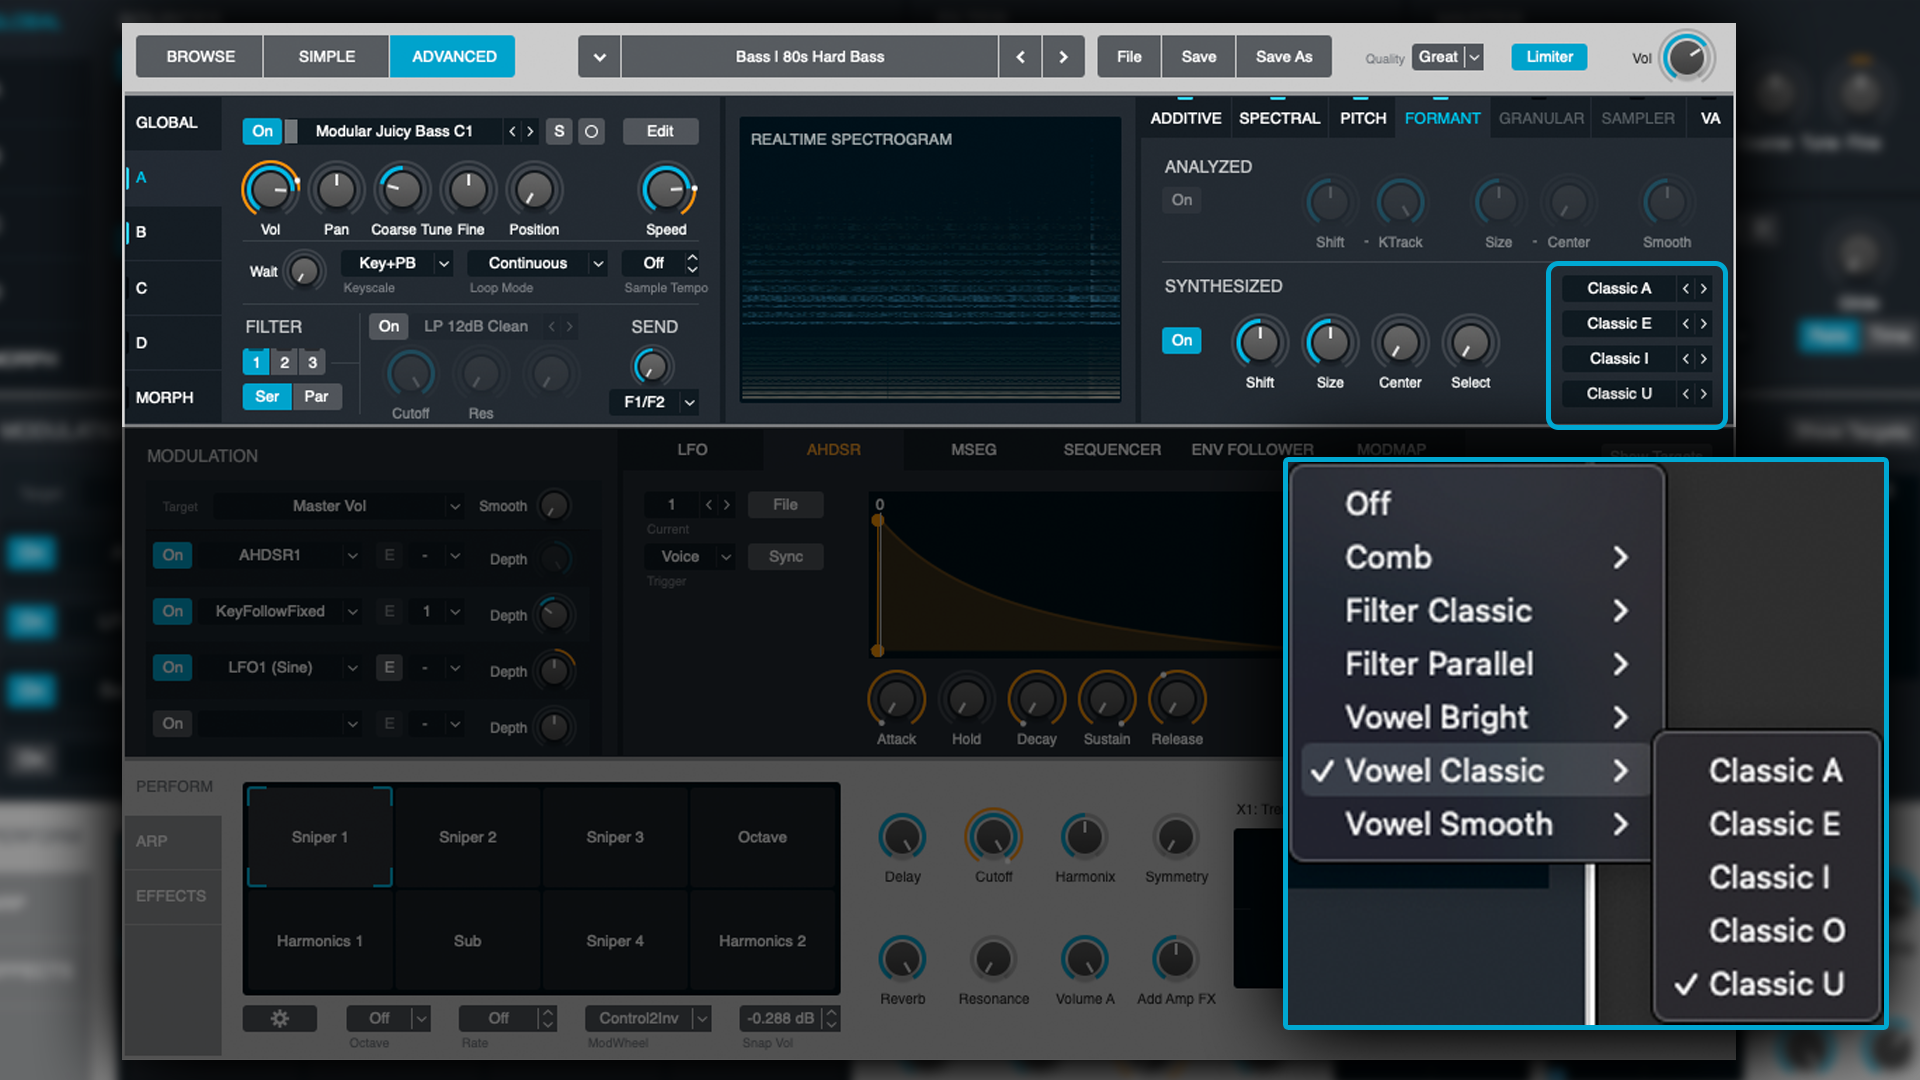
There are 30 Formant Filter types in total, ranging from conventional high-pass/low-pass filters to filters with distinctive speech characteristics. Whilst their naming is a strong indication of what to expect, it’s worth previewing them to better understand their tonal flavour.
Granular
As outlined above, Granular synthesis takes tiny portions of a sample and jumbles them up, reordering them into new sounds that still bear some resemblance to the original sound source, whilst feeling new and different.
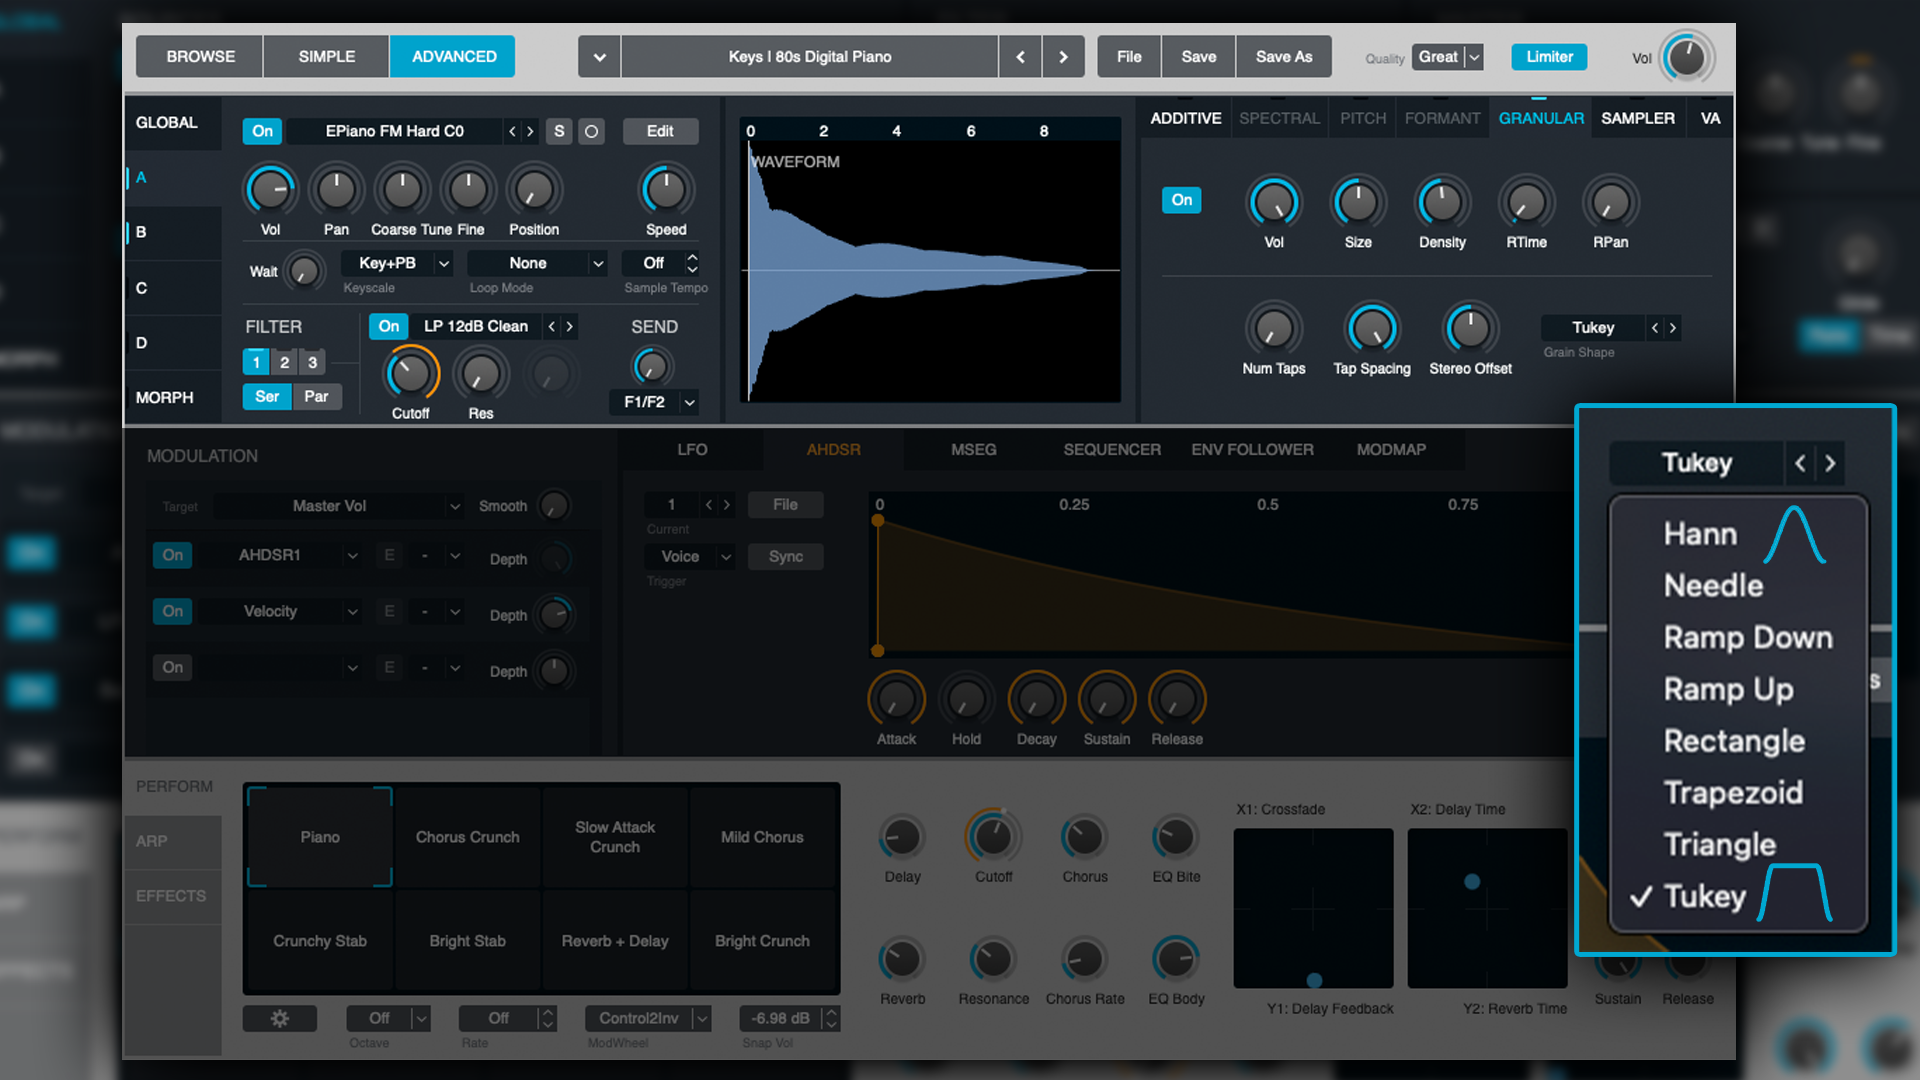
When you load a sample into Alchemy in Granular mode, Alchemy randomly creates grains of anywhere between 2 and 230 milliseconds. There are a range of variables to control the character of the grains. Let's run through those.
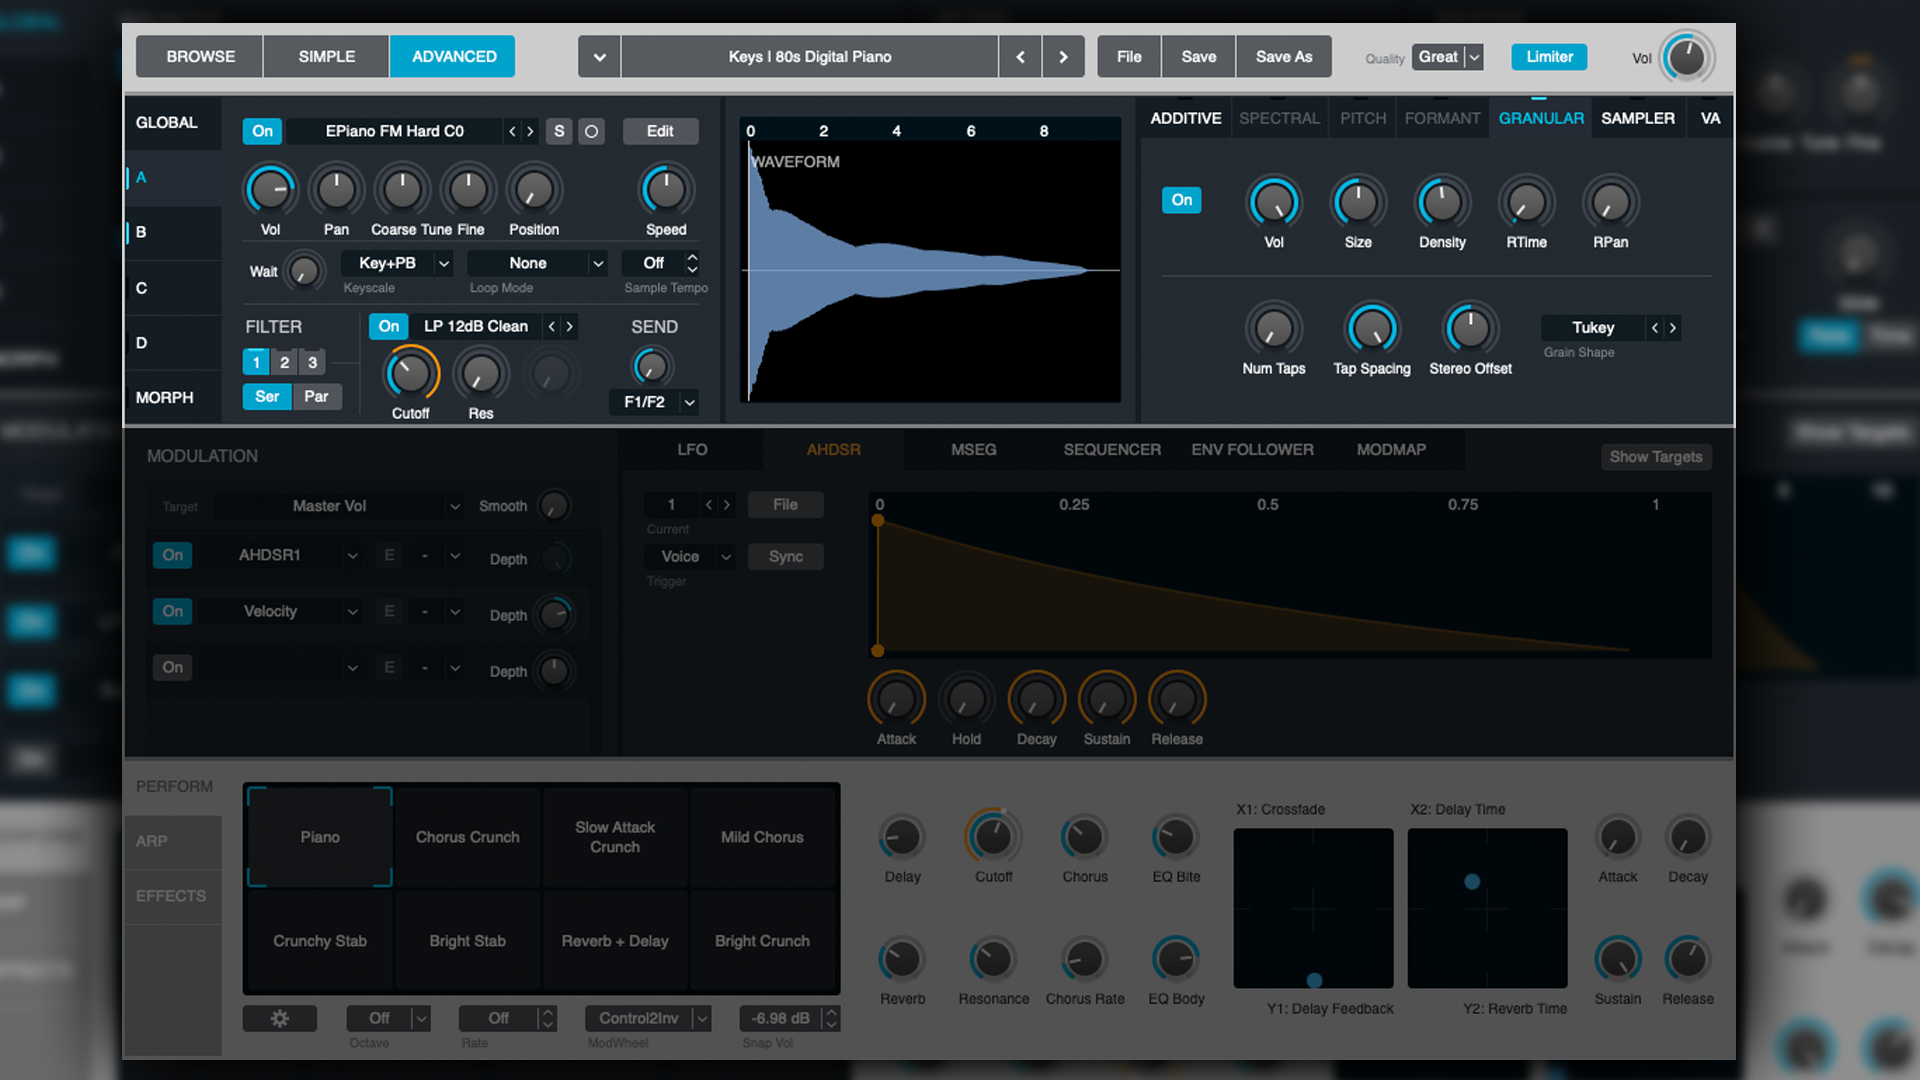
- Size - adjusts the duration of grains. The shorter, the choppier, noisier and more dissonant things become
- Density - determines the number of overlapping grains. Low values have an almost Tremolo-like slicing effect. The higher you go, the smoother things become
- RTime - applies randomisations to grain start-points. The higher this value, the thicker and warmer things tend to get
- RPan - randomises the panning of the grains. The higher the value, the more lush the stereo picture becomes
- Num Taps - a tap retriggers the attack phase of the source. Increasing the taps can induce a lot of interesting harmonic overtones
- Tap Spacing - determines how long a tap is played before it is cycled. This can have profound impacts on the taps at both extremes of the dial. Low tap spacing renders the taps almost ineffective, with only minor characteristic changes noticeable, meanwhile high tap spacing can result in the taps becoming rather dissonant above values of 1 or 2
- Stereo Offset - widens or narrows the stereo image
Lastly there is the Grain Shape. Think of this as the amplitude envelope of each grain. They’re all based on established envelope/filter shapes found throughout electronic signal processing. Most provide a gradient (fade in/out), however the Ramps and Rectangle have flat edges, meaning they can be fairly choppy.
Sampler
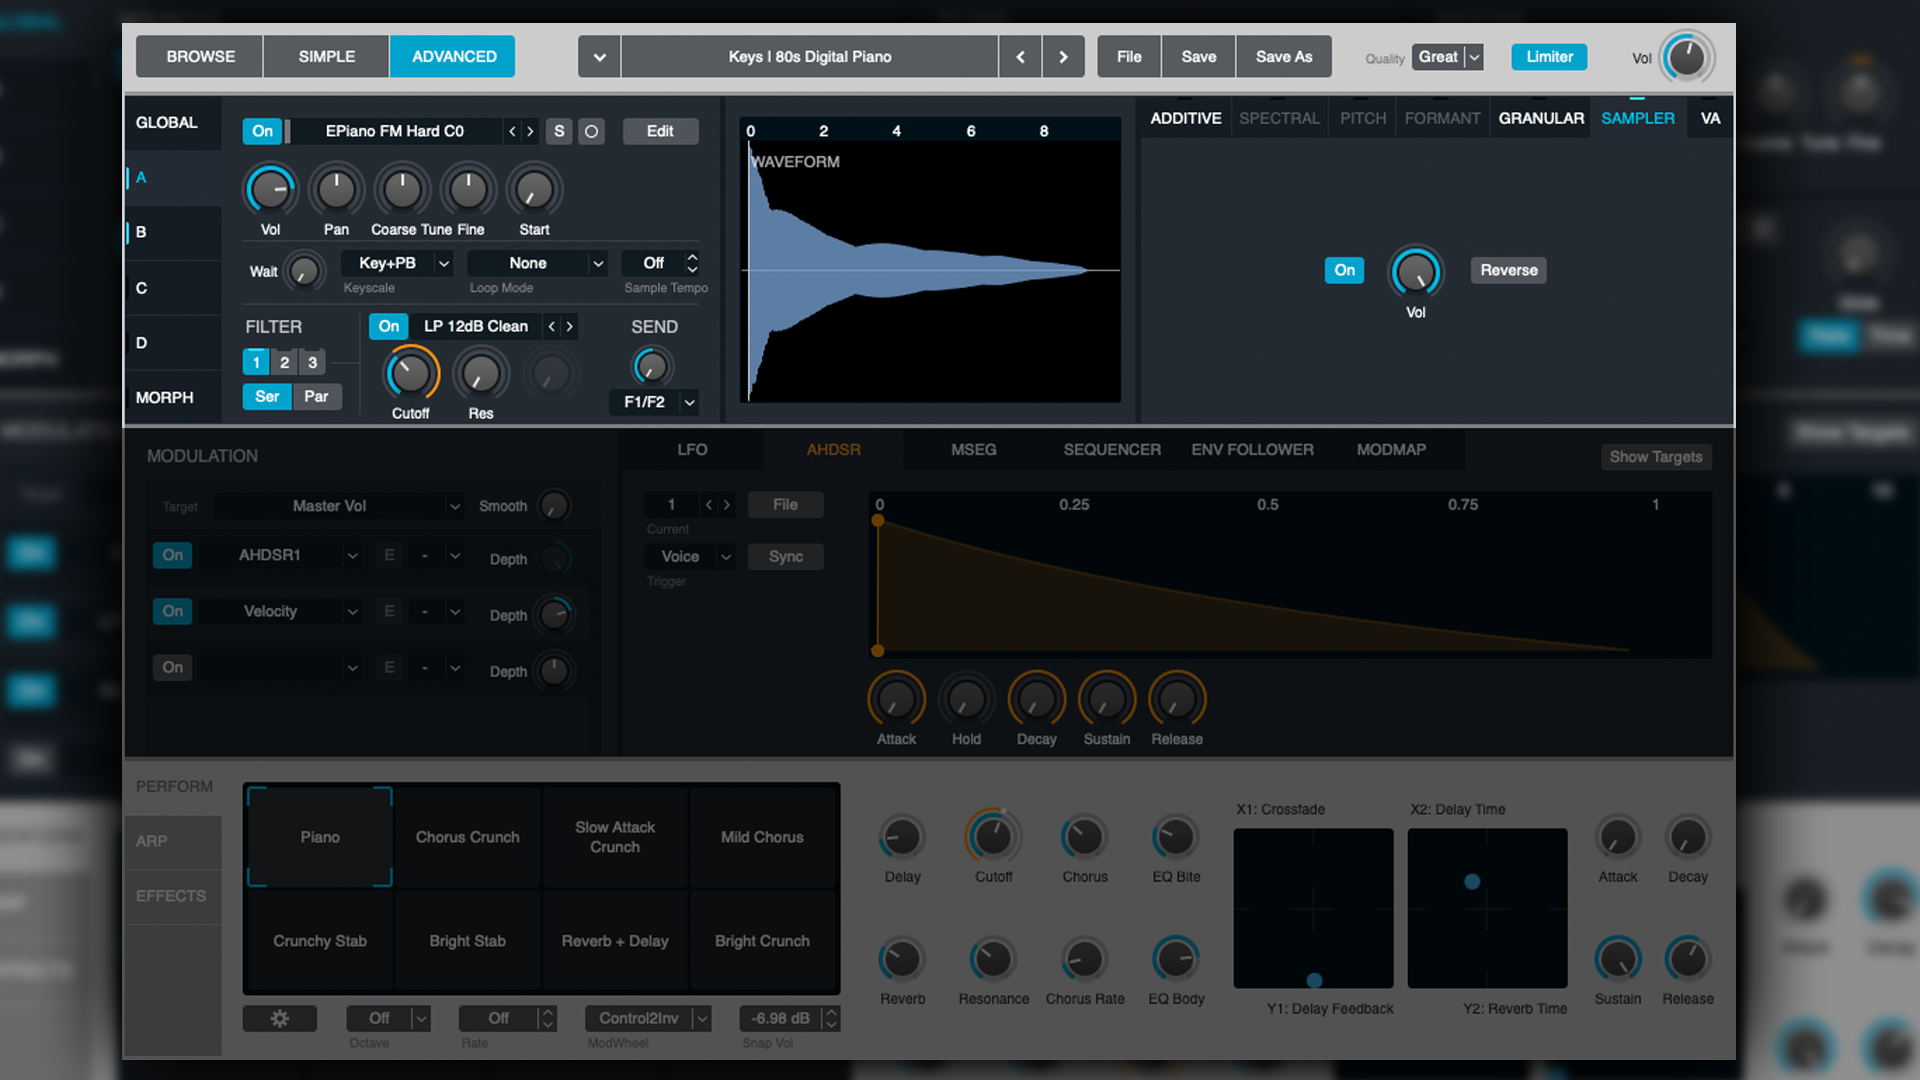
This section is only available when you load a sample in either Sampler or Granular mode. It’s extremely pared down, only offering a volume control and reverse switch.
VA
VA stands for Virtual Analogue and allows you to add an analogue-modelled and pitched oscillator and a noise oscillator post-Additive/Spectral/Granular processing.
This is something of a luxury, as it gives us access to the nearly 100 waveforms Alchemy supports, which can be blended/mixed with whatever sound we've designed with our Source (via Additive, Spectral or Granular).
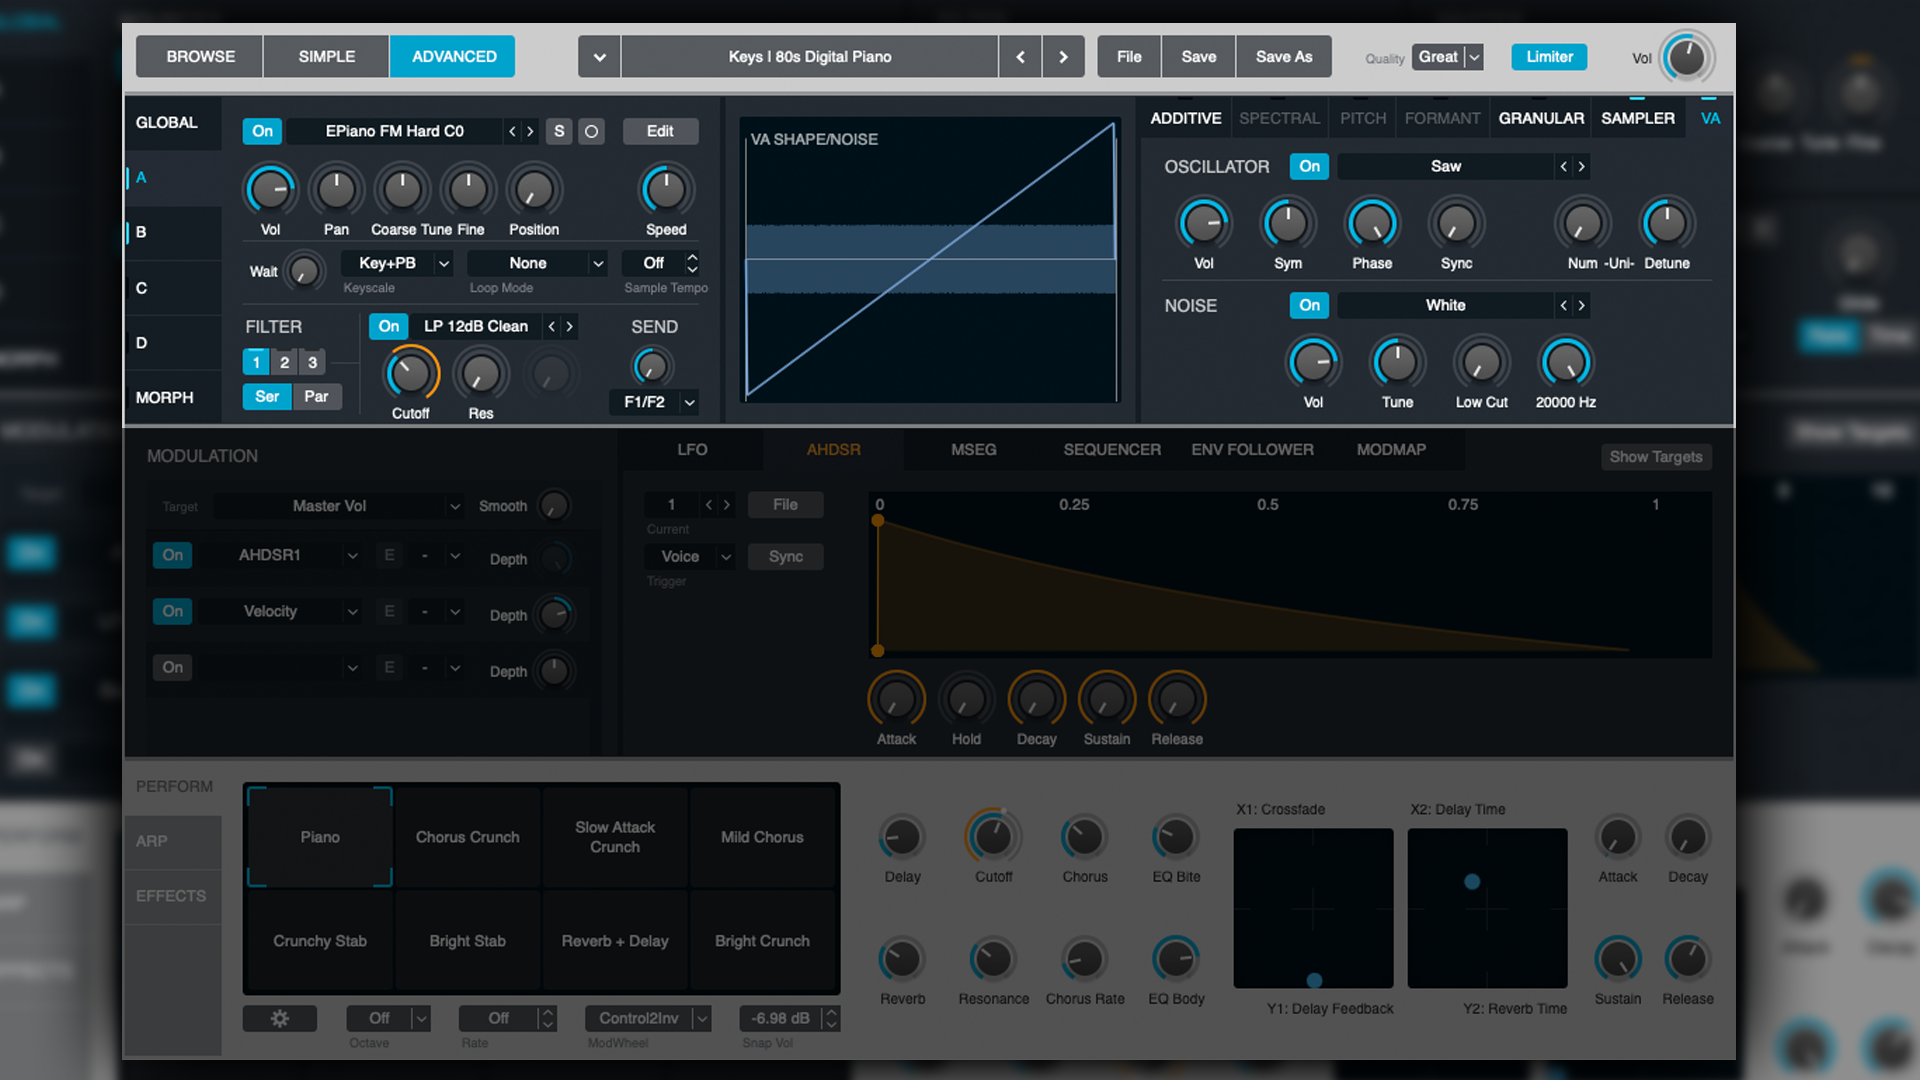
There are a few basic oscillator parameters available in the VA section.
Oscillator:
- Sym - shape/symmetry of waveforms
- Phase - sets the waveform start point
- Sync - synchronises the OSC with the pitch of the Source OSC
- Uni Num - number of unison voices
- Uni Detune - detune of unison voices
Noise:
- Tune - set the tuning of the noise (more like a morph between white, pink and brown noise)
- Low Cut/High Cut - high-pass and low-pass filter to tailor the noise to taste
Morph
Upon first viewing Alchemy in Advanced mode, we see the four Sources outlined under Global. Here, the four Sources can be mixed with their respective volume controls. However, lurking beneath the individual Source selectors is the Morph feature.
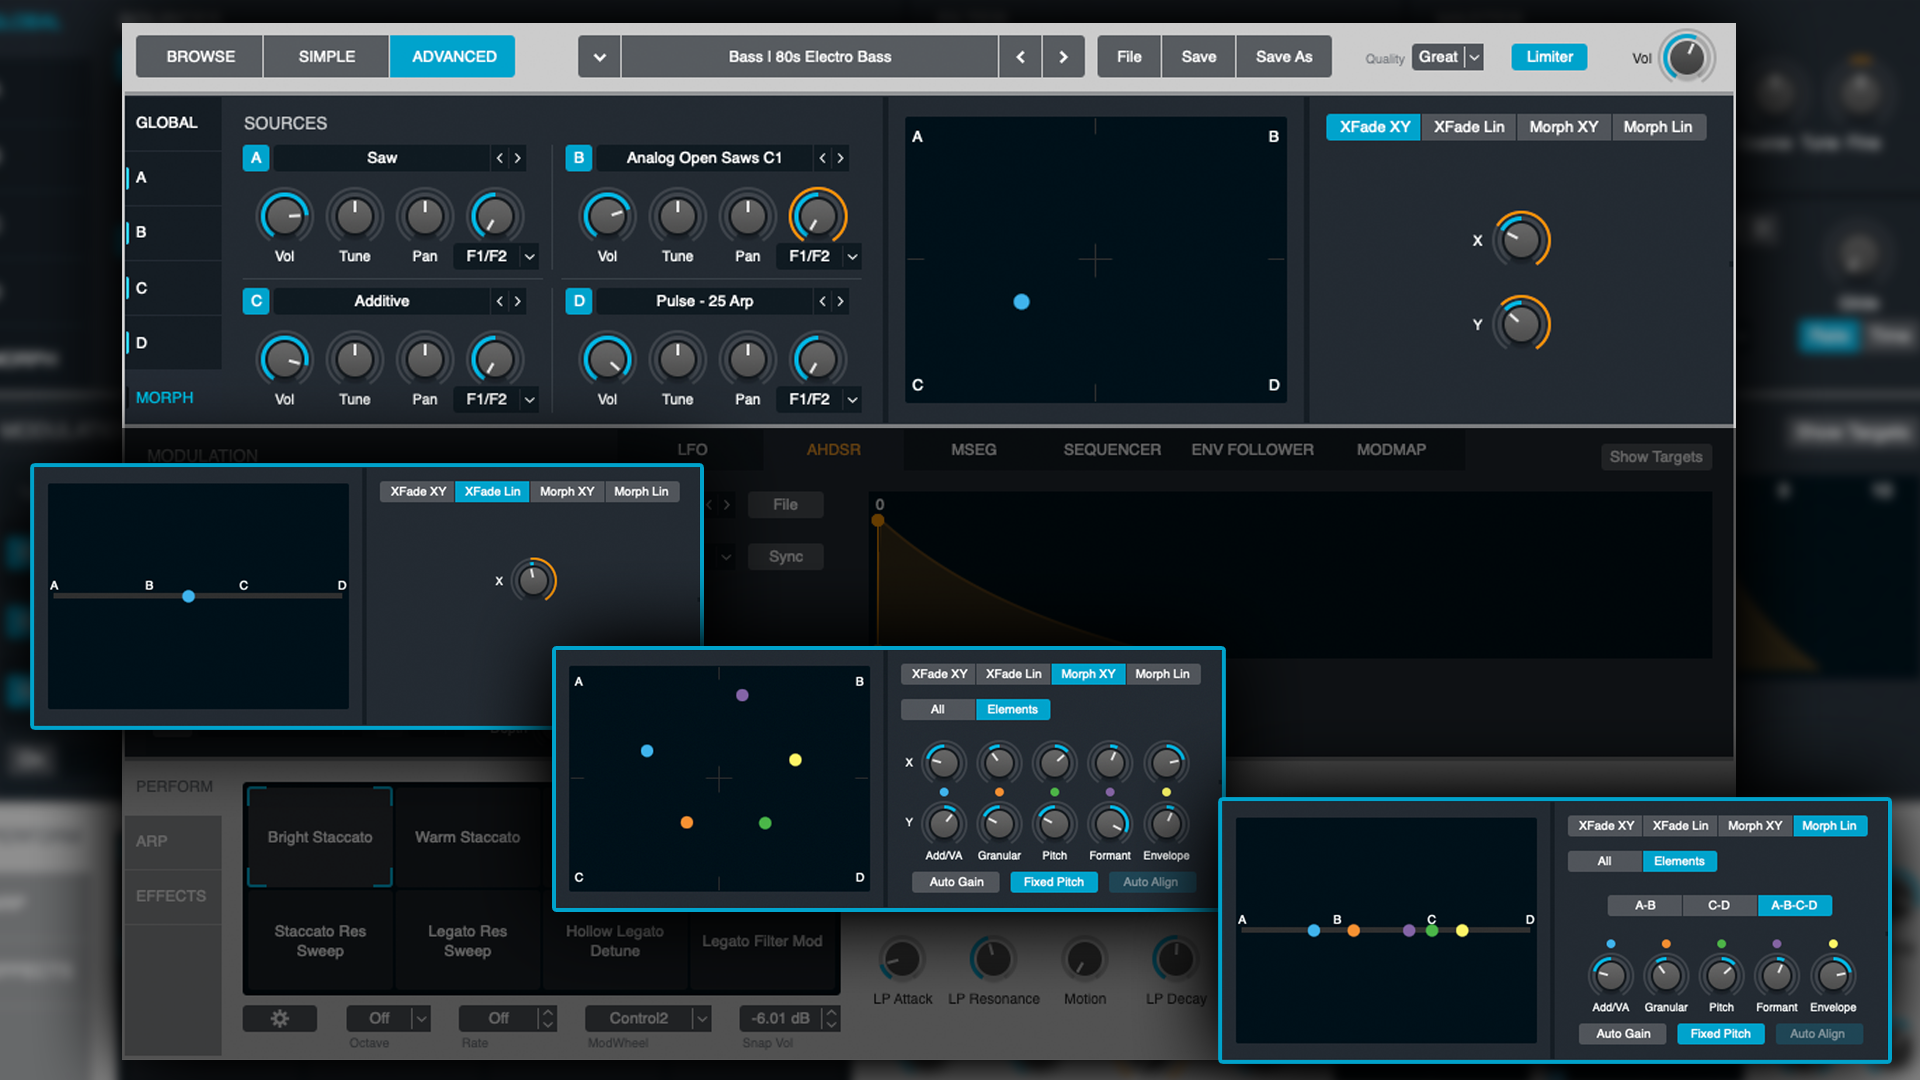
Morphing goes beyond simply mixing the output levels of each Source, and instead actually morphs or cross-pollinates the synthesis that’s taking place in each Source.
There are four morphing modes:
- XFade XY - crossfades between all four Sources
- XFade Lin - crossfades between all four Sources in a linear fashion, ideal for crossfades based on other control parameters such as Velocity or KeyFollow
- Morph XY - multiple aspects of each Source are time-aligned, morphed/merged together and moved/adjusted together according to where their point is placed on the axis. There’s a lot going on behind the scenes with this control, and it can be hard to instantly pinpoint precisely what each morphing characteristic is doing. Let your ears guide you!
- Morph Lin - like the XFade Lin, only with morphed parameters, as opposed to mixed levels
OK, how are you holding up? That was a lot of info to digest regarding how to generate and manipulate tones at their source! Let’s take a break for now, and catch up with the rest of this hugely powerful synth in the next tutorial.
Until then, don’t be afraid to dip into Alchemy and have a tinker with what’s been covered so far, and in the next article, we’ll dig deep into the synth's modulation options, step sequencers, effects and performance parameters.
“OSC” Steve is a composer, producer and educator with a background in piano, synthesisers and sound-engineering. He is an established, independent artist in the Synthwave and Retrowave music scenes, and has composed for several independent video-games including Nintendo Switch™ titles.
