Something we’ve yet to cover in this series of tutorials is vocoding, and a good-quality (free) vocoding synthesiser. Well, this article has got you covered! Before we get stuck into the specifics however, let’s have a quick refresher on what vocoding actually is and how it works.
The name vocoder is an abbreviation of 'vocal encoder'. The first vocal encoder was invented in 1928 by Homer Dudley whilst working at the famous Bell Laboratories. It was developed with the aim of reducing telephone signal bandwidths. It never caught on for telephone applications, however during World War Two, the technology was put to use encrypting telecommunications.
Fast forward to the late 1960s and Bob Moog and Wendy Carlos were collaboratively experimenting in ways to musically use vocal-encoding technologies. By the late 1970s, commercially available vocoders found their way into pop music via artists such as Kraftwerk and Yellow Magic Orchestra, amongst others.
The vocoder sound soon became part of the zeitgeist of 20th century popular-music and could be found in many genres. Most notably in the modern era, Daft Punk are probably the best known proponents of vocoders.
How do they work?
In one sense, vocoders are similar to FM synths (like the DX7), in that they utilise a carrier and a modulator. In vocoders, the carrier (the sound-making part of the synthesiser that you hear) is typically a subtractive synthesiser of some sort (so the core/root tone should feel familiar to anyone with synthesiser experience).
Unlike FM synthesis, the modulator is a sound wave received via a microphone-input or line-input fitted on the synthesiser (generally, people use the human voice via a microphone, but in truth, any sound wave can be used as a modulator signal).

The vocoder analyses the modulator signal (such as a voice via a microphone) and divides it into frequency bands. It then modulates (envelopes) the respective frequency bands of the carrier signal in accordance with the peaks and troughs of the modulator soundwave.

Every time the modulator’s soundwave peaks, the envelope opens, and every time the modulator’s soundwave troughs, the envelope closes. What’s quite remarkable is that simply by modulating the amplitude of the synthesised signal in this way, we can accurately interpret and recognise human speech patterns.
Getting set up with the TAL-Vocoder
Now that we understand the core principles of how vocoders work, let’s take a look at one in practice to better understand their musical potential. For this, we’ll use the TAL-Vocoder.
If you’ve read some of my previous articles, you’ll know that I’m a big fan of TAL. They offer a great range of synthesisers, and their freebies are often more than enough to cover all of your bases for different forms of tone-design (and their vocoder is no exception!)

Whilst vocoders fall under the bracket of synthesis, in this instance, the TAL-Vocoder is more like an enveloper or signal processor. With that in mind, its configuration is a little more complicated than just creating a software instrument channel and making TAL-Vocoder the instrument.

The TAL-Vocoder modulates the left channel’s signal (the carrier) by the right channel’s signal (the modulator). Therefore, it’s recommended that you use a stereo bus or track stack as per the diagram below. Notice how the software synthesiser (carrier) is panned hard-left and the audio channel (modulator) is panned hard right.
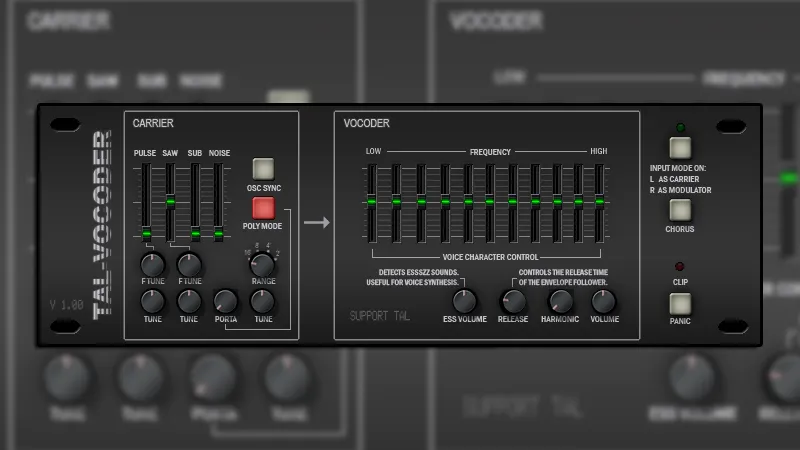
For this mode of functionality, you must select the INPUT MODE ON: L AS CARRIER R AS MODULATOR button.

Alternatively, you can add the TAL-Vocoder as an audio effect on the channel strip of a software synthesiser, and set its Side-Chain to your desired audio channel or input (as per the diagram below).

Both of these methods allow you to use any synthesiser (or other sound) you like as the carrier, and it’s therefore extremely versatile and adaptable.
There is a third method, which utilises TAL-Vocoder’s inbuilt synthesiser, however this doesn’t work in some DAWs (Logic Pro included). If your DAW will support using TAL-Vocoder as an instrument that accepts MIDI input, you simply need to assign the TAL-Vocoder as your software instrument (as opposed to an effect) and utilise the side-chain to your desired audio (for modulating).
The reason this doesn’t work in some DAWs is that this plug-in is both an effect and an instrument: it’s a VST and a VSTi. Some DAWs simply only acknowledge it as an effect, and not an instrument. Therefore routing MIDI directly to it can prove problematic in some software.
The inbuilt synth is fairly basic however, so if your DAW won’t allow you to use the vocoder’s inbuilt synthesiser, don’t worry. You can easily recreate its tones with other synths, provided you have access to a saw, pulse, sub and noise oscillator.
Side note: I’m only guessing, but I would imagine the TAL vocoder’s oscillators are the same coding as what’s used on the TAL-NoiseMaker (which is also free), so you could always use that as your synth of choice (if you’re keen to keep things entirely TAL).
Let's make some noise
So, now we know how a vocoder works, and how to set one up in our DAW, let’s look at making some synthesised vocals. Provided you followed the above setup, the following should work without any problem.
Firstly, hold a note or chord on your MIDI controller. You won’t hear anything yet, but you’ll see from the level meters on your mixer, that the synthesiser is generating sound. Now speak into your microphone and you should hear your voice vocoded. It’s that simple!
It’s quite common that upon initial setup, everything can get a bit hot and clippy. I tend to run both my carrier and modulator signals at around -9db, so as not to clip on the way into the vocoder. I also find the vocoder can boost levels significantly, so I tend to pull down the Volume dial to about the 10 o’clock position.

The first time you make some noise with a vocoder, it can feel a little ungainly and incoherent. Let’s look at the controls and how to better dial in and shape the character.

Front and centre is FREQUENCY, which is akin to a graphic EQ. This is controlling how much vocoding is happening in each frequency band. Much like EQing a normal audio signal; if you scoop the mids, it thins out; if you boost the upper-mids, it gets crispy; if you boost the lower mids, it gets muddier, etc.
The ESS VOLUME allows you to attenuate sibilant sounds. This is very important, as microphones are very sensitive to sibilance and this can result in undesirable results from the vocoder.
The RELEASE controls how quickly the vocoder closes the envelope after being triggered (much like the release control on a noise gate).
The HARMONIC control allows you to exaggerate or extend the harmonic information in the modulator signal. Ideal for breathing a little more upper-mid-range detail, but be mindful not to overcook it, as it can yield some spikey and unpleasant results if not appropriately applied.
The INPUT MODE is for switching between standalone and bussed-operation mode (as outlined earlier in the article).
The CHORUS adds TAL’s legendarily lush chorus to the signal.
The SC button allows you to hear the modulator signal in isolation, in case you need to double check anything.
Lastly, there’s a Clip Light to alert you to clipping, and a PANIC button, in case the plugin misbehaves in any way.
Tips and tricks
Typically, this is the point in my articles where I delve into some presets, however as the sound you create with this is strongly defined by the carrier signal (which could be literally anything), outlining presets is not of much help.
Instead, let me take you through a few things I’ve learned over the years from working with vocoders, in the hope that you can learn from my mistakes, and quickly get yourself to some good-quality vocoding.
Pre-modulator processing

In my experience, adding a little utilitarian processing to your modulation channel can pay dividends later on in the signal chain (as it refines the modulator’s sound to better optimise the nuances of the vocoder).
I usually EQ out unwanted highs and lows, and shape the tone to reduce any bloated frequencies (I may also use multi-band compression for this). I usually de-ess fairly aggressively (as vocoders respond quite dramatically to sibilance). I also lightly compress the signal to bring the quieter dynamics forward and provide the vocoder with a more uniform signal.
Depending on the recording environment, you may also want to consider a noise-gate on the modulator’s signal. As a side note on this point, I also highly recommend using dynamic microphones for modulator signals, as opposed to condensers or ribbons.
Dynamic microphones have a very small catchment area, only receiving very close proximity sounds. This keeps your modulator signal free from unwanted background noise, which a condenser or ribbon will more easily pick up.
Maximising a small register

Whilst your synth patch might sound great across several musical registers, that doesn’t mean the vocoded voice version of your will. Utilising ranges at the extremes (or outside) of the human vocal-range can make vocoded vocals hard to perceive and understand.
In my experience, I’ve found that working in the same octave as the original voice (being vocoded) typically yields the best results. Sometimes, it’s necessary to step down to an octave below that of the voice, to maximise clarity, however this is largely dependent on how complex your synth-tone is.
Pronunciation

If you’ve ever used a Talkbox, you’ll probably relate to this one! How you pronounce your words is really important. There are nuances and details to speech that are easily lost in the vocoding process. Fast speech, slurred words, mumbling, unstated “H”, “L” and “R” sounds, etc, will almost definitely sound incoherent.
For accurate translations through the vocoder, you should aim to really project and pronounce every syllable. Speak as if you’re trying to show your teeth. Extend and push the fricative sounds in an over-the-top manner. Airy sounds, like “H”, will often require an extra guttural push, and it’s worth imagining every “H” being doubled or tripled. For example, if you’re going to “hello”, break the phrasing up a little and project it clearly like “HHe-Low”.
Use to enhance and mask
Sometimes, you might have a (normal) vocal recorded, plus a few layers of backing vocals, but things just aren’t popping and hitting the ear as planned. Consider creating a glassy or bright synth tone with a bit of upper-harmonic texture and route it through a vocoder that’s referencing the lead or backing vocals.
Play the chords of the song and let the vocoder do its thing. Nest this vocoded vocal layer amidst the backing vocals. This reinforcement, when done right, acts like scaffolding that supports the lead vocal with excitement and energy. Often people won’t even notice you’ve done it, especially if it’s also nested alongside normal backing vocals.
Step outside of just using a voice
There’s been a lot of discussion around the voice, but in actuality, with the TAL-Vocoder, you can vocode anything with anything else! In the past, I’ve vocoded synth chords against rhythmical things such as a tambourine loop, giving the synth chords an interesting rhythmic phrasing, the likes of which I’d never have thought to actually play myself.

But even this example only scratches the surface, and at this point, you’re only limited by your imagination! You could have something with the dynamic expression of a piano playing the tones of a heavily distorted electric guitar. You could reinforce percussion with white noise. Use ambient field recordings and the noise contained within to influence and morph synthesised soundscapes in bizarre and unexpected ways. I could go on…
Closing thoughts
I love a good vocoded vocal, front and centre in a mix. However, it’s not for everyone, and sometimes attracts criticism from detractors who consider it piggybacking on the whole Daft Punk/Kraftwerk thing.
However, if you dig down on the technique, you’ll find it’s a powerful texturising tool that can enhance backing vocals, be used rhythmically to make all kinds of interesting sounds, and also create ethereal and otherworldly textures.
What makes TAL-Vocoder such a delightful entry into the techniques of vocoding is the fact that it’s so simple! It’s effective, easy to use, and by allowing you the freedom to use whatever you like as a carrier (as well as modulator), it hands you full control of your sound-design. For these reasons it’s been my one-stop-shop and go-to plugin for vocoding for almost a decade now.
So, whether you want to make vocoded vocals, try out rhythmic synth-pads vocoded by your hi-hats, thicken backing vocals with glossy synths or any other amplitude-modulated shenanigans, be sure to check out this modest, little, yet powerfully creative plugin. Happy vocoding!
