
Moog’s original lineup of Moogerfooger pedals, first released in 1998, were more special than it might seem in today’s crowded landscape.
The range initially started with two models, a low-pass filter named the MF-101 and a phaser, named the MF-102, each set in a large chunky box with wooden sides and large knobs. They were easy to grab, and most importantly, came with a back panel rife with CV inputs and outputs, designed to interact with other Moogerfoogers but also your analogue modular synth.
They caught on quickly, finding favour with such musicians as John Frusciante and The Edge. The hands-on design of the Moogerfoogers meant they became genuine studio tools, designed to be tweaked, turned, and abused. Eventually the range grew to seven different models, each with a wide array of functionality. Unfortunately the original lineup of Moogerfoogers were discontinued in 2018. The prices of the originals, especially the coveted MF-101 Lowpass Filter and the even rarer MuRF, began to soar beyond the reach of the average musician.
So when Moog announced that their lineup of Moogerfoogers were being reborn, albeit in plugin form, in the fall of 2022, there was excitement from all corners of the production world. Let’s dive in and discover what the ’Foogers have to offer...
How do they compare?
While this isn’t the first time the set of coveted Moog analogue effects have been reborn in plugin form (there was a previous attempt all the way back in 2000 by plugin maker Bomb Factory strictly for Pro Tools), this is the first time the plugins have been made in conjunction with Moog with their stamp of approval. While we’ve seen impressive plugins and apps from Moog before, this is still no small undertaking.
So how do these digital counterparts compare to their analogue inspirations? Did Moog choose to expand the functionality of each of these plugins, or did they stay fairly true to the original designs that Bob Moog intended? Well, as with any story, there is a bit of both.
In almost all cases, Moog have tried to remain as dedicated to the original designs as possible
There are seven plugins in the range – the MF-101S, a low-pass filter with dynamic envelope control; the MF-102S, a ring modulator with built-in LFO that can go from tremolo to extreme ring mod tones; the MF-103S, a 6- or 12-stage phaser, complete with built-in LFO as well; the MF-104S (the most well-known of the bunch) a bucket-brigade ‘analogue’ delay capable of self-oscillation; the MF-105S MuRF, a resonant bank of filters that changes based on a user-selected pattern; the MF-107S, a VCO-fuelled FreqBox capable of FM sounds; and lastly the MF-108S Cluster Flux, a multi-effect that can function as chorus, flanger, or vibrato based on the settings.
As you’d no doubt expect, each of the pedals brings a decidedly hardware feel to their various effect offerings. In most cases, they tend to skew on the darker side of the EQ spectrum, and it’s very easy to find interesting analogue-like textures by chaining several Moogerfoogers together. They also work well in places you wouldn’t expect – for example, the MF-102S Ring Mod sounds terrific on hi-hat loops,
giving them some nice crunch and texture. There are many unexpected uses for each.
In almost all cases, Moog have tried to remain as dedicated to the original designs as possible. There are a few cases where the Moogerfooger plugins differ slightly from their analogue counterparts. For example, the MF-104S delay doesn’t have an external feedback loop like the original, so you can’t process only the delay’s feedback (aside from using the effect 100% wet).
Fortunately where Moog did match the analogue counterparts’ functionality is in the CV connectivity department. Flip open the CV ‘panel’ on each of the Moogerfooger plugins, accessed by either clicking near the top of the UI or with the button in the top-right corner, and you’re met with a variety of digital connections where virtual CV signals can be sent into the Moogerfoogers.
In this way it’s possible for Moogerfoogers on various tracks to all interact with each other, creating a multitude of complicated signal paths that couldn’t otherwise be replicated in the DAW domain. These CV connections can also interact with Ableton’s CV Tools and Bitwig’s Grid for even more interactivity.
Cluster Flux
What exactly is a Cluster Flux? Combine chorus, flanger, vibrato, and more in one single effect and you’re almost there. Though the Cluster Flux came out after the passing of Bob Moog, it’s one of the most unique of the Moogerfooger set. Capable of flanging, chorus, and much more ‘out there’ sounds, you could say that the Cluster Flux is the closest thing to a multi-effect pedal in the group.
While other pedals in the Moogerfooger batch also have LFOs in their architecture, none are as fully featured as the one in Cluster Flux, which has no fewer than six waveform choices. This LFO can be synced to the tempo of your DAW, but like the other Moogerfoogers, tempo rate divisions are not shown anywhere on the plugin’s UI.
Scrolling through the presets gives you a small taste of the range of sounds possible from Cluster Flux, and Moog have managed to capture that thick tone of the original hardware.

The Cluster Flux can function in flanger or chorus mode, selectable via the rocker switch on the left side. This section is confusingly labelled Delay; what’s really going on is a Bucket-Brigade Delay set to very short delay times to create those chorus and flanged tones.
While being able to control the exact delay time already gives the Cluster Flux a lot more control than typical chorus or flanger plugins, there is also an LFO that can modulate the delay time. This LFO can be synced to your DAW’s tempo and goes up to 50Hz.
A vibrato effect is possible when setting the plugin to output only the Wet signal and setting the LFO to the sine wave position, although more unique pitch effects can be explored with other waveforms. The depth of pitchbending is controlled with the Amount knob.
Seven quick Moogerfooger tips
1. Use the Compare switch
Directly to the right of the preset dropdown is the Compare switch, which switches between the last loaded state and the last changed state. Load a preset, play around with it, and then click the Compare switch to toggle between the preset loaded and your most recent modifications to it.
2. Double-click to reset
Another handy workflow tip – double-click any control to reset it to its previous position. This is incredibly useful if you just made a change to a knob’s position and then decided you liked the previous setting better but don’t quite remember where it was.
3. Use the Control key
If you’d like more precision control, hold the Control key while adjusting any knob for more precise fine-tuning. This is especially helpful given the analogue-like feel of these pedal-emulating plugins, where a tiny nudge of a knob can have a huge effect on the resultant sound.
4. Experiment with CV
Each of the Moogerfooger plugins has a host of CV connectivity, making it possible to use them in conjunction with each other even when they are on different tracks and instruments.
Importantly, when using an LFO from either the MF-102S Ring Mod and the MF-104S Analog Delay, you have a choice of unilateral or bipolar movement. Unilateral will move the knob you’re affecting in only one direction, while bipolar will have both positive and negative changes. This difference will have a drastic change on the sound, so try both and see what fits your particular situation best.
5. Check your ID
When using multiple Moogerfooger plugins in a single session, you can differentiate between various instances of the plugin by clicking on the CV tab and finding the identification ‘number’, which in this case, is a four letter ID.
This is useful when connecting the plugins via virtual CV cables, as it could get quite confusing quite quickly trying to navigate based on track name alone. This is true for both multiple instances of the same type of plugin, or different models within the Moogerfooger lineup.
6. Make connections
The Moogerfooger plugins can interact with each other and also other CV-enabled software, including Bitwig’s Grid and Ableton’s CV tool pack. Moog have given each CV input on the Moogerfoogers an attenuation knob, accessed under the CV control panel. Each CV input can be positively or negatively attenuated.
When set to a negative value, the range of modulation flips and goes from negative to positive, allowing you to create some inverted envelope mod sounds. Only one source of modulation can be applied to each jack, so it’s not possible to have your filter cutoff be modulated by both an envelope and an LFO, for example.
7. Get visual
Moog have found a clever solution to show how incoming CV signals are modulating the controls of the Moogerfooger plugins. Any incoming modulation is reflected visually on the UI of the pedal with a thin white circle around the knob.
This circle moves in time to the modulation source; this rate is also shown with a pulsing yellow colour on the input jack lead on the CV control panel, giving further visual illustration of what’s going on with your sound. Making changes to the attenuation knobs below the CV jacks will illustrate those changes in real time; these act as depth controls for whatever CV source is selected.
The MF-104S
While most of the plugins in the new Moogerfooger pack are fairly what-you-see-is-what-you-get, the MF-104S Analog Delay does have a few settings under the proverbial hood that are worth exploring.
These are accessed by clicking the icon in the top-right of the plugin window, which will bring up the Settings screen. Changing ‘Type’ from Echo to Ping-Pong mode will make the delay signal bounce across the stereo field left. The ‘Tone’ setting directly below is going to have a substantial effect on the overall sound of the plugin. There are three options available – Legacy, Analog and Modern.
Legacy recreates the famed dark tone of the original pedal, and it is quite dark! In fact many producers turned to digital delays or brighter analogue delays because of how dark the MF-104 was. Analog brightens things up somewhat but keeps the top end fairly rolled off. Modern has a more full-spectrum sound to the repeats. Note that this knob only affects the sound of the delay repeats, not your clean signal.
Create a trippy delay with MF-104S
While many plugins can modulate the delay time internally, few have the options that the MF-104S has.

For this walkthrough, we’re going to be adding delay to a simple ii – V – I chord progression in the key of C at 100bpm (Dm7 – G7 -–Cmaj7). This can obviously work on a variety of melodic material, including samples, synth pads, keyboard chord progressions, but here we are using the Glass High Strings Pad in Ableton’s Analog instrument.

Without the delay, the part sounds fairly lifeless. Put the MF-104S on the track, and let’s start adding a bit of movement to the sound by having the LFO change the time of the delay. To do this, open up the CV panel by either clicking the jacks near the top of the plugin UI, or the CV button at the top-right of the window.

Click on the jack above the knob labelled Time. You’ll see all the various modulation sources available. If you have other Moogerfooger plugins in your session, you’ll see them listed towards the bottom. We are going to use the internal LFO of the MF-104S, so select that. You’ll see a yellow light start pulsing on the input jack at the current rate of the LFO.

In order to attenuate how much the LFO is affecting the delay time’s change, turn the knob directly below the CV input jack. This can also be set to negative values, making the delay time decrease, creating unique sound possibilities.
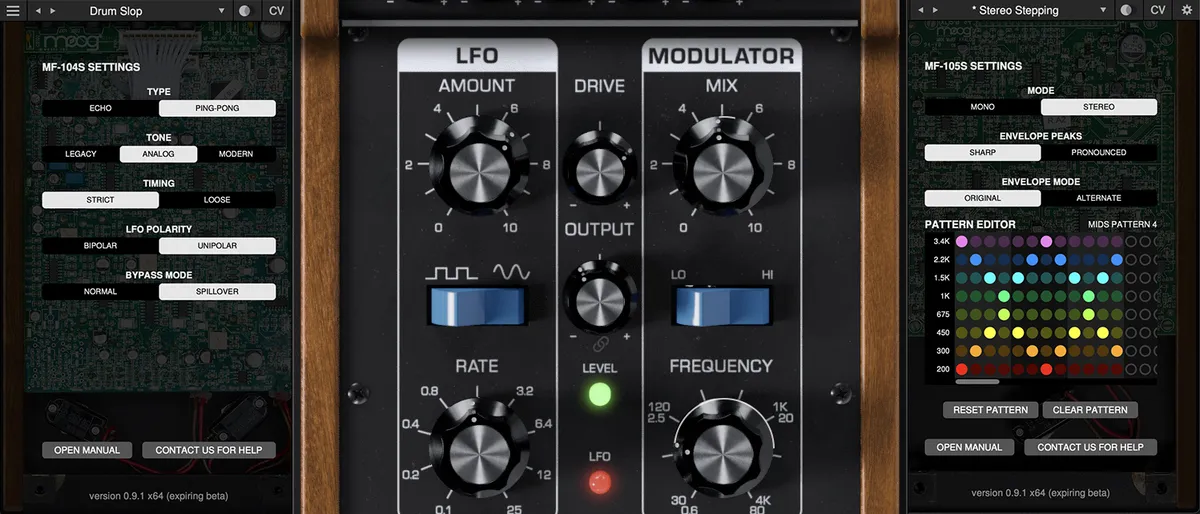
Utilising Moog's MuRF filter bank in your DAW
Moog’s MF-105S, also known as the MuRF, is a great, quick way to add movement to your grooves.

The MuRF pairs a bank of ten filters with volume sliders, a choice of 12 patterns, and an envelope knob. The rate can either be free-running, or synced to your host DAW’s tempo. Unfortunately there’s no way to see what the tempo divisions are when the plugin is synced, so you’ll have to rely on the red blinking light to figure this out.

Increasing the Drive knob will overdrive the input of the plugin and get some pleasing grit to your sound. This can be used regardless of whether or not you’re making use of the filter bank. The real fun begins when you start tweaking the filters in real time – these can be assigned to a MIDI controller to emulate the real pedal workflow.

In the centre of the plugin’s UI is the pattern select knob. Click the top-right wheel button to open the settings menu. Like the original MF-105 MuRF, which also had pattern editing software, here’s where you can edit and load patterns. There are 24 positions in total, 12 each for both Bass and Mids. However the 1st and 13th positions contain no animation and thus can’t be edited.

What’s even more unique about this Pattern sequencer is that each frequency band can have its own number of steps, thus making it very easy to create simple, evolving polymetric sequences. To do so, simply turn on a step by clicking that circle in the corresponding row.

A lightly coloured step means that the pattern extends to that step. A more brightly coloured step means that step is on and thus the filter frequency band will open when the pattern moves through it. It’s possible to create all sorts of rhythmic variations by playing with these patterns and sequences.