Coil-splitting is a neato function where essentially you cut out one coil of a dual-coil humbucker to achieve single-coil Strat-style tones from your electric guitar.
This is done most often with a secret push-pull pot, with a mini-toggle switch, or sometimes even built into a 5 way pickup selector.
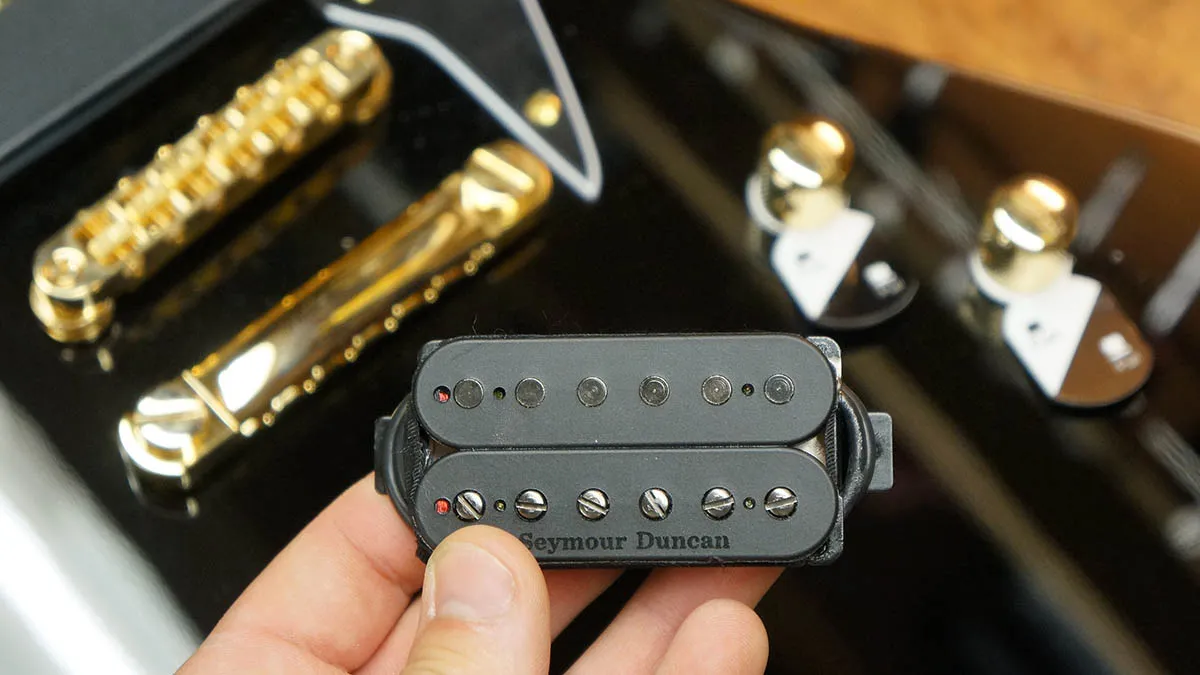
Today, we’re operating on an ESP Bill Kelliher Sparrowhawk, which comes with a coil-split function for each pickup. We’ll be putting in a Seymour Duncan Pegasus bridge pickup in but we want to keep the sweet coil-split function.
Coil tap or coil split?

They’re different names for different functions! A “coil tap” is where you tap into a lone coil’s winding (usually at half way). Usually this features on Fender-type single-coil pickups. A “Coil split” interrupts the joining of two coils within a humbucker! That’s why you might need the so-called “4 wire conductor” wires.
We’ll guide you through the different colour codes between manufacturers showing how to successfully switch between brands, solder your own pickup, and show you how to test if you’ve got it right!
What you need

- A shiny new pickup
- 25-40 watt soldering iron
- 60/40 solder
- Wire cutters
- Wire strippers
- Soldering holder clip
- PH1 and PH2 screwdrivers
- Lead
- Amp
- Analogue Multimeter (optional)

Let’s pull out the old humbucker. Ours is fastened with pickup rings which we have to remove. Take out the four screws with a PH1 screwdriver.

The humbucker will now lift out of the rout freely but there will still be trailing wires leading to the rest of the circuit. Don’t drop this onto the guitar top or you’ll be sorry!

Lift off the back plate on the guitar so you can see the guts at the back. As you can see, this old Lace Sensor pickup has five wires coming from it; we pulled the pickup out so we could see which wires were the right ones before we cut! Lightly pull the wires coming from the pickup to identify which wobble in the control cavity.
This ESP has the function of the pots back to front compared to most guitars, hence us checking – in this case, the bridge pickup was the control closest to the strings.

Pickup ring liberation: more guitar parts that aren't quite standard are pickup rings. These old ones fit and they still look great – let’s reuse them! Unscrew the dandy little bolt with a PH1 driver. Beware! There’s a highly charred spring waiting to launch itself into orbit.

Load in the new humbucker in the exact reverse. We got lucky and the old matching gold bolt also matched threads with the new pickup!
Spring taming trick: try to pre-tension the spring with a fingernail onto the bolt. This leaves some thread for you to poke into the pickup’s receiving threaded hole.

Orientation: check that you have the logo or the polepieces the correct orientation to the pickup ring – it’s slanted!

Gingerly poke the new pickup’s wires through the drill hole and into the cavity. This can be mighty fiddly – patience is key

Watch for the new pickup wire emerging into the electronics cavity on the back and pull through the wire until it’s reasonably tight. Keep hold of the pickup on the front in case it slips and scratches the guitar top. Got it? Fasten that sucker down.

Hey guys, it’s diagram study time. Here’s the basic flow diagram of what’s going on in this circuit. As you can see, the first stops are the independent volumes with a coil-split switch for each pickup, then they get mixed at the pickup switch. The switch is part of a dual function push-pull pot.

We’re popping a Duncan in here. Seymour himself puts in a wiring diagram for us so we can decipher the colours of the wires inside. It includes some common wiring tricks such as this: "Coil splitting"? How handy.

Here are our prepared wires coming from the new Seymour Duncan pickup, a grand total of five wires: Coil 1 start, end, coil 2 start, end, and a master ground which is connected to the baseplate. Our Lace sensor pickup that we just took out had 5 wires, too, just in completely different colours!
You can find a very handy common colour code sheet here from Seymour Duncan to help match up what colour code you may have. We use this all the time at Jack’s Workshop.

Following the instruction handed down from Seymour, we’ll nobly join together our red and white wires to create a series link between the coils (that’s full fat humbucker power).

Time to solder it onto the right bit now – let’s get a hold of the push pull pot. Take it out of the guitar so we can get better access to it.

Hey, it’s just like the print out picture! You can see the old white wire we chopped off earlier. That lug is where we’ll solder on the red and white link.

...Like this. Pop on the other wires according to the diagram above including the bare wire (master earth).

Time to test before we get any further, plug into a guitar amp and lightly tap the polepieces to hear the pickup. This tests that you have the wires connected, you can test the volume control as well as the coil-split function at this point.

Getting a sound and coil split effect isn’t everything though – we need to make sure it’s working correctly with its neighbouring pickup, too. Due to how pickups are made, each pickup colour code is different as well as their magnetic poles and winding directions… With an opposing combination your neck pickup and bridge pickup may be out of phase.
How do I tell?
There’s two ways, we’ve rigged up an analogue multimeter set to ~mV and plugged into the jack socket. Set the pickup switch to bridge, turn everything up and tap the polepiece. We want the needle spiking the same direction as the neighbouring neck pickup – doesn’t matter which way as long so long as they are both the same!

The second way to test is by winding a Low E string on and tuning it up. Plug into an amp and listen to your bridge pickup alone, next try out the neck alone. Note the bass response. When you set the pickup switch to mix both pickups you should have the same bass response. If it sounds thin and weedy that’s out of phase.
How do I correct out of phase wiring?
I’m glad you asked. You simply swap around two wires from the pickup. In our case you swap around the black and green wires from the Seymour Duncan pickup (leaving the red and white alone). That makes the current flow in the opposite direction to suit the neck pickup – i.e. in phase.
Other problems:
If one of your humbucker pickups only has two wires, you better make the other pickup suit this one. If you swap a two-wire pickup around you will make the baseplate or cover live. It’ll work but will buzz when you touch it plugged in!

Finally, all plumbed in, volume: check, coil split function: check, pickup switch: check, combined and in phase: check, master tone function: check. Seal it up and fit the backplate, stand back and admire your handiwork. You bossed it.

More gear maintenance tips...
