Today we’ll show you how to set up a wraparound bridge. Often found on Les Paul Juniors, Melody Makers, and PRS guitars, it is a traditional, primitive bridge that has some big advantages over the tune-o-matic.
Despite its simple construction, a wraparound bridge is responsible for setting your electric guitar's action, radius curvature, intonation and string anchoring all in one!
Two stud bolts and a bridge is all it takes, the lack of moving parts is perhaps accidental genius, because it offers the best form of coupling from strings to the guitar’s body. We’re talking about maximum vibration transfer!
Let’s compare a Stratocaster and a Les Paul Junior's bridge parts

Les Paul Junior: String > full bridge > stud bolt x2 > bushing x2 > timber

Strat bridge: String > six saddles > 12 string-height grub screws > base plate tremolo > six fastening woodscrews > timber
Quite simply, the fewer movable parts, the better the tonal transfer to the wood of the guitar.
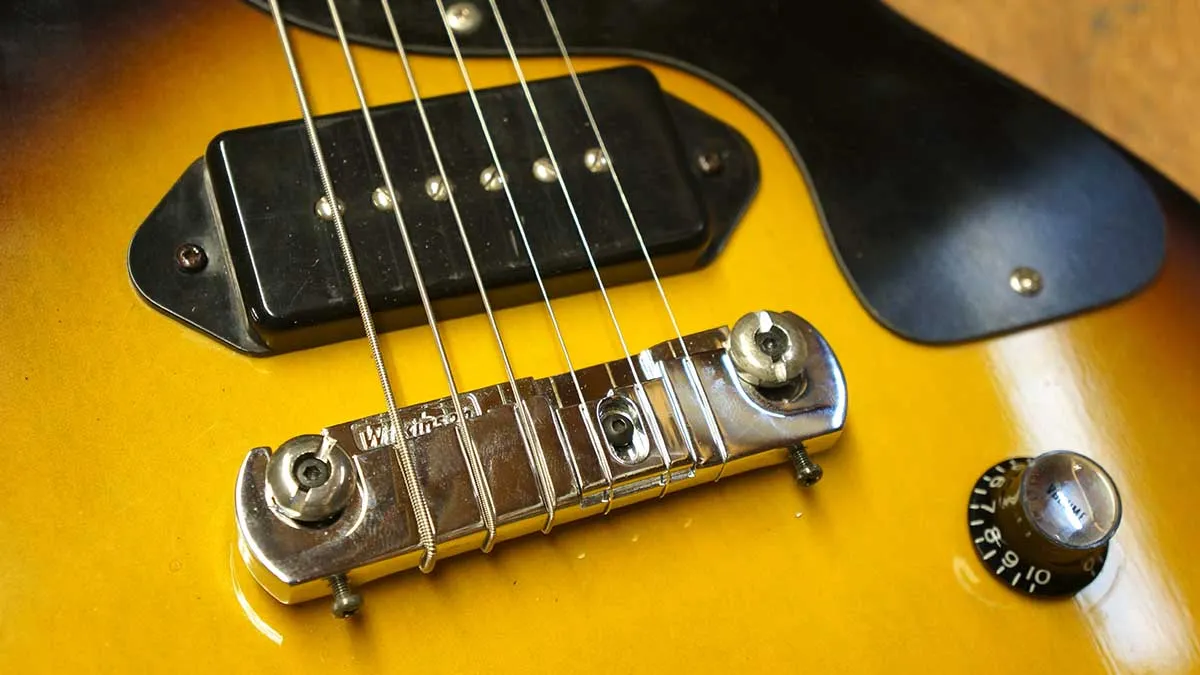
We’re tackling the Wilkinson GTB Wraparound bridge which was necessary for this Arbiter Les Paul Junior copy. We also have the optional locking studs upgrade covered as well – a little fiddly but totally worth it.
Tools you may need

Fresh strings, action, ruler, one pence piece, flat-head screwdriver, radius gauges, Allen keys.
Setting up your wraparound bridge

A very simple bridge but let’s check over a couple of things to make sure it’s suitable before setting it up just right.

We need to make sure that the radius curvature of our bridge suits the fretboard radius. Because this Wilkinson bridge is non-original to the guitar, it’s worth double-checking. Use a radius gauge, and test on a couple of areas of the fretboard to figure out which tool is correct. Some guitar’s spec sheets state a radius which is actually incorrect!

Bang on! Our bridge matches the fretboard curve perfectly, which means that each string will be held at the same distance. There’s no use having the middle strings sag downwards because they will cause fret buzz.

This Les Paul Junior copy has some Wilkinson brand locking studs in use – a standard stud is for comparison on the right.
The bottom part sets the height of the bridge, and when that’s kosher, lock it up by closing the top part down with the small bolt. A bolt within a bolt!

Assemble the bridge into its locking studs but only set them finger tight. We will tackle string string height first.
This bridge system has a pre-defined radius curve that matches the fretboard, and a predefined intonation pattern with an adjustable G and B saddle on this particular model. The string height is also controlled by the two studs.
Radius talk: This is absolute, and there’s never any need to change it unless you have your fretboard carved into a different radius!
String height talk: Great, let’s move our master string height up and down by only adjusting 2 stud bolts.
Intonation talk: The intonation pattern is almost absolute, too, with modern wound strings all following an incredibly similar pattern when properly set. Here are some other guitars for comparison...

Can you see how the contact point for each string is the same on each bridge type?
Gibson Classic Wraparound bridges

There are 2 types of the classic Gibson wraparound bridge out there: those designed for string sets with a plain G (Left) and one designed for wound G strings (Right).
Now, back to the programme: how shall we set this Wilkinson bridge up then?
First we will tune up, then set master string height on each side, then set master intonation, and finally lock the locking studs...


Let’s wrap them strings on!

With the strings set to your desired tuning, read the string height at 12th fret with a ruler. Some standard measurements might be helpful for you here: try out 2mm clearance on the low E and 1.5mm on the high E strings at the 12th fret, measuring from the top of the fret to the bottom of the string.

Here’s a great tip for adjusting the height on wraparound bridges: take a string height reading while tuned up, then slacken off the strings when you turn the studs. This stops unnecessary stress and wear.

On the right is a Stewmac Tune-o-medic specialised driver versus a common flat head screwdriver. You can use a 1p coin to turn the studs too, which is actually really good as the penny is made from softer metal than the chrome-plated stud bolt!

Setting the intonation: When plugged into a tuner, play a harmonic at 12th fret. Compare it to the fretted note at 12th fret – they should be exactly the same pitch.
Our intonation bolts on wraparound bridges set the intonation for all the strings at the same time, so it’s important to test the tuners reading for each string.
To make an adjustment you simply loosen or tighten the 2 small bolts at the back. You must slacken the strings if you need to tighten these so that you again don’t cause unnecessary stress and wear to the bridge.

However, you might have noticed that this peculiar Wilkinson bridge has a movable G and B string saddle part – these will have to be set independently, unlike the traditional Gibson designs.
Tune up and check the intonation again. Rinse and repeat until it’s set right. We know it’s long winded but your chrome plating will thank you for detuning!

Is it there yet? Yes? Brill! Let’s lock it up! Using the small black bolts, tighten the tops of the locking studs down. This crushes the bridge against the studs, improving the tone and sustain of the guitar twofold!
