Let’s start with the basics: compression squashes the loudest parts of an audio signal and boosts the quietest parts, ie reduces the overall dynamic range. Ideally, you should let a song breathe, meaning it should have some dynamics. But compression is a very useful tool used lightly.
Sidechain compression is essentially when the level of one instrument causes a compressor to activate on another instrument. In this tutorial we’ll be using Logic Pro X to show you how to use sidechain compression on instruments that are competing for space in the same frequency range.
There’s no better example we can think of than bass and your kick drum, but you’ll find this battle happening in other areas of the frequency spectrum too – such as your vocal sweet spot vs piano, synth etc. In the tutorial you’ll see that by sidechaining the bass we’re effectively ducking the instrument’s signal to make sure the bass and kick don’t fight, and to let the kick really thump in the track.
Sidechain compression is not just an effective engineering tool but also a creative one. Through the last decade and more we’ve seen this technique employed a lot in electronic music, particularly EDM. There’s a very rhythmic feel to sidechaining that almost has a gated feel to it, and it’s very common in danceable music.
Let me make clear that we're using a very specific functional application of sidechaining. But you could creatively sidechain your bassline through any other component of your track.

Step 1: So you have a new mix loaded up with your chords, a bass track and drum tracks. In its standard state, these elements of the track will probably sound OK, but you might notice the bass is masking the punch of your kick drum.

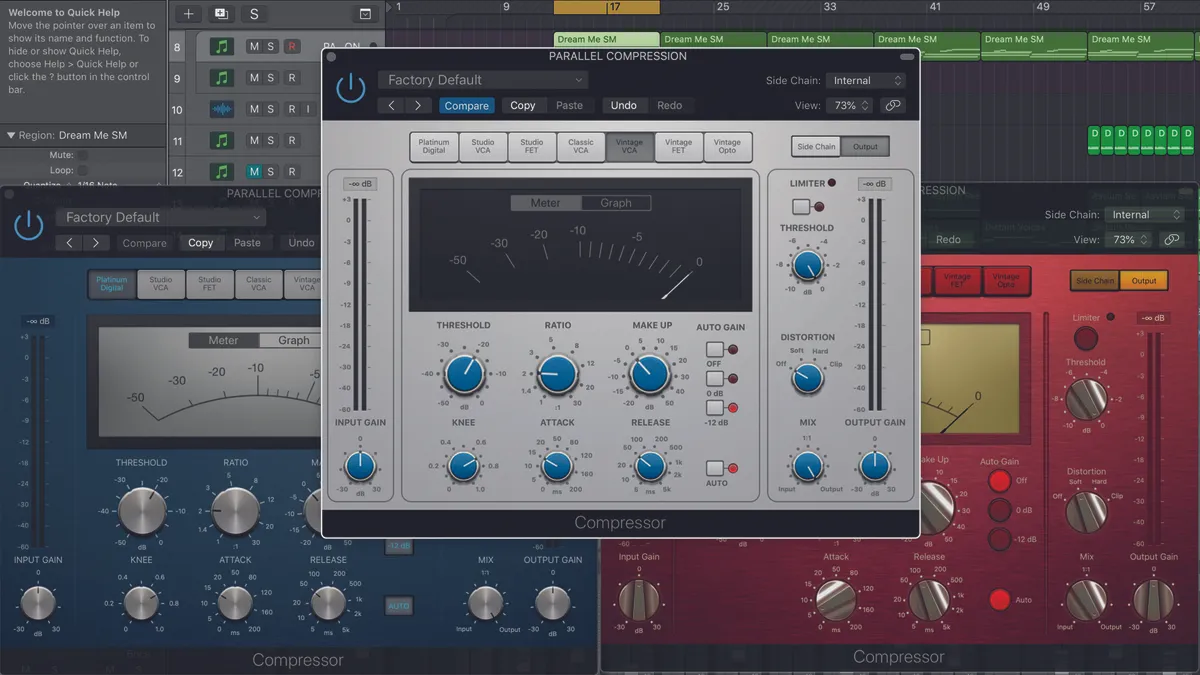
Step 2: Get a compression plugin on your bass track’s channel strip. We’re using this on the bass track because that will be the affected instrument, ie the compressed signal, momentarily reduced in its dynamic range.

Step 3: Select the sidechain dropdown in the top right of the compressor pane and select your kick as the instrument. This establishes where the input is coming from. This means the kick signal is going to the compressor on the bass track and the compressor will only act once that signal is received.

Step 4: De-activate the compression plugin at first and play back the song. Listen to how it sounds with and without. When you then activate the compression, you should be able to hear a sort of pumping effect. This is the sidechain activated so that the full sound of the kick comes through.

Step 5: To hear sidechain compression in its most extreme form, turn the Threshold dial on the compressor all the way up to -50 and turn your ‘ratio’ up too. This will exaggerate the effect so that you can see exactly how the bass is impacted.

Step 6: It should sound kind of like there’s an attack on the bassline whenever the kick is triggered. In fact, there needs to be! Use Attack on your compressor and make sure it’s set fast rather than slow. As a starting point, take the attack all the way down to 0 ms. You can then start adjusting the compression components to your taste and needs.

Step 7: Now change the Release dial. Similar to the attack, you also want a quick release time. The release is how long the compression stays active on the bass after it’s come into effect. We just want to give the kick room but not to mask the bass.

Step 8: Bring the threshold back to about -25 and the ratio to about 3:1:1. While this is less extreme than before, because of the fast attack and short release window you’ll still noticeably hear the punch of the kick and dip of the bass.

Step 9: The lower the threshold the more signal it takes for the sidechaining to activate. Find a good balance, bringing the threshold down, so that it isn’t too overpowering. I also recommend de-activating and activating the compression plugin as you’re working to hear what it sounds like with and without

Step 10: By using that A-B comparison, you’ll have a great gauge of how much sidechaining is best for the particular song you’re working on. Subtlety can be key – if you’re using sidechaining functionally you don’t want the effect to stand out, just to give the drums that bit of space.

Step 11: Ratio will affect how much kick signal is coming through. You’ll probably find that about 3:1:1 is where you’d want to be at. Just keep on adjusting the threshold to your taste depending on how extreme you desire the effect to be.
Step 12: Play your whole track through, using the A-B comparison to keep the changes you’ve made in focus. Hopefully, your kick is really coming through now but not to the detriment of the bass – just with a little ducking to make sure your low-end instruments are working harmoniously.
Tools of the trade
Cableguys Shaperbox 2

A lot like FL Studio's built-in plugin Grossbeat, Shaperbox 2 is great for time effect, stutters, scratches, half time effects, filters and sidechaining. If you’re looking for creative sidechain experimentation then this is a great tool. We are a little bit in love with it on the basis of what it’s helped us accomplish in our DAW, with minimal effort at that.
Logic's Bass Amp simulators

We talked about recording bass into an audio interface last month. As we’ve been using Logic’s stock compressor today, we also find it fitting to talk up Logic’s stock bass amp simulators! You may be happy with your bass tone upon recording, but man oh man – the options in Logic make you think twice about sticking with what you have. Not only can you select the type of amp or cab you’d like, you get to mix and match between amp and cab styles, select the virtual mic placement next to the cone and use all of the individual features of whichever amp you choose to colour the sound.
