Sample Alchemy is a new software instrument added to Logic Pro X in the recent 10.8 update. It’s something of a mashup between Quick Sampler and Alchemy.
Moreover, it’s something that nobody asked for, but everyone will want to use! This humble sample-synth is frankly incredible and doesn’t sound like anything else! Let’s check out what it does and how to use it.

Much like Quick Sampler, Sample Alchemy is a drag-and-drop sampler that automatically analyses the pitch information of a sample ready for MIDI-triggered playback. Simply grab some audio from your arrange page or sample library and drop it into the plugin.
Playback however is anything but conventional in this case, as Sample Alchemy applies multiple instances of Alchemy’s synthesis engine to the portions of the sample. These instances are called “Sources”, and each Source (A, B, C, and D) is independently capable of resampling (or resynthesising) the sample using Granular, Additive or Spectral synthesis methods borrowed from Alchemy.
The resulting sound is often unrecognisable from the original sample, yet still contains sufficient trace elements (of the sample) to yield a texture that would be near impossible to achieve with synthesis alone.
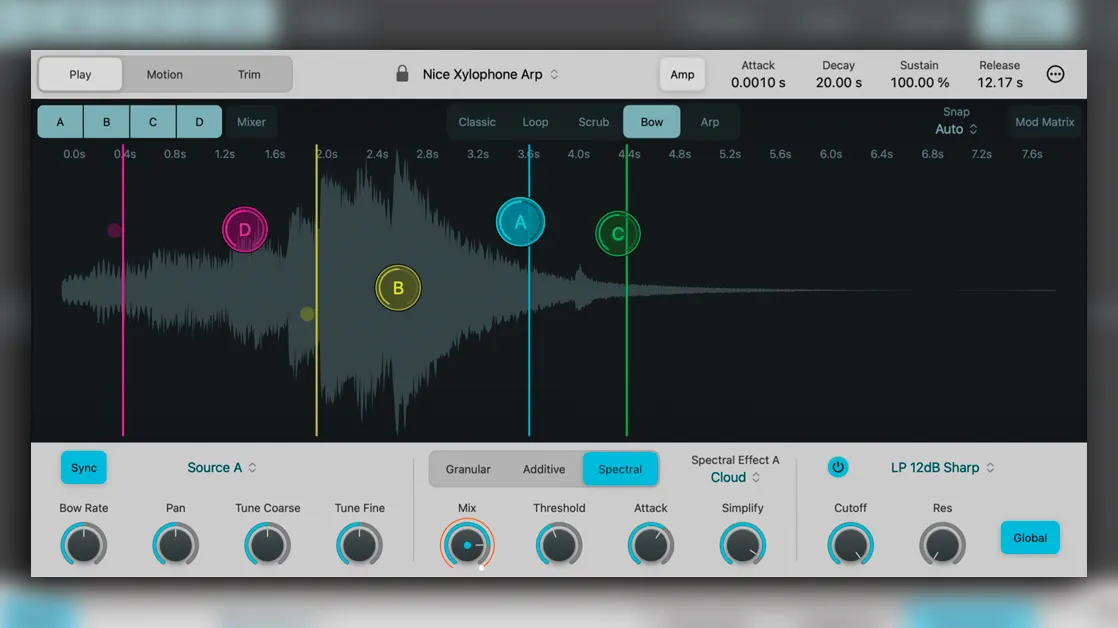
Sources
The four Sources represent the areas of the sample that are being re-sampled (or re-synthesised) and they can be moved to anywhere in the sample-window. The horizontal axis determines the playback start-point of each Source.
The vertical axis is tied to the first control (on the left-hand side) of the Granular, Additive, or Spectral synthesiser settings (these settings change depending on the synthesiser mode - more on that later).

Sources can be switched On/Off in the upper left, and there’s also a Mixer to enable individual volume adjustments of each Source.

Above the wave-form window are the options Classic, Loop, Scrub, Bow and Arp. These options determine the playback behaviour characteristics of the Sources as follows:
- Classic - Plays the entire sample from the Source point (until note-release)
- Loop - Loops sample playback between two user-designated points (only two Sources available in this mode)
- Scrub - Plays/cycles a very narrow portion of the sample around where the Source is placed
- Bow - Somewhat similar to Scrub, but moves back and forth with a slightly wider cycle range (as if bowed like a violin)
- Arp - Plays each source sequentially, like steps in an arpeggiated sequence
The superbly intuitive user interface has a bespoke visual representation for each of the above modes, and it’s therefore advisable to recall a preset, play some notes and watch what the plugin does for a greater understanding of what’s happening.
Above the sample window on the left are three editing modes:

- Play - The default window for playback and patch editing. This is the mode you will spend most of your time working with
- Motion - A means of recording and mapping customised sample playback movements. Hit the Record button and move a source around. These movements are now memorised as movement paths for that Source playback. In Play mode, you’ll see the Source’s playhead move as per your Motion Recording (as opposed to simply playing through the sample in a linear fashion)
- Trim - Allows for trimming the start and end points of the sample, similarly to Quick Sampler
To aid with Source placements and Trim parameters, there is a Snap function in top right of the sample-window, allowing for Auto, Transient, Beat, and Fixed (custom) snapping behaviours.

To the right of this section is the Envelope. By default, it displays the Amplitude Envelope, but if you press the button labelled Amp it will change to Mod and display the Modulation Envelope settings.

Lastly, there are Global parameters such as Polyphony and Glide, as well as MIDI parameters such as Source MIDI Channel Assignment and Pitch-Bend Range. This makes controlling Source movements with a MIDI controller very simple to access and configure remotely.
Specifics and patch editing
So far, we’ve looked at a lot of navigational info but not discussed how these adjustments alter the sound. It’s tricky to explain or describe, as it’s entirely dependent on what sample you’ve loaded into Sample Alchemy to begin with, however there are some synthesis basics we can cover that will create (somewhat) predictable changes to the tone of each Source.

On the bottom left, there are four control parameters for the selected Source (or you can select to make global changes to all four Sources at once with Select All). Three of these four controls remain the same, regardless of the mode, but the dial on the far left pertains to time-based characteristics and therefore changes according to the Mode selected.
- Playback Speed (Classic mode) - speed of the sample play-through
- Loop Speed (Loop mode) - speed of the loop play-through
- Scrub Jitter (Scrub mode) - the amount of jittering (smoothness) in the Source playback
- Bow Rate (Bow mode) - Back/forth movement speed (according to beat-division)
- Arp Rate (Arp mode) - Arpeggiator resolution (according to beat-division)
- Pan - Left/Right position
- Tune Course - Semi-tonal pitch/transpose adjustments
- Tune Fine - Fine tune adjustments
The Synthesis section allows you to select either granular, additive or spectral synthesis for each Source. These methods of synthesis are covered in more depth in our Alchemy tutorial, but we’ll summarise them here, along with their bespoke controls.
Granular

Granular synthesis takes snippets of samples between 1 and 100 milliseconds in length (referred to as 'grains'), randomises their playback and layers multiple grains upon one another, often with volume, pitch, speed, and phase manipulations.
- Size - Grain size (number of samples)
- Density - Amount of grains being randomised and layered upon one another
- Random Time - Amount of randomisation present in the grain diffusion
- Random Pan - Amount of randomisation present in the panning of the grains
Additive

Additive synthesis creates tones and timbres by blending multiple (different frequency) sine waves together (and in the case of Sample Alchemy, presumably blends and/or substitutes these sine waves with soundwaves present in the sampled audio).
There are five operating modes for additive synthesis, and each mode has bespoke controls. Choose your additive effect of choice from the drop-down menu on the right, and the dials/options change as follows:
Harmonic - Processing centred on the harmonics of the sample:
- Odd/Even - Sets where the focus of the harmonic range is (odd or even harmonics of the root sample). More odd and the lower/deeper the harmonic content. More even and the brighter and more airy the harmonic content
- Fifths - How much of the fifth harmonic is present in the re-synthesis
- Octaves - How many octave harmonics are present in the tone
- Fundamental - How much the fundamental pitch is present in the additive resynthesis
Partials/Partials Lock - Processing centred on the partials of the additive re-sampling. Partials Lock only focuses on harmonic partials (and ignores inharmonic partials), and therefore contains more tuning stability:
- Symmetry - Upper/lower partial symmetry; the less symmetry, the brighter and more harmonically detailed the tone
- Odd/Even - Same as above; the more odd, the darker the tone, the more even, the brighter the tone
- Pitch Var - Partial pitch variation
- Num Partials - Number of partials; the more partials, the closer it will sound to the original sample
Formant/Formant Synth - Processing centred on the formants of the sample:
- Shift - Moves the formants in semi-tone/half-tone intervals - the higher the setting, the brighter and more shimmery things get
- Key Track (Formant mode only) - lower notes have less top-end detail and higher notes have more brightness and clarity (like an acoustic instrument, such as a piano)
- Size - Creates the illusion of bigger or smaller tonal space (somewhat like stereo widening)
- Centre - Sets the frequency which the formants will gravitate towards
- Vowel (Formant Synth mode only) - A formant filter that evokes a vowel-sound characteristic
Spectral

Spectral synthesis analyses the amplitudes and frequencies of an input signal and recreates it by means of oscillators. It separates the deterministic (pitched) and stochastic (percussive) aspects of the sound, replacing the pitched elements with sine waves and percussive elements with whitenoise.
Much like additive (mentioned above), there are different means of producing this form of synthesis, selectable from the drop-down menu on the right. The options change as follows:
Formant - Focuses on the formants present in the Spectral tones:
- Shift - moves the Spectral Formants in semi-tone/half-tone intervals - the higher the setting, the brighter and more shimmery things get
- Key Track - lower notes to have less top end detail and higher notes to have more clarity
- Size - creates the illusion of bigger or smaller tonal space (somewhat like stereo widening)
- Centre - sets the frequency which the Spectral Formants will gravitate towards
Low/High Cut - Functions like a high-pass/low-pass filter:
- Low Cut - high-pass filter
- High Cut - low-pass filter
Blur - Blurs or reduces the clarity and distinction of the spectral tones:
- Mix - Blend between the original sample and spectral tones
- Length - Length of spectral tones
- Variance - Variety present in spectral tones
- Gate - Noise gate to reduce/remove overly quiet spectral tones
Cloud - Creates a cloud or blanket of spectral tones that can have a chorus-like effect:
- Mix - Blend between source sample and spectral tones
- Threshold - Spectral detection for cloud activation
- Attack - How fast the spectral cloud emerges
- Simplify - reduces the harmonic scatter of the spectral cloud (improves tuning stability)
Metalize - Essentially a comb filter, but the results are typically rather metallic (even FM) sounding:
- Mix - Blend between source sample and spectral tones
- Interval - Set the number of harmonic intervals; the fewer intervals, the purer the tone
- Simplify - reduces the harmonic scatter of the spectral metalization (improves tuning stability)
- Feedback - Similar to feedback in FM synthesis; more feedback results in more harmonic distortion
Noise - Uses noise as a means of spectral synthesis (blended with the sample):
- Low Cut - high-pass filter
- High Cut - low-pass filter
Filter

Lastly in the Source parameters is the filter section. Each Source can be individually filtered, or the filter can be applied globally. Furthermore, there are 10 different filter algorithms to choose from.
Modulation matrix

Lastly, there is a comprehensive modulation matrix on the right of the plugin. Simply click on whatever you wish to modulate and select the modulation parameters of your choosing.
The parameters are not exhaustive, but there are four MIDI-assign slots, six sine wave LFOs and a range of other parameters that can be set to control the modulation. All modulated dials will display with an orange line around them, signifying their modulation range/depth.
Presets
This explanation may have felt a bit dense with terminology, and light on actual sonic characteristics. The synthesis in use here is far more nuanced and complex than the familiar linearity of subtractive synthesis, and therefore technical specifications can be tricky to sum up concisely.
Furthermore, the hybrid sampling/synthesis nature of this instrument means that the sounds you get from it are largely determined by the samples you upload into it. The possibilities are nearly endless, and there’s no way to actually describe how it sounds, as the sounds it makes are wholly determined by the user’s choice of sample.
Ultimately therefore, the proof is in the listening, and I strongly recommend diving in and having a play. Before you know it, things will start to make sense, as you familiarise yourself with this tactile and hands-on software instrument.
To get the ball rolling, here are five presets that nicely showcase what Sample Alchemy can do.

- Arpeggiated > Plucked Voice Arp - A voice sample turned into an unsettling pluck-like sound with a glitchy tail-off on Source D
- Bass > Growling Pulse - A growly, textured, synth-bass patch that feels somewhat FM in nature
- Keyboard > Blown Bottle Keys - This contains both a breathy and wooden quality, whilst also harbouring overtones that are possibly reminiscent of electric pianos
- Pad > Chiming Glockenspiel - An eerie pad that utilises the loop functionality to create a deep shimmer with some sparkly twinkles up-top
- Pluck > Big Strings Pluck - A spacious string-pluck that has an almost bell-like quality, coupled with a glitchy shimmering of sorts
Closing thoughts
Sample Alchemy puts an innovative, new twist on the principles of both sampling and synthesis in ways I’ve not encountered before. Under the hood, it’s doing some astonishingly complicated and powerful things, however its playful user interface makes it a sheer delight to use.
You can push and pull things around, switch, invert, bow, cycle, and arpeggiate fragments of your sample resulting in sounds that can feel as synthesised as they do organic. It’s only limited by its user’s imagination, and there’s nothing else quite like it.
