How to recreate classic analogue drum sounds in your DAW and with hardware
Learn to make vintage drum machine sounds from scratch
Want all the hottest music and gear news, reviews, deals, features and more, direct to your inbox? Sign up here.
You are now subscribed
Your newsletter sign-up was successful
This month, we’ll examine the structure and components of classic analogue drum sounds. Nowadays, these percussion instruments can be created with nearly any full-featured softsynth, including Ableton Operator, Xfer Serum, or Reason’s Thor and Subtractor, but the underlying principles are identical. That said, the tonal identity of any given synth, hardware or software, will define the sonic flavour of a bespoke drum kit.
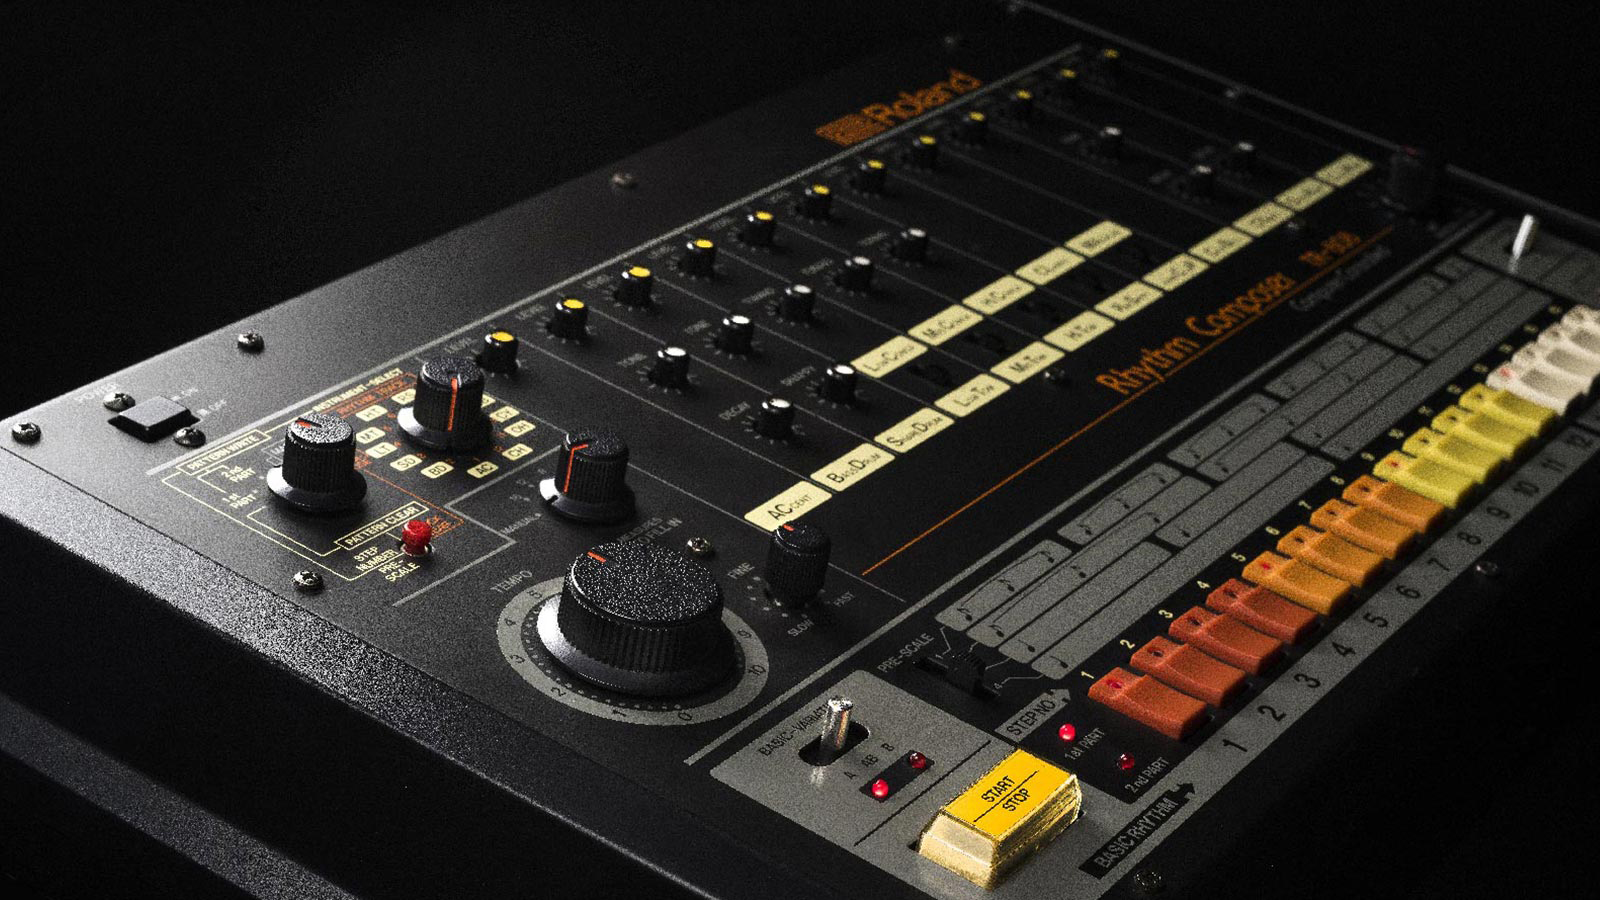
While it’s possible to re-create timbral aspects of familiar analogue drum machines like a Roland TR-808 or TR-909, exact duplication can be extremely tricky since the original units incorporated specialised circuits that defined their sound in a way that traditional synthesis tools can’t quite capture.
Although this master class includes tips for approximating those iconic drum machines, the techniques are broader than that, encompassing other classic analogue percussion sources like the Simmons SDS-V and Roland CR-78. Once you understand the essentials, you can then explore the range of possibilities lurking within your existing tool kit of instruments, but with a much broader range of customisation options than those of the originals.
• SampleRadar: 105 free 808 weight samples
• SampleRadar: 378 free 808 drum samples
Synth drum essentials
If you consider the analogue technology available for those classic drum machines from the ’70s and ’80s, it becomes obvious that they couldn’t possibly include dual oscillators, extensive filtering, and multiple modulation sources. In those days, having a full synth for each drum would have been prohibitively expensive.
To recapture their essence, you have to think about them in terms of their simplicity. It’s no exaggeration to state that many of the most familiar drums are downright minimal, technically speaking. To get started, it helps to understand that many of the early analogue drum sounds consist of two elements: a sine or triangle wave and a noise generator with filtering. Of course, envelopes are involved, but with the exception of simulated maracas and cabasas, these are strictly ramp shapes with instant attack and simple decay/release segments.
Some of the early Roland tones, notably cymbals and the iconic 808 cowbell, rely on more complex oscillator configurations that are unique to their custom circuits. Additionally, the distinctive 909 toms use a dual-oscillator approach. But by and large, the most common drum sounds can be re-created with a single oscillator, noise generator and filter, with a few basic envelopes for sculpting the behaviour of each.
Want all the hottest music and gear news, reviews, deals, features and more, direct to your inbox? Sign up here.
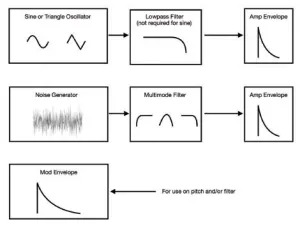
Since these design techniques apply to a huge variety of synths, we’ll approach the concepts agnostically, using diagrams that are applicable to nearly every modern subtractive synth. Figure 1 shows the architecture that serves as the foundation for most of the drums in a standard kit (kick, snare, toms, hats and cymbals), so if you have a synth that supports this structure, you’re all set.
You’ll want to keep your oscillators in the 30-70Hz range or all kick drums, keeping in mind that 40-50 Hz is the sweet spot. It’s worth noting that frequencies below 40 Hz may not be reproduced by many speakers, which is why the magic notes for club-friendly bass are E0 (41.2 Hz) to A0 (55 Hz).
Kick drums
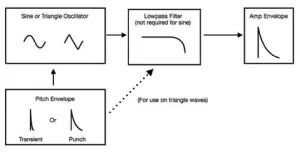
808 Kick. It’s fascinating that the most popular kick drum for modern dance music (the Roland TR-808 kick) has, arguably, the simplest architecture of any synth sound; a sine wave with no filtering, with a ramp (decay/release only) amplifier envelope and a pitch envelope set to an extremely fast decay (see Figure 2). Setting your pitch decay to between 20 and 70 milliseconds will impart that trademark 808 “click” transient (depending on the depth of the pitch modulation), while longer amplifier decay/releases (both should be the same) will give you that “Jeep drone” originally popularized in hip hop.
Best drum machines 2020: our pick of the best grooveboxes for beginners and pros
If you want to use your custom 808 kick for bass lines, switch your synth to monophonic mode so the releases don’t overlap and create unpleasant low-frequency intermodulation artefacts. For a more synthwave, retro sound, back off on the pitch envelope and shorten the amplifier decay. The result will be a shorter, more traditional new-wave kick.
Pro tip: If your synth only offers a triangle wave, you can approximate a sine by using very low filter-cutoff frequencies that eliminate all but the lowest harmonics. In this case, route the rapid pitch envelope to the filter cutoff as well, to retain the attack transient.
909 Kick. You can simulate the 909 using this same architecture, but switching to a triangle wave followed by a lowpass filter with a very low cutoff frequency. From there, add a bit of cutoff modulation from the pitch envelope (on some hardware synths, these are one and the same).
Next, increase the decay of the pitch/filter envelope to the 200-500 ms range. By lengthening this decay, then adjusting the depth of the modulation for each destination, you can increase the punchiness of the kick into 909 territory. I’ve heard several producers refer to this as “chest punch,” which is fairly apt.
Pro tip: By experimenting with cutoff modulation depth, in conjunction with slightly raising the cutoff frequency itself, you can simulate the hard-style distortion effect, since triangle waves contain odd-numbered harmonics, the same harmonics that are emphasised by adding a distortion pedal.
Snare drums
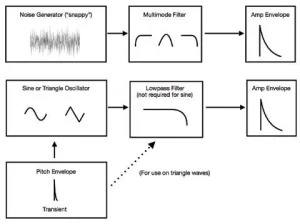
Classic analogue snares generally consist of a sine/triangle tone generator and a noise generator, each with their own dedicated amp envelopes (see Figure 3). Fans of the 808 and 909 (and TR-8 and -8S) snares are already familiar with the “snappy” knob, which is essentially a volume knob for the noise aspect. Reduce that to zero and you’re left with the tonal element of the drum.
While both the 808 and 909 include a bit of control over that component, many other vintage drum machines do not. As a rule of thumb, E2 is the MIDI note that’s generally closest to the most common analogue snare pitch (around 160 Hz). For a less derivative drum sound, it’s worth examining everything from 100 Hz (beefier) to 200 Hz (thinner) for the pitched component. As with the kick drum, applying a pitch envelope with a lightning-fast decay can add a strong transient, which will help the snare cut through a mix.
As for the noise, filtering and amplifier decay are the two defining parameters. Unless your synth allows the pitched oscillator to be routed directly to the output—or through its own filter—you’ll need to stick with a lowpass filter to fine-tune the noise character. Some synths, like Reason’s Subtractor offer detailed control over noise decay, volume, and colour (tone), which is perfect for this application. Other synths, such as Sylenth, offer parallel signal paths with independent filters for sculpting the noise without affecting the sine/triangle oscillator.
808 Snare. Start with a sine wave, tune it to 160 Hz (or play E2), and give its amplifier envelope an instant attack and decay/release time between 250 and 350 milliseconds. If there’s a lowpass filter in its path, open the cutoff to maximum.
For the noise component, give it a separate amplifier envelope and re-create the “snappy” parameter using its volume. The snare decay parameter can be simulated by varying the decay/release value between 100 and 600 milliseconds.
If both sources also share a single amp envelope at the end of their synthesis signal path, be aware that it will affect the overall decay, in addition to any enveloping on the oscillator and noise.
909 Snare. Structurally, the 909 snare is nearly identical to the 808, so you can use the above instructions as a starting point. While the pitched waveform of the 909 is more complex than a simple sine or triangle (and too short to be determined using an oscilloscope), a triangle wave serves well. The amplifier envelope of the pitched element has a slightly longer decay, but not significantly so.
As for the pitch envelope, part of the 909’s punch comes from a slightly longer decay. Instead of the 808 click, experiment with decay ranges in the 100-200 millisecond range. Additionally, lowering the lowpass cutoff to 90% and applying an identical envelope to modulate the cutoff will enhance the impact of the sound. From there, you can adjust the noise decay independently to taste.
Pro tip: To make the 909 snare emulation even more convincing, apply generous amounts of compression. This was a key production technique in classic house and techno.
Toms
Those other drums in the kit, the toms are no less important than the kick and snare in adding the right vibe to your music.
808 Toms. Under the microscope, the 808 toms are largely based on the same architecture as its kick: A sine wave with an extremely short pitch envelope for a transient, and an amp envelope with a short-to-medium decay/release—but played in higher octave ranges. However, if you listen closely, you can hear a touch of lowpass filtered noise with a very low cutoff frequency subtly blended in the background. Because of this, the architecture for the snare drum will work well for reproducing them, by following the above instructions.
909 Toms. 909 toms are a different beast altogether, consisting of two oscillators tuned a fifth apart (7 semitones), with the fifth being slightly lower in volume. Here, a triangle wave will serve as a convincing substitute for the original oscillator circuit. As with its kick and snare, the 909 toms’ pitch envelope has a slightly longer decay than the 808 (100-200 ms). This adds punchiness and should also modulate the filter cutoff frequency for added authenticity. The base value for the cutoff should be about 40% to 60% of maximum. From there, customization is a matter of what’s available on your chosen synth and personal taste.
Simmons Toms. Simmons electronic drum kits dominated the ’80s. While the Simmons kick and snare were just as common, it’s the SDS-V tom that is the most recognizable today, as it’s also a close cousin of the disco tom.
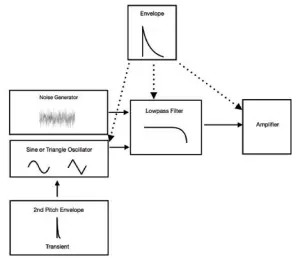
Because of the era’s technology, the Simmons tom is incredibly easy to re-create with a modern synth, where a single ramp decay/release envelope governs pitch, filter cutoff, and amplifier equally. The only variables for customization here are global decay time, pitch modulation depth, lowpass cutoff frequency, and filter envelope depth. Additionally, a second pitch envelope with near instant decay can be used to add the trademark Simmons click to the attack of each hit. Figure 4 diagrams the architecture and routing for these toms. Because of their simplicity, experimentation will yield a huge assortment of familiar new-wave and disco toms.
Pro tip: To create that classic disco-tom sound (pew! pew!), skip the noise generator, open the filter cutoff to maximum, and use a sine wave instead of a triangle.
Percussion
Wood and metal provide the defining acoustical properties of real-word percussion such as cymbals, hi-hats, cowbells, and claves.
And although hand claps, bongos and congas are made of different materials, they share design elements with metal and wooden percussion, but with a few additional tweaks.
Hi-Hats and Cymbals. While the TR-909’s cymbals were all sample-based, the 808’s cymbal, hihats, and cowbell are all based on a bank of six pulse oscillators that are processed using a HD14584 hex Schmitt trigger inverter chip. This is amazingly specialized and nearly impossible to reproduce without physically re-creating—or digitally modeling—the circuit design. So, we’ll stick with the synthesis model we have used so far to build the types of cymbals and hats found in ’60s- and ’70s-era home organs and the Roland CR-78 drum machine.

Here, the architecture is remarkably straightforward: A noise generator followed by a resonant highpass filter followed by an amp envelope, with no other modulation (see Figure 5). For hi-hats, start with the open hat by selecting white noise and a highpass filter (12 and 24 dB/octave both work for this). Next, raise the cutoff to 2 kHz or higher and adjust to taste. From there, give the amp envelope a medium decay of around 1,000 ms to nail the character of an open hat.
For a closed hat, duplicate the sound (by saving and reloading, or copy/pasting) then give the new sound a tight decay of 200 ms or less.

To get the closed hat to cut off the open hat, as on all drum machines, you’ll need to create a “choke” or “exclusive” group and assign both hats to the same group. Ableton’s Drum Rack allows this from within its input/output section (see Figure 6). This assigns both drums to a monophonic channel so that when one plays the other is cut off.
Pro tip: To get closer to the vintage Roland CR-78 character, add a touch of resonance to your highpass filter to create more of a “ping.” For cymbals, use the above open-hat design principles, but with a very long decay and release time.

Clave. A clave is another simple sound to synthesize. All it consists of is a sine wave (or filtered triangle) with an amp decay of 150-250 milliseconds (see Figure 7). That’s it. You’re done.
E6 is a good MIDI note to begin with, and the frequency range of 1.5 to 3.5 kHz offers a wide array of valid options.
Pro tip: While it’s tempting to add a touch of pitch envelope to enhance the transient, at these high frequencies, the result will be more of a squeak or chirping sound.
Cowbell. The essence of the original 808 Cowbell consisted of four simultaneous pulse waves at the following frequencies: 555 Hz, 835 Hz, 1.37 kHz, 1.94 kHz. You can easily swap them out for sawtooth waves, if your synth doesn’t provide pulse-width control.
Since there’s no filtering—and 555 and 835 Hz are the dominant frequencies—you can approximate this timbre on nearly any two-oscillator synth by dialing in those tunings. (A tuner and MIDI key-to-frequency chart will help if you’re synth is limited to semitones and cents.) From there, set your amp envelope decay to around 600 milliseconds. Even on an affordable synth like the Korg Minilogue, the results are compelling if you have the patience to tune it properly.

As for more realistic cowbells, the process is quite simple. Using the same approach as the above clave example, increase the decay time to around 400-500 milliseconds, and place a ring modulator at the end of the chain (see Figure 8). Because ring modulators add the sum and difference to the original source frequency and the ring mod’s oscillator frequency, it’s easy to add the metallic cowbell texture with a little tinkering. The result will change dramatically depending on which notes you play and how you tune the ring-mod oscillator, but it’s worth the time to get it right.
Pro tip: You can often use these same settings to create congas and bongos, simply by playing the sound a few octaves lower. For agogo bells, try a higher octave.

Handclap. 808-style handclaps are very difficult to re-create on a standard synth, because the initial portion of the sound includes a dedicated circuit that sharply repeats a fast attack-decay transient three times, followed by a more traditional decay for the “reverb” element.
To simplify this technique for nearly any synth, just use white noise, followed by a static (unmodulated) bandpass filter with a cutoff frequency between 800 Hz and 1.5 kHz. To add more of a cupped-hand sound to the clap, increase the resonance. The amp-envelope decay works best between 450 and 800 milliseconds.
Pro tip: For finger snaps, increase the bandpass cutoff to around 2.5 kHz and add reverb.
Electronic Musician magazine is the ultimate resource for musicians who want to make better music, in the studio or onstage. In each and every issue it surveys all aspects of music production - performance, recording, and technology, from studio to stage and offers product news and reviews on the latest equipment and services. Plus, get in-depth tips & techniques, gear reviews, and insights from today’s top artists!
