20 Logic Pro X power tips you need to know about
Apple’s Mac-only DAW is full of hidden functions and operational secrets - here’s a score of them
Want all the hottest music and gear news, reviews, deals, features and more, direct to your inbox? Sign up here.
You are now subscribed
Your newsletter sign-up was successful
Thanks to a steady stream of updates, Apple's Logic Pro X is now a very different DAW to the one that was released in 2013. The software's feature-set has expanded greatly, turning a great music production package into an even greater one.
What's more, the good news is that you can currently use Logic Pro X for free for 90 days, so if you've got a Mac, now's the time to find out what it can do for you
We've called on all our Logic Pro X experience to put together this list of power tips, which are designed to make your experience of using the software even happier.
1. Chase revere
By default, Logic Pro X won’t play back a MIDI note unless the playback bar passes through the start of it, which can be annoying if you’ve set up a loop in the middle of your track containing notes that start prior to the loop start point. To fix this, go to File > Project Settings > MIDI and click Chase, then check the Notes checkboxes at the top and Chase on Cycle Jump at the bottom.
2. You might as well jump
It can be interesting to experiment with the structure of a track by ‘jumping’ from one part to another. Rather than delete everything in between the two sections in question, though - a pretty drastic move if you’re still making up your mind - cycle the section you want to ‘jump over’, then reverse the locator positions. Playback will now skip that section.
3. Alt rock
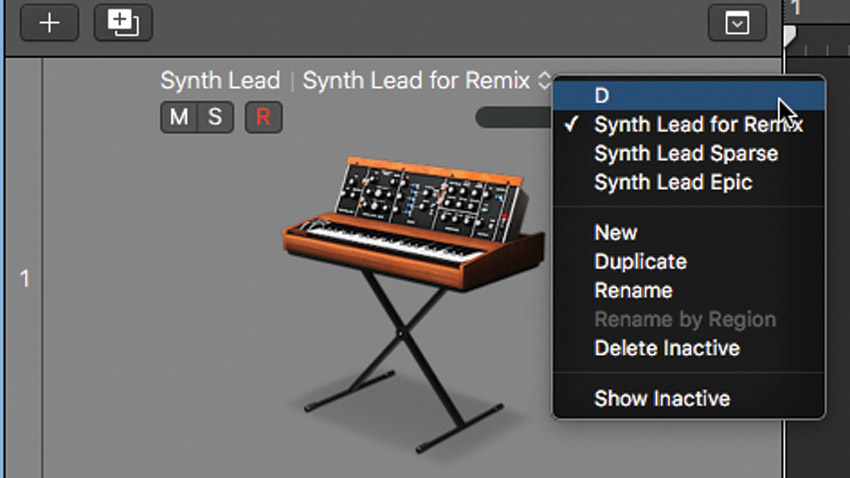
If you want to audition several separate approaches to the part for a particular instrument, you don’t have to make multiple copies and furiously work the Mute and Solo buttons. Instead, try Track Alternatives, which lets you try out several ideas before choosing your favourite.
4. Brush work
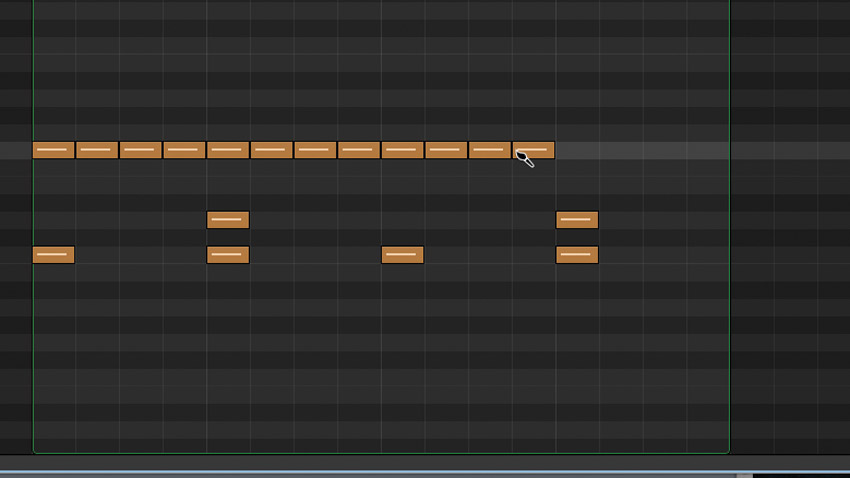
The Pencil Tool is a useful way of inputting MIDI notes, but it can be time-consuming clicking 16 times to input a row of hi-hat notes in a drum pattern. To do the same thing more quickly, select the Brush Tool. This lets you ‘paint’ lines of notes as you click and drag.
Want all the hottest music and gear news, reviews, deals, features and more, direct to your inbox? Sign up here.
5. Peripheral vision
You’re moving from one Instrument track to the next, making changes to key parameters as you go. However, the plugin window for the synth on Track 1 stays active when you move to Track 2, so you’re constantly opening and closing GUIs. Click the purple Link button in the top right-hand corner of the plugin window and the Instrument on your current track will always be the one in front of you.
6. Lowering latency
You’ve got loads of plugins running, maybe including some ‘lookahead’-compatible ones like Logic’s own Adaptive Limiter on the master output. Suddenly, any notes you play on the keyboard start to lag, with an audible gap between triggering them and the corresponding sounds being heard. Head to the Customize Control Bar options and activate the Low Latency Mode option. Enable this whenever you need to add notes to a busy project.
7. Stacked
Grouping complementary sounds together using Logic’s Track Stacks makes mixing much easier. Suddenly, all of your drums can share a single fader, and auxiliary effects added to a Stack will affect all sounds inside it in the same way. Select the individual tracks you want to ‘stack’ and right-click to select the option from the dropdown menu.
8. Alternative comedy
Rather than save multiple Logic projects with different file names for the various ‘versions’ you’re working on, save them as Project Alternatives (File > Project Alternatives). These keep the plugins associated with a project active, making it easier than loading a whole new session.
9. Record without recording
Enable Capture Recording, and anything you ‘play’ while not actually recording can be turned into a clip. Switch it on by right-clicking the grey Control bar at the top, selecting Customize Control Bar and Display, and choosing Capture Recording. You’ll see a second record button next to the main one - press this whenever inspiration strikes and whatever you’ve just played will appear as a new ‘recorded’ region.
10. Import duty
Need to grab a sound, some MIDI or automation data, or a whole channel setup from another project? Here's how to make yourself a master of imports…
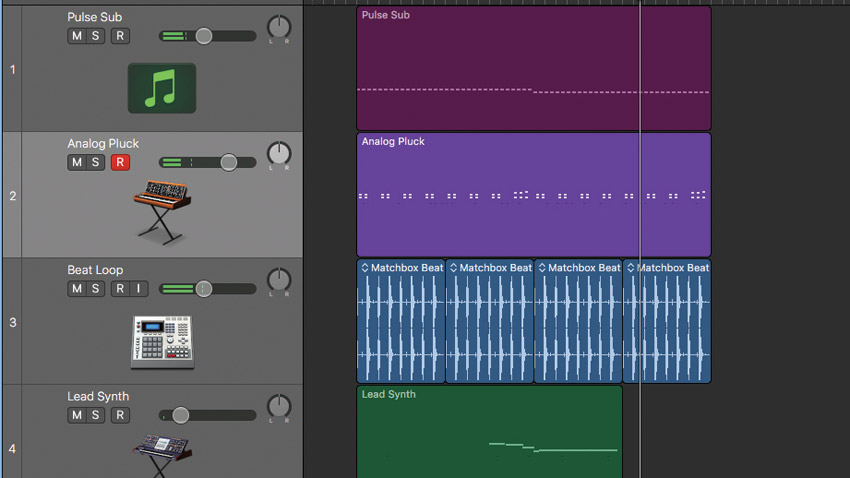
Step 1: We’re starting with a basic sequence incorporating a pulsing sub bass, a plucked synth line, a beat loop and a Solina-style string line. Now we want to add something we created in another project.
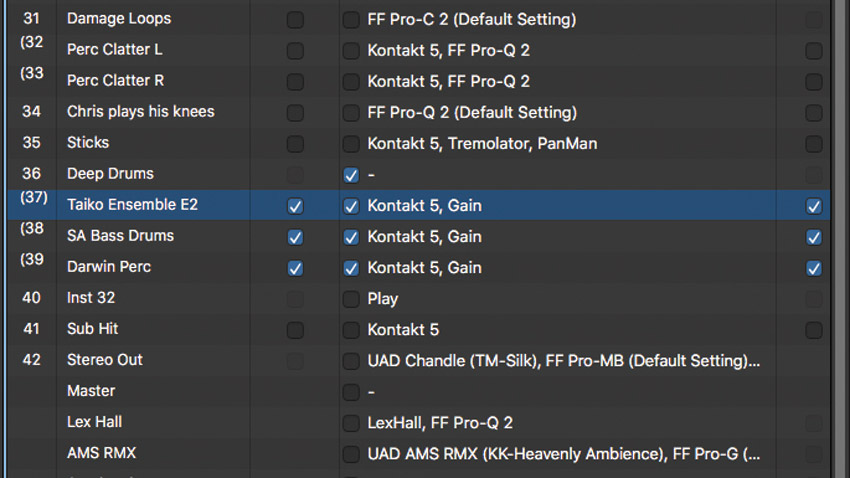
Step 2: We can browse to the relevant track without having to leave this project. Click Browsers in the top right-hand corner, then All Files. Browse to the location and double-click the relevant Logic Pro X project.
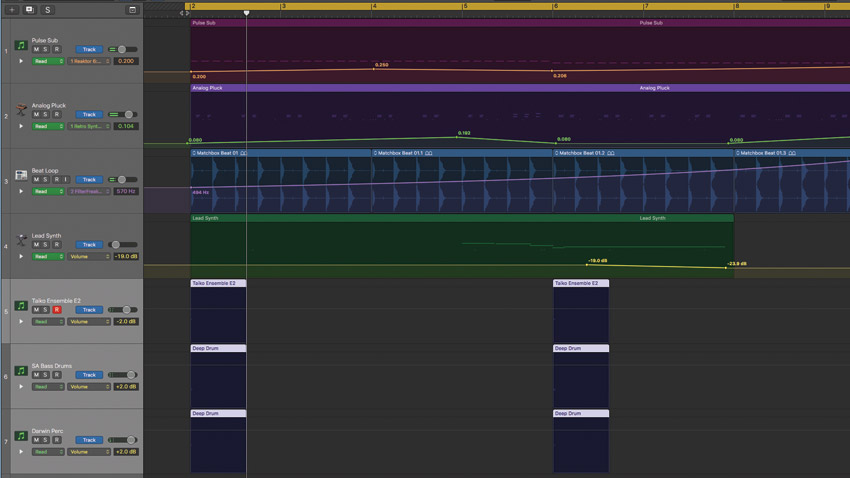
Step 3: Click the Content for the sound(s) you want - and, if you like, the auxiliary effects and automation you used, too, then click Add. The regions from that project will be added to your current project - move them, edit them and drop them wherever you like.
11. Think smart
Smart Controls can be very useful - that is, unless you want to manipulate parameters that aren’t among those covered by the default dials. To edit the selections, click i in the top left-hand corner of the Smart Controls window then the dial you want to reassign, and browse through the parameters available for it.
12. State of Collapse
When you’re programming beats, it can be frustrating having to accommodate notes that are sometimes octaves apart in the Note Editor, such as a pattern with a kick on C1 and a crash cymbal on G4, for example. Once you’ve included all the notes that you need in the pattern as a whole, click Collapse Mode and all unused note lanes will be omitted from the interface.
13. Flex appeal
A good way to make glitchy, weird beats is to enable Flex Mode and choose Tempophone as your Flex algorithm. Click the audio region to create Flex Markers and pull them around, creating high and low speed sections in the process. Then try varying the Grain Size on the left-hand side to make your beat loop sound like it's being attacked by grains of sand!
14. Multichannel management
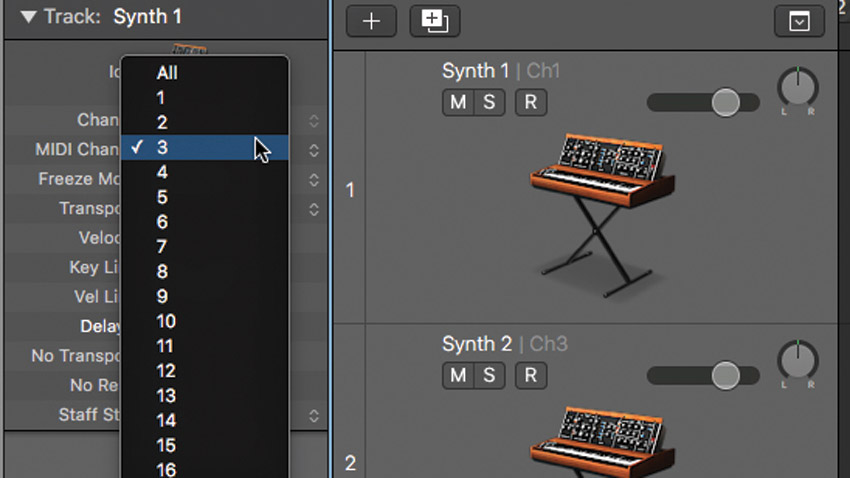
When working with third-party multichannel plugins such as NI’s Kontakt, you might want to host several instruments in one instance. Match each instrument to its own MIDI channel by selecting it in the left-hand side of the Inspector; and to automatically assign the next created track the next MIDI channel, choose Track > Other > New Track With Next MIDI Channel.
15. MIDI compression
Sometimes the weighting/action of your controller keyboard might not suit the real-time performance of a part you're playing. Rather than painstakingly boosting low velocities and curtailing high ones, let the Velocity Processor MIDI effect do the hard work for you. Analogous to a ‘MIDI Compressor’, this lets you select a Threshold point above which the Ratio will set the amount of velocity reduction.
16. Stretching exercise
Suppose you’ve recorded a MIDI sequence comprising a series of short notes, and you suddenly decide you want each one to sustain until the following note takes over. Rather than manually adjusting the length of each note, open the Note Editor, select all notes, then choose Edit > Trim > Note End To Following Notes (Force Legato).
17. Dual automation
Logic Pro lets you create automation either for individual regions or entire tracks. For example, if you want the same filter movement to repeat for every bar of a synth sequence, select Region Automation. On the other hand, if you want the synth to, say, fade in and out over a longer period of time, that curve would need to be drawn in Track Automation mode.
18. Better than the real thing
If you want the depth of mixing control offered by a live drum recording session when working with acoustic drum samples, try selecting a Producer Kit. You can choose these from the Instrument Library in Drum Kit > Producer Kit. With these, a close mic channel is created for every drum, along with overhead, room and leakage channels.
19. Pitch perfect
Alongside its time-correcting Flex Modes, Logic Pro X also offers Flex Pitch, its very own Melodyne-style pitch correction system. It’s worth familiarising yourself with the ‘hot spots’ around the edges of detected notes, as these control various parameters. Fine Tune, Pitch Drift, Vibrato amount and even per note Volume can all be adjusted here, depending on which corner of the note you drag.
20. Percussion discussion
Drummer, MIDI and audio regions all have a part to play in making great drum parts - here’s how…
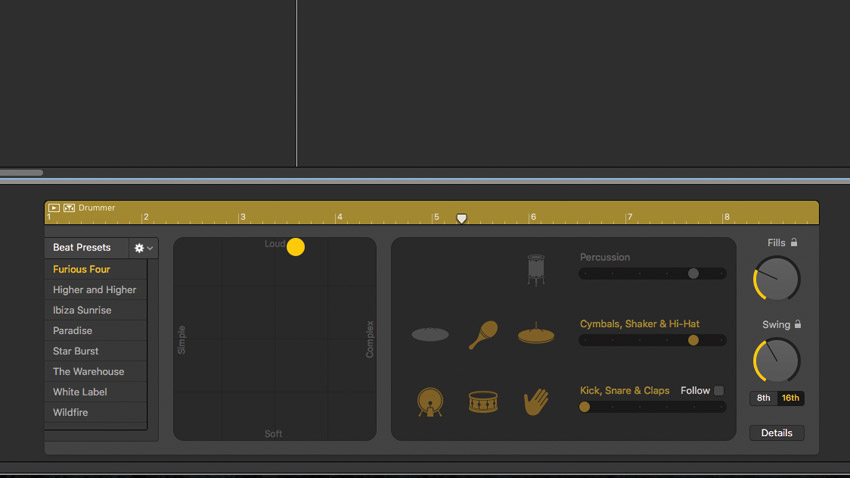
Step 1: Here, we're using Drummer’s Modern House kit. We don’t have much control over the details of the drum pattern beyond the broad changes we can make in the editor.
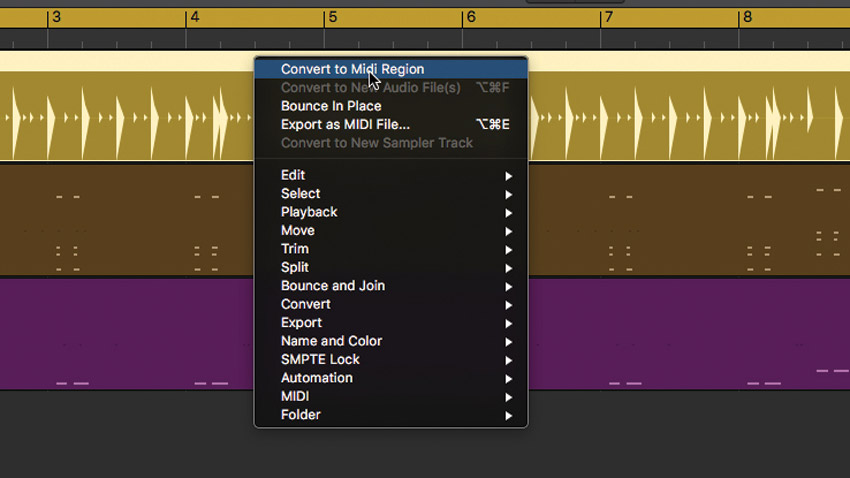
Step 2: To get more control, we right-click the Drummer part and select Convert To MIDI Region. This turns the part into a regular sequence, with individual hits now represented as MIDI notes. We can now easily edit the drum pattern.
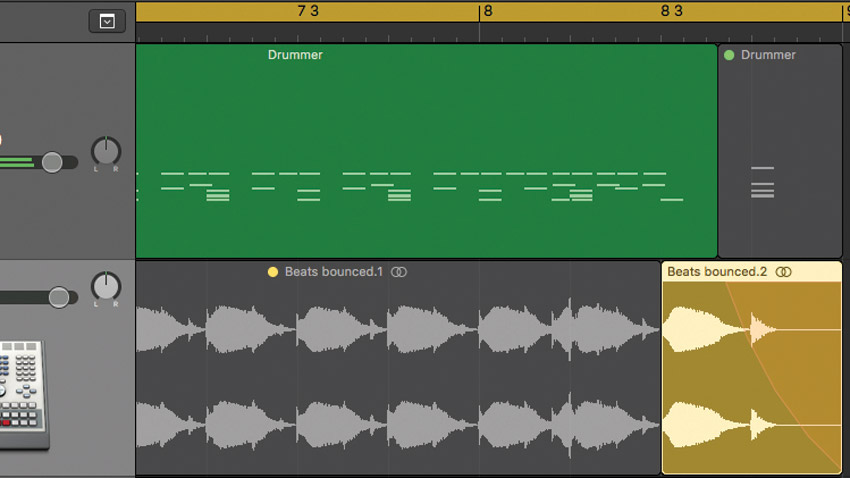
Step 3: We convert the MIDI region to audio using Bounce In Place, then select the last two hits, muting the rest, before adding a slow-down effect at the end. We mute the corresponding section of the MIDI. We also create a reversed audio file in the last beat of bar 4.
Computer Music magazine is the world’s best selling publication dedicated solely to making great music with your Mac or PC computer. Each issue it brings its lucky readers the best in cutting-edge tutorials, need-to-know, expert software reviews and even all the tools you actually need to make great music today, courtesy of our legendary CM Plugin Suite.
