In this tutorial, we'll show you how to put iZotope's spectacular plugin to work transforming a vocal into an energetic fill. BT, eat your heart out…
Learn more creative effects processing techniques in the December edition of Computer Music (cm237).
Click here to download the files referenced in the tutorial

Step 1: Load the WAVs beginning "IDM…" onto audio tracks in a 168bpm project, then turn the vocal track down to -12dB and put a limiter on the master bus. Take a listen to the fill at bar 16. We want to transform the spoken word "request" into a stuttered fill that spans the whole bar, so add iZotope Stutter Edit to the vocal track.

Step 2: Stutter Edit is a MIDI-triggered effect, so we need to route MIDI into it to make it work. How you do this depends on your DAW, but in Ableton Live, you add a new MIDI track, then set its output to the vocal track, and the secondary output selector to Stutter Edit (which should be selected by default anyway). Set the MIDI track's monitoring mode to In.

Step 3: Now loop bars 16-18 and hit a key on your MIDI keyboard as the vocal begins - each key produces a different effect, called a Gesture, and you can see the settings changing with each one. Change the MIDI track's Monitor mode to Auto and program a MIDI clip that plays the note C3 for 5 beats, overlapping where the drums come back in. Select Bank so we can program our own…

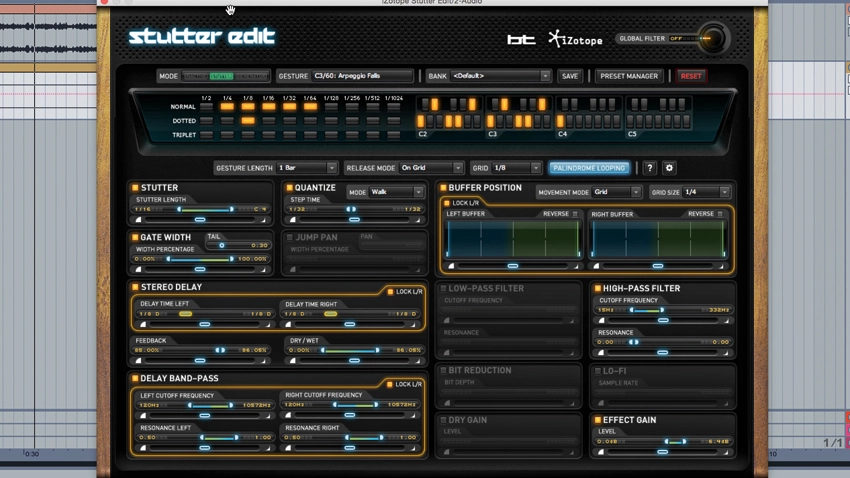
Step 4: An eighth-note repeat is applied by the Stutter module. Adjust the Stutter Length handles - when the Gesture is triggered, the parameter sweeps from the blue end to the green one. Set up a full-range sweep from 1/64 to 1/4 (the right-click options can help with this). Now use the curve slider below to make the transition ease in or out (the Timeline Dot visualises this), and set it to about 60%.

Step 5: The other modules work similarly. Less obvious is that Stutter, Quantize, Gate Width, Jump Pan and Buffer Position all relate to the stutter process. Quantize makes the Stutter module jump instantly between note values for more rhythmic results. Enable it, then set the Stutter Matrix as shown to restrict repeats to those note lengths only. Set the Stutter slider to Full Range again if needed.

Step 6: Gate Width sets the length of stuttered slices. Set it to range from 30-100%, so it starts out choppy and staccato, then eases off. Enable Jump Pan to make the slices jump around the stereo field. Let's finish the effect by using the High-Pass Filter, Bit Reduction, and Lo-Fi modules to mangle the vocal. Effect Gain can be used to compensate for level discrepancies.
