How to use a Guitar Hero controller to control Ableton Live
Getting started
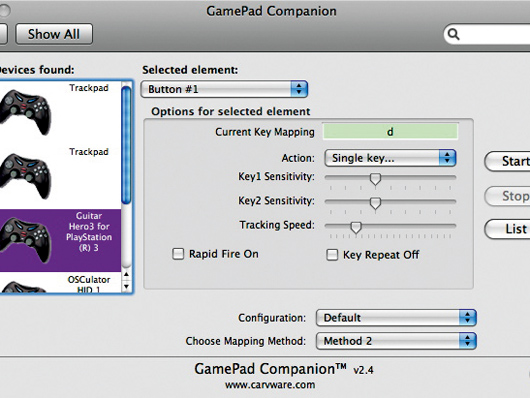
Step 1: Connect the Guitar Hero wireless receiver to your computer via USB (you might need a mains powered USB hub). Open Game Pad Companion for OS X (a licence costs $15 but there’s a demo version) in System Preferences. Tap each button in turn on the guitar to highlight it, and assign a letter to each - like ASDFG. Assign the bridge buttons, too - We used Q and W, and the whammy bar - Z. Assign E and R to the up/down movements of the joystick/knob. Finally, assign l to the ‘picking’ bar.
This will give us the ability to play chords, activate effects and use the whammy bar. The guitar sounds are from Live’s Tension instrument. Click ‘Start’ to activate Game Pad Companion.
• For many more Ableton Live guides go to our massive learning hub: Learn Ableton Live and Ableton Push: music production tips and tutorials
Creating the Live set
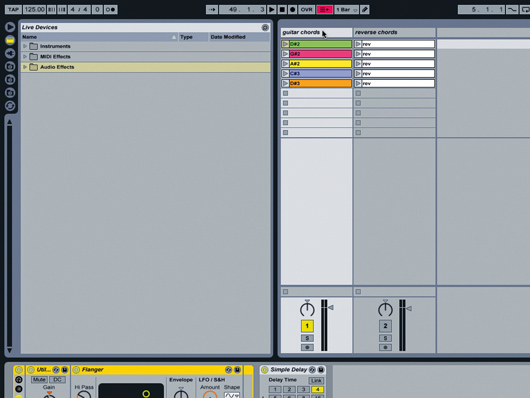
Step 2: Launch a new Live set, go into Session View and create an audio track. Load your guitar chords above each other in the track. We used Tension with MIDI clips, then froze and flattened the clips to create standalone audio. We just used basic power chords - root note, 5th, octave - for D#2, G#2, A#2, C#3, and D#3. Set one-bar clips, and disable quantisation. Once that’s done, duplicate the track and use the Rev command to reverse each of the clips. Add a clip envelope to transpose it down one octave over one bar. Finally, add a Flanger effect to the original track and Ping Pong Delay and Reverb to the reverse track.
Mapping
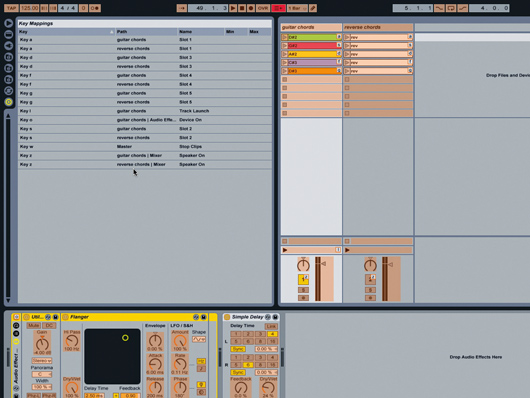
Step 3: Set the Ping Pong Delay Dry/ Wet mix to 40%, and the Reverb Dry/Wet to 50%. Now we’re getting to the fun part - put Live into Key Map Mode and map the guitar neck buttons to the chord clips in track 1, then repeat for track 2. Map the large bridge button to toggle the Track 1 Flanger effect, and the smaller bridge button to Stop Clips. Map the picking bar to the Track Launch button in Track 1. Finally, map the whammy bar to the Activator switches for Tracks 1 and 2, then use your mouse to click on and deactivate the Track 2 activator, so the track’s muted to start with. Exit Key Map Mode, and let’s give it a spin!
Taking control
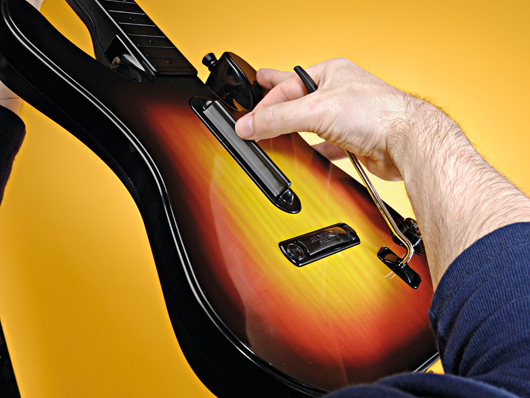
Step 4: Use the picking bar to trigger the chords if you want a picked/strum feel. Use the bridge buttons to toggle the Flanger or stop all clips when necessary. Then we come to the whammy bar - start by firing off a chord from one of the neck buttons, then quickly push the whammy bar down. As long as you’ve deactivated the duplicate track to begin with, the reversed and transposed version of the triggered chord will kick in, with the Delay and Reverb - it should sound cool! There’s no easy way of getting the whammy bar to do real pitch bends, but we can use tricks like this to create effects that suggest the same kind of thing.
Triggering loops and beats
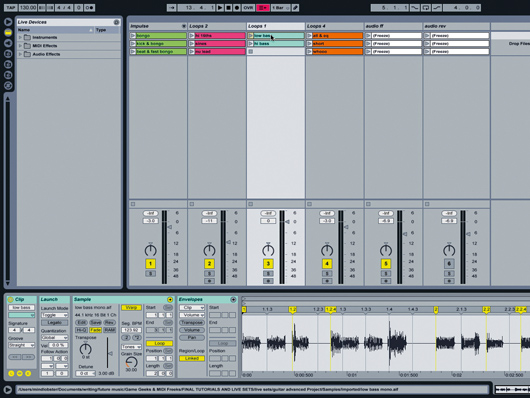
Step 5: Next, something a little different, and very flexible, so take this walkthrough as just one example of the many ways you can work. Begin with the set you previously created; Use the Save Live Set As... command to create a new version of the set, and rename it something like ‘guitar loops and beats’.
We’re going to keep the forward and reverse guitar parts we’ve created, while adding loops that we can also trigger from the guitar. Create four new tracks (put the guitar tracks on the far right), and load some loops. Keep it simple at first, try it with just three loops per track, and theme them - one for beats, one for bass, one for synths, etc. This’ll help you remember things when you’re jamming!
More mapping
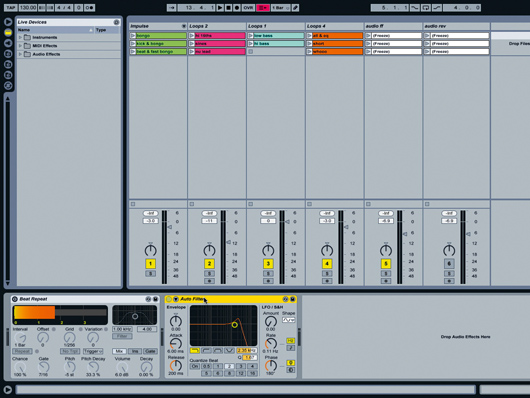
Step 6: Load Beat Repeat and Auto Filter in the Master track. We need to start from scratch with the key mapping, so go into Key Map Mode and clear the Mapping Browser. Then map the Track Launch buttons from the guitar, the same way as in the other tutorial. Use ASDFG. Those two ‘G’s are for the whammy trick we used previously, which is also why we’re remapping the Track Activation Switches for tracks 5 and 6 to Z again.
Then use Game Pad Companion to set the guitar knob/ joystick to send K on ‘up’ and L on ‘down’. Map the large bridge button to send W to toggle Beat Repeat, and the small button to O, to toggle Auto Filter. Exit Key Map Mode. Now we can use the guitar’s knob to scroll up and down through the Session View scenes, and the guitar neck buttons to fire loops in the selected scene.
Other options
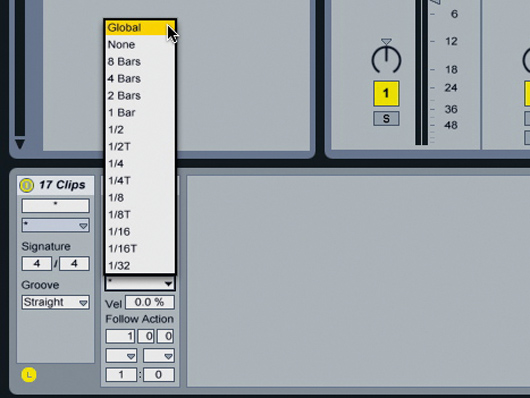
Step 7: The whammy bar and effects control should work as before. Because you’re working with synced loops, you could quantise the guitar chords, so choose Global in the Clip Quantization box. You might also want to set all loops to Toggle, so you can switch them on and off easily. Also, you might like to use looping guitar riffs instead of one-shot chords - it’s up to you. Remember that you can use the Transpose and Detune controls to tune the guitar sounds to any other instrument parts that you’ve loaded. If you’re using MIDI clips coming through Tension, you can use the comprehensive tuning controls in the Filter/Global section. The touch strip on the guitar neck transmits two keystrokes as either end of a changing value, and it doesn’t really translate well into Live - it’ll just jump from one extreme to the other, so we’re not using it for this.

Summary
Step 8: These are the basics of using a GH guitar with Live. The main difference from the more basic arrangement we started with is that you have to step through guitar chords using just one neck button in conjunction with the ‘volume’ knob. With a bit of practice you’ll remember which buttons are firing what loops, and it’s cool to be able to navigate through the scenes, though you’ll have to keep an eye on the computer screen to check where you are. If you’re playing a solo set, this is the way to go - if you’re jamming with a buddy on drums, it might be more fun to stick to the guitar way of doing things, and let him/her deal with the loops.
Future Music is the number one magazine for today's producers. Packed with technique and technology we'll help you make great new music. All-access artist interviews, in-depth gear reviews, essential production tutorials and much more. Every marvellous monthly edition features reliable reviews of the latest and greatest hardware and software technology and techniques, unparalleled advice, in-depth interviews, sensational free samples and so much more to improve the experience and outcome of your music-making.
