Beloved of the dance music fraternity, LennarDigital's classic soft synth specialises in basses, leads and pads, with those ultra-rich oscillators and powerful, edgy filters serving up quality raw materials for shaping with the modulators and effects.
On the down side, it is starting to show its age a little, architecturally, with more recent rivals outperforming it in several areas.
However, none of that detracts from the fact that Sylenth1 still sounds as stunning as ever, controls beautifully and stands as an essential inclusion in any dance producer's arsenal. Here, we'll show you how to sculpt the raw sound of the oscillators using its filters and amp envelopes.

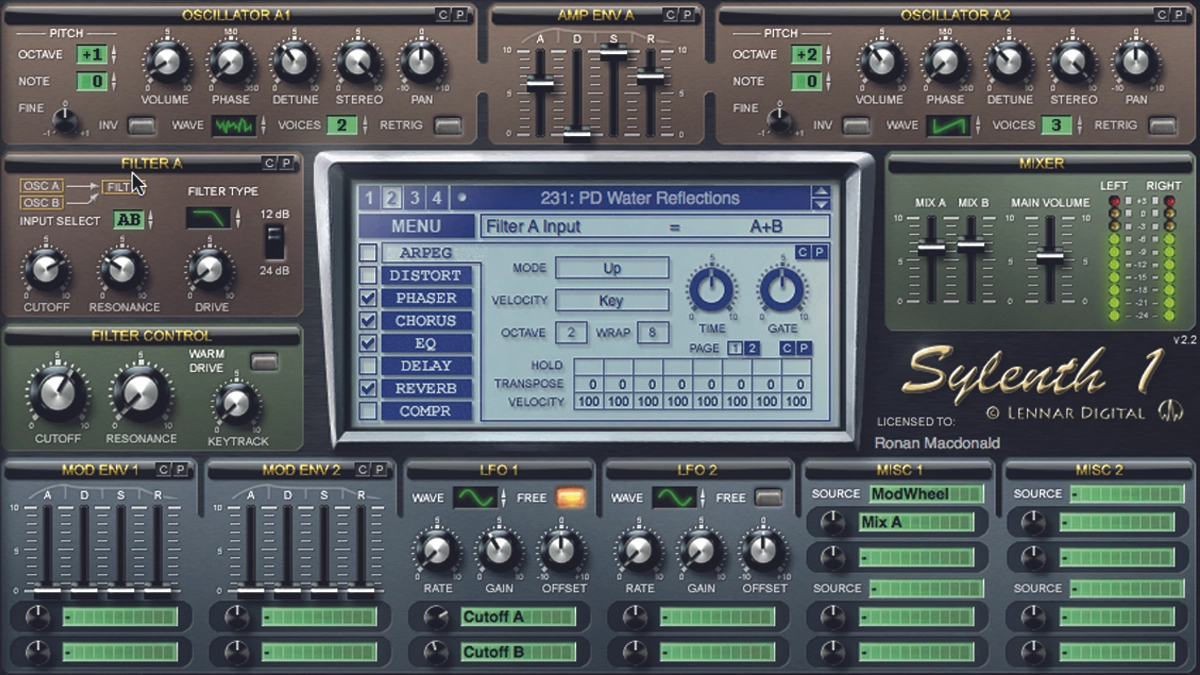
Step 1: Sylenth1's two filters are used to shape the frequency content of the four oscillators. Each Part - A and B - has its own filter, which by default is fed only the output of the two oscillators in that Part. To feed all four oscillators into either filter, drag up on its Input Select spinner and choose AB or BA. To kill the input into the filter, select None. The routing graphic updates to reflect your chosen scheme.

Step 2: The standard array of three filter types are available to both filters - Lowpass, Highpass and Bandpass, for attenuating frequencies above, below and around the cutoff frequency, respectively - plus a Bypass setting. Two roll-off slope options are also on tap: 12dB/octave and the sharper 24dB/octave.

Step 3: To adjust the frequency above, below or around which the signal is attenuated by the filter, sweep the Cutoff knob. To apply a variable amount of boost to the frequencies immediately around the cutoff point, raise the Resonance - push it far enough and the filter will self-oscillate, producing a separate tone of its own that follows note input when keytracking is fully applied.

Step 4: The Drive knob pushes the signal increasingly hard through the filter's four internal stages, each of which adds in its own non-linear saturation. The higher the Drive is raised, the more harmonics are introduced, the net result being warm distortion of the filter output, in a convincingly 'analogue' fashion.

Step 5: The Filter Control panel below the Part A/B Filter section is used to offset the Cutoff and Resonance parameters of both filters together, for combined control, and where the amount of Keytracking to be applied is specified. The Warm Drive button, meanwhile, switches the filter drive to a higher-quality algorithm at the expense of CPU.

Step 6: The output of each filter routes to its Part's Amp Envelope, where the volume curve of each pair of filtered oscillators is shaped. Attack sets the time for the volume to rise from zero when a note is played; Decay sets the time to then fall to the level set by the Sustain slider; and Release sets the time to drop to silence again after the note is released.
For more on programming Sylenth1 and creating an absolute DnB banger with our track-building guide, grab Computer Music 223, which is on sale now.
