How to create a monumental digital pad sound using Korg's M1
Discover classic hybrid synthesis with this legendary instrument
Want all the hottest music and gear news, reviews, deals, features and more, direct to your inbox? Sign up here.
You are now subscribed
Your newsletter sign-up was successful
The '80s was an incredible time for synthesizer enthusiasts, with two huge synth technologies coming of age.
At the beginning of the decade, analogue ruled the roost, but in 1983, Yamaha's digital DX7 changed the game with its more convincing, FM-based synthesis of both acoustic and electric instruments. The DX7's dominance of the synth scene only lasted a few years, thanks to the arrival of instruments combining digitally sampled sound sources with subtractive synthesis-style processing. This technique allowed keyboards like the Roland D-50 and Korg M1 to deliver acoustic and electric instrument sounds that (to the untrained ear, at least) were strikingly authentic and usable.
The D-50 and M1 weren't as expressive as today's ROMplers, as they used very short samples, typically consisting of an attack stage and a looping sustain section. These sound sources might be small (the M1 only had a mere 4MB of them), but they could be used to create authentic instrument sounds with the application of amplitude, filter and pitch modulation, and onboard FX.
As well as producing "real" instrument sounds, so-called sample-based synthesis made it possible to create previously unimaginable instruments, such as the M1's Universe preset. It's no coincidence that this is the first patch you hear when you turn the M1 on: at the time, its combination of filtered choir and layered pitchbending rhythmic FX - plus swathes of digital reverb and delay - was stunning.
In this walkthrough, we'll use the plugin version of Korg's M1 synth to create a similarly epic pad, employing some simple sound design tricks to build a lush, captivating pad that's far more than the sum of its parts.
For more on vintage synth emulation in software, pick up Computer Music 218, which is on sale now.
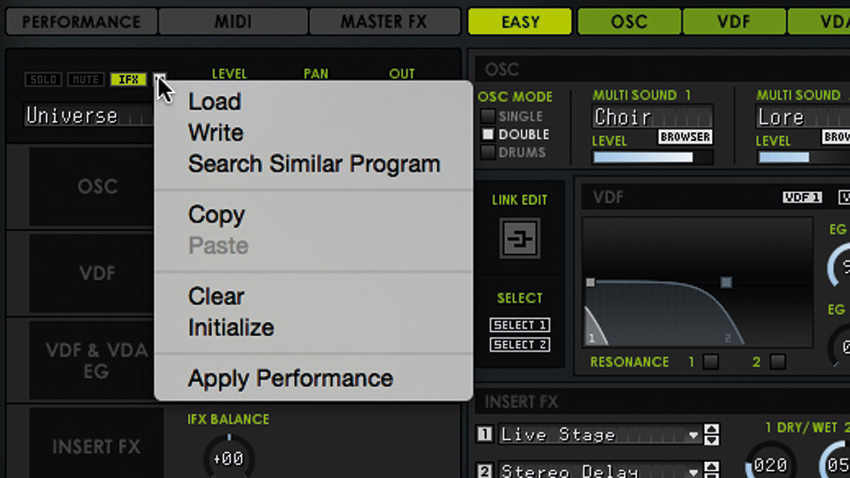
Step 1: Open the Korg M1 instrument in your DAW and click the Prog button at the top of the interface. This puts the synth in Program mode. Initialise the program by clicking the dropdown menu button above the patch name on the left of the interface, and selecting Initialize.
Want all the hottest music and gear news, reviews, deals, features and more, direct to your inbox? Sign up here.
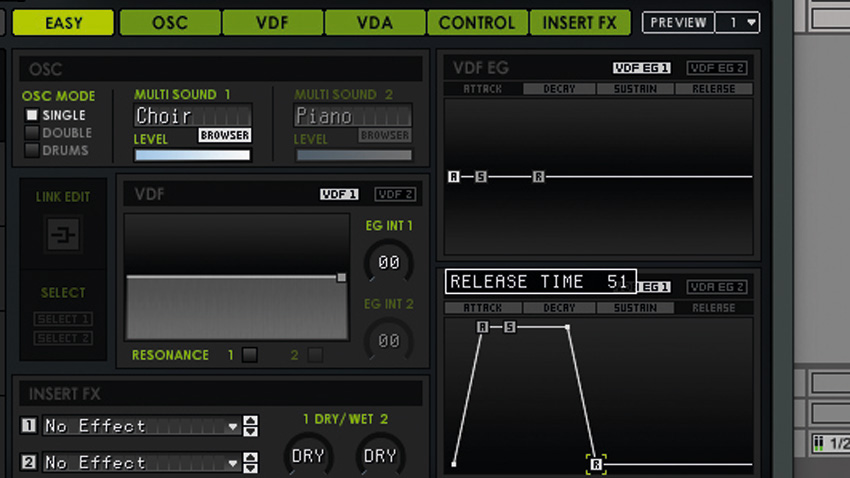
Step 2: Click the Browser button in the Multi Sound 1 panel. A window showing the available waveforms will appear. Click the Vocal/Airy button to filter the search results, then double-click Choir in the list below to select it. To create smoother fades, set Attack and Release times in the VDA EG (Variable Digital Amplifier Envelope Generator) of about 50.
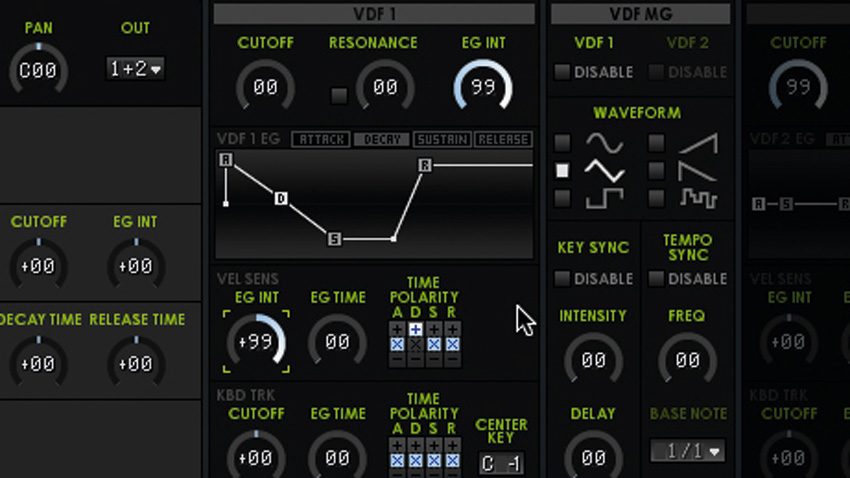
Step 3: Now for some filter movement. Click the VDF (Variable Digital Filter) tab, then turn the VDF 1 Cutoff down to 00 and its EG Init up to 99. Copy the envelope settings we've used here to give the patch a slow decay and lazy release. You can make the patch more expressive with larger Eg Int values, and by setting the Time Polarity of the Decay to +.
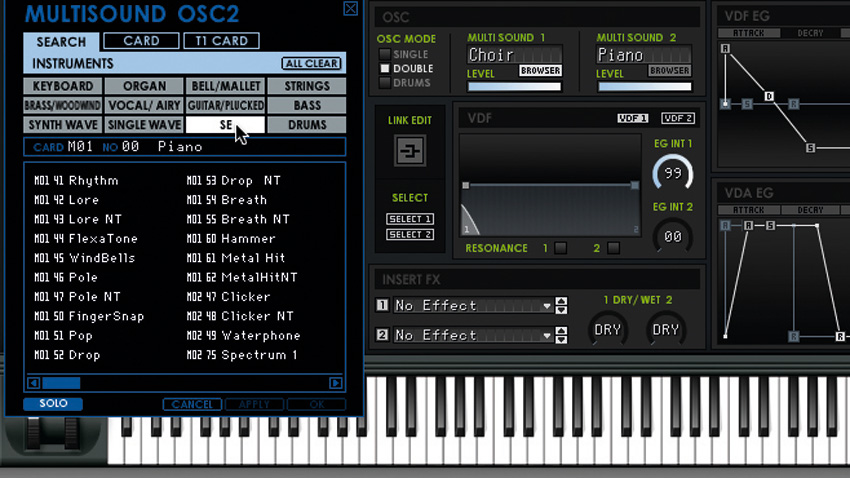
Step 4: Now patches with higher velocity values will sound brighter and have longer filter decay times. Click the Easy tab and change the Osc Mode to Double. Click the Browser button in the Multi Sound 2 panel, and this time select the SE filter. The Universe patch uses Lore, but let's try it with 'Clicker'. Select it in the list of available PCM waveforms.
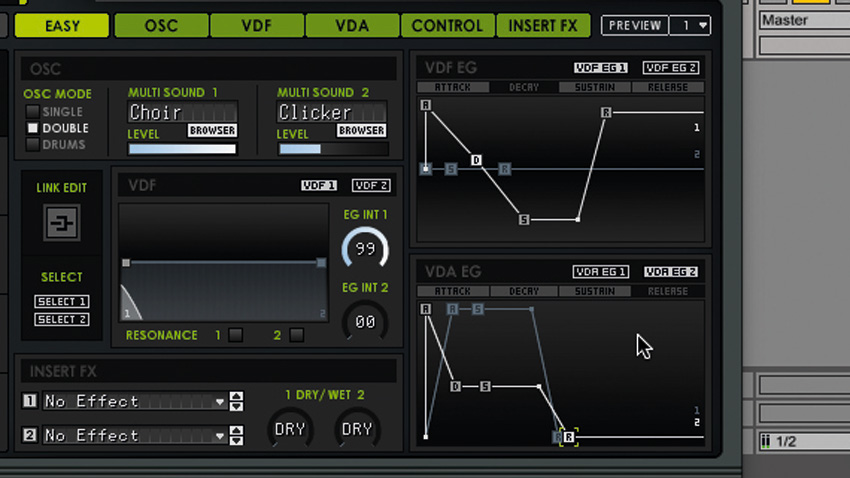
Step 5: Turn the Level fader in the Multi Sound 2 panel down to 40 or so, then, in the VDA panel, click the VDA EG 2 button and copy the envelope settings we've used here. Next, click the Osc tab. Here we can adjust the envelope to make Osc 2 rise and fall in pitch.
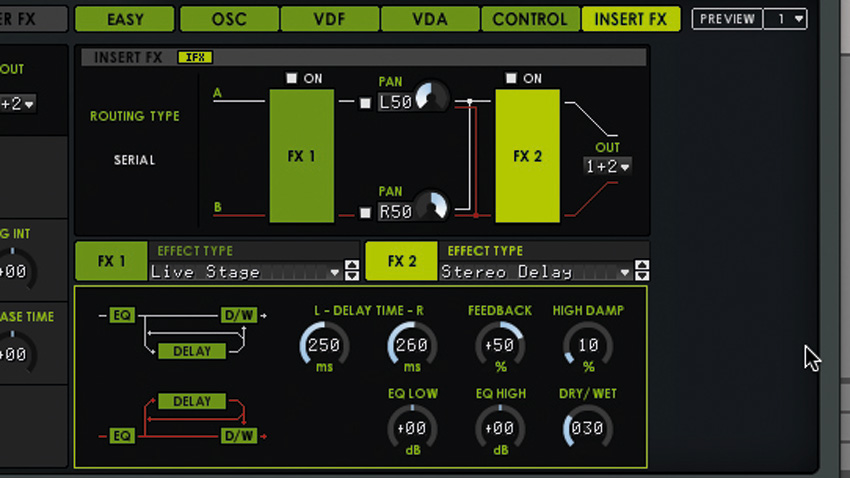
Step 6: Copy the Pitch EG envelope settings for Osc 2. Next, click the Insert FX tab, then click the FX Effect Type slot and select Reverb>Live Stage. Set its Wet/Dry level to 20 and turn up the Reverb Time to 2.4 seconds. Set the FX 2 slot to Delay>Stereo Delay to get that epic, spacious sound!
Computer Music magazine is the world’s best selling publication dedicated solely to making great music with your Mac or PC computer. Each issue it brings its lucky readers the best in cutting-edge tutorials, need-to-know, expert software reviews and even all the tools you actually need to make great music today, courtesy of our legendary CM Plugin Suite.
