Music Radar MusicRadar The No.1 website for musicians
  • Guitars
  • Amps
  • Pedals
  • Drums
  • Synths
  • Software
  • Pianos
  • Controllers
  • Recording
  • Buyer’s guides
  • Live
  • DJ
  • Advice
  • Acoustic
  • Bass
  • About us
  • More
    • Reviews
Magazines
  • Computer Music
  • Electronic Musician
  • Future Music
  • Keyboard Magazine
  • Guitarist
  • Guitar Techniques
  • Total Guitar
  • Bass Player
More
  • How to make an AI cover song
  • 84000+ free music samples
  • Foo Fighters' new drummer
  • Ken Scott on recording The Beatles
  • First EVH Jump synth recording

When you purchase through links on our site, we may earn an affiliate commission. Here’s how it works.

  1. Home
  2. Tuition

How to create a mix with dynamic range
By Computer Music Specials
published 18 February 2010

Getting started

Getting started

It seems that our guide to making your music loud rattled a few cages, so - just to prove that we’re not taking sides in this bloody and brutal loudness war - here’s a step-by-step walkthrough that’ll show you how to create a mix with plenty of dynamic range.

If you adopt a full-on approach to your dynamics, to the extent that even the quiet sections of your track are pushed up to match the volume of the loudest, you’re actually likely to limit the musical experience your track could provide. Rather than the dynamic variation we’re looking for, you end up with a loud but lifeless mix.

In this tutorial, we want to make sure the musical parts are set free to do their work, with the quieter sections being used as a means to make us appreciate the louder ones even more.

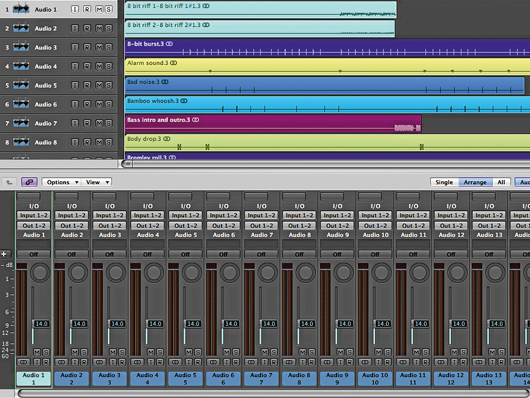
Step 1: To get started, drag all the AIF files from the dynamic-mix-parts.zip folder (click here to download the 241MB file) into a new arrangement, with the tempo set to 140bpm. Drop all faders to -14dB to prevent the output bus overloading. This is how it should sound:
Page 1 of 15
Page 1 of 15
Inserting a limiter

Inserting a limiter

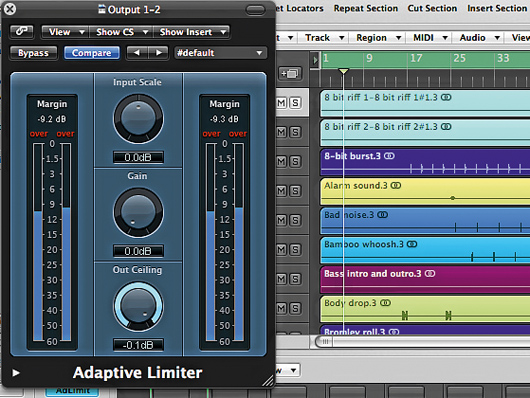
Step 2: Now we take the unusual step of inserting a limiter into the output channel. This will stop the output channel overloading as we increase and decrease the volume of aspects of the track. We’re not actually adding in overall volume, however - the limiter adds no gain and is simply there to prevent the mix clipping.
Page 2 of 15
Page 2 of 15
Beat compression

Beat compression

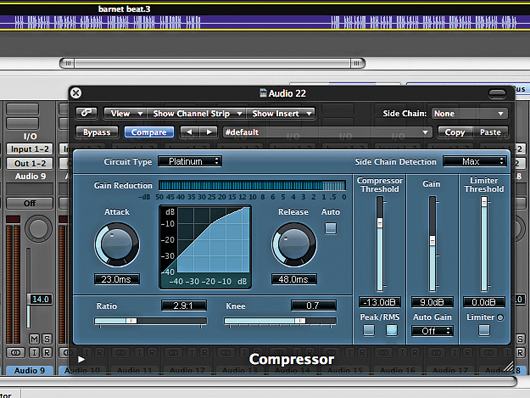
Step 3: Our aim is to create a mix with both light and shade, so let’s start with the darker passages - that is, the loudest ones. Compress the Barnet beat part to get the groove thumping. We’ll use a Ratio of 3:1, with the compressor Threshold set to -13dB and output Gain at 9dB. This produces a good deal more drive.
Page 3 of 15
Page 3 of 15
Main bass

Main bass

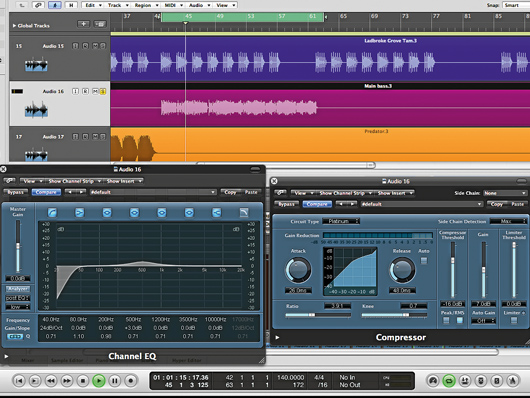
Step 4: The square-wave Main Bass part provides the weight we need to create the dark side of our mix. Use the high-pass filter on your EQ to filter out any super-low frequencies. Try a boost of 3dB at 500Hz to warm the mids, then compress the signal with a Ratio of 4:1. Set the Attack to 26ms, the Threshold to -16dB and the output Gain to 7dB.
Page 4 of 15
Page 4 of 15
Blending the tom kick

Blending the tom kick

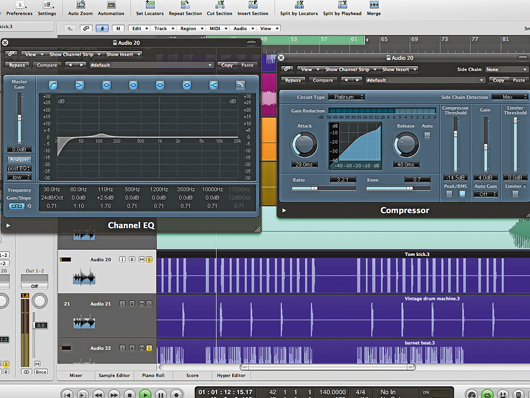
Step 5: The Tom Kick now needs to blend in with the extra depth we’ve created in the mix. EQ and compression are our tools here. Scoop out the low frequencies below 30Hz and dial in a 2.5dB rise at 110Hz. Then compress the sound using a Ratio of 3.2:1, with a Threshold of -14.5dB and output Gain of 4dB.
Page 5 of 15
Page 5 of 15
Tweaking the fill

Tweaking the fill

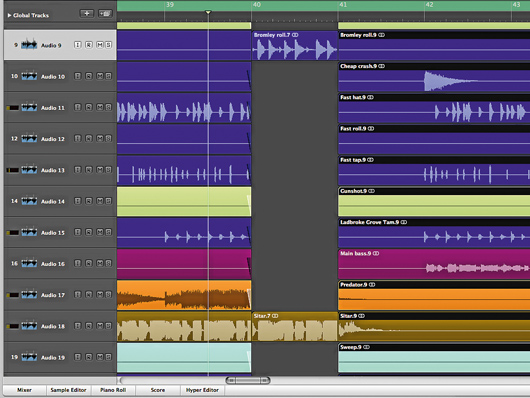
Step 6: The Bromley Roll fill provides crucial rhythmic variation, so boost its volume to -6dB. To thin the mix around it, chop and erase all tracks during bar 40 except the roll and Sitar parts. Add 20ms fade-outs to the other tracks to stop them clicking at the cut points. Repeat this in bar 57, leaving only the roll and main bass.
Page 6 of 15
Page 6 of 15
Making space

Making space

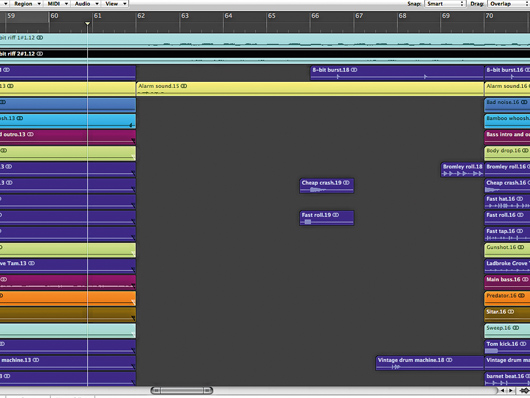
Step 7: Using the same technique, we’ll cut out some tracks to give the 8-bit parts on tracks 1 and 2 more room at bar 62. Erase all tracks apart from Alarm Sound, Fast Roll and Vintage Drum Machine until bar 70.

Page 7 of 15
Page 7 of 15
High-pass filtering

High-pass filtering

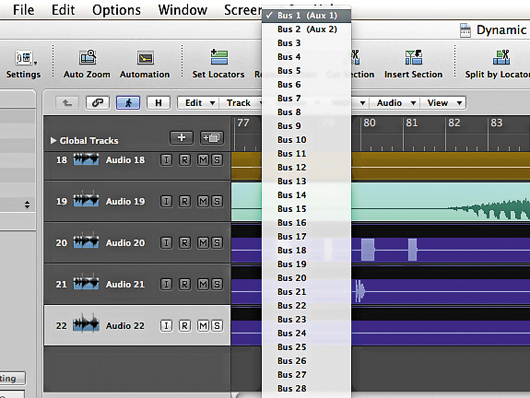
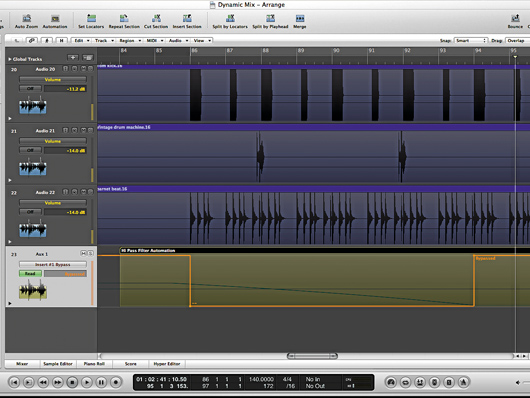
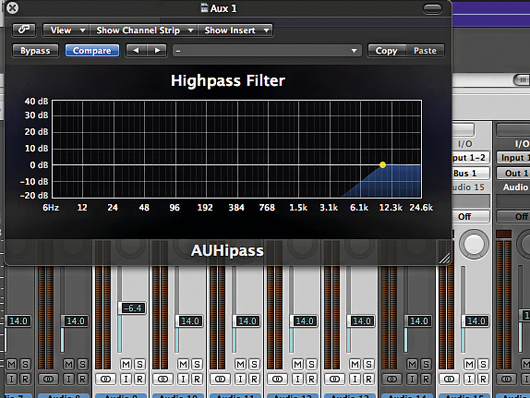
Step 8: We also want to create more space around the Sitar part at bar 86 for the first eight bars where it returns. Rather than chop out the parts around it, however, we’ll use a high-pass filter on every other part that’s playing through this section. Identify the relevant parts and switch their outputs to an auxiliary - we’re using Auxiliary 1.
Page 8 of 15
Page 8 of 15
Thinning out

Thinning out

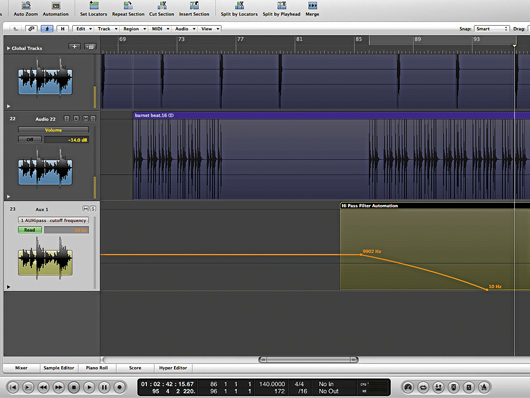
Step 9: On your auxiliary, insert a high-pass filter plug-in. Set the Cutoff to 10kHz while using no additional resonance, and press play. The whole of the track around the sitar suddenly becomes extremely thin, which works well.

Page 9 of 15
Page 9 of 15
Filter automation

Filter automation

Step 10: This filter change would work even better dynamically. Use your DAW’s automation system to draw a curved frequency drop through this section, so that the high-pass filter allows all frequencies through by the beginning of bar 94. This keeps the whole mix moving.

Page 10 of 15
Page 10 of 15
Bypass automation

Bypass automation

Step 11: This definitely sounds better, but we now have most of our tracks routed to an auxiliary with a high-pass filter set up the whole way through the track. To resolve this, we automate the Bypass button on our plug-in so it only switches in for the eight bars starting at bar 86. This way, we’ll only hear the effect during that section.
Page 11 of 15
Page 11 of 15
Tremolo sitar

Tremolo sitar

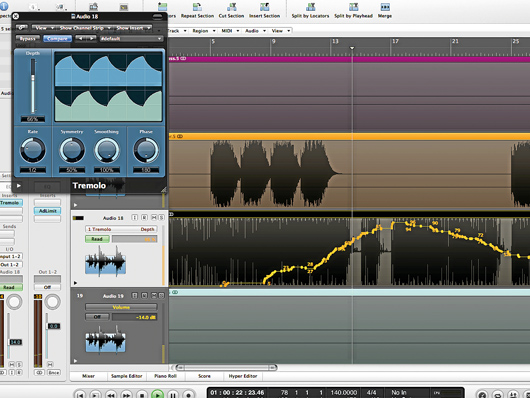
Step 12: Movement and dynamics can be introduced in lots of different ways. We want to get more variation into the sound of the sitar, but rather than volume adjusting this part, let’s add a tremolo effect to auto-pan the sound from one side to another. Try syncing this effect to tempo using a half-note setting, and automating the depth so that the effect is sometimes obvious and sometimes nonexistent.
Page 12 of 15
Page 12 of 15
Hi-hat variation

Hi-hat variation

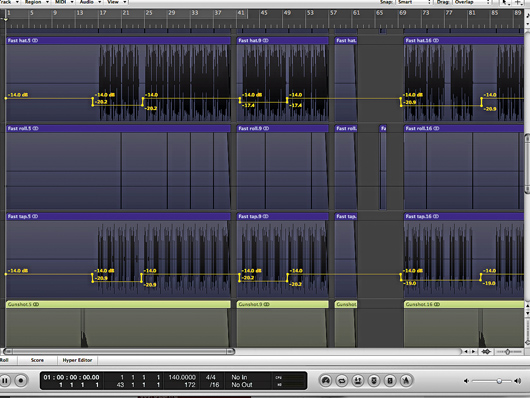
Step 13: Continue using automation to put more dynamics into the mix by drawing in some extra volume rises and drops. We want to get some contrast into the hi-hat parts, so we draw boxes of volume data to create variation - you can hear this in the audio example below, where the hi-hat pattern is louder in the second lot of eight bars.
Page 13 of 15
Page 13 of 15
Level adjustments

Level adjustments

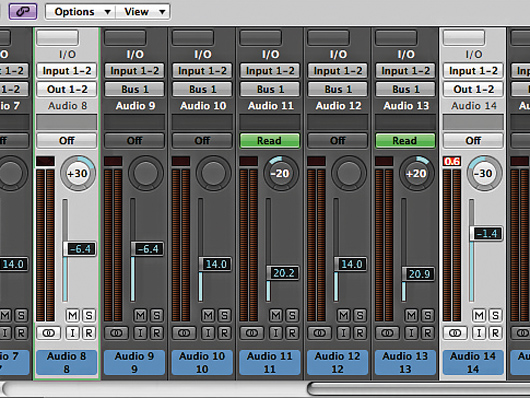
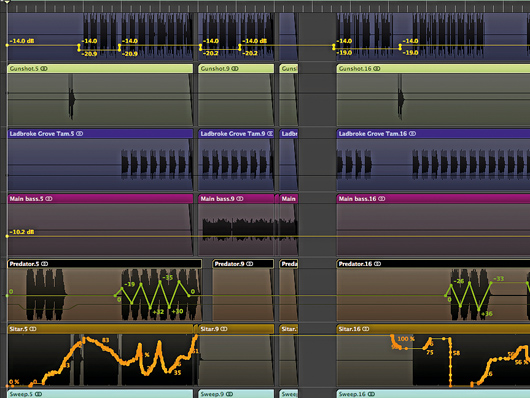
Step 14: Now it’s time to make some final level adjustments. Boost the Gunshot sound effect back up to -1.4dB, as this doesn’t interfere with the main mix elements either time it plays. Increase the Body Drop volume to -6.4dB too. Pan the Gunshot halfway to the left and the Body Drop halfway right.
Page 14 of 15
Page 14 of 15
Final mix

Final mix

Step 15: Finally, use automation to pan the Predator synth pad back and forth in two-bar blocks between mid-left and mid-right to get the sound moving. Draw in a volume rise through the two sweeps to make them more dramatic still, and turn up the main bass part when it appears for the last time to give the final section some extra drive. Here's out final mix:
Page 15 of 15
Page 15 of 15
Computer Music Specials
Social Links Navigation
More about tech
Polyverse Supermodal

Polyverse Supermodal

Akai MPC One Plus

Akai issues a red alert as it launches the MPC One+, but it might not have all the upgrades you were hoping for

Latest
SSL UF1

SSL’s UF1 promises to “set a new standard for single fader DAW controllers”

See more latest ►
Most Popular
Try these 16 inspiring guitar chords that use open strings

By Total Guitar19 April 2023

Led Zeppelin II: Jimmy Page guitar lesson

By Total Guitar17 April 2023

Bored by your own guitar chord playing? Try inversions!

By Rob Laing17 April 2023

Learn 5 essential blues guitar turnaround licks for your solos

By MusicRadar15 April 2023

Computer Music 321 June 2023: free downloads

By Computer Music11 April 2023

Learn 7 extended jazz guitar chords

By MusicRadar11 April 2023

Learn 20 blues, prog rock, folk and funk guitar chords

By MusicRadar6 April 2023

Learn to play 4 awkward but awesome-sounding chords

By Leigh Fuge5 April 2023

How to use the '3 reverb approach' to nail reverb in almost any mixing scenario

By Jon Musgrave29 March 2023

How to optimize your PC for music production

By Matt McCracken27 March 2023

22 essential reggaeton production tips to help you sound like Bad Bunny

By MusicRadar22 March 2023

  1. And you can watch Mr Gilbert introduce them in the maximum shred demo video
    1
    Ibanez expands its Paul Gilbert signature series with the super classy, super shreddable PGM50 and PGM1000T
  2. 2
    The Jura’s out: Air Music releases new plugin emulation of Roland’s Juno-60 synth
  3. 3
    Mick Hucknall on the 10 songs that changed his life: “The Beatles changed the way music sounded, but the Stones were the world’s greatest rock band”
  4. 4
    People are going crazy for Nopia, the MIDI chord generator prototype that’s racked up 2.6m video views in 8 days
  5. 5
    Learn these four essential guitar chord inversions and unlock new ideas
  1. Get your fifths and ninths in order as we explore one of the most identifiable pad sounds around
    1
    How to create the 'perfect fifths' synth pad
  2. 2
    The Jura’s out: Air Music releases new plugin emulation of Roland’s Juno-60 synth
  3. 3
    Mixing engineer Bob Clearmountain: “I shouldn’t say this, probably, but I think in a couple of years Dolby Atmos is going to go away”
  4. 4
    Mick Hucknall on the 10 songs that changed his life: “The Beatles changed the way music sounded, but the Stones were the world’s greatest rock band”
  5. 5
    “Nebraska was cut on crap equipment…” How Bruce Springsteen made his most important album in his bedroom with just a Gibson J-200 and a TEAC 144

MusicRadar is part of Future plc, an international media group and leading digital publisher. Visit our corporate site.

  • About Us
  • Contact Future's experts
  • Terms and conditions
  • Privacy policy
  • Cookies policy
  • Accessibility Statement
  • Careers

© Future Publishing Limited Quay House, The Ambury, Bath BA1 1UA. All rights reserved. England and Wales company registration number 2008885.