EQ is essentially a cross between a filter and a level control. It affects only specific frequencies and is used to either boost or reduce the level of said frequencies.
In times gone by, most budget EQ was very simple and limited to three bands; at least two of which were fixed-range. These days we have the facility to apply highly precise EQ to every channel, which makes it even more critical that we understand what we're doing.
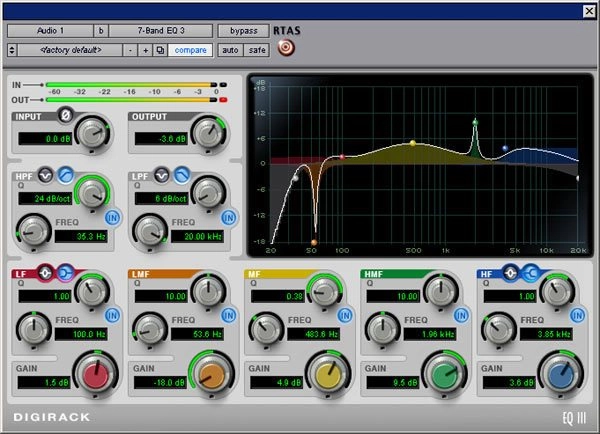
The anatomy of an EQ plug-in
1. EQ Graph - A visual representation of the frequencies affected by EQ
2. Shelving - These EQs affect only frequencies above or below the cutoff frequency
3. Parametric/band-pass - This EQ type only affects frequencies within the specified range
4. Frequency - This sets either the cutoff or centre frequency to be affected
5. Gain Controls - The boost or gain applied to either the shelving or parametric EQ
6. Q - This specifies the width (parametric) or angle (shelving) of frequencies affected either side of the centre/cutoff frequency
Parametric EQ
Parametric EQ is the most powerful type of EQ for all-round use.
A fully parametric EQ strip will have three controls. The first is Frequency. All EQ is based around a curve, centred on a certain frequency, and the Frequency control determines this frequency. The next control is Gain. The Gain control specifies how much the specified frequency is made louder or quieter. If you set the Frequency control to 3kHz and apply 3dB of gain, then any frequencies at 3kHz will be boosted by exactly 3dB.
The next control is Q, and the Q control determines the amount of gain or attenuation applied to either side (industry folklore has it that Q stands for 'quality'). To understand the Q control, imagine a strip of rubber, pulled straight and attached at either end, with a row of pen marks at regular intervals. Each of the marks represents a specific frequency, and if you push any part of the rubber band up it represents gain to those frequencies, whilst pushing it down represents attenuation. The first thing you notice is that all of the notches either side of the central notch are pushed up or down too, and this is what the Q control is used for - shaping the curve either side of the centre frequency.
The Q is assigned a value, and this is derived from dividing the centre frequency value by the bandwidth of the affected signal. Of course, the frequency width is hard to define, so it's taken to mean the point on either side of the curve where the signal level drops by 3dB. High values equate to narrow frequency ranges, for precise cutting or boosting, while low values equal wide curves, for broad boost or cut.
Graphic EQ
Although not used often by the modern producer, in the days before DAWs the pro-quality graphic EQ was a highly valued and much sought-after final link in the mixing chain.
A good mix should have a reasonably smooth frequency response (though not necessarily flat ). There might be a bias to the bass and/or treble, depending on your genre, but generally speaking, you want to avoid too many narrow peaks.
That's what a graphic EQ is for: shaping your mix subtly. And it really does work. You should be aiming for a very decent EQ though - 30-band used to be the industry standard. Essentially, this means that the entire audible frequency range (roughly 20Hz to 20kHz) has been divided up into useful frequency segments, and with a 30-band EQ each band is spaced roughly a third of an octave apart from the next. Of course, the nature of graphic EQ is that the preset Q curve of each band will also affect any surrounding bands (the effect of one slider will usually be felt on the range of the two or three above and below as well), so having boosted or cut one, you'll need to be more subtle with those on either side, otherwise the effect on the crossover frequencies between them will be exaggerated.
It goes without saying that the benefits of graphic EQ are limited largely to mix shaping, and any corrective or creative EQ applied to specific sounds will benefit from the precision of a parametric EQ instead.
Shelving and other sonic DIY
EQ is essentially a type of filtering, and this is why on a number of EQ plug-ins you'll see similar controls as you would on a variable-type filter. Most notably, these have to do with shelving, cut and band-pass settings.
The first of these is found at the top or bottom end of the frequency range, and is used for applying broad boost to all the frequencies above (if it's at the treble end) or below (at the bass end), ideally with the ability to select the cutoff frequency. The second is like a basic low- or high-cut filter, cutting off everything below a certain point (although be careful, as some, such as that in Cubase SX 3, actually have a small slope, rather than an exact cut). Finally, the band-pass settings are those, such as with fully parametric EQ, where you can sweep the affected frequency range up or down, affecting only those frequencies within the range. All of these types can be useful for different purposes - the trick is thinking logically about which one is best for the job.
Phase problems
One of the interesting things about EQ units and plug-ins is how different they can sound, despite the fact that they all have the same theoretical effect. And one of the main causes of this is now thought to be due to the phase relationship of different frequencies. Because frequencies travel at varying speeds through analogue circuitry (even if it's only that in your speaker), the exact relationship between the time that high and low frequencies hit our ears can be affected, making the sounds appear duller. Indeed, many enhancer plug-ins rely on this very principle, and offset higher or lower frequencies slightly, making the sound ultimately brighter.
By the same token, different EQs can affect the phase relationship in different ways, which probably explains why some EQs can make sounds shine through with minimal boost, while others require much more radical gain settings and yet still don't offer the same clarity and punch. For this reason it's important to experiment with as many EQs as you can, and then settle on the one that gives the best results and requires lower settings.
Further reading
See our essential EQ tips for advice on using EQ.
