25 more pro tips for better home recordings
Essential advice for bedroom producers

Want all the hottest music and gear news, reviews, deals, features and more, direct to your inbox? Sign up here.
You are now subscribed
Your newsletter sign-up was successful
Your house is a great place to eat, sleep and relax, but as you probably know by now, it can also be turned into a high-level recording facility.
We've already given you 25 pro tips for better home recordings, but, generous sorts that we are, we've now compiled 25 more. Read and act on these, and the quality of your domestic productions should improve still further.
If your thirst for knowledge still hasn't been quenched, our final piece of advice is to pick up a copy of Computer Music Specials (Volume 31): Recording Essentials. This is on sale in selected UK newsagents now and can also be purchased online.
1. Timing
Fortunately, modern technology enables you to fix plenty of timing problems, but you won't necessarily end up with the feel you're after. Do your utmost to encourage musicians to lock into the feel and groove of the track.
2. Coach the performance
So-called 'red light fever' can result in excessively timid or cautious performances. Listeners naturally respond to feel, so try to balance the need for an enthusiastic delivery with the timing and tuning basics. Learn how to create a relaxed recording environment without resorting to drink (or worse!).
3. Phase
If you're using more than one mic on the same sound source, watch out for potential phase problems. A useful diagnostic technique is to pan the mic sources left and right, then listen in mono and stereo. If the sound becomes impossibly compromised in mono, you know you've got a problem…
4. 3-to-1 technique
One rule of thumb for avoiding phase problems is to space your stereo mics by three times their distance from the sound source. The stereo image should be wide but still sit 'inside' the monitors, and should sound good in mono too. If the image sounds wider than the monitors, this indicates serious L/R phase differences.
Want all the hottest music and gear news, reviews, deals, features and more, direct to your inbox? Sign up here.
5. Grouping
Professional engineers using large desks often group (or blend) multiple microphones to produce a mono signal, which is then recorded. This is a worthwhile and creative process even if you're only using a couple of mics on a guitar amp. Equipping yourself with a simple analogue desk will make the process much simpler.
6. Shifting ambience
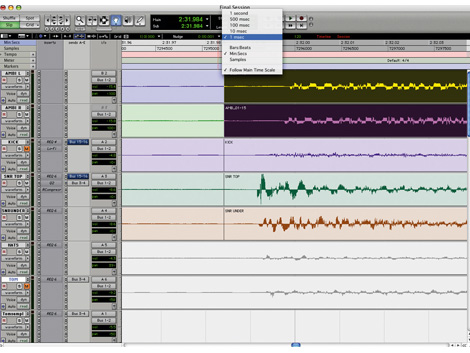
One of the great things about software-based recording is that you can easily shift the timing of individual tracks. One of the most useful tricks for drum kits, or anything else recorded with a separate ambient mic, is to shift the ambience track by a few milliseconds (earlier or later). This directly affects the pre-delay of the ambience, and thereby the perceived size of the room.

7. Band layout
If you're recording a band playing together in a room, you'll have lots of bleed into the various mics. The temptation is to try and screen everyone off. This can work, but it's sometimes better to embrace the problem and keep everyone close together. With the mics nearer to each other the spill they pick up will be less ambient and less delayed, and the overall sound will be tighter.
8. Know your terms
The most common scientific term you'll encounter in the recording business is the decibel (dB). This is a logarithmic scale, and you'll often see it used without any reference value. In this form, +6dB roughly equates to a doubling of voltage and a quadrupling of power. In musical-speak, the subjective term 'twice as loud' roughly equates to an increase of between +6dB and +10dB.
9. Re-recording
If you spend much of your time sourcing sounds from sample libraries, re-recording is one sure-fire way to inject them with new life. Choose a space with interesting acoustics, route your samples through a speaker, then record them back down. For extra interest, why not try sticking them through a guitar amp or headphones.
10. Beware CRT monitors
Haven't got a flatscreen yet? Electric guitars and basses have a habit of picking up interference from all sorts of sources. Often, turning slowly in a CRT field will have a considerable impact on interference levels, so find the best position.
11. Use your space
Although a purpose-built studio may seem like the Holy Grail, our humble abodes offer up all sorts of useable spaces, from the bright sound of a tiled bathroom and the live sound of a wooden-floored room to the deadness of a bedroom. Use these spaces to capture interesting and colourful recordings.
"If you spend much of your time sourcing sounds from sample libraries, re-recording is one sure-fire way to inject them with new life."
12. Understand latency
Recording a signal into computer software and monitoring that signal via the software introduces a processing delay dependent on the buffer size. To deal with this, some interfaces include near-zero latency monitoring options. Also, try monitoring outside the computer using a mixing desk.
13. Back up
Knowing that complete hard disk failures are fairly rare occurrences will only serve to make you feel that much worse if it happens to you - unless, of course, you've done the right thing and backed up all of your data. We can't say this often enough: back up, back up, back up. And if you don't trust yourself to remember, there are plenty of automated packages you can use. No excuses!
14. Maxed out sessions
Pushed your computer to the limit and still want to lay down more tracks? Before your machine gives up completely, try the old tape slave trick. Bounce down a working stereo mix to overdub to, stick this in its own arrangement, and when you're finished recording, drag all your new parts back into your main session.
15. Setting up time
When you're recording in a pro studio, time is money. One of the great advantages of recording at home is that you don't need to rush anything, so take your time setting up your instruments and mics, and experiment until you get the best sound you can. This approach requires some patience, but it's the best way to learn.
16. Record 'as live'
Most bands rehearse in a room, effectively balancing their collective sound, so suddenly sticking headphones on them in a recording session can be quite disconcerting. If you want to capture a more natural vibe (and if the band are well rehearsed), let them set up as they do in rehearsal, then use a few carefully positioned mics to record them 'as live'.
17. Hard drives and file sizes
Audio files tend to be comparatively large in relation to most other files stored on your computer, so your system will perform better if you keep them on their own drive. If you have the option to increase the cluster size on that drive, even better.
18. Experiment with stereo
Some instruments, such as piano, naturally lend themselves to stereo recording. But all featured instruments can benefit from a spot of stereo treatment and it's often nicer to capture this at source. Give it a try.
19. Pop shields
Recording a vocal performance with a condenser or ribbon mic will require a pop shield to prevent plosive sounds on your recordings (and to protect your microphones from the corrosive action of saliva!) Stick one between the singer and the mic, a few inches from the capsule. If you can't afford one, make your own out of tights and a coathanger.
"One of the great advantages of recording at home is that you don't need to rush anything, so take your time setting up your instruments and mics."
20. Do a test recording
In a computer-based recording system it's quite possible you'll be monitoring your signal long before it reaches its final destination. To be sure there are no gremlins lurking in your setup it's a good idea to perform a quick test record and playback before you get into doing any proper takes.
21. Digital inputs
Using digital connections such as S/PDIF phono or optical can lead to clocking problems - clicks in the sound are often a giveaway. Most interfaces allow you to select a digital clock source (internal or external). When recording from digital inputs, it's often best to set this to 'external'.
22. Be ruthless
Now that disk space is so cheap and big hard drives are common, it's easy to leave far too much lying around on them, especially if you use software that enables you to remove takes from view without permanently deleting them. Save yourself time (and megabytes) in the long run by keeping only the takes that you think have a real chance of making it into the final cut.
23. Be cautious with gating
Gating a signal while recording is a useful way of keeping things tidy, but unless you're an expert with thresholds, it's also an easy way to mess up. Your software may well offer a silencing feature you can apply afterwards that's more flexible (and non-destructive). Logic's Strip Silence is one such example.
24. Understand meters
You'll encounter various types of meters in your recording chain (LEDs, VUs and so on). The biggest difference is that some of these are 'peak' and some 'RMS' (root mean square). A digital peak meter will be labelled up to zero. Beyond this point your recording will distort, so use a peak meter to monitor your maximum signal level and avoid hitting zero.

25. Editing
Although getting the perfect performance on a single take sounds like a wonderful ambition, it may prove time-consuming in reality (not to mention being the cause of the dreaded 'performance fatigue'). Try to approach the overdubbing process with the view that you may have to compile a good take from many others. Make sure you have enough in the bag, and then get in there with the razor blade and chinagraph - sorry, mouse and scissors tool.