Want all the hottest music and gear news, reviews, deals, features and more, direct to your inbox? Sign up here.
You are now subscribed
Your newsletter sign-up was successful
There was a time, before the total dominance of computer-based DAWs, when the vast majority of bedroom producers really had no idea what mastering was, or why you’d want to entertain it.
We understood mixing, because faders are fairly self-explanatory, but not so with the aural depth of mastering. Before we look at how we can now handle this process ourselves, let’s take a moment to reflect on its legacy.
Mastering is the final process in the production chain; it’s where you take your finished mix and give it that final bit of spit and polish, before you send it up the wire to your chosen streaming service for public consumption. Make no mistake, a good master can breathe life into a mix, but how is this done?
It’s easiest to think of mastering in terms of its signal processing chain, wherein one process leads to the next. For example, you may choose to use equalisation to brighten your mix, or enhance the bottom end, while the next process may involve compressing your mix. There are other tricks we can use to add grit or sweetness.
In a pre-DAW age, tape would have been mastered through a series of analogue devices, such as EQ, compressors and limiters. The very sound of these units, including the tape machine itself, would add colour and enhancement to the final mix. The finished article would be the master, ready for pressing to record or CD.
In 1996, TC Electronics introduced the Finalizer; a 1U, rack-mounted product that could perform the entire mastering process in one box. It caught on; in fact, it completely changed the industry for home producers. It was therefore only a matter of time before the technology progressed to the DAW level.
There is plenty of pro-aimed mastering software on the market, but it’s also possible to achieve great results using our core DAW elements. Understanding the process is key, so let’s walk through some basics, in order to release your mastering mojo.
Want all the hottest music and gear news, reviews, deals, features and more, direct to your inbox? Sign up here.
Setup and equalisation
Before you begin mastering a track, consider your setup. You don’t need to have a massive arsenal of software, but you do need to ensure that you’ve got some basics, and these should all be kept close to hand.
Most DAWs are pre-equipped with plugins that are ideal for simple, or even more advanced mastering. Regardless of your DAW of choice, try using these ready-to-go tools before spending extra dough.
It’s helpful to have a volume control; you might choose to use your computer’s volume, but having an audio interface, with a handy level pot, is by far the most ideal solution. You don’t want to be working at terribly high volume, and you certainly don’t want to be caught out by a sudden loud burst of audio, so remain ready to adjust that dial should you need to.
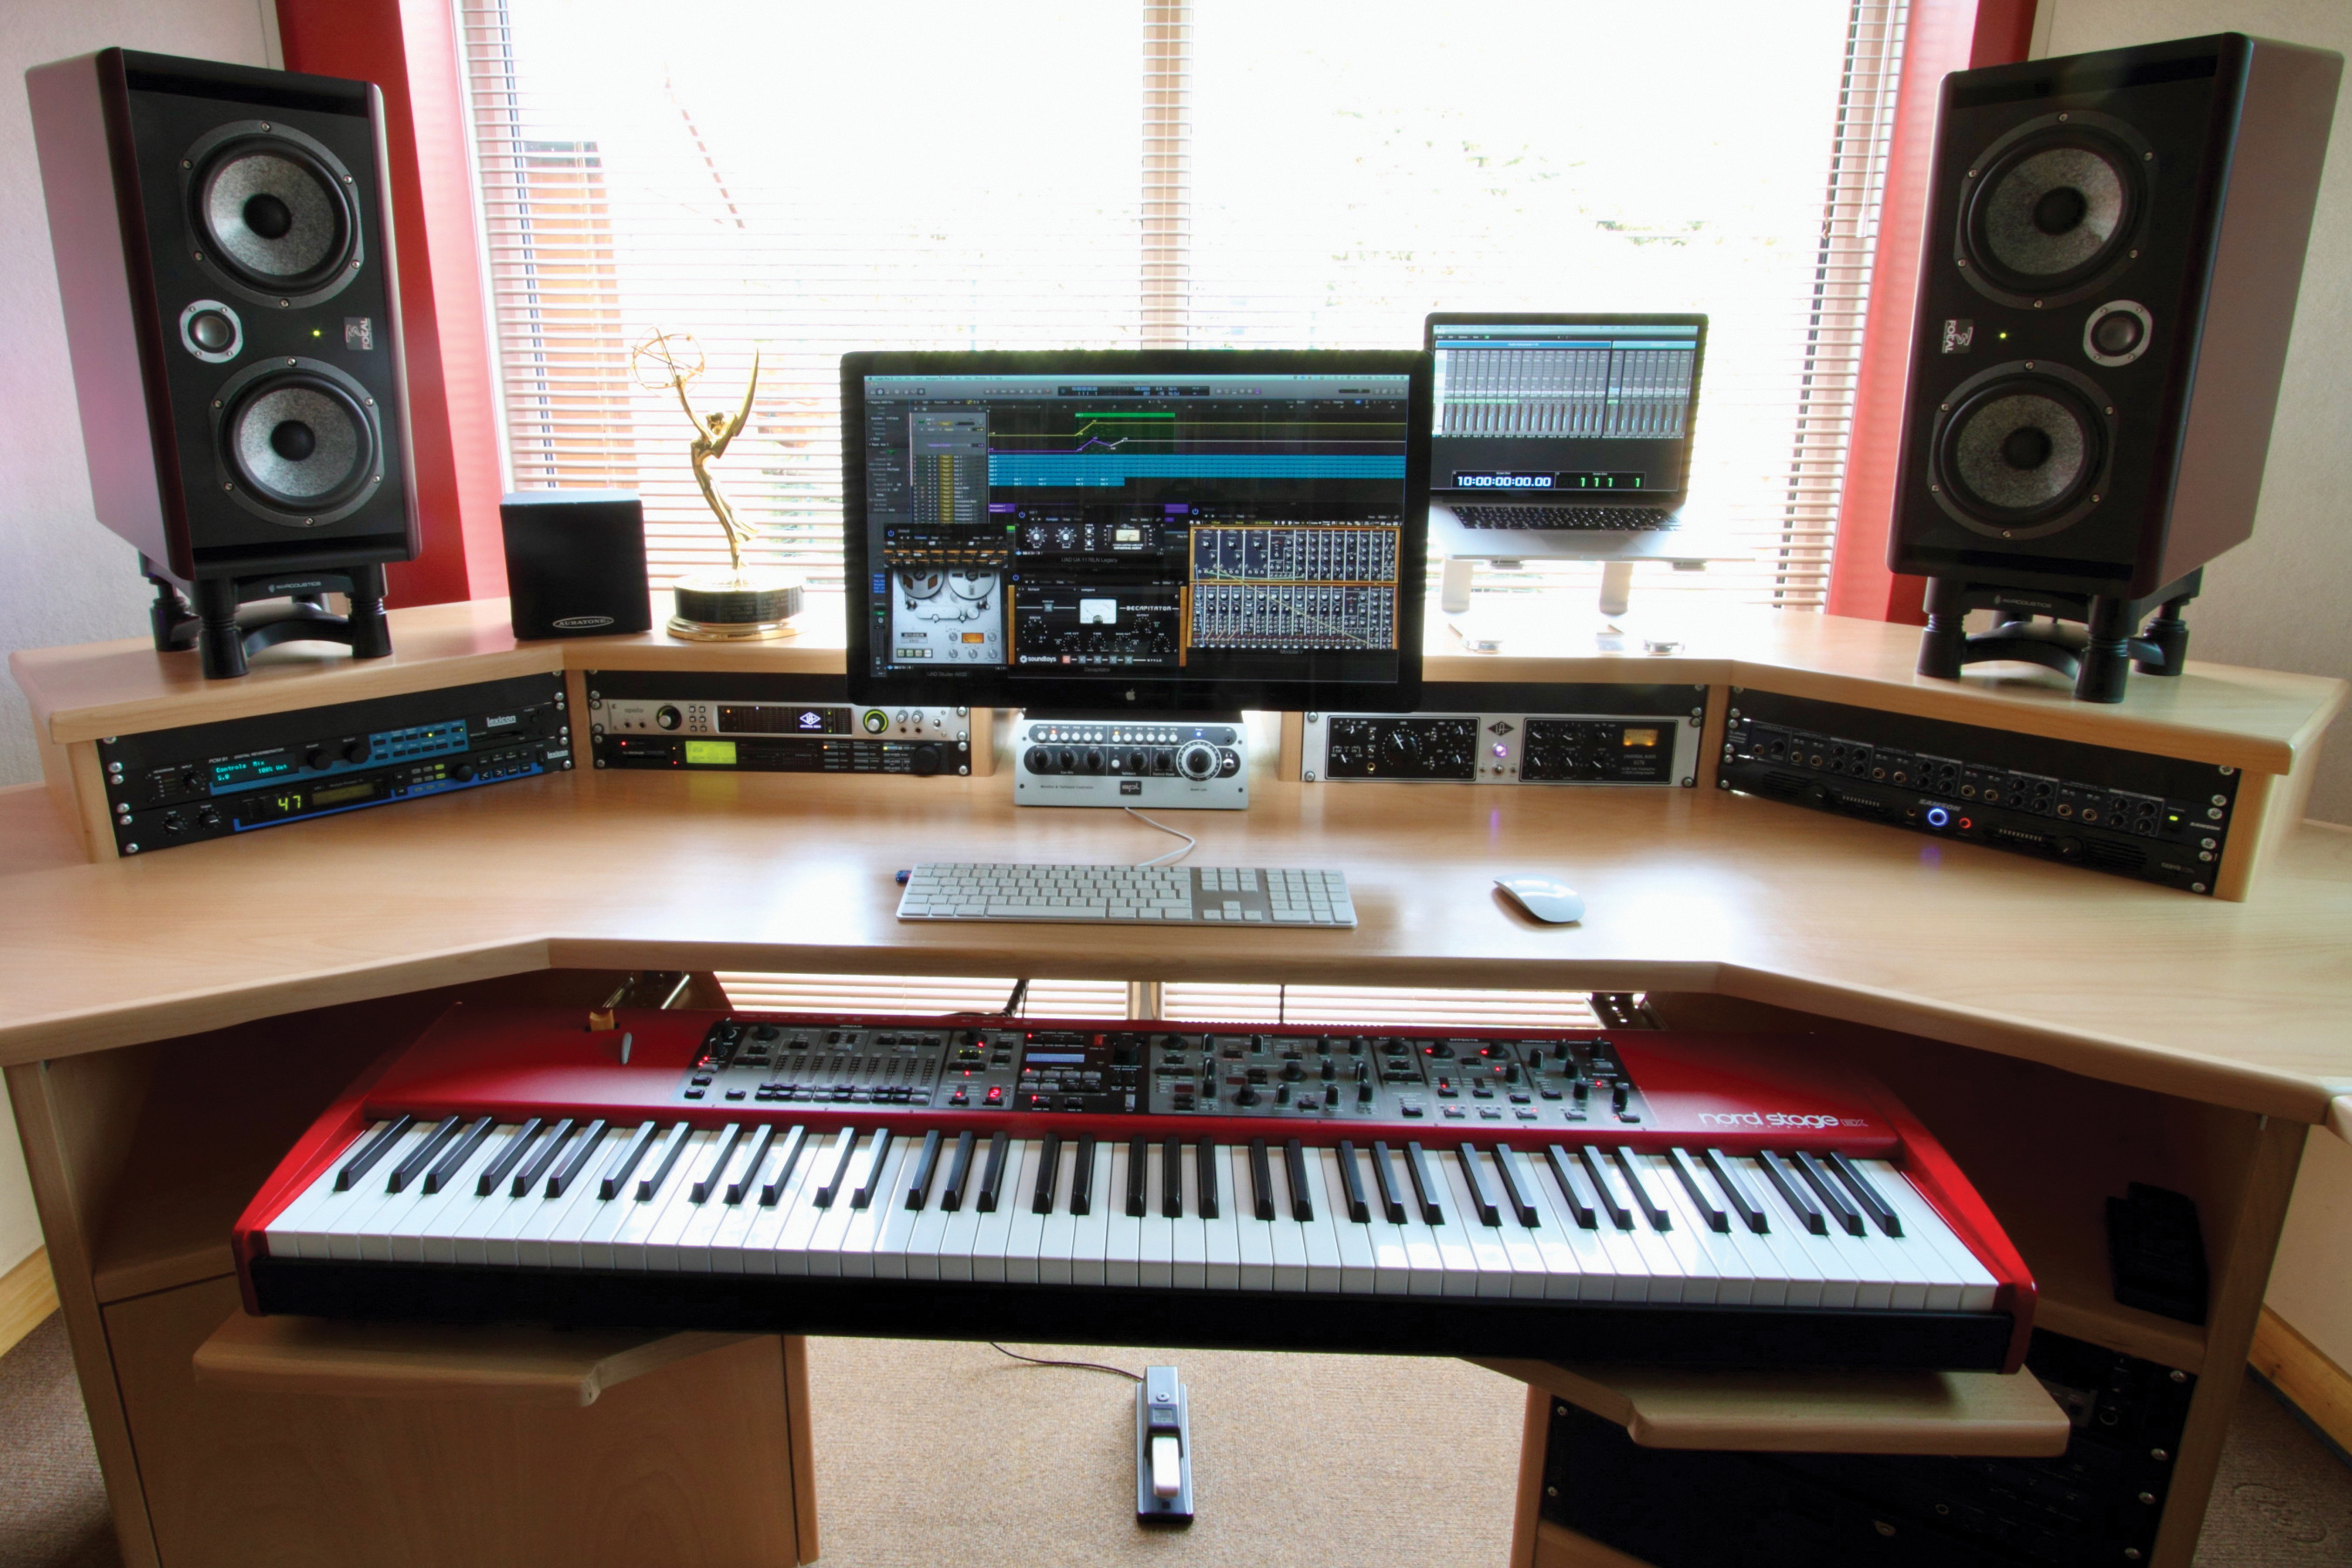
And you’re going to need some form of monitoring. Headphones can be useful to check mixes, but there is no substitute for planting your head between a pair of studio monitors. The ideal is to have your computer in the centre, with monitors on either side, so that as you make adjustments to your track, you can hear them easily, without the need to move your head very far. Many of the adjustments that we make in mastering can be quite subtle, and craning your neck to hear each processed element is not ideal.
The room you are mastering in may affect your perception of what you can hear from your monitoring, so try to keep your monitors out of room corners, unless you have acoustic treatment in place. Room corners exaggerate bass frequencies, so placing monitors away from corners will help reveal a truer picture of your track’s make-up.
Check your references
Once you’re happy with your equipment setup, listen to some commercially available tracks which demonstrate a sonic identity that you want to try to emulate. Listening to existing music will also help you gauge exactly how much high-frequency content is provided by your monitoring. Be aware that certain styles of produced music might seek to over-emphasise or highlight certain frequency bands. Rap and hip-hop will almost certainly present a greater amount of bottom-end gain.
In essence, you need to begin to listen to music and mixes in a more analytical way. A good starting place is to think of a track being divided into a top, middle and bottom, in terms of frequency (pitch) plots, while considering how much of each of these three areas are in play within your track. If you’re listening to a pop track, you’ll probably hear a crisp and bright vocal, meaning that there is exaggeration in the upper echelons, whereas the pounding bass and kick of a club track offers bottom-end exaggerated tendencies.
Linking the chain
Having prepared the physical elements of your setup, it’s now time to place your mixed stereo file on a track within your DAW, and pave the way for mastering.
The chain of plugin elements that you might choose to use will differ from one musical style to another. However, the basics will largely remain the same. We’re going to begin by using an EQ; this is an abbreviation for equalisation, and could be more accurately described as a precision tone control.
Ideally, you want some form of multi-band EQ plugin, which provides capacity to cut and boost your high and low frequency bands, but with the ability to zoom in on a specific frequency, to either reduce or boost. These more focussed equalisation examples are found on parametric EQs. It is possible to also use multiple instances of EQ plugin to achieve the same result, but having all of the information available in a single display definitely makes life easier.
Taking your reference material, begin to compare it with the track that you wish to master. Start by thinking about the lower bass frequencies, and the bright upper frequencies. While there might be a temptation to boost both elements, try to be objective; your aim is to create a balanced and listenable master akin to your reference, not one that just excites and exaggerates immediately.
Troublesome tones
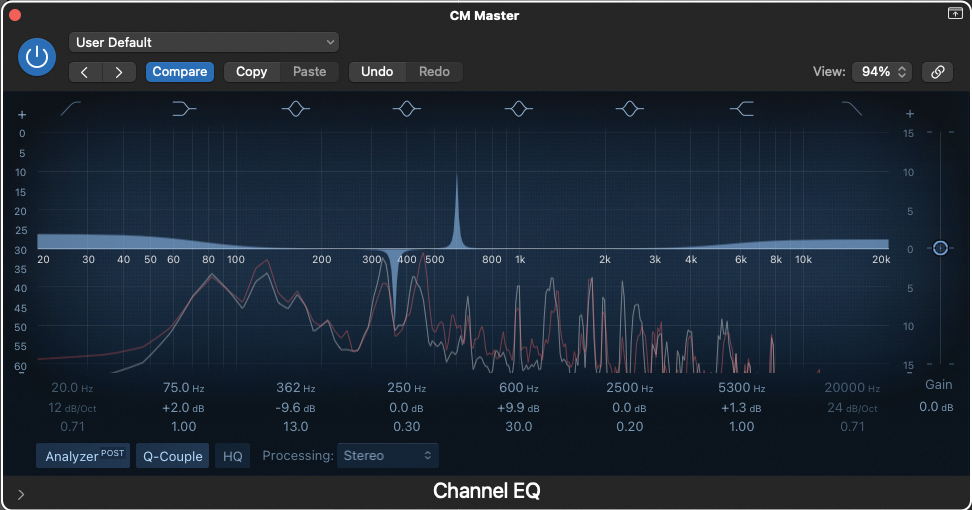
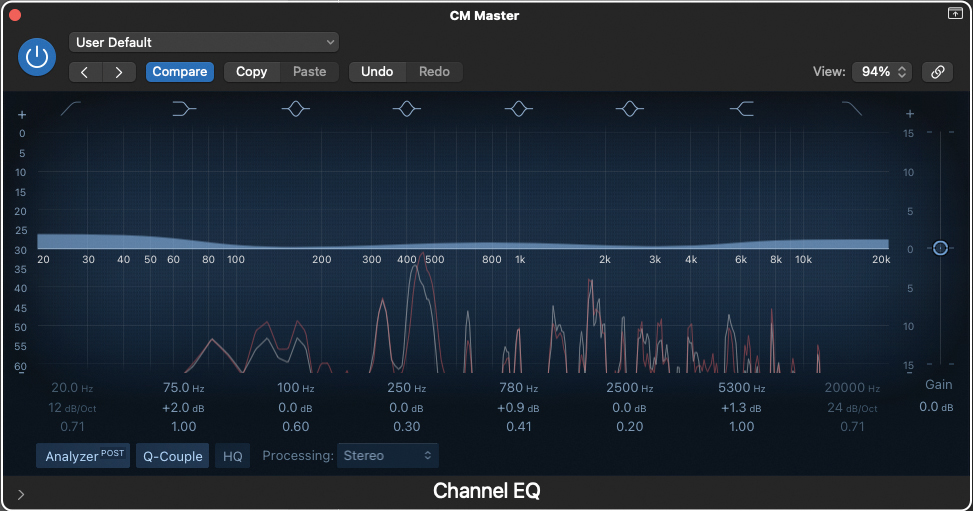
You may have encountered frequencies in your mix which are not very pleasant. These can often stick out of a mix like the proverbial sore thumb. When you are new to mastering, these rogue frequencies may not be quite so obvious, so there’s a useful trick to try.
Narrow the Q ratio of a parametric EQ, and sweep the full frequency spectrum. This promotes any rogue frequencies, enticing them to jump out at you; as these are slowly revealed, you can eventually correct. The best way of doing this is to cut the troublesome frequency point back, using the cut/boost control on your EQ. The end results should be starting to sound far more palatable.
Just like mixing, getting to grips with mastering EQ takes time, patience, listening and practice. Always try to be objective. If it doesn’t sound as good as you thought it did, when you come back to your master an hour later, try again!
DIY room optimisation
One of the biggest issues for anyone working in the confines of a home studio, is dealing with the acoustics presented to you by your home. Very few of us have the luxury of being able to hire an acoustic specialist to treat your working area. As if the domestic situation couldn’t get much worse, we often have to deal with rooms which are cube or oblong-shaped, or to put it another way, the worst possible shape for a home studio setup.
There are, however, plenty of cheap tricks you can use, just about all of which involve lessening the reflection of sound, from walls or windows. If you have heavy curtains in your studio room, try placing your speakers in front of them. This will limit reflection from the wall/windows behind. Or hang a blanket or duvet over some mic stands, behind your mixing position. This greatly reduces reflections from the wall behind you, as you’re monitoring, and is particularly effective in smaller rooms.

Limiting and compression
Have you ever been stood in a noisy location, struggling to be heard as you have a conversation, and found yourself shouting? It’s really no surprise that the advertising industry has been employing the exact same tactic for years when it comes to selling us their products in the media.
You may notice that when television or radio adverts, or even podcast and YouTube ads, present themselves, they appear to be louder than the content that you tuned in to hear/see. In other words, the advertisers are shouting just that little bit louder, to get their point across.
The more volume-sensitive individuals among us might have noticed that this increase in volume is not just a literal increase in sound levels. It is actually a squashing of the dynamic range of the advert, in order to metaphorically tap us on the shoulder, and drive the point loudly home.
This can be achieved through the use of compression and limiting, both of which are among the core weapons in the armoury of a mastering engineer.
Should we limit or compress?
What is the difference between compression and limiting? Before we attempt to answer that question, it’s important that we note that while equalisation deals with the tone of your master, compression and limiting deals with the dynamic range. This point is clouded slightly, as certain styles of compressor will also affect the tone of a track.
Often, we prefer to use transparent-sounding compressors for mastering, as we get a sound exactly as described on the tin. This is less the case with compressors of a vintage persuasion, either in hardware or cloned software, as they often bring benefits in tone, along with a slight distorting of frequencies. As a case in point, you’ll find that the classic 1176 compressor exaggerates bass frequencies, hence it lends itself to use on bass instruments,
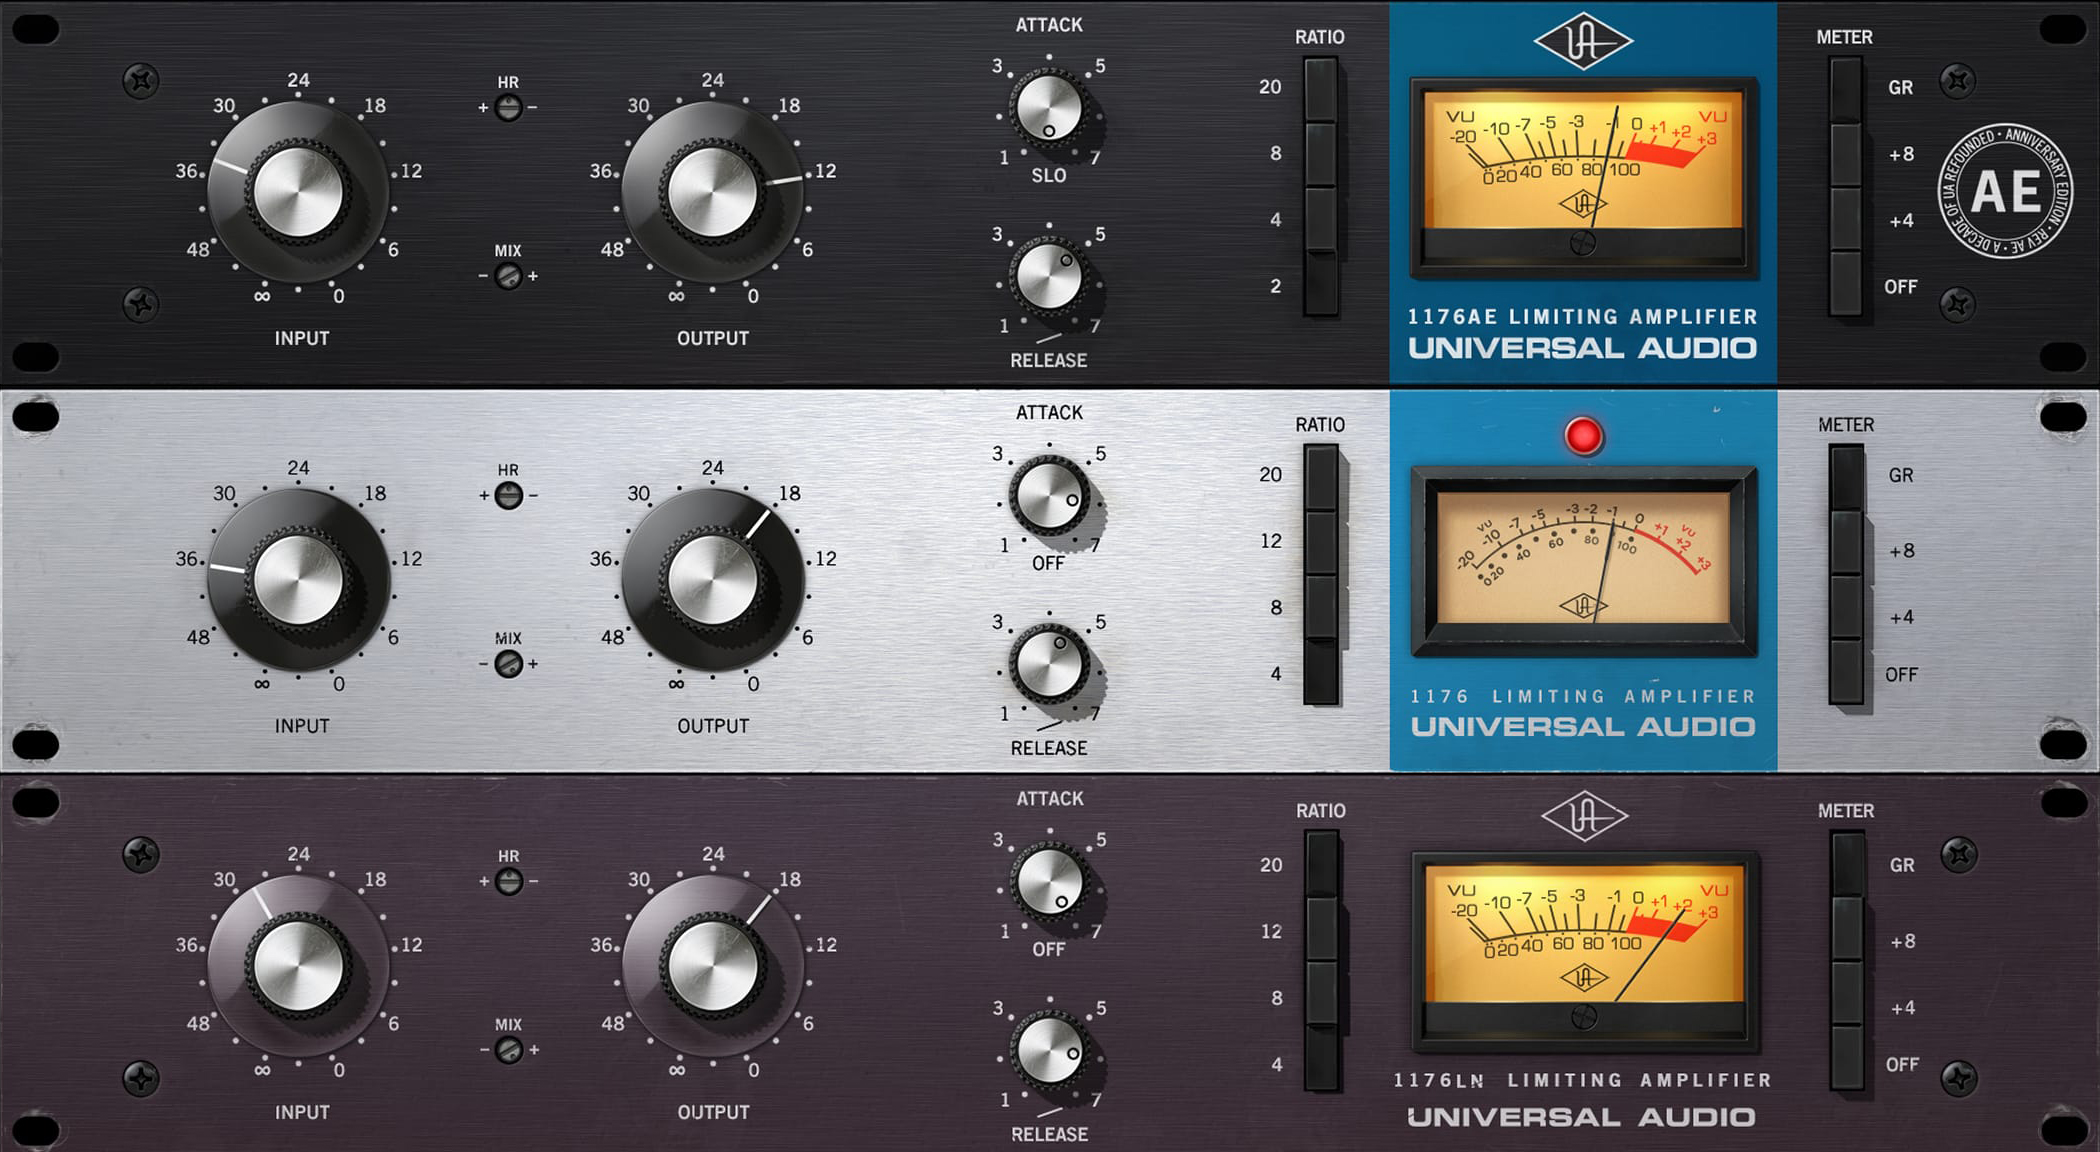
Coming back to our original question, limiting has one function, which is to seek out peaks in volume, and reduce them. Limiters are very literal in the way that they operate, and could be considered quite utilitarian as a result.
By contrast, compressors approach the dynamic spectrum from both above and below. They will also locate peaks in volume, reducing them at a threshold set by the user, but they also allow for the dynamic floor of your mix to be increased, creating a far narrower, dynamic range. If you take this concept to its logical conclusion, it means that you could completely squash your mix into the most narrow of dynamic bands.
Why might you want to do this? Think back to those adverts you see and hear everyday. If you’re working within the realms of commercial music, it’s quite likely that you’ll adopt a reasonably narrow band for your dynamic range, creating a sustained, constant, and perceptually loud sound, which makes the listener take heed.
By contrast, take a style of music which is more cinematic or classical in nature, and you’ll probably want to maintain a wide dynamic scale. Classical music, in particular, is dependent on a wide and varied range of dynamics, so you’ll want to employ compression to a far lesser degree.
Levelling up
Whatever your chosen musical genre, you should leave headroom for any compressor to plough its trade. This means adopting an industry standard, by presenting a mix for mastering with a headroom of -6dB below maximum peak. This allows the compressor to perform its duty. Post-compression, you’ll be able to recover that missing 6dB, using the makeup gain.
It’s sensible to adopt a similar workflow while adding compression, as we did with EQ. Listen to your reference track again, and think about its dynamic range. Is it relatively full and dynamic, or at the more compressed and squashed end of mix business?

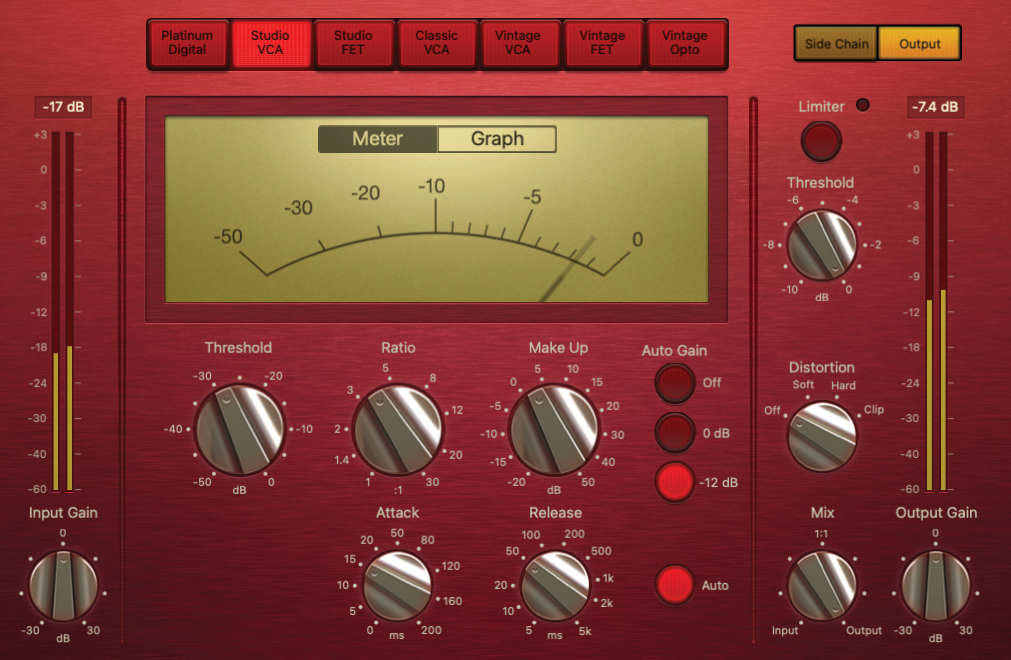
Plug in a suitable compressor from within your DAW. We’ll concern ourselves with three main controls; firstly, the threshold control will dictate where the compression starts to take effect. If you want to compress more, you’ll need to reduce the threshold setting. Most compressors will give you some form of gain reduction metering, so if it’s not immediately obvious, you should see some form of graphic twitching, as you reduce the threshold amount.
The ratio control will dictate the amount of compression, as it’s applied. As you increase this control, you’ll probably start to hear your mix pumping in a rhythmic manner to accompany the music which is being compressed. This might be desirable in certain musical scenarios, but by and large you’ll most probably want to employ compression, which is transparent to the listener.
The third control that we want to use is the Make-Up control; this performs much like a volume control, increasing the output from the compressor. By increasing the make-up gain, while also compressing the top of the dynamic spectrum, you can create a squashed and compressed mix, which for most commercial settings will be very desirable. The knack is getting this to sound natural, and this is where you have to listen and be objective.
Battle of the bands
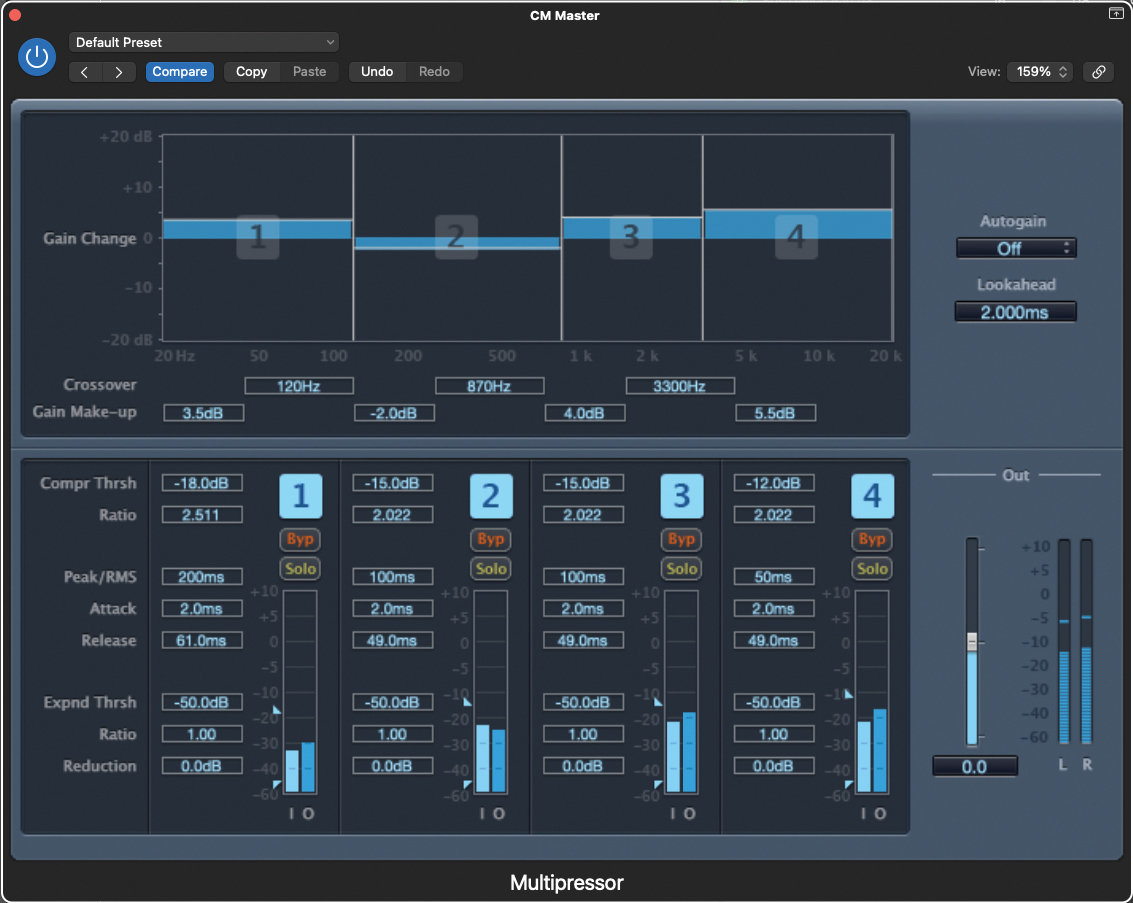
Apart from basic compressors, we also have access to multiband compressors, which allow us to zone in on a particular frequency band, only compressing that particular section.
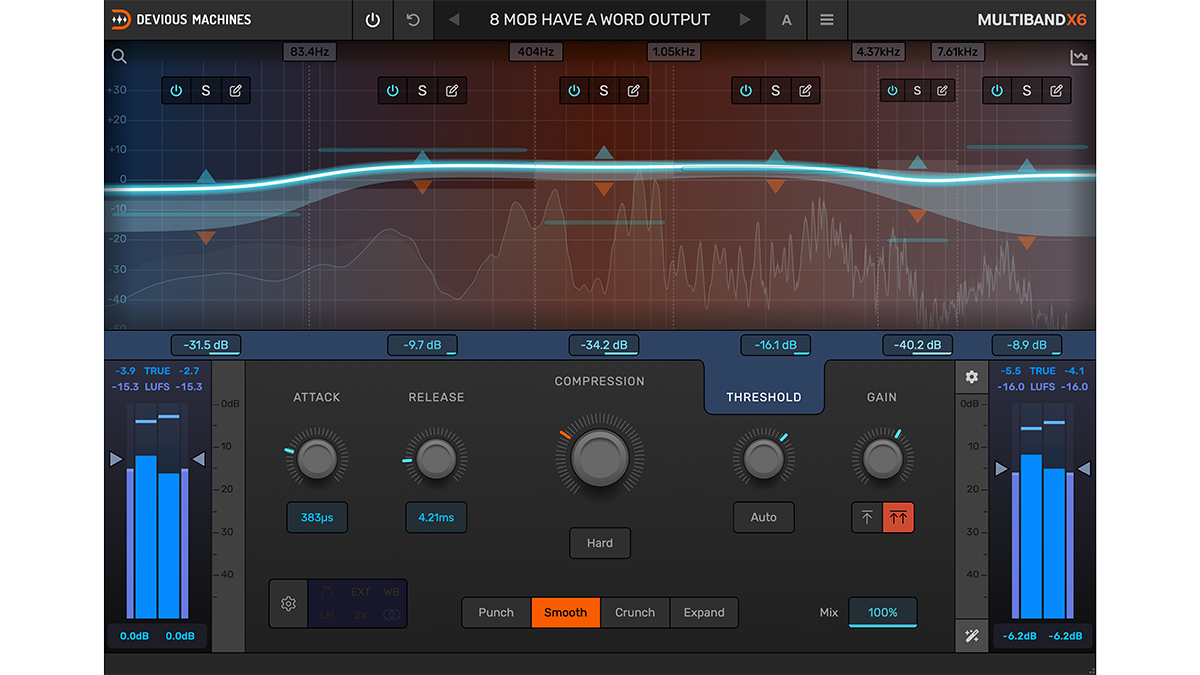
When to use multiband rather than stereo compression on your output channel
In mastering terms, this can be something of a revelation, as it engages a mix-like mentality to mastering a track. Many DAWs will offer plugins to cater to this, as part of the package. The Multipressor, offered in Logic Pro, is a great example; we can compress, reduce and increase specific frequency bands to not only balance a master beyond the mixing stage, but also add the all-important compression.
This can be particularly useful when taming low-end bass frequencies. Many of these forms of multi-band compressor allow for soloing, at the band level. This means that you can clearly and accurately select the frequency band you wish to tame by auditioning.
Distortion, saturation, imaging and beyond
Much like trying to conquer any new production technique, practice makes perfect, and hopefully you’ll be starting to listen to your music in a slightly different way; more analytically and from a holistic perspective. But there are plenty of other plugin devices that can help colour your track in a positive way. Some are less applicable, depending on the style of music you’re creating, but it’s worth considering all things at this stage, as something unexpected might promote a new direction.
Adding distortion
We tend to link the concept of distortion with instruments like guitars. Distortion comes in many shapes and sizes, and sometimes even the smallest amount of distortion has a positive effect on a track.
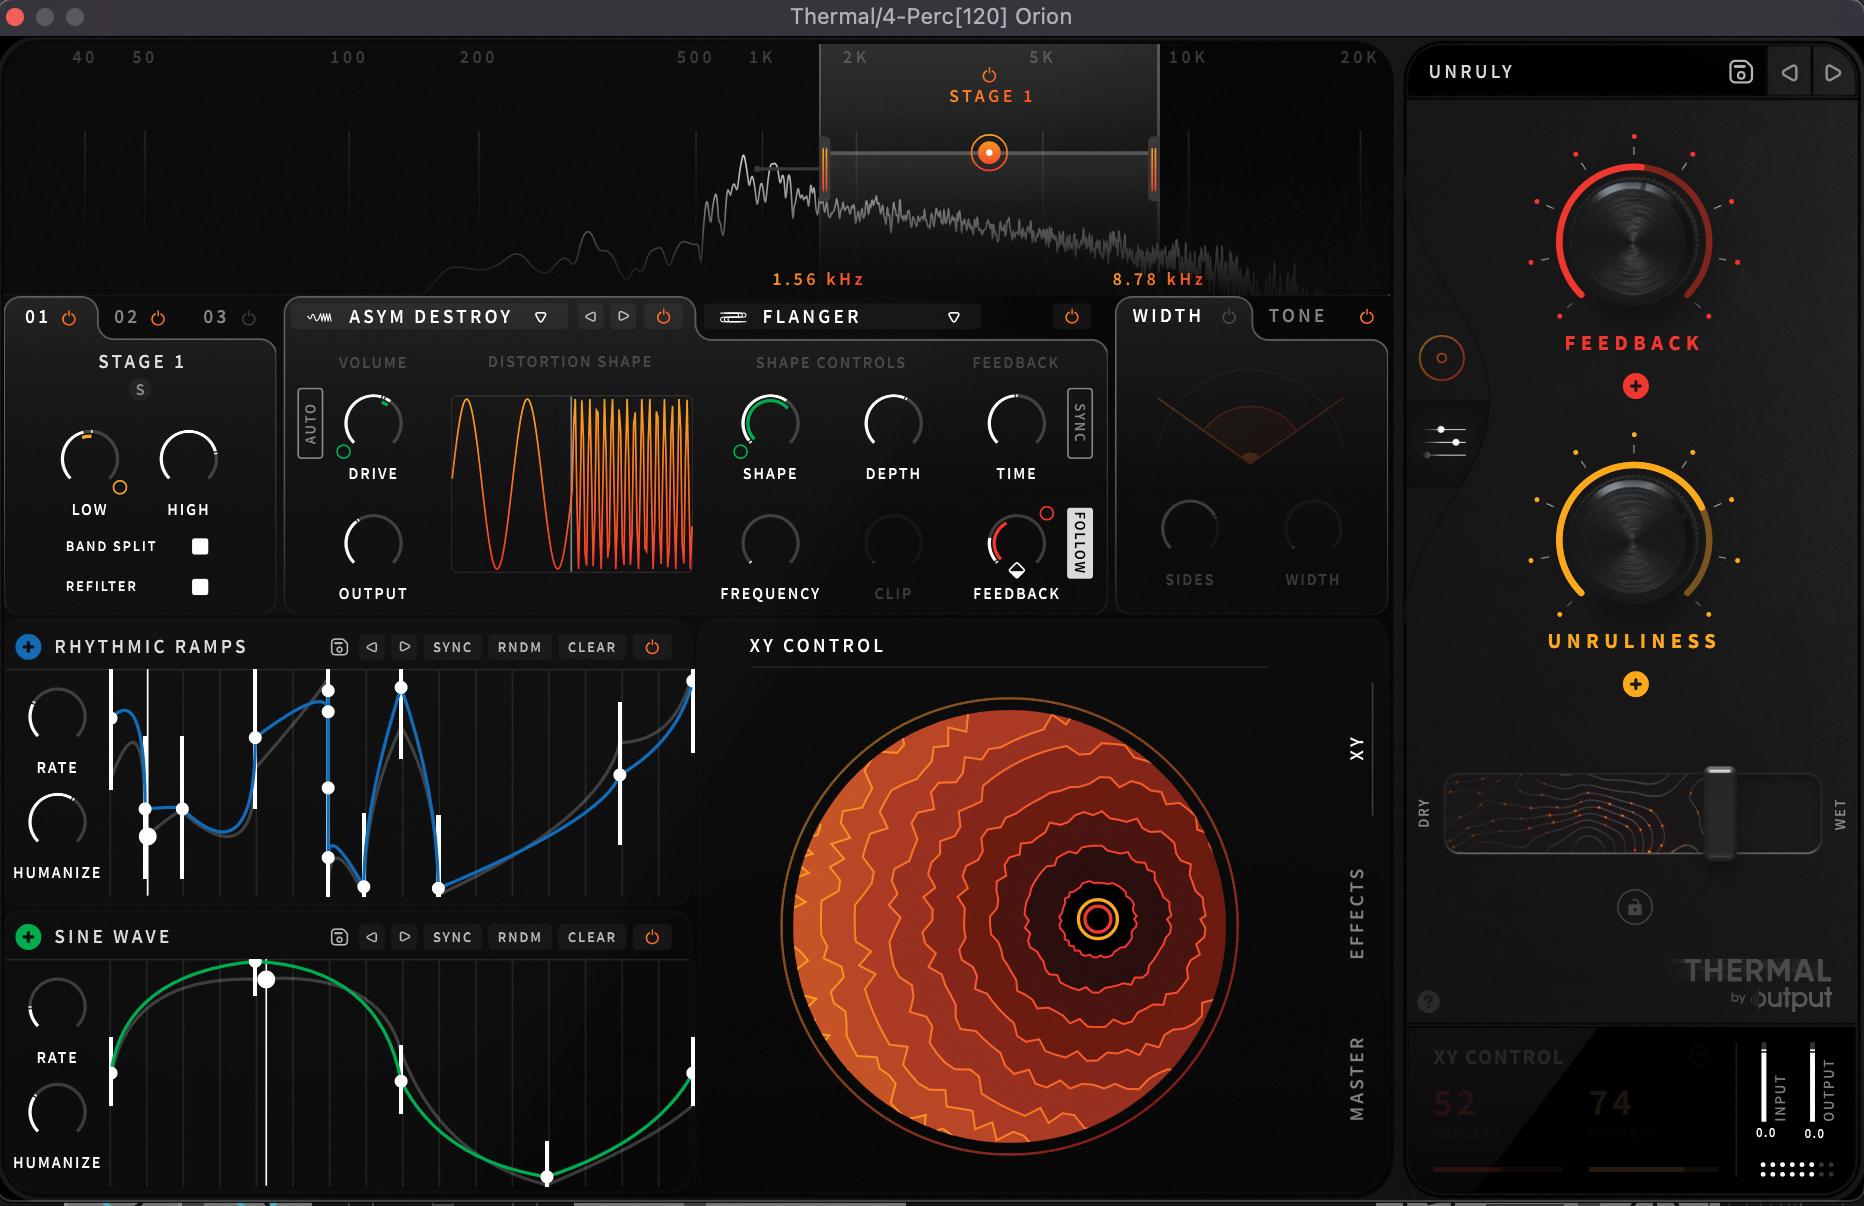
Sonic destruction: the science of distortion and how to use it
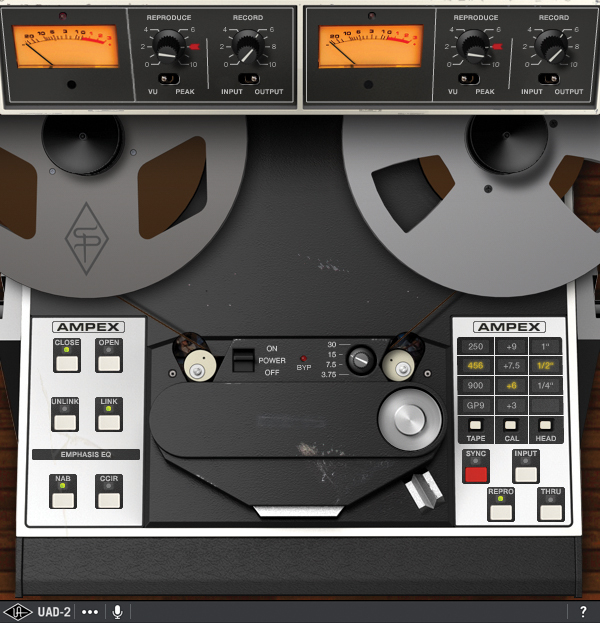
One such concept relates to the mimicking of analogue tape. Many producers still yearn for the ‘warmth’ which presents itself to the listener, from music that has been recorded to analogue tape. While the cost of traditional tape-based hardware might be exorbitant, it’s possible to purchase plugins which will do a fine job of recreating this classic analogue sound. This enigmatic word ‘warmth’ is just the human way of describing what we’re listening to, but under the hood we’re applying a form of distortion. In fact, it’s more accurately described as second harmonic distortion.
To add such colour, use a plugin based on a traditional mastering tape machine. One of the most highly prized machines was the Ampex ATR-102; a two-channel, stereo machine that could handle both 1/4” and 1/2” tape, and is still revered today, but at a vintage price!
But fear not, as Universal Audio have cloned the machine as a software plugin, available in UAD Format, letting you apply second harmonic distortion, right onto your master. Away from the UA eco-sphere, the J37 Tape plugin, from Waves, also provides vintage distortion and noise, modelled on the infamous Abbey Road J37 tape machine.
Imaging
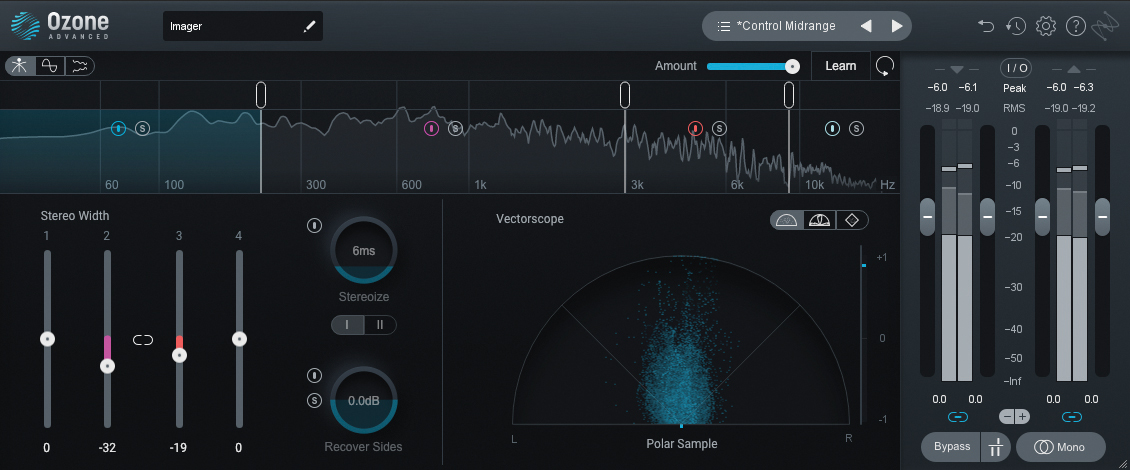
Imaging plugins can assist in broadening (or narrowing) your stereo image and soundstage. During the mix phase, you’ll doubtless have thought about where to place the instruments in the stereo image, using the pan pots available within your DAW. As you reach the mastering phase, the sum of parts created in your mix may not present the breadth of soundstage that you hoped for. Dedicated plugins can assist you in altering this.
Under the category of Imaging, these plugins also provide capacity to centre lower frequencies, while broadening higher frequencies. The net result is a more coherent and grounded mix, that will have a real sense of depth across the frequency spectrum.
Imaging products aren’t always available within the included content of your DAW, but help is at hand from companies such as iZotope, who offer Ozone Imager v2 for free, though you will have to register your email address. The S1 Imager by Waves provides a paid imaging solution, with some helpful graphics to illustrate the application on your mix.
Another pair of ears
As the concept of mastering has filtered down, from the professional sphere to the bedroom DAW setup, a multitude of products have become available to assist you with your mastering conquests, while also adding that helpful second pair of ears, should your home monitoring not be quite as you might like. Some packages are designed to operate outside of the DAW, while others are designed to be initiated on the master bus of your DAW’s mixer.
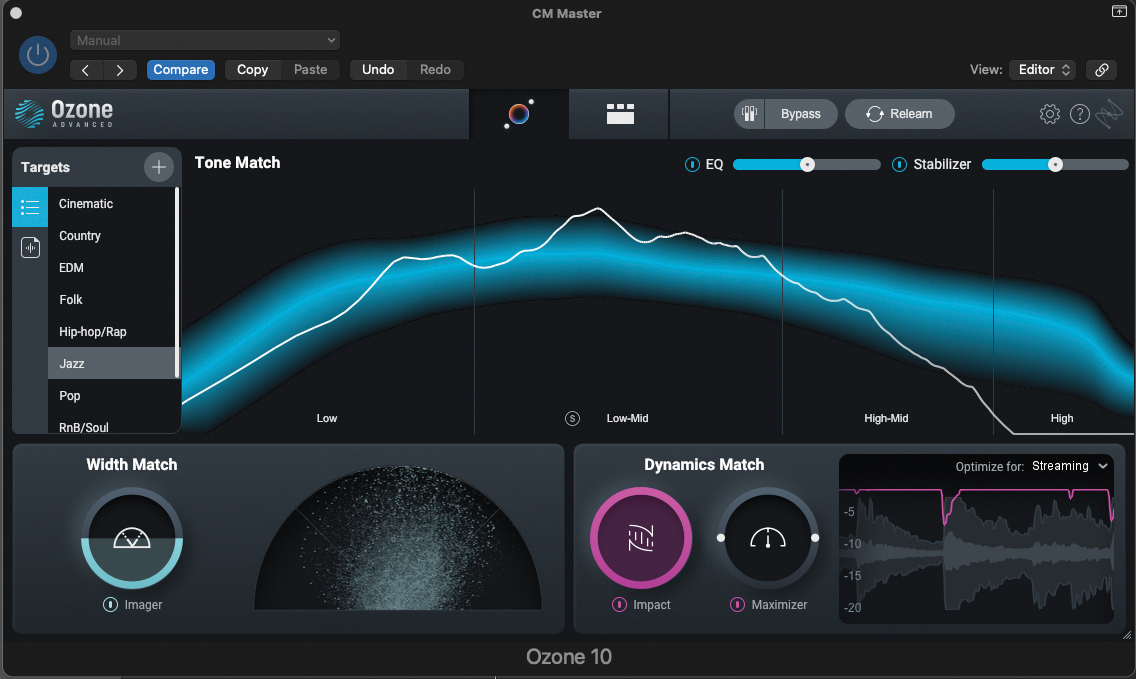
One of the most highly recognised packages of its kind is Ozone, from iZotope. You will find aspects of everything we have discussed within the Ozone suite, but also find other generous included modules, which will help improve your sound further. Ozone exists in a number of package sizes, designed to suit all budgets, with the top package affording the ability to listen to a reference track, and provide a suitable signal chain to mirror the track’s sound.
It’s easy to get swept along by the automation of the software, but it’s vital to listen with objective ears, to check that the algorithm has provided you with the best option. You can break out of the chain of effects at any point, altering and editing as you go, until you get your perfect master.
Max headroom
There’s one last thing you should consider before committing your final master. Given that you’re likely to be mastering your track for public consumption via a streaming platform, each platform has their own requirements for final track levels.
As a general rule, this is 1dB below maximum headroom, but you should check with your distribution outlet, as all platforms subtly vary. Hopefully, if you have adequately adjusted your compression, reaching a stable headroom level should not be a problem, but if it is, thanks to our computer-based mastering world, it’s very easy to go back and adjust.
Electronic and pop mastering for streaming
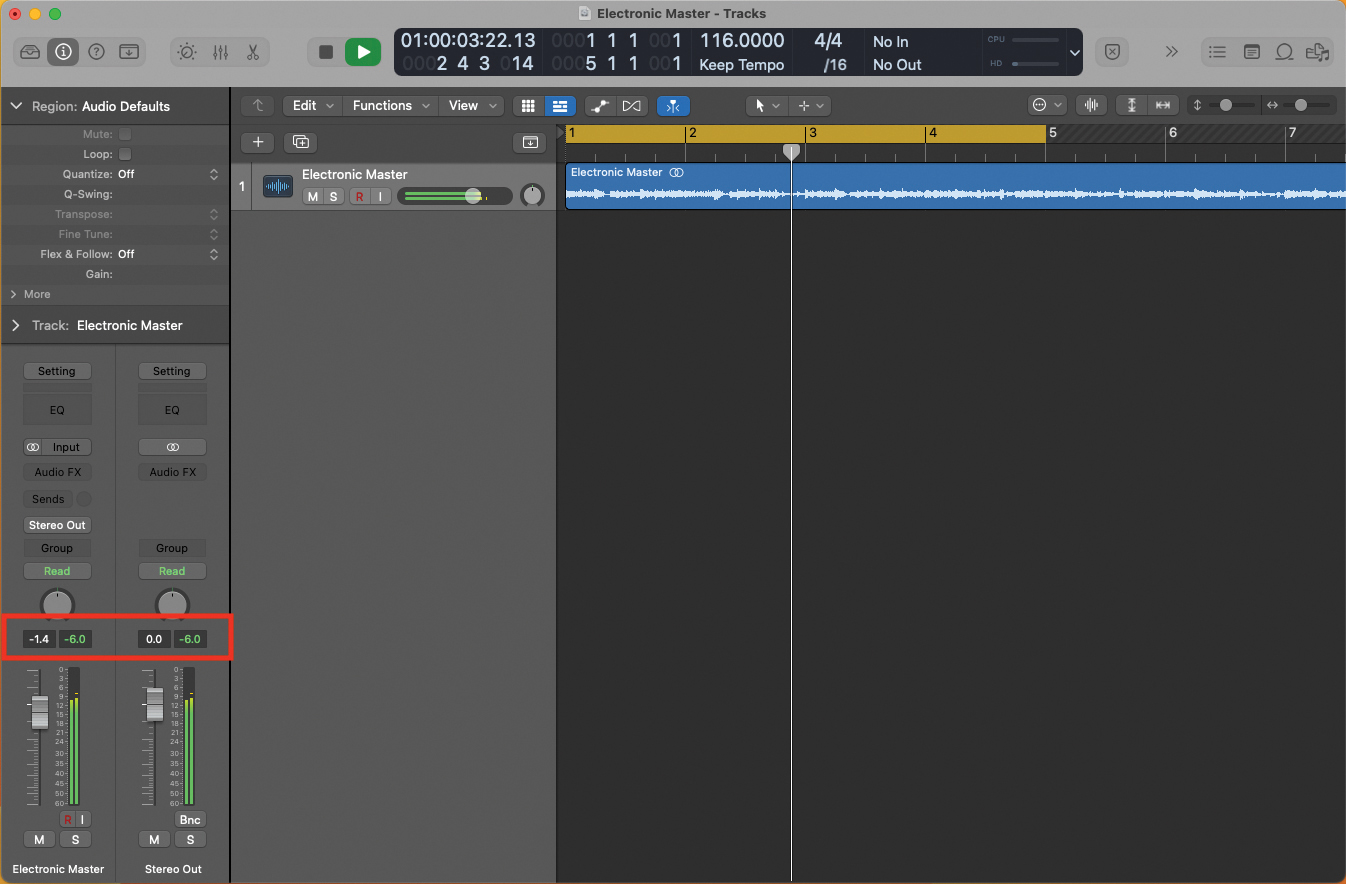
Before we begin to build our mastering chain, it’s vital to ensure that we have an appropriate track to work with. The ideal rule-of-thumb is to prepare your mix to a maximum level/headroom of -6dB. This means that your metering should reflect this, once mixed-down and outputted from your DAW.
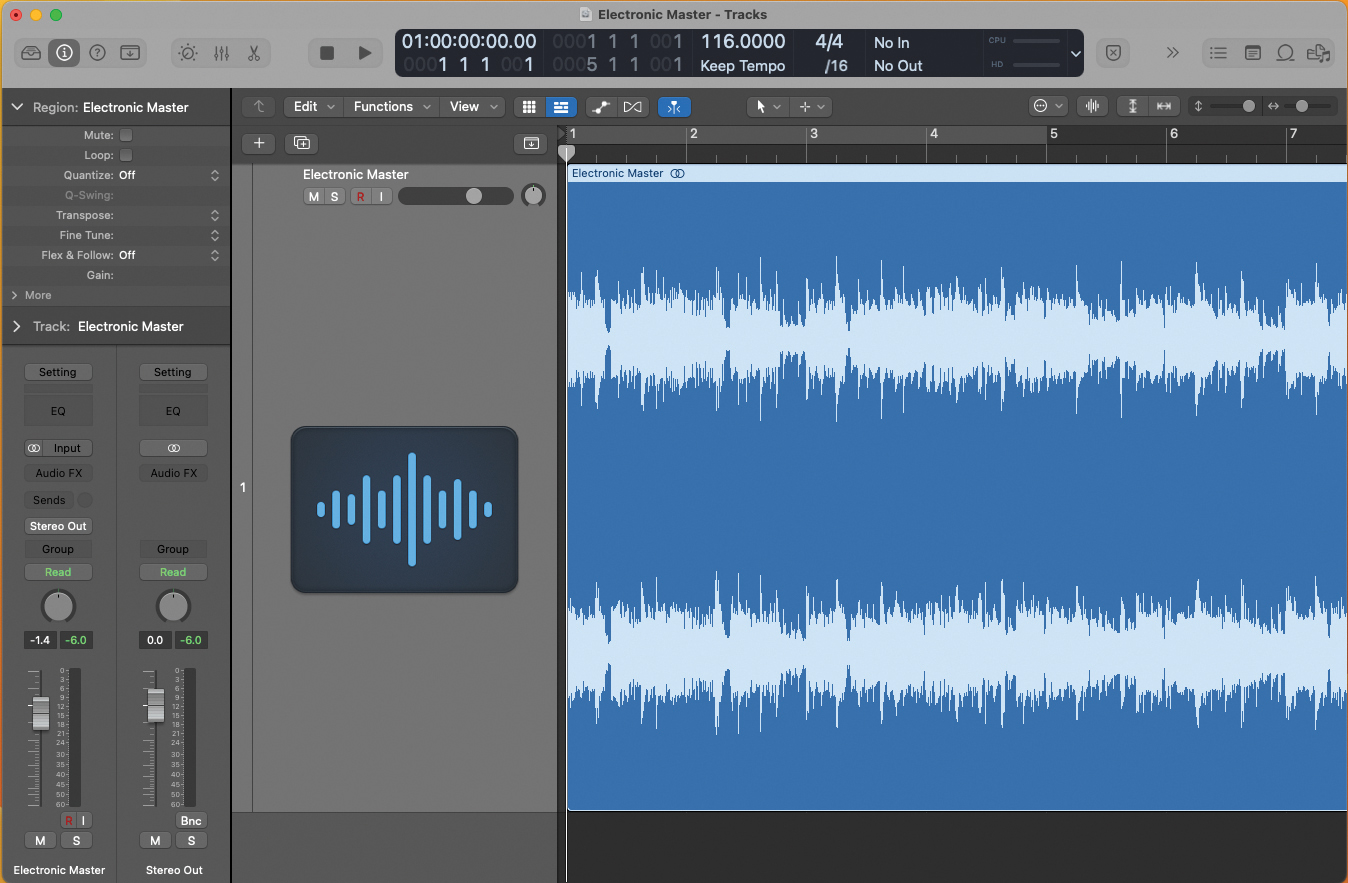
Import your mix into your DAW, as a stereo audio file; think about the sampling rate you wish to use at this stage. As a general rule, you should aim to keep the sampling rate the same, throughout the mixing and mastering process. 44.1kHz/24-bit is considered to be the baseline standard.
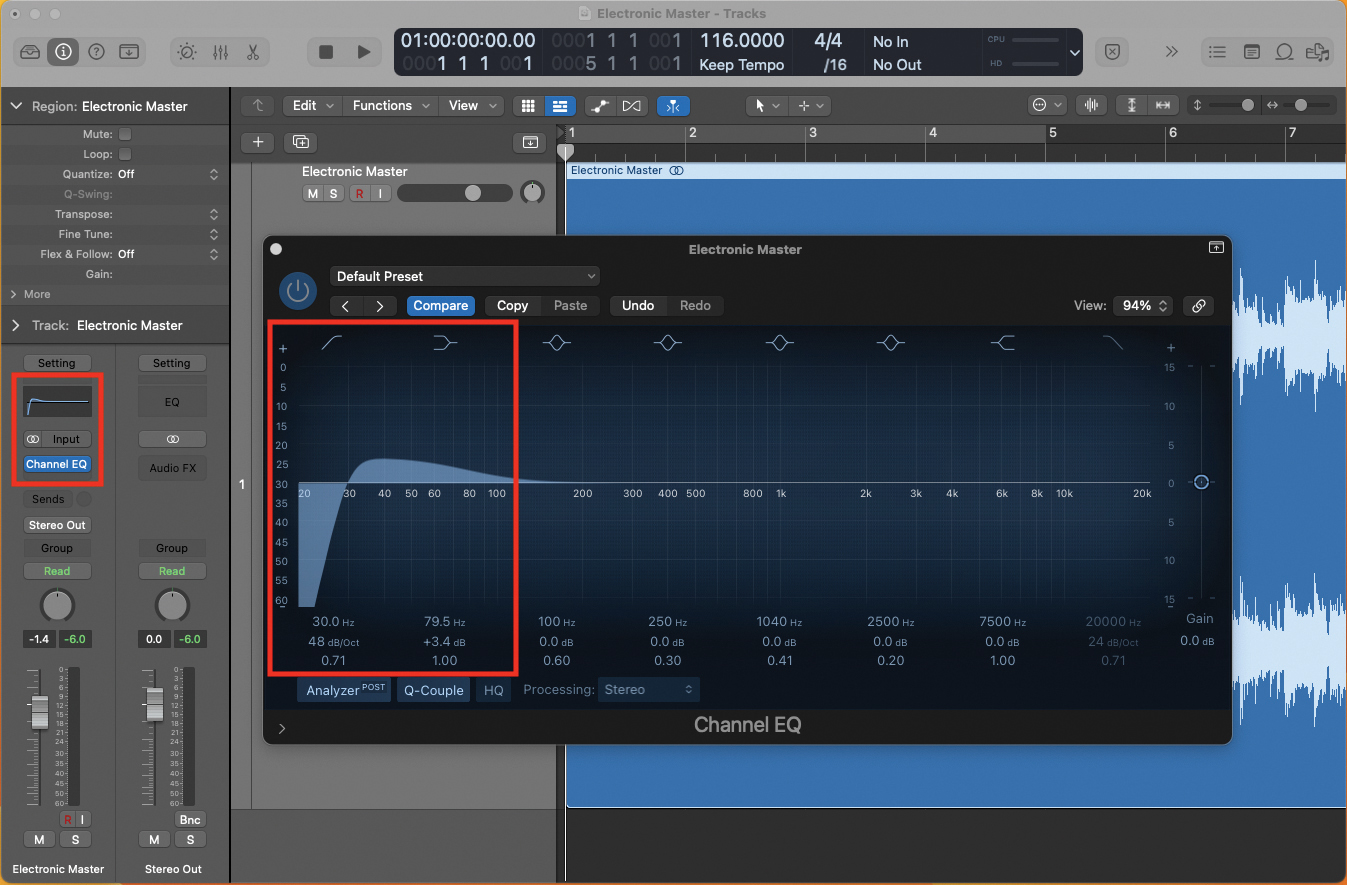
We’ll begin the mastering chain with EQ; plug in a multi-band EQ and listen analytically to your track. We’ll start by subtly increasing the low end, to taste, while placing a low-end shelf at around 30Hz, to prevent extreme rumble. Being a commercial track, it will benefit from increasing your low end, around 80Hz.
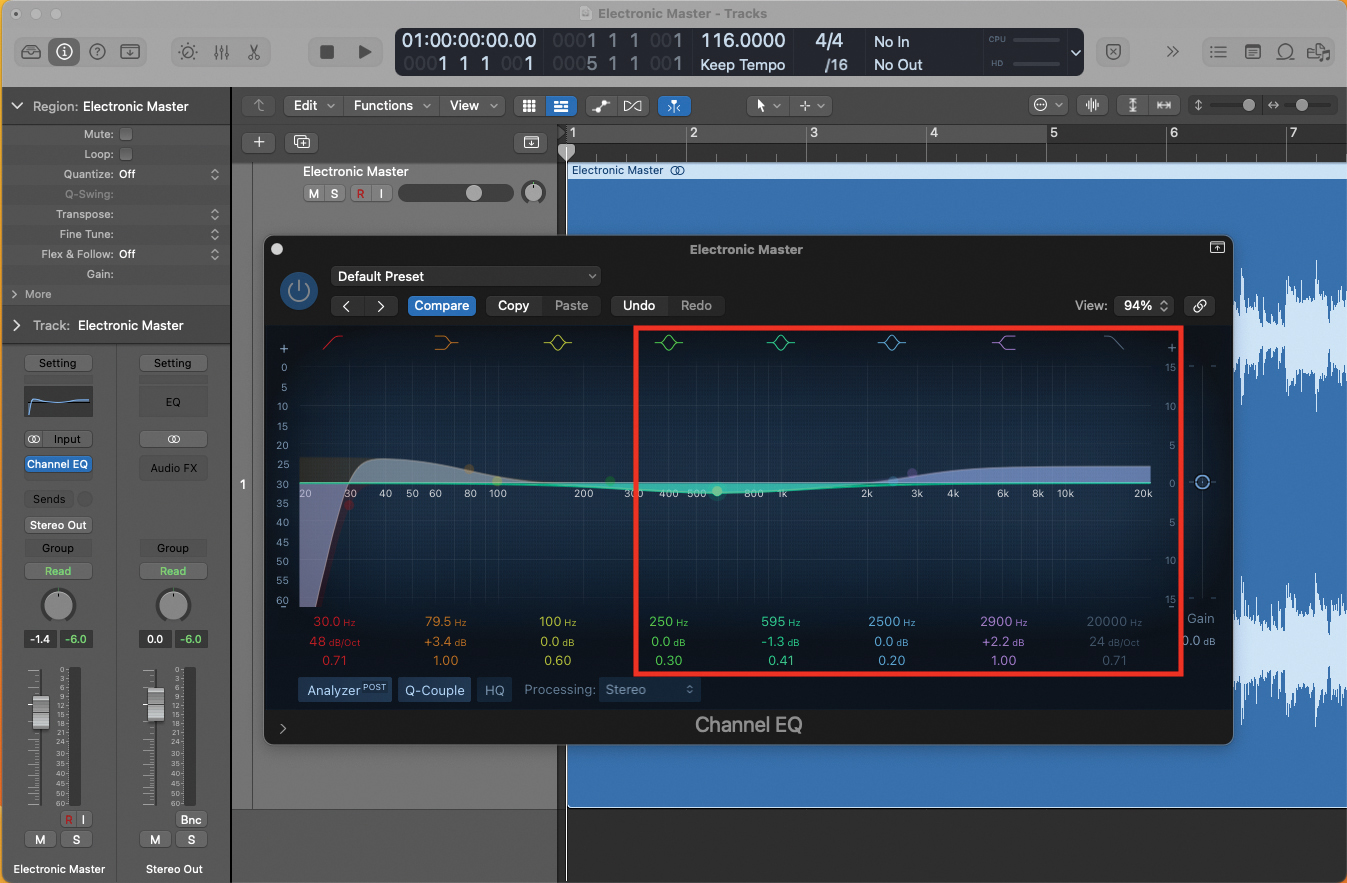
Next we’ll brighten the top-end; add a subtle increase to the high-end frequencies, which will help add presence to the snare and hi-hats in the track. Listen as you apply this; don’t over-cook it! You can also add a scoop in the mid frequencies, to help highlight the top and bottom ends of your frequency spectrum.
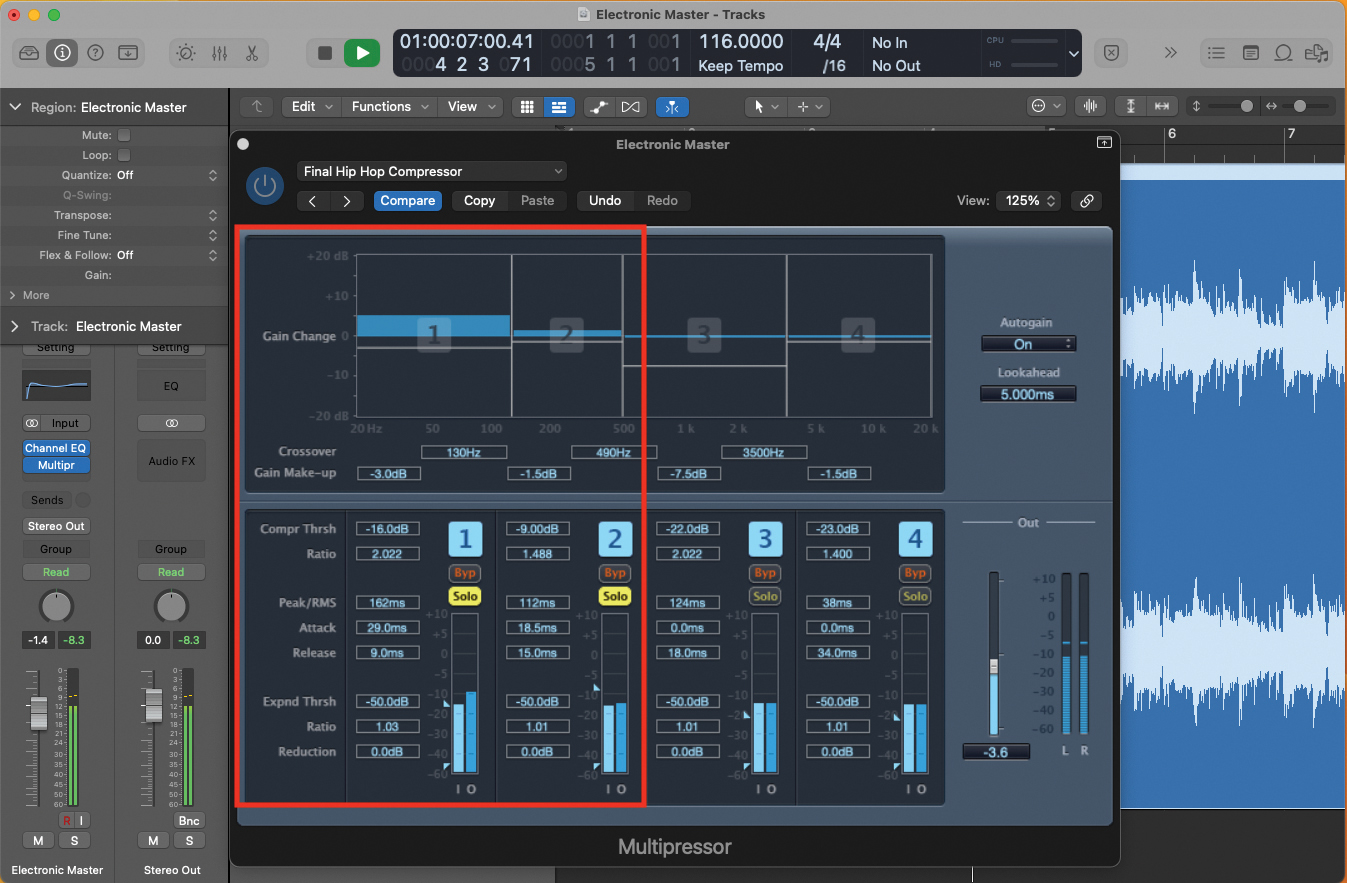
The second component of our mastering chain involves compression; if you have one, try a multi-band compressor. This will let us further analyse and compress the elements that we’ve equalised in the last two steps. Listen, using Solo (if available), to target the low-end area to be compressed.
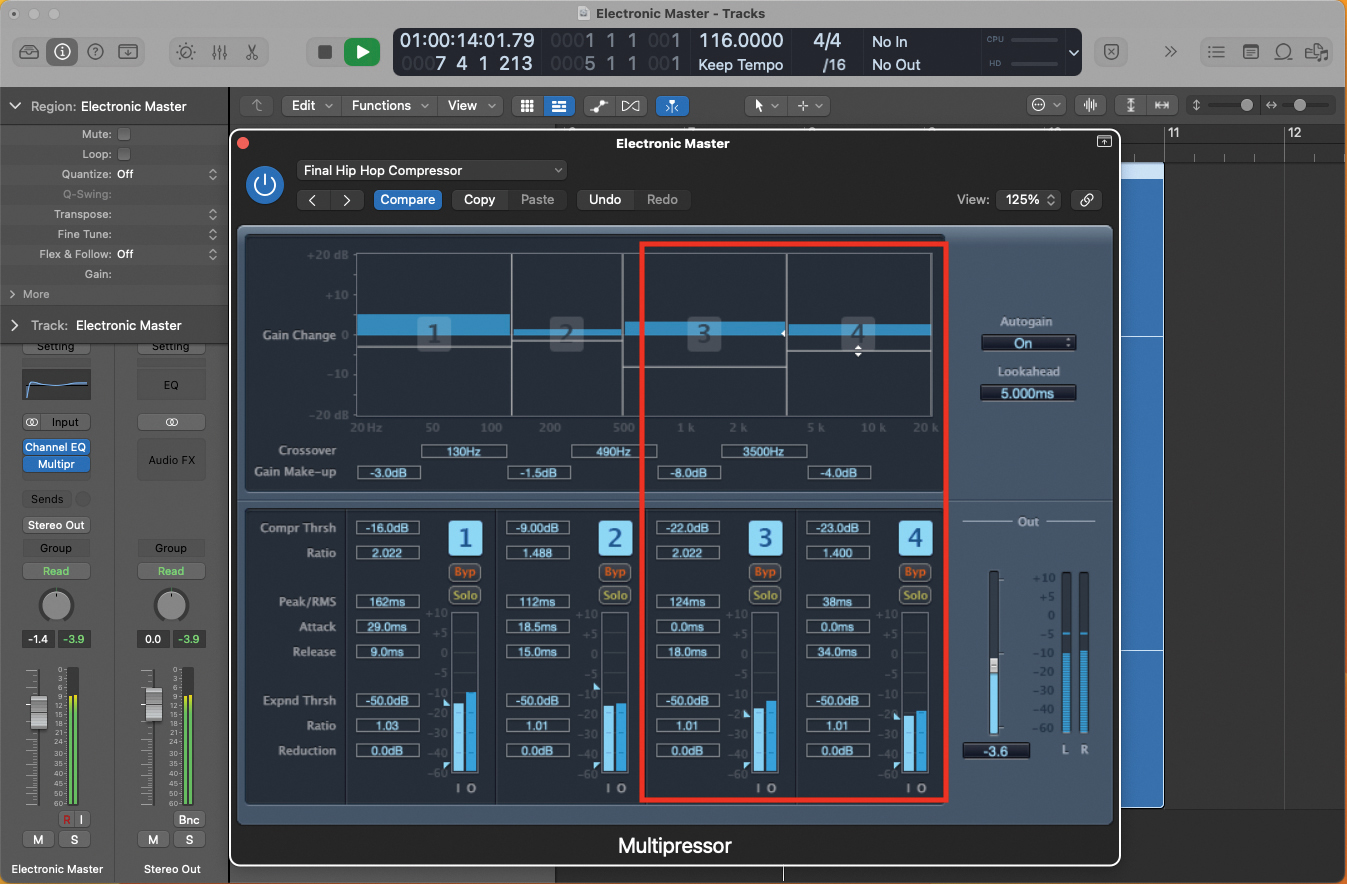
The second component of our mastering chain involves compression; if you have one, try a multi-band compressor. This will let us further analyse and compress the elements that we’ve equalised in the last two steps. Listen, using Solo (if available), to target the low-end area to be compressed.
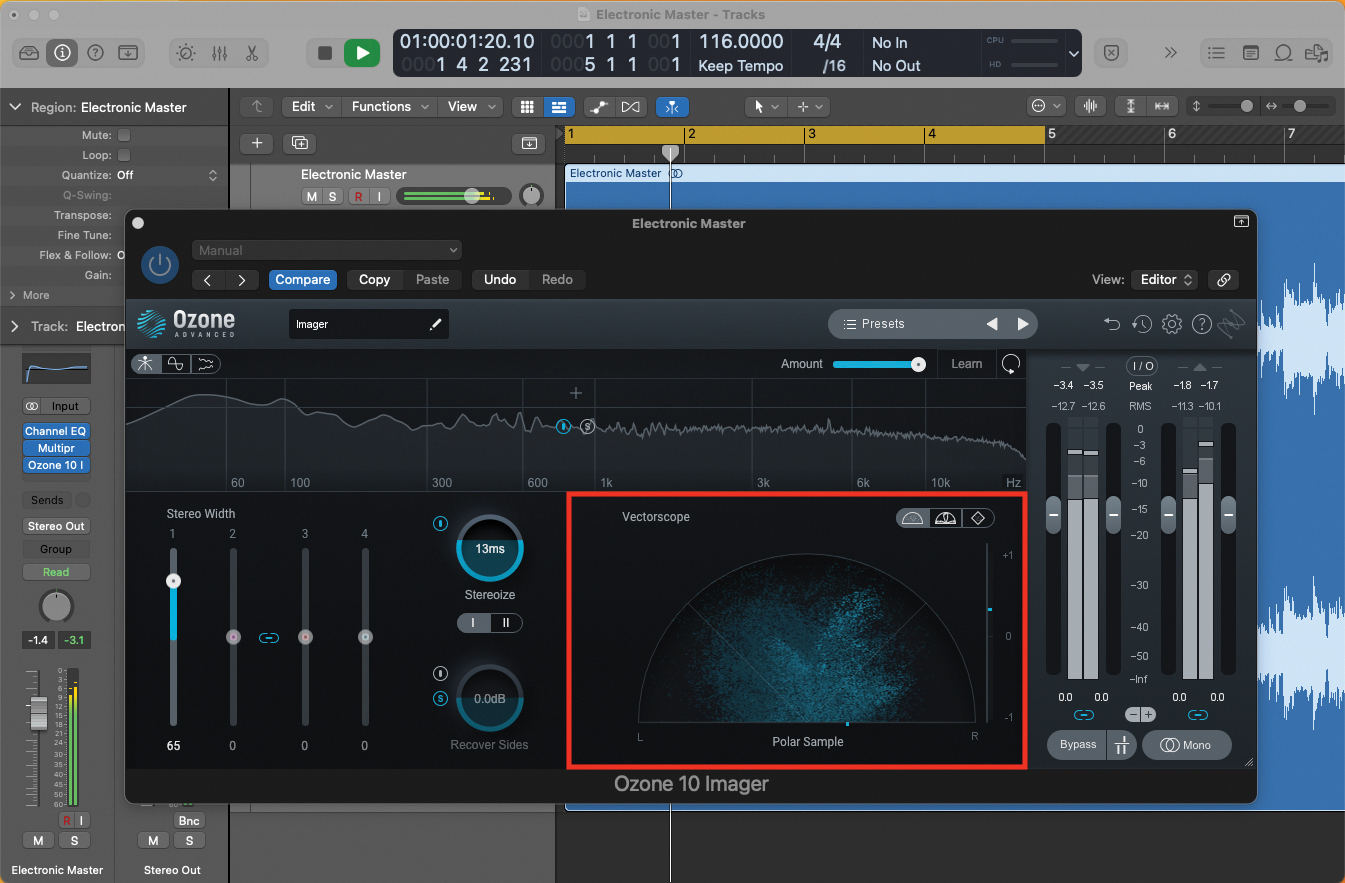
We can widen our stereo image considerably; our example offers a relatively narrow stereo soundstage, which we can enhance via a suitable imaging plugin. You can see the increase in width, displayed on the Imager’s display. Beware of widening too far, as the result may weaken the overall effect.
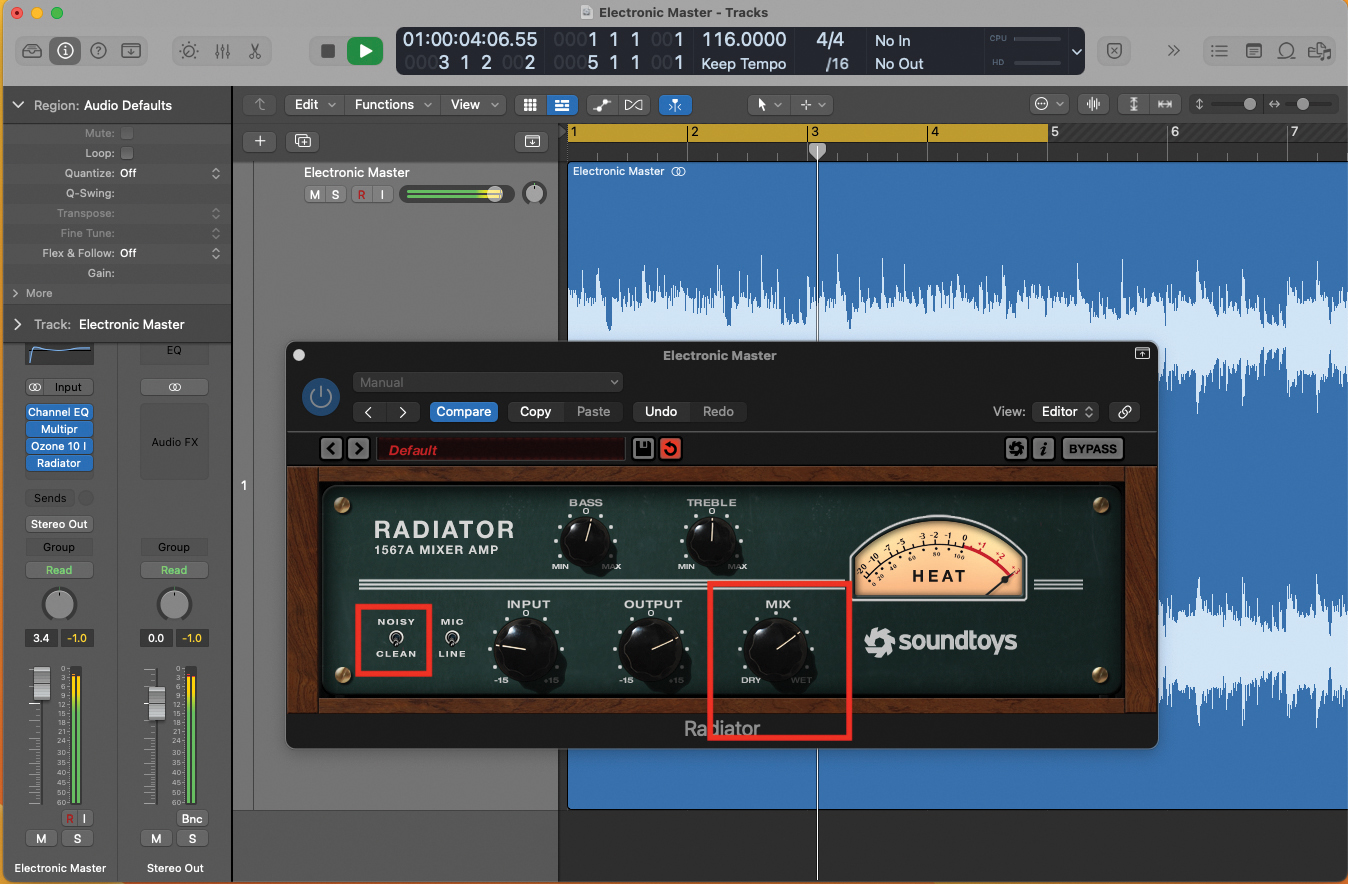
As a final element, we could consider adding a saturation effect. Being an electronic track, we want to keep the signal relatively clean and sharp, so listen as you apply, to prevent the application of too much grit to the signal. Our example here uses a basic amp simulator, which we can blend into the dry signal as desired.
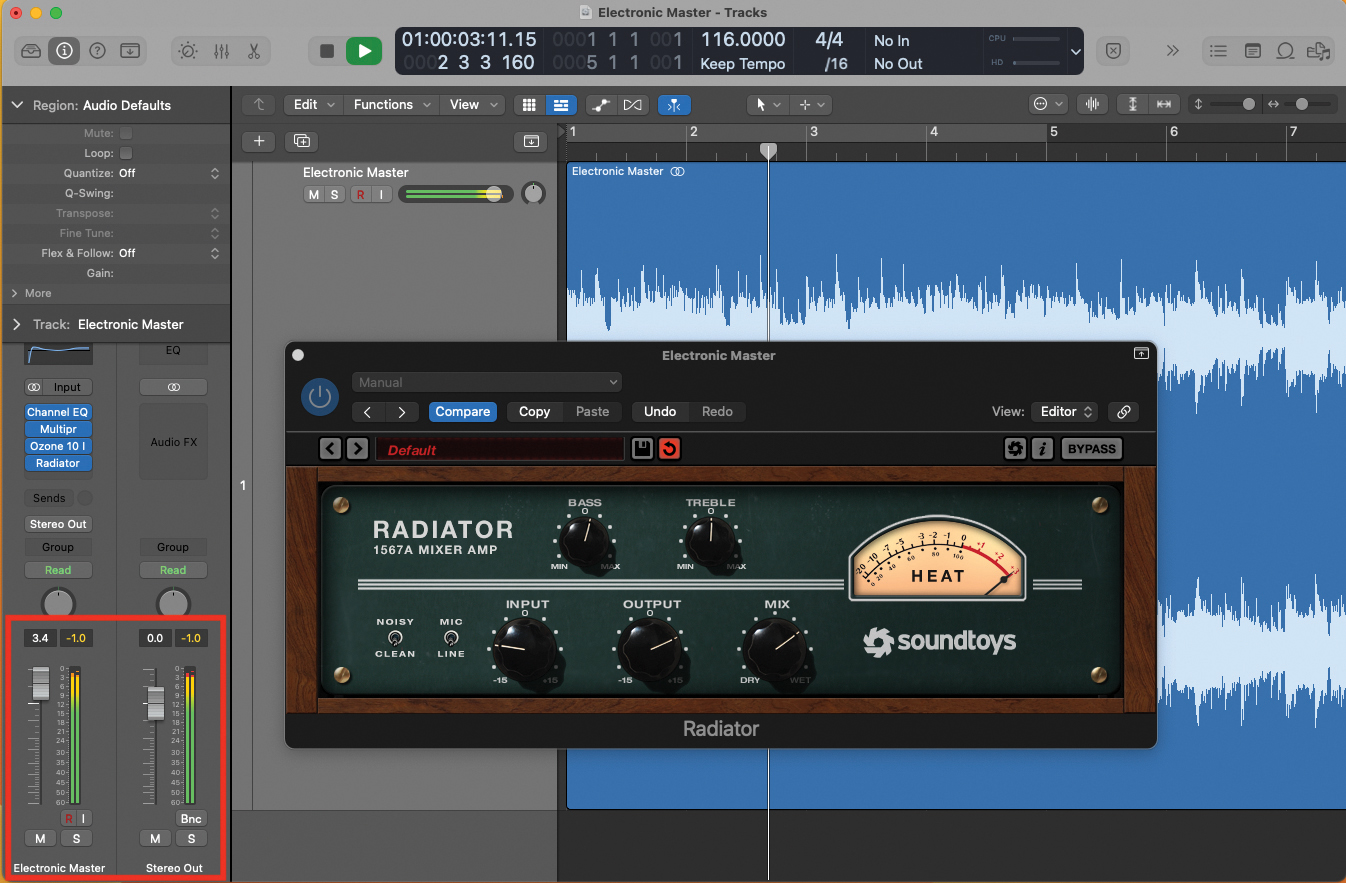
Now we’ve built a nice signal chain, A/B the results against your original unprocessed mix, to check you haven’t driven the mastering too far. Once happy, bounce the master out of your DAW. For streaming, deliver a final master 1dB below headroom. Allow time at the start/end of the track to avoid truncating your music.
Vintage and guitar-based mastering
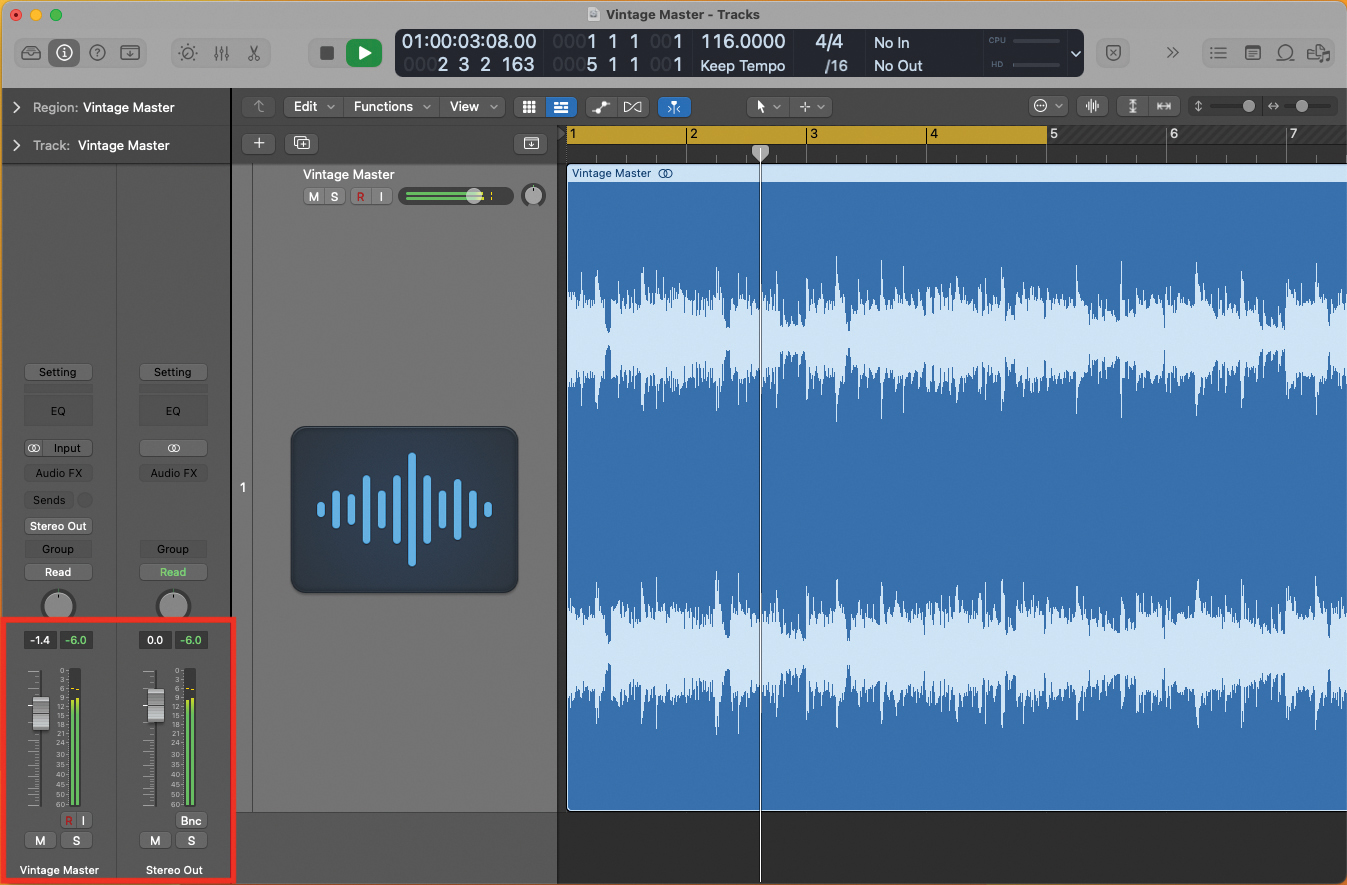
During the mixing process, prepare your track so that its peak does not exceed -6dB. This is pretty essential for ensuring that you can take maximum advantage of any applied compression, as part of the mastering process.
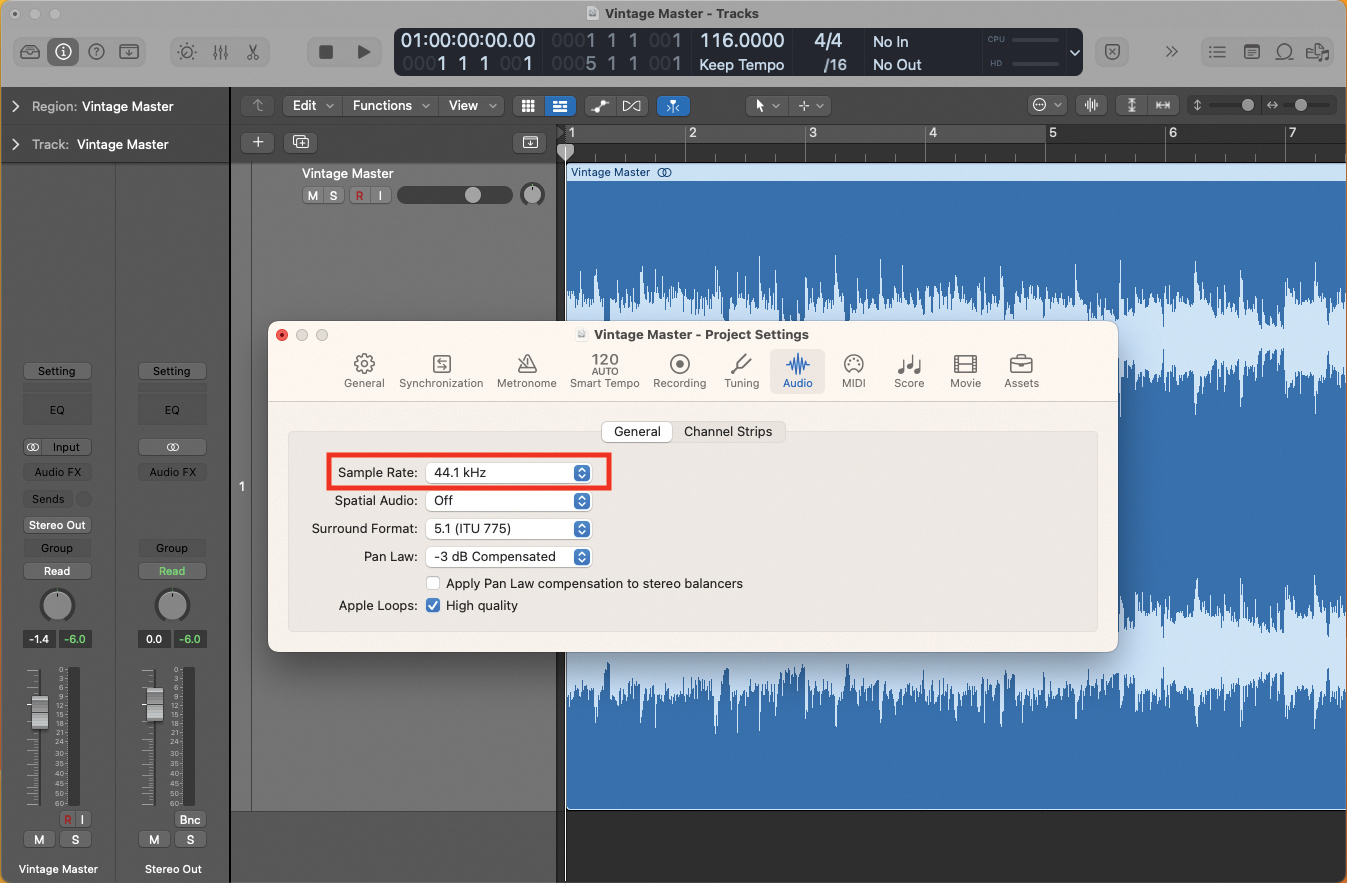
Import your final mix into your DAW. For computer/CD playback, ensure you have the correct sample and bit-rate settings. Set your DAW to play back at a sampling rate of 44.1kHz and a bit rate of 16-bit. You can also work at 24-bit, and your DAW can dither the bit-rate down to 16, if you want to send for CD pressing.
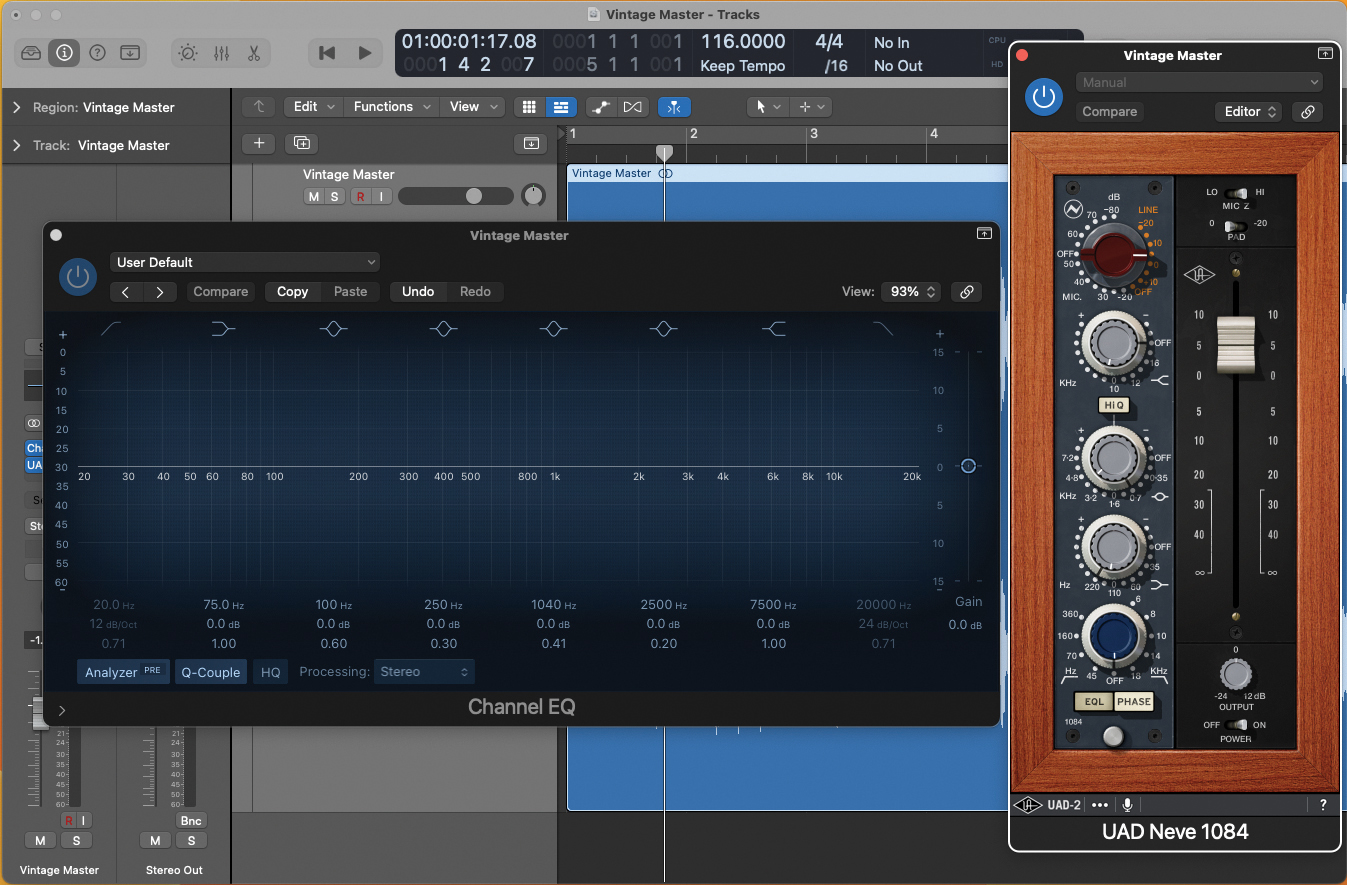
If you have one available, plug in a multiband EQ plugin (multiple single-band EQ plugins may drag out the process). You could also try a vintage-style EQ plugin, like a Neve or Pultec-modelled design. These software emulations will add colour to the sound, which is ideal for rock or guitar track mastering.
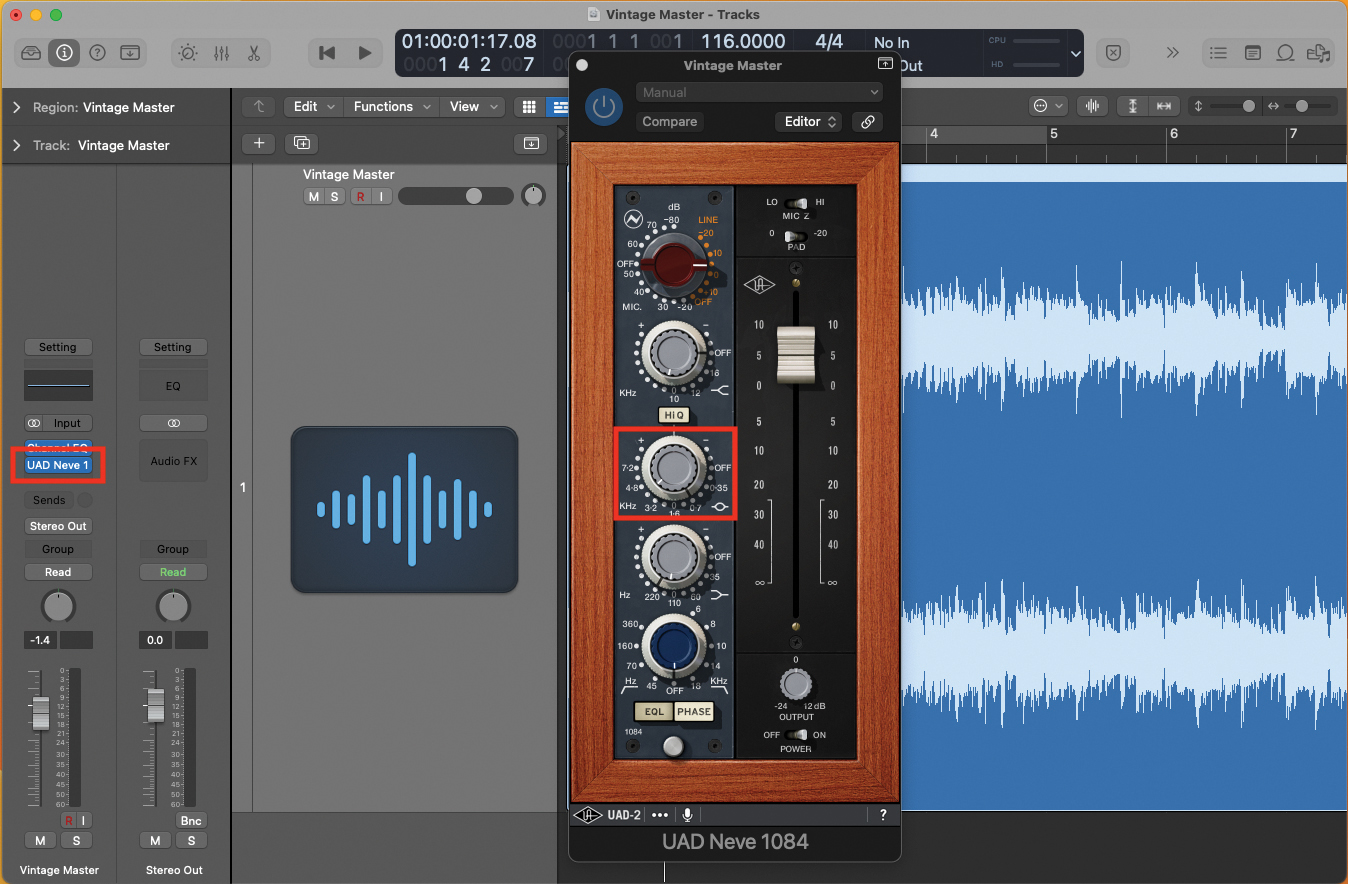
As our track contains guitars, we want to bring out some of the lush inner frequencies. We’ll use our vintage-style EQ for this effect, boosting the frequencies at around 700Hz. Listen and analyse, as the desired frequency point for boosting will rely on several factors, such as style of playing, register, and even key
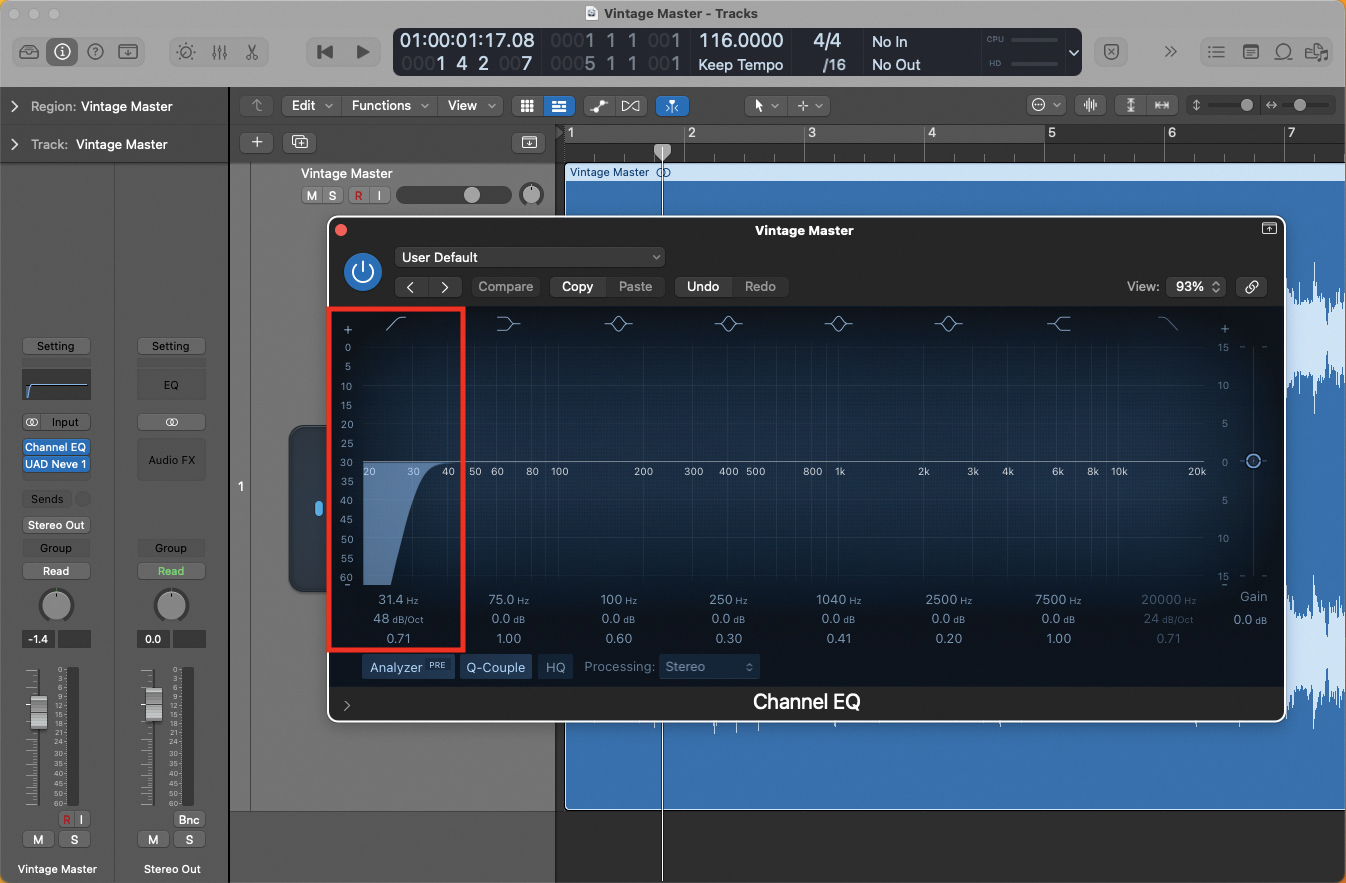
Returning to our more commonplace, multiband EQ plugin, filter the very bottom end of the master, to prevent any unwanted rumble, which we might not be able to hear with our domestic monitoring. Apply a low-end cut-off at around 30-35Hz.
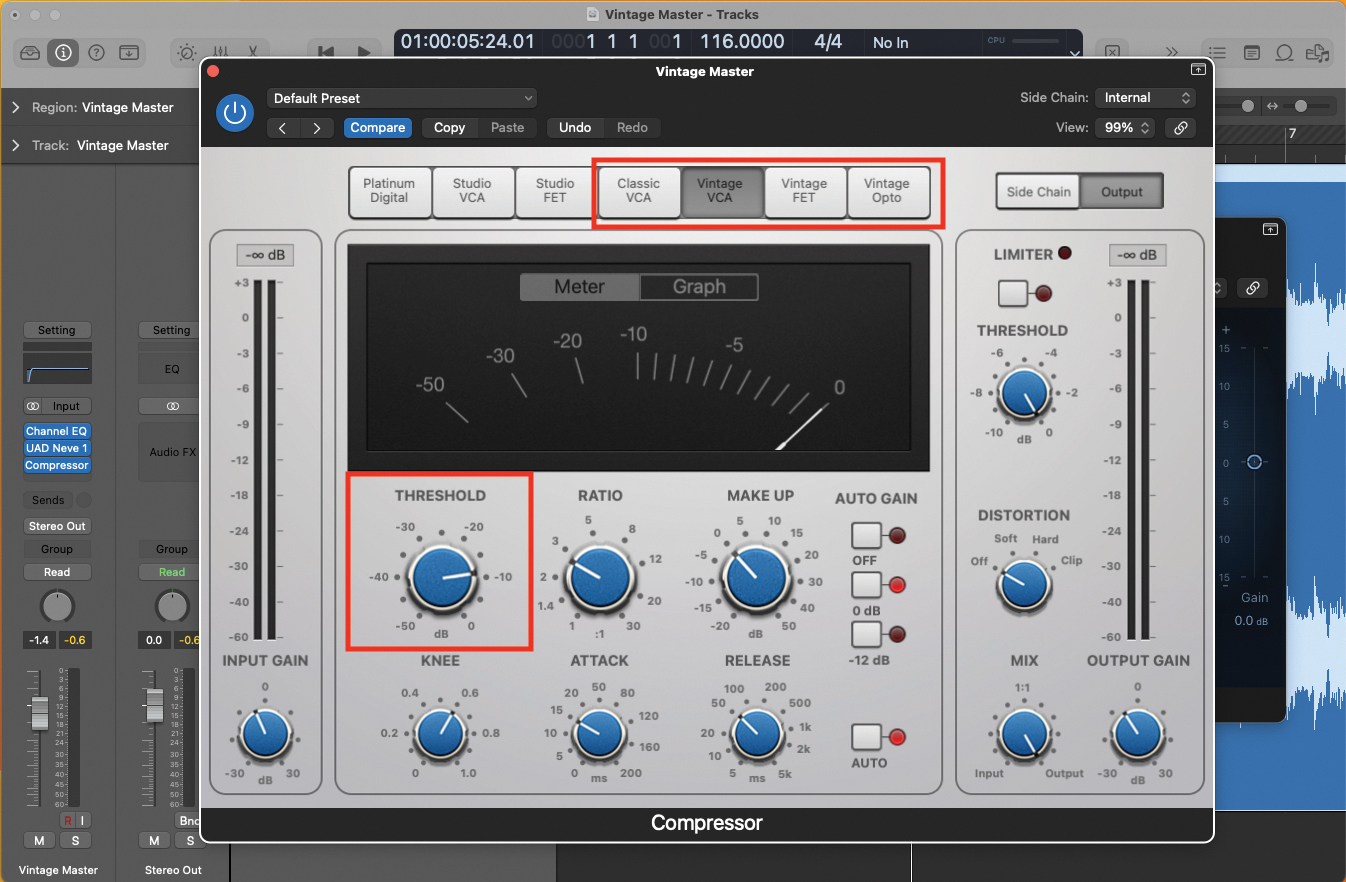
We’ll apply a single compressor channel, across the entire mix. Using a basic compressor from within your DAW, you may be able to take advantage of a classic or vintage-style of compressor sound. Begin by adjusting the threshold, while listening and observing the amount of compression being applied.
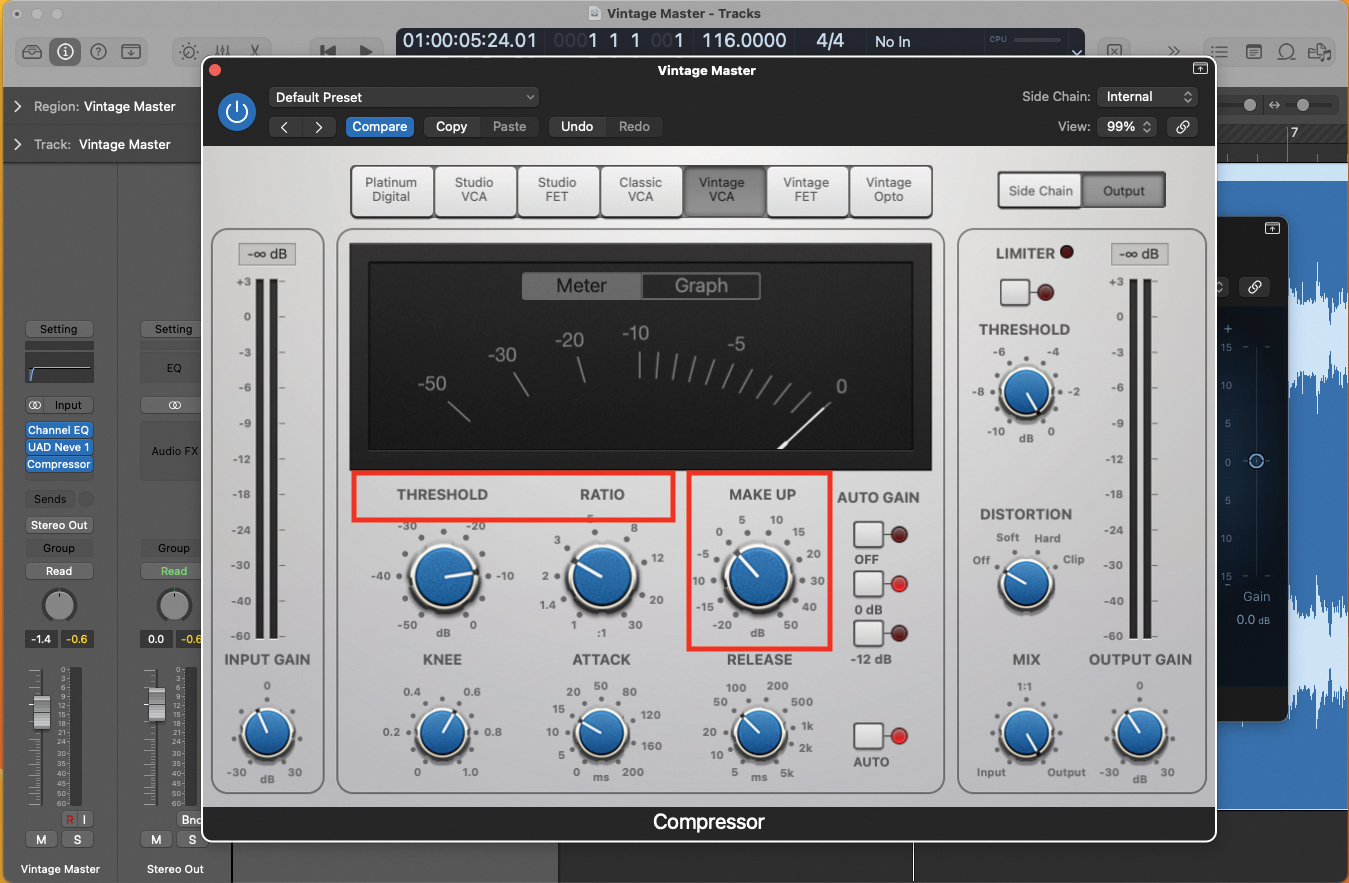
If your mix begins to ‘pump’ as the compression takes effect, back off the threshold and ratio amounts, and use the Make Up gain to add headroom to your outputted signal. Classic-style compressors can change frequency content, particularly in the low end. You may have to compensate with EQ.
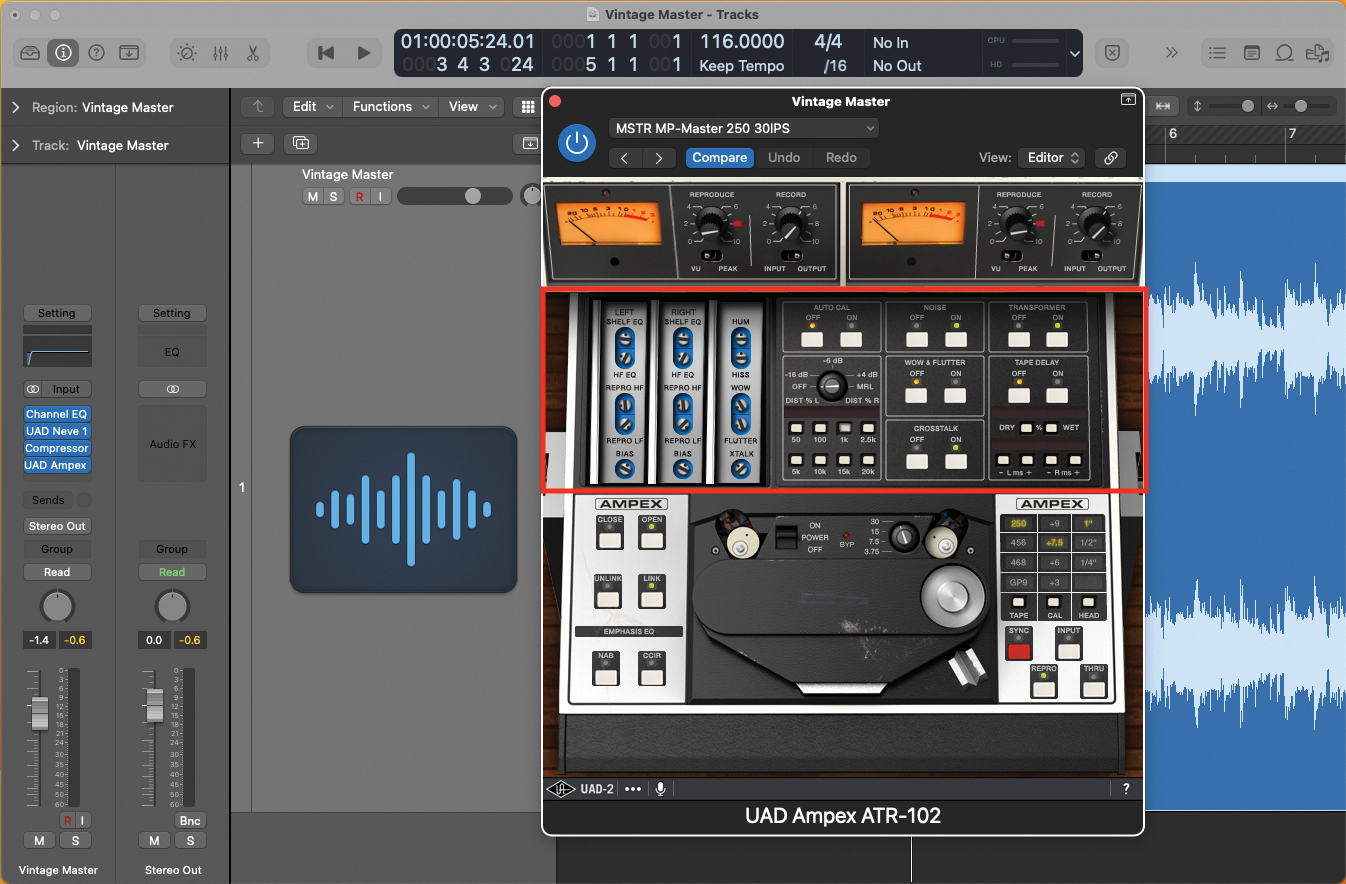
To fully embrace a vintage sound, with this style of mastering, using some form of saturation would be exceptionally beneficial. Try a tape saturation effect, such as the Universal Audio ATR-102 plugin. You can make many adjustments to degrade the signal, for that classic sound, while also adding machine noise!
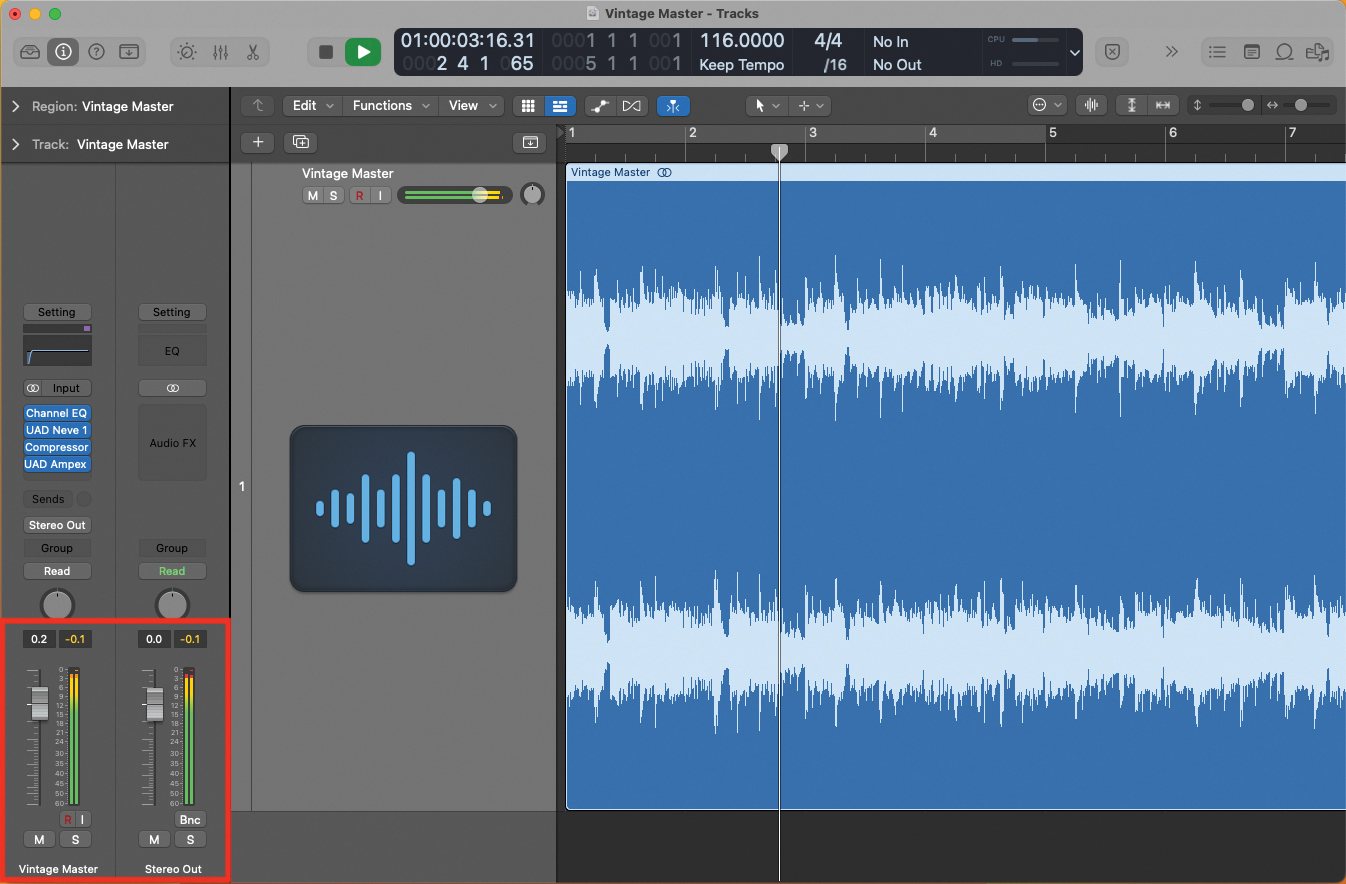
Finally, adjust your output headroom, so that you’re peaking at -0.1dB below maximum output. This is particularly important if sending your master for CD duplication, but also provides efficiency if just played back as a file on your computer. Maintain sample rate and bit-rate settings, when exporting the audio.