How to use Linux in the studio and why it could change the way you make music
Wound up with Windows? Not too ’appy with Apple? An alternative exists, and it promises to be a potential paradise for all things music production. Let’s investigate…
Want all the hottest music and gear news, reviews, deals, features and more, direct to your inbox? Sign up here.
You are now subscribed
Your newsletter sign-up was successful
Picture the scene: You’re in your studio, the creative juices flowing liberally and freely, working on what is sure to be the most important moment in the history of music since John turned to Paul and said “D’you fancy forming a band, mate?”.
You’re in the zone. Every note a symphony, every EQ adjustment, compressor tweak and fader move a perfectly judged masterstroke. And then it happens:
“Windows will now restart to install updates.”
The situation is little better with macOS. It may not be quite so insistent on installing updates whenever it feels like it, but Apple’s treadmill of incessant OS version updates can often leave mission-critical hardware, software and workflows broken and non-functional. Particularly if you’re a user of the older end of the software world.
With every update, the walls of Apple’s and Microsoft’s ‘walled gardens’ grow higher. Sure, Microsoft’s ankle-high bordering comes in stark contrast to the towering edifices surrounding Apple’s plot, but it, seemingly, also envies and admires those walls, and is slowly raising its own by way of response.
Does Linux yet have the hardware and software support that would make it a good fit in the studio? The short answer is “yes”…
Windows and macOS run many background tasks that may be entirely irrelevant to how you use your computer, or be tasks you actively do not want running – snooping and analytics, for example. This stuff gobbles up the raw computing power you paid for when buying the machine, yet even if you disable unwanted features, they’ll invariably be re-enabled by the next OS update.
In short, your right to choose your computer’s software, hardware, features, workflows and update cycles has been lost. But what to do?
Want all the hottest music and gear news, reviews, deals, features and more, direct to your inbox? Sign up here.
The only potential alternative is Linux. As a general purpose OS for web, email, document writing and such, there’s nowadays little to choose between Linux and the ‘Big Two’. But what about music production? Does Linux yet have the hardware and software support that would make it a good fit in the studio? The short answer is “yes”…
What is Linux?
The first thing to understand about Linux is that there is no single Linux operating system but rather a Linux kernel that’s used as the core of many different operating systems. (A kernel is the core code of an OS that’s loaded into memory and run when the system boots.)
The Linux kernel is free and open-source software, aka “FOSS”. This means that anybody can use the kernel without paying a fee, and that anybody can view the source code, search it for bugs and vulnerabilities, make their own modifications, and submit code changes to be considered for inclusion in the official kernel.
Unless you are a developer, though, the Linux kernel on its own is not very useful. To become useful it needs to be wrapped up with system software, tools and applications – in other words it needs to be built into a full operating system.
Distros, desktops and repos
An OS built on the Linux kernel is known as a Linux ‘distro’, short for distribution. There are many distros kicking about, and whilst some include proprietary code and so aren’t FOSS, many are developed by communities of developers and remain free to use and fully open source.
Therefore, as with the kernel, you can view and modify the source code, make contributions, or even ‘fork’ the code to adapt into your own operating system. Indeed, many distros are themselves based on another distro, which itself is likely based on yet another distro.
Linux is very flexible when it comes to GUIs, or desktop environments. There’s a wide choice available, from those that are very light on the hardware through to examples that lean heavily on it. You can even use Linux with just a command line and no GUI at all.
The desktop environment goes deeper than just the visuals, impacting many aspects of how system and user interact
The desktop environment goes deeper than just the visuals, impacting many aspects of how system and user interact. Choice of desktop is largely down to personal taste and the capabilities of your hardware, then, but be aware that some apps rely on particular desktop environments, and whilst this can usually be worked around, such fixes can still result in visual bugs.
Linux distros typically handle software via a package manager; monolithic installers as used by Windows and macOS aren’t the norm. The package manager stores a list of online software repositories, or ‘repos’ for short, and accesses these to download software and find updates. The system is intelligent, identifying additional software components – or ‘dependencies’ – needed by the software and installing/updating these automatically.
Breaking through
Linux experts and enthusiasts often hail the imminent arrival of “the year of Linux on the desktop”. This reflects a belief – or hope – that Linux is on the verge of a tipping point into wide-ranging adoption across the desktops of the world.
This belief has so far proved to be wrong, and for one key reason: users are unlikely to want to adopt an OS unless the software they wish to use is available for that OS, but developers will not develop software for an OS unless there are sufficient users of that OS to make it financially worthwhile.
Linux-compatible alternatives to widely used creativity apps are getting better all of the time
This vicious circle keeps both consumers and developers locked into the effective duopoly of Windows and macOS, and is the fundamental reason why there is no Linux-compatible version of, for example, Cubase… or not yet anyway, because the picture is changing.
Linux-compatible alternatives to widely used creativity apps are getting better all of the time, and many are now ported to the Big Two, breaking down OS-specific lock-in by winning over new users. More importantly, an increasing number of Linux-compatible versions of premium apps are being released too, bringing the fabled year of Linux that bit closer.
Inherently virtuous
One nice thing about Linux is that it can run from a USB memory stick, making it really easy to try out, but when you’re ready for a more permanent installation you have a few options.
You can, of course, buy a completely new computer, sans pre-installed Windows. However, the inherent efficiency of Linux can breathe new life into old hardware, so that old laptop lurking at the back of the cupboard could be ideal.
One nice thing about Linux is that it can run from a USB memory stick, making it really easy to try out
It’s also possible to create a dual boot system on either a Windows PC or an Intel Mac (aged PowerPC Macs struggle with modern apps and desktop environments, while Apple Silicon Macs can’t boot to anything other than macOS… those garden walls again!). Take great care if going down this route, being sure to have full backups.
A further option would be to run a Linux distro in a virtual machine, using something like DOSBox or VMWare. This can work just fine but a VM’d Linux may not play nicely with your audio hardware – there’s nothing lost by trying it out though!
Choosing a distro
A solid basis for any Linux system is Debian thanks to it being long-established and well-supported. Debian isn’t exactly a general purpose OS, but it can be configured as such.
You could do this yourself, but it is less kerfuffle to just install a general purpose distro that’s based on Debian; a good choice here would be Ubuntu or an OS based on it, such as the very efficient Mint. Add software from a repo such as KXStudio, which contains a stack of DAWs, plugins, instruments and other music tools, and you’re all set.
But this is the world of Linux, so there are distros out there that bring these elements together for you. One such is Ubuntu Studio, an official member of the Ubuntu family designed especially for all areas of creative work. It’s our preferred music-making Linux distro and the one we’re using throughout this feature.
Testing and installing Ubuntu Studio
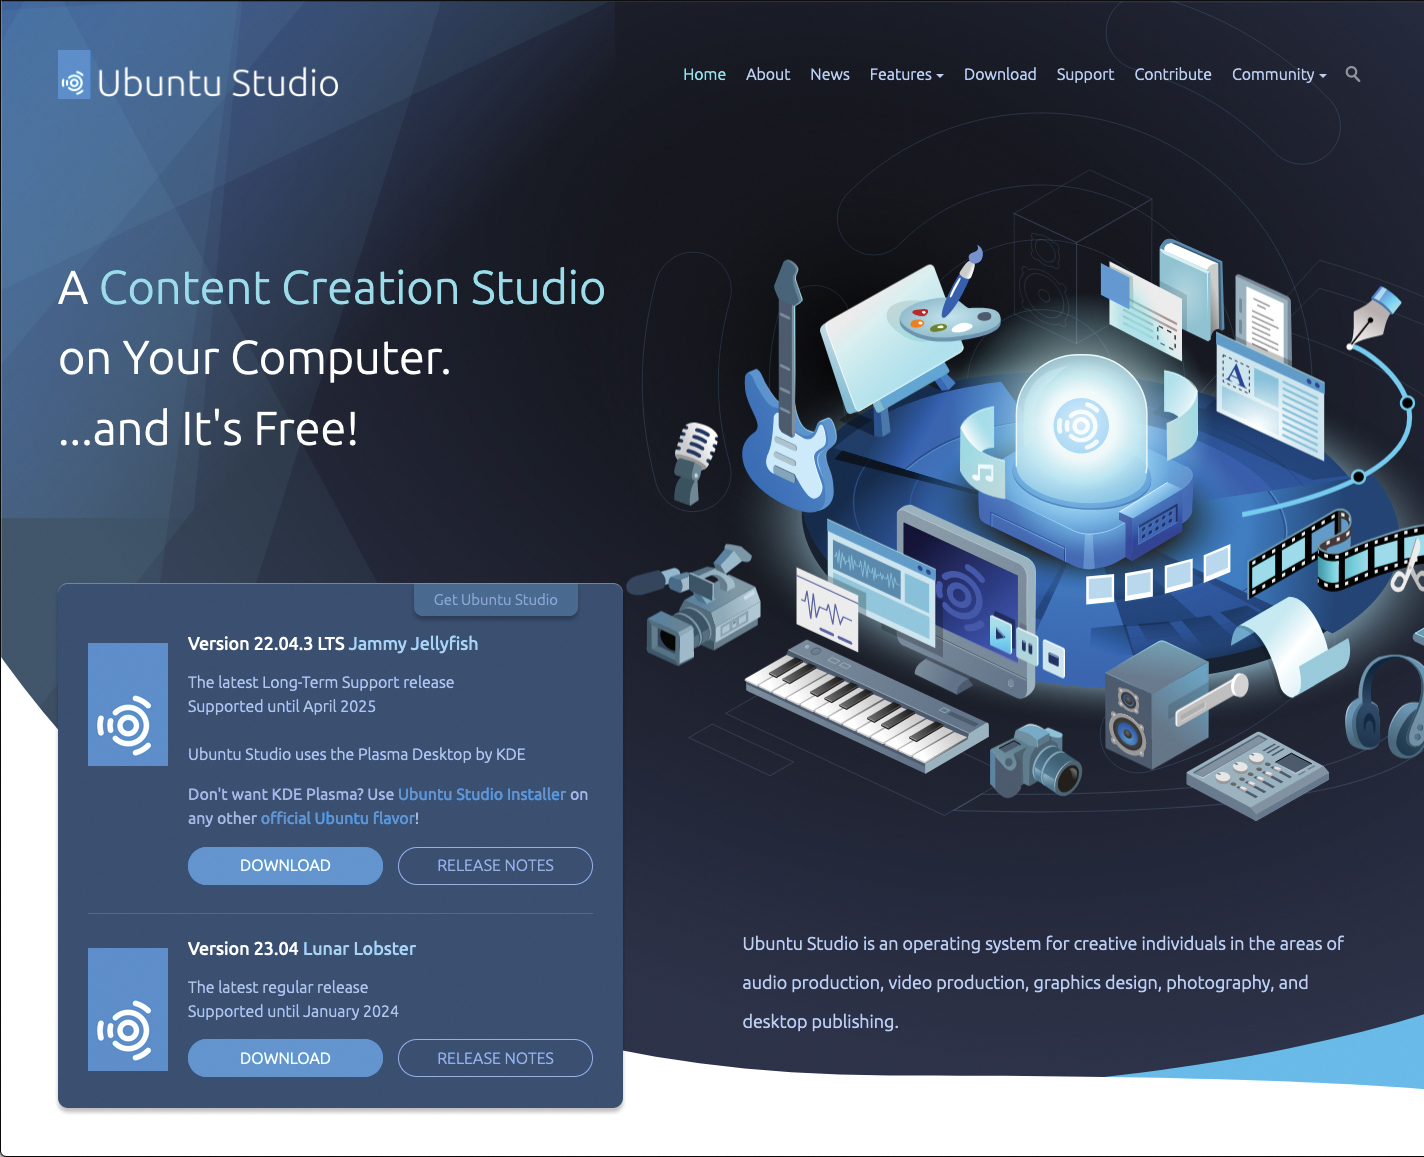
Head to Ubuntu Studio's website and download the most recent version marked ‘LTS’ (ie Long Term Support, meaning updates will be available for a decent period). This distro has modest minimum system requirements, but if your hardware is very old you can use the page to hunt older versions of the OS, or ones that use a more lightweight desktop.
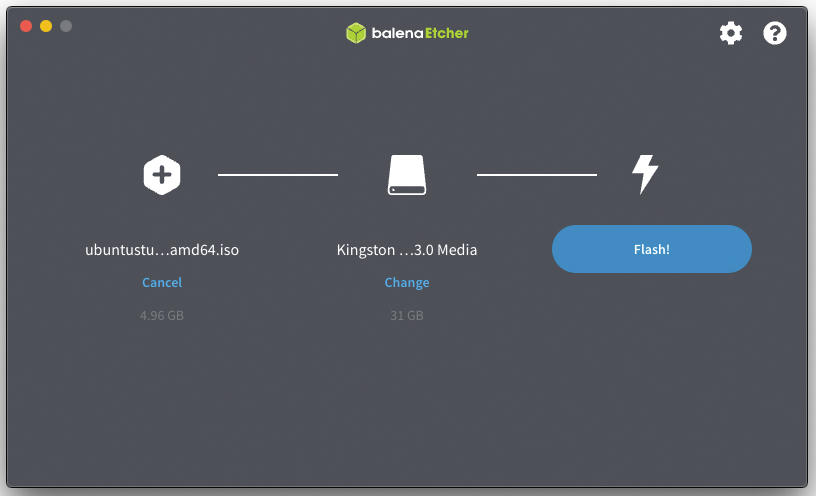
The ISO file you have downloaded has to be cloned to a USB memory stick (min. 12GB) in order to use it. A good cross-platform tool for doing this is balenaEtcher [etcher.balena.io]. Within balenaEtcher, click ‘Flash from file’ and then select the ISO file when prompted. Attach your USB stick, use ‘Select Target’ to select it, then click ‘Flash!’.
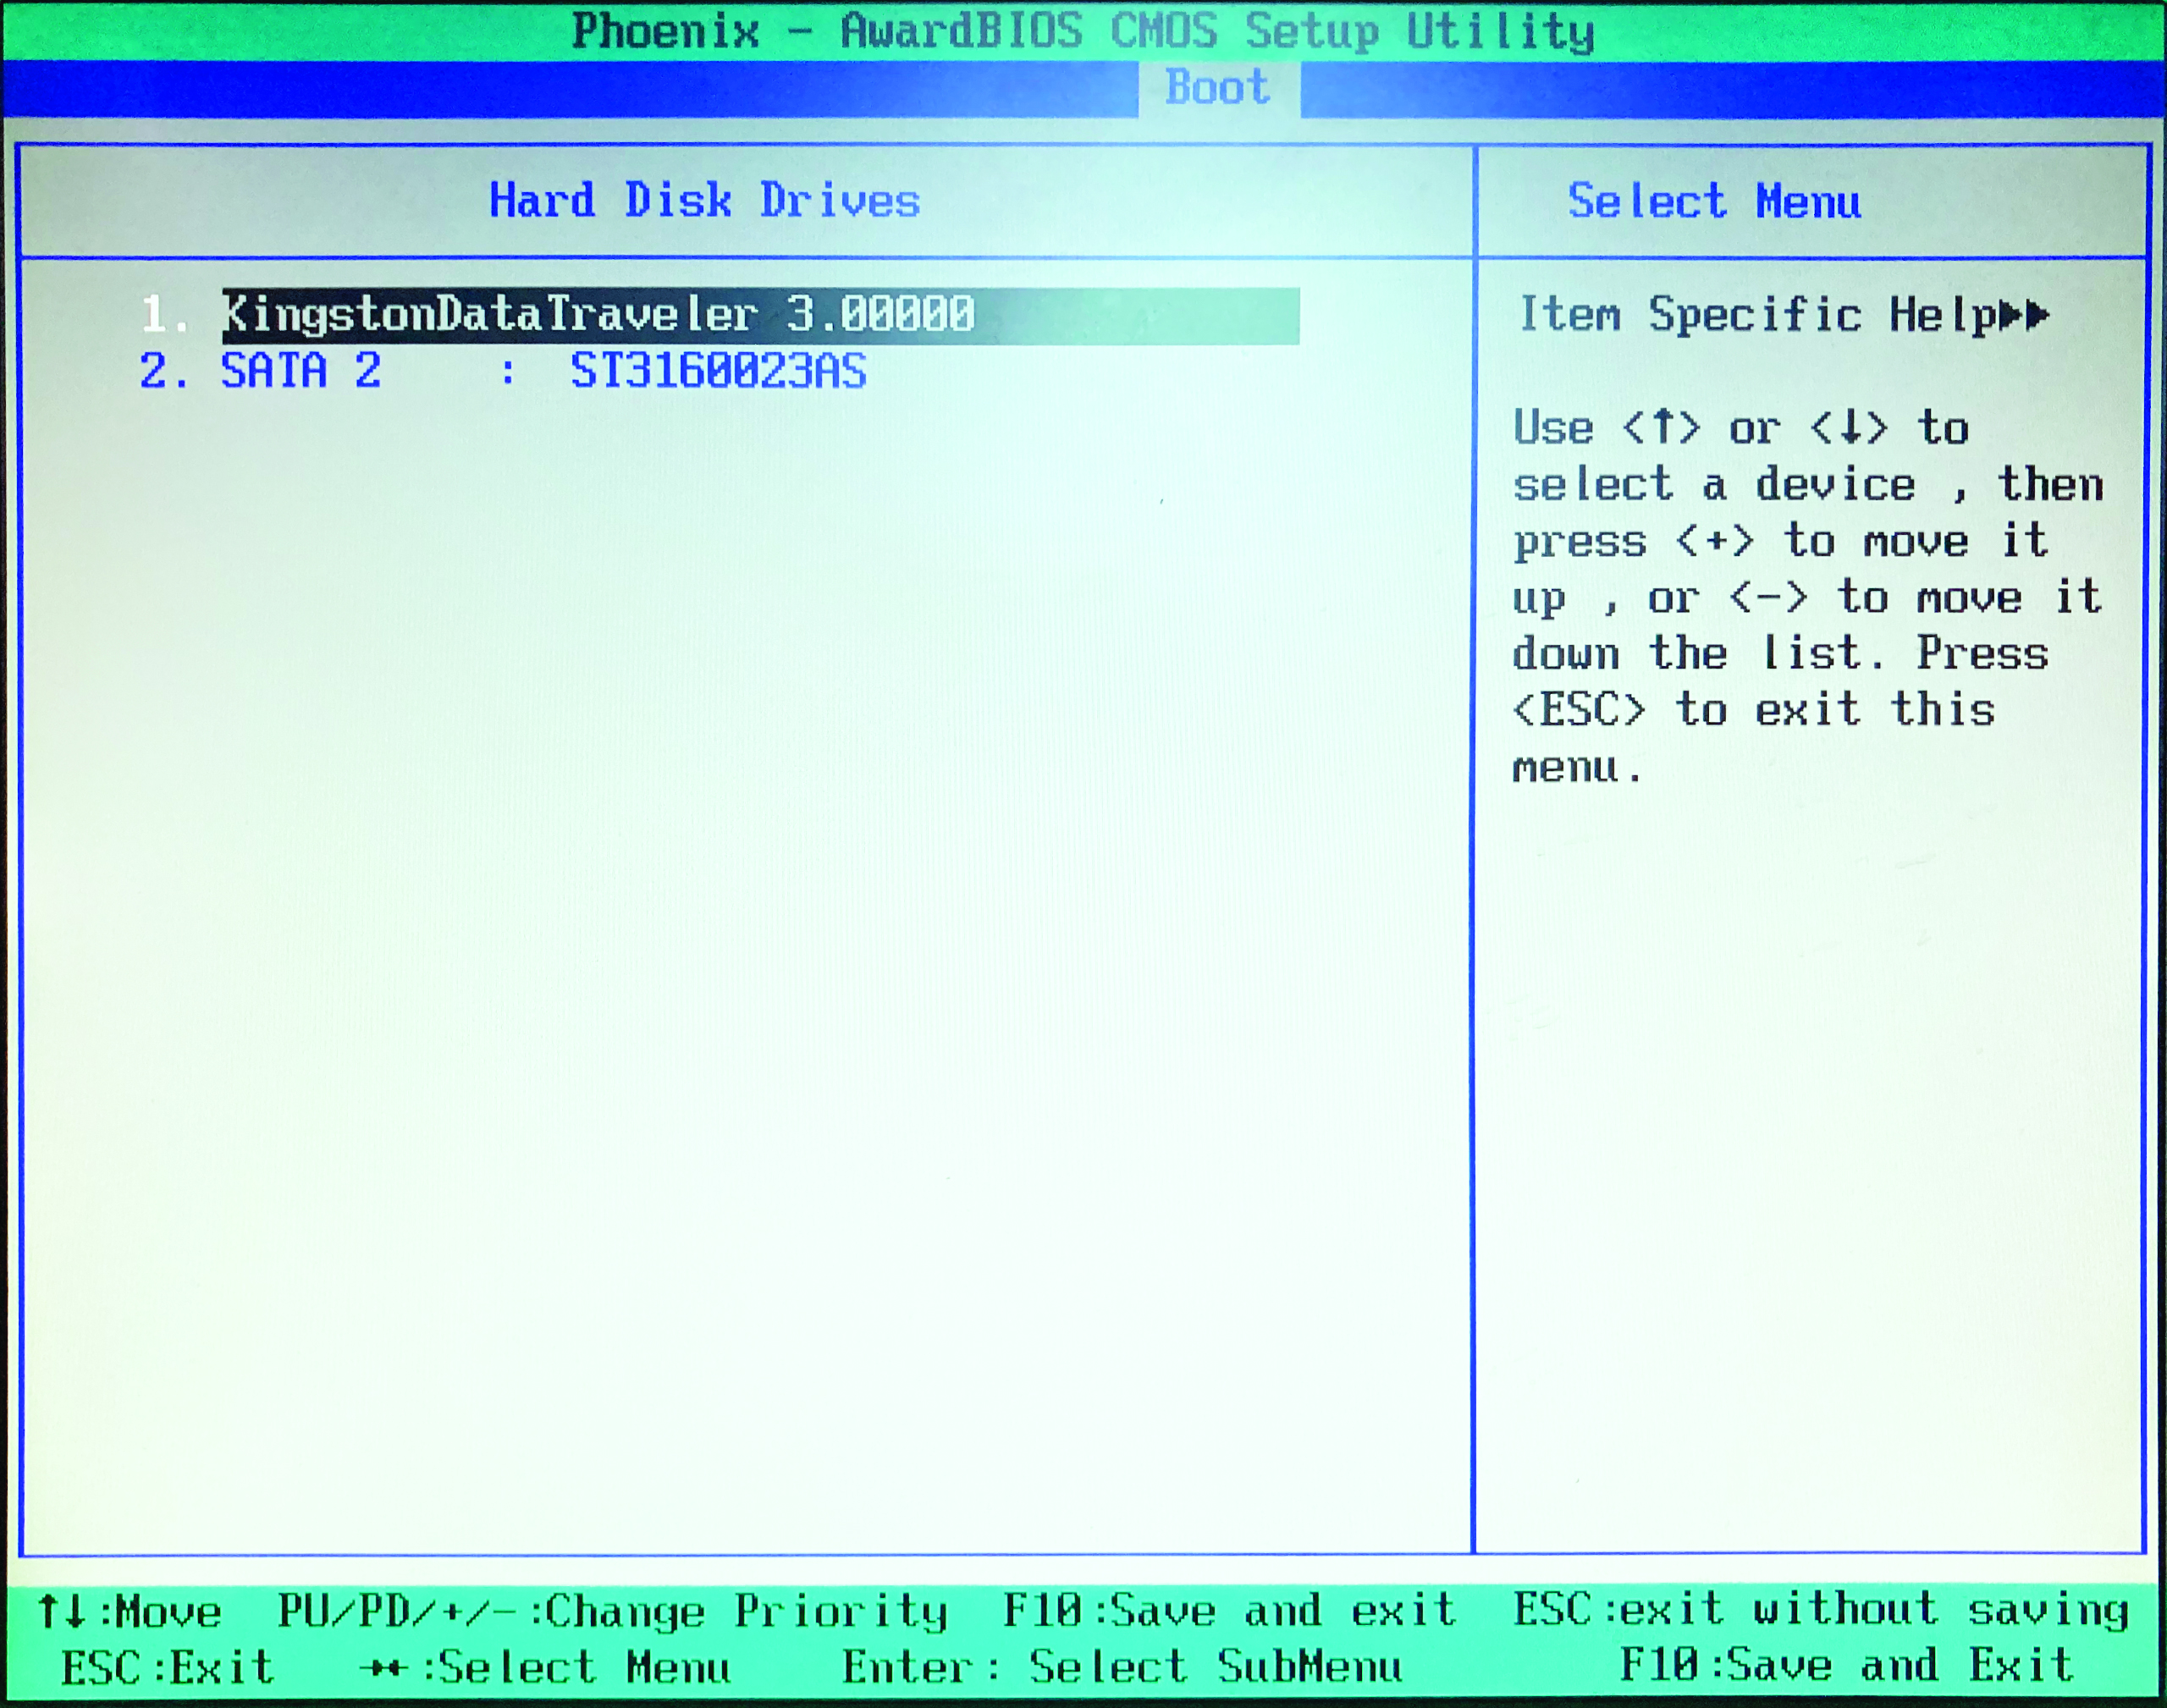
Connect the USB stick to the computer on which you plan to install Ubuntu Studio. On Mac hardware, hold the Option key whilst powering up the computer then select the USB stick as the startup disk when prompted. On PC you will need to boot into the computer’s BIOS or UEFI screen, set the USB stick as the first boot device and then restart.
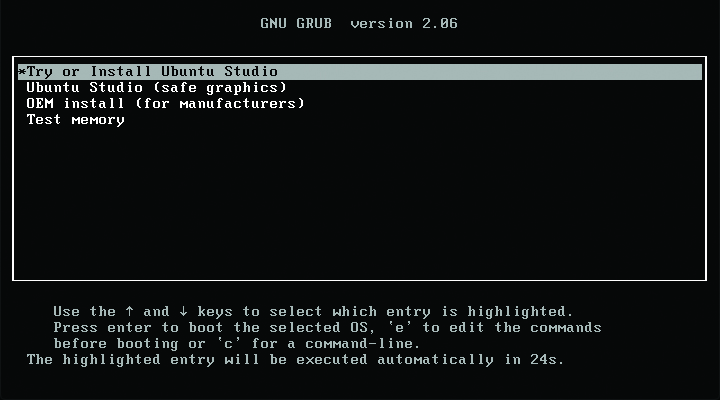
The first screen you’ll see is the GRUB bootloader screen, a bootloader being a tool that launches an OS. Select ‘Try or Install Ubuntu Studio’ and hit enter. Once the OS starts, you can have a look around and launch a few apps. As you can see, things work intuitively, and the OS includes all sorts of creative software.
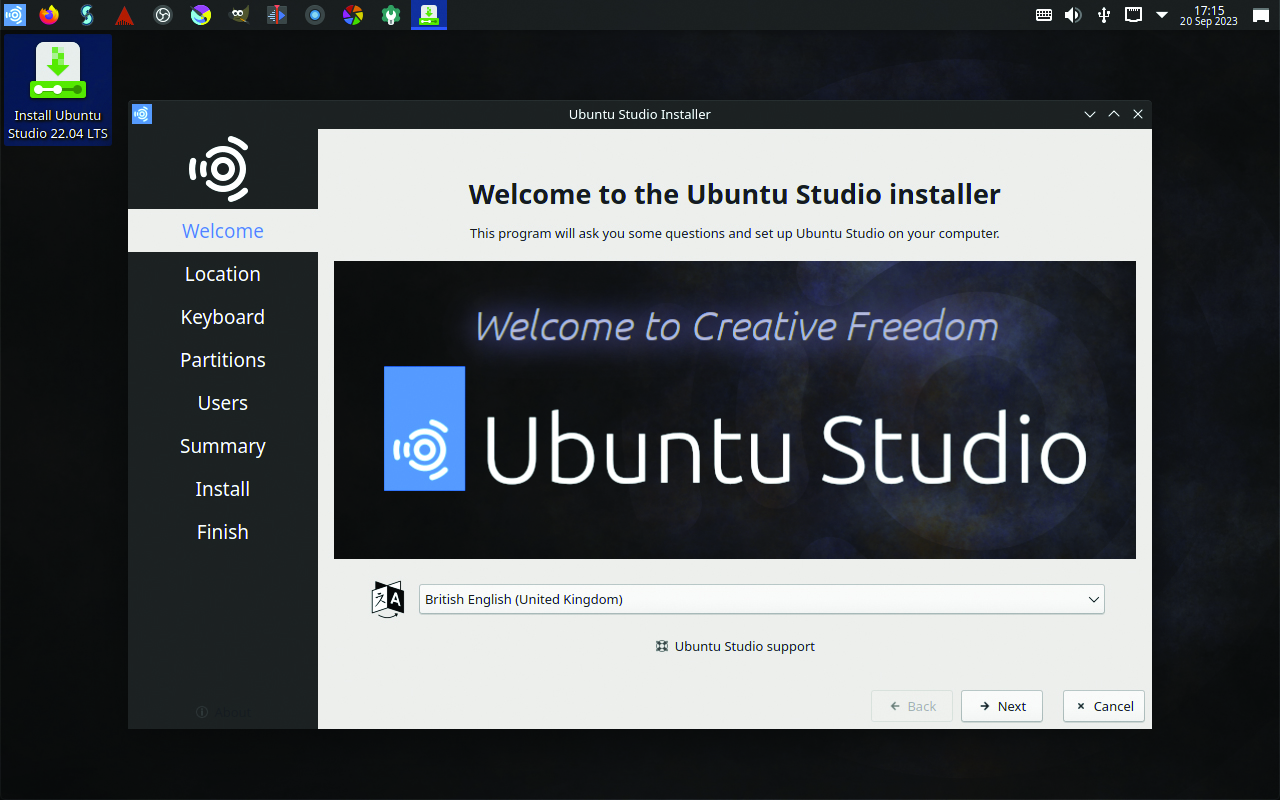
When ready for the installation, launch the ‘Install Ubuntu Studio’ shortcut located on the desktop. Begin working through the installer’s screens, setting language, location and keyboard options. At the Partitions page, choose the disk where you want to install Ubuntu Studio via the menu at the top of the page.
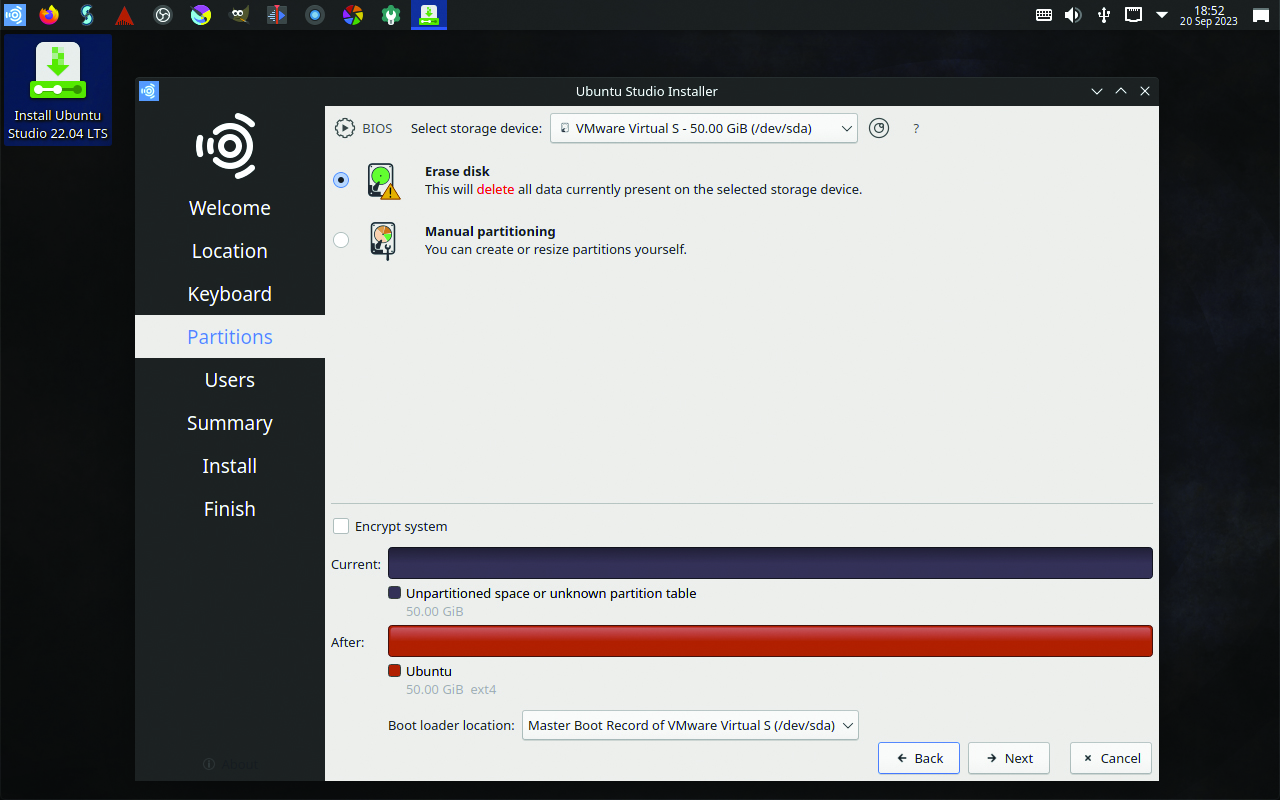
If you’re installing to bare hardware, or are happy to irrevocably delete any existing OS and/or data, select ‘Erase disk’ and ‘Next’. To set up a dual boot with another OS, manually configure partitions, or do anything other than fully overwrite the disk, refer to the Ubuntu support wiki: help.ubuntu.com/community/DualBoot
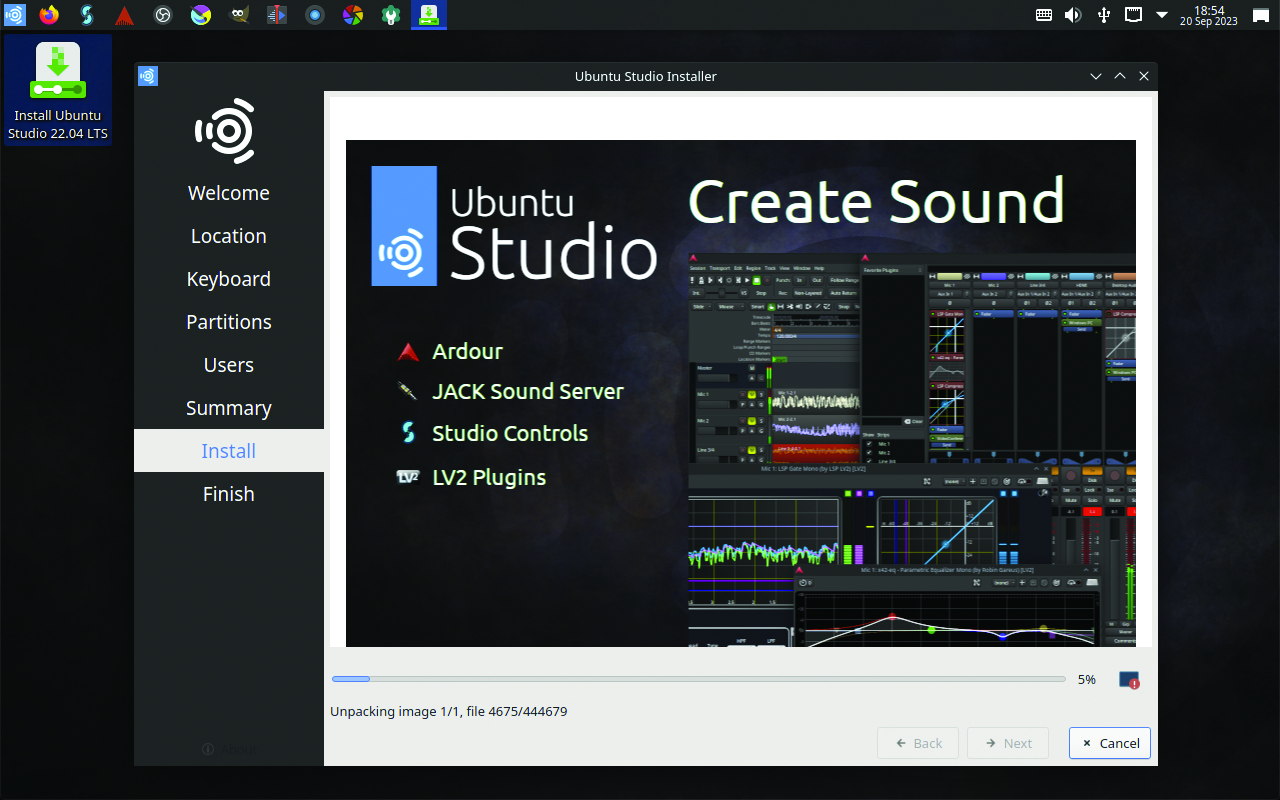
The remaining screens are where you set up your user details and confirm settings. Once satisfied, click ‘Install’ then the installer will show some useful info while it runs. Restart the machine once done, being sure to remove the USB stick when prompted. All being well, you should soon be presented with a login screen.
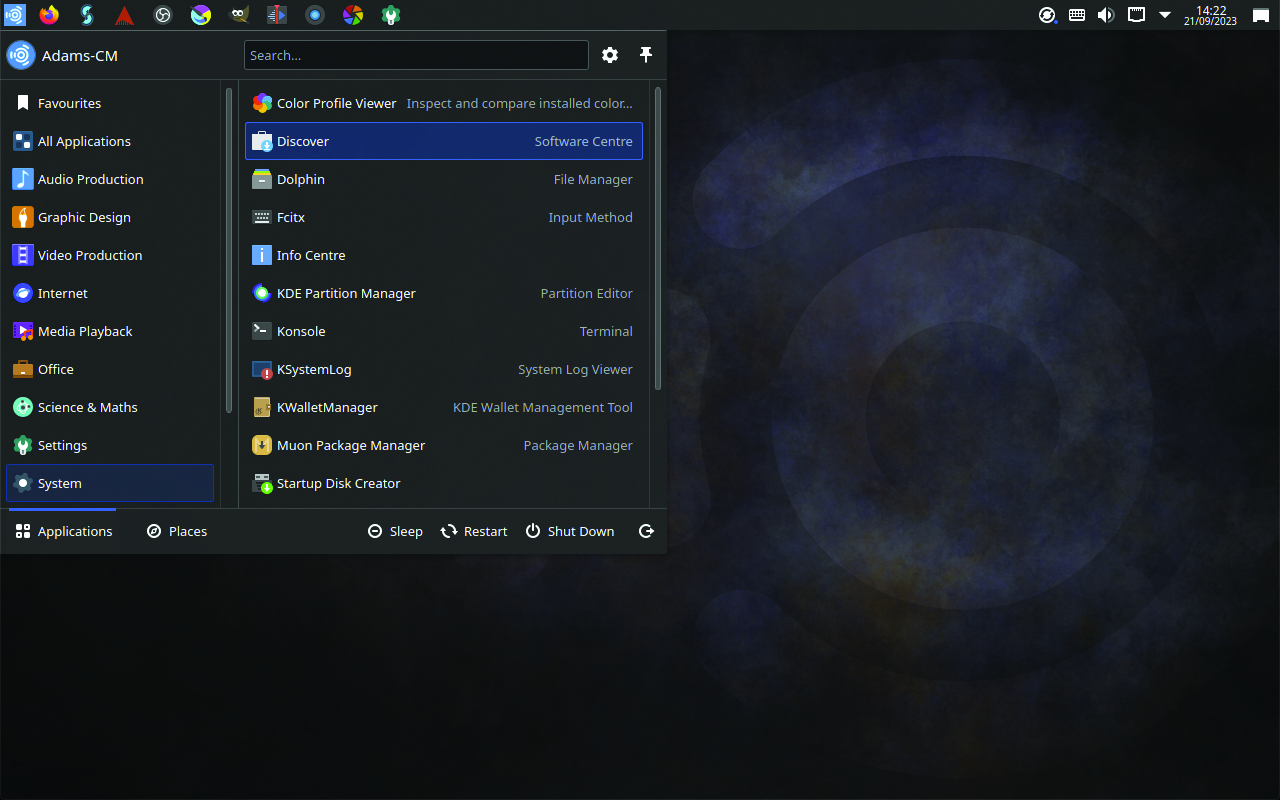
The first task after logging in is to update everything to the latest versions. Open the Application Launcher, mouse-over the ‘System’ group then click ‘Discover’. Select the ‘Update’ option in Discover’s sidebar then click ‘Refresh’. Once the list is fully populated, ensure all options are ticked then click ‘Update All’.
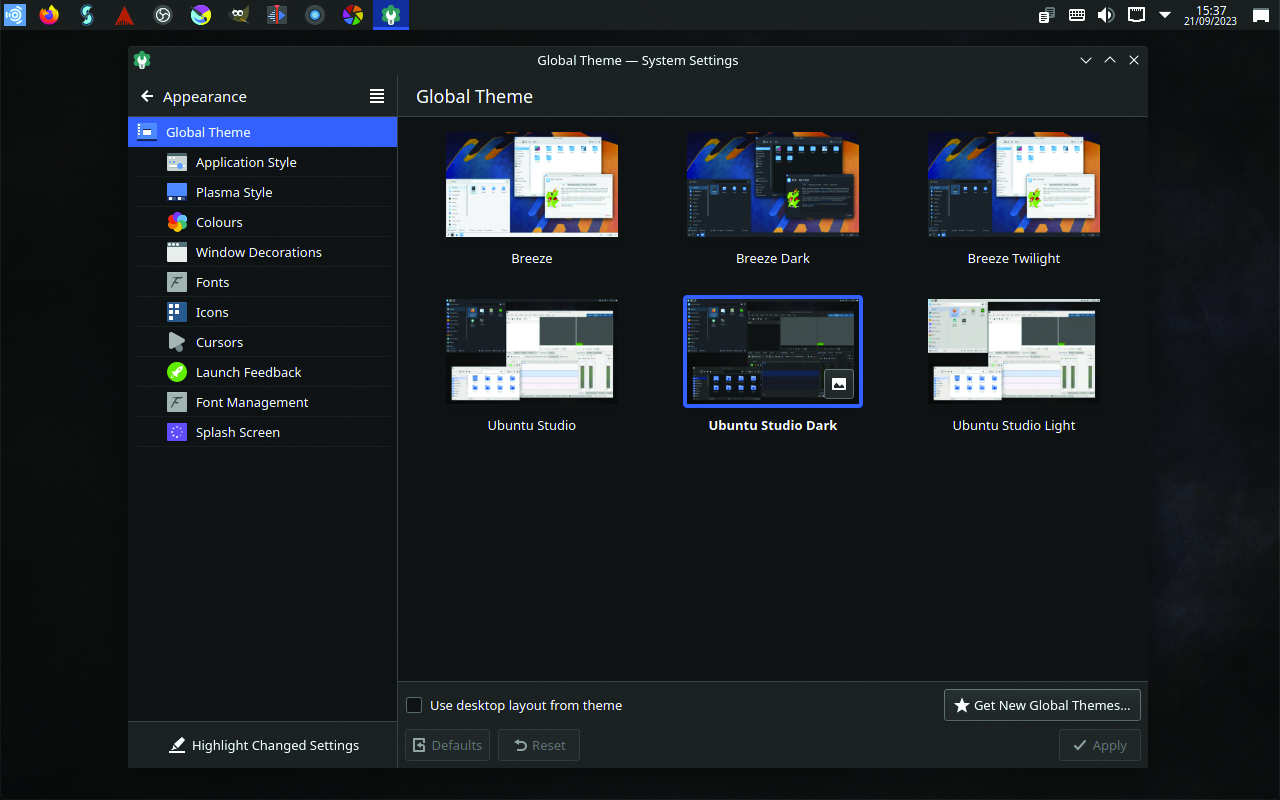
Restart after the update, then reopen Discover and check updates have been applied; repeat the update process if not. Once all updates are installed, and no more are showing in Discover, familiarise yourself with your new OS: the Application Launcher, Discover, the System Settings app, and the Dolphin file browser.
Linux audio systems
ALSA
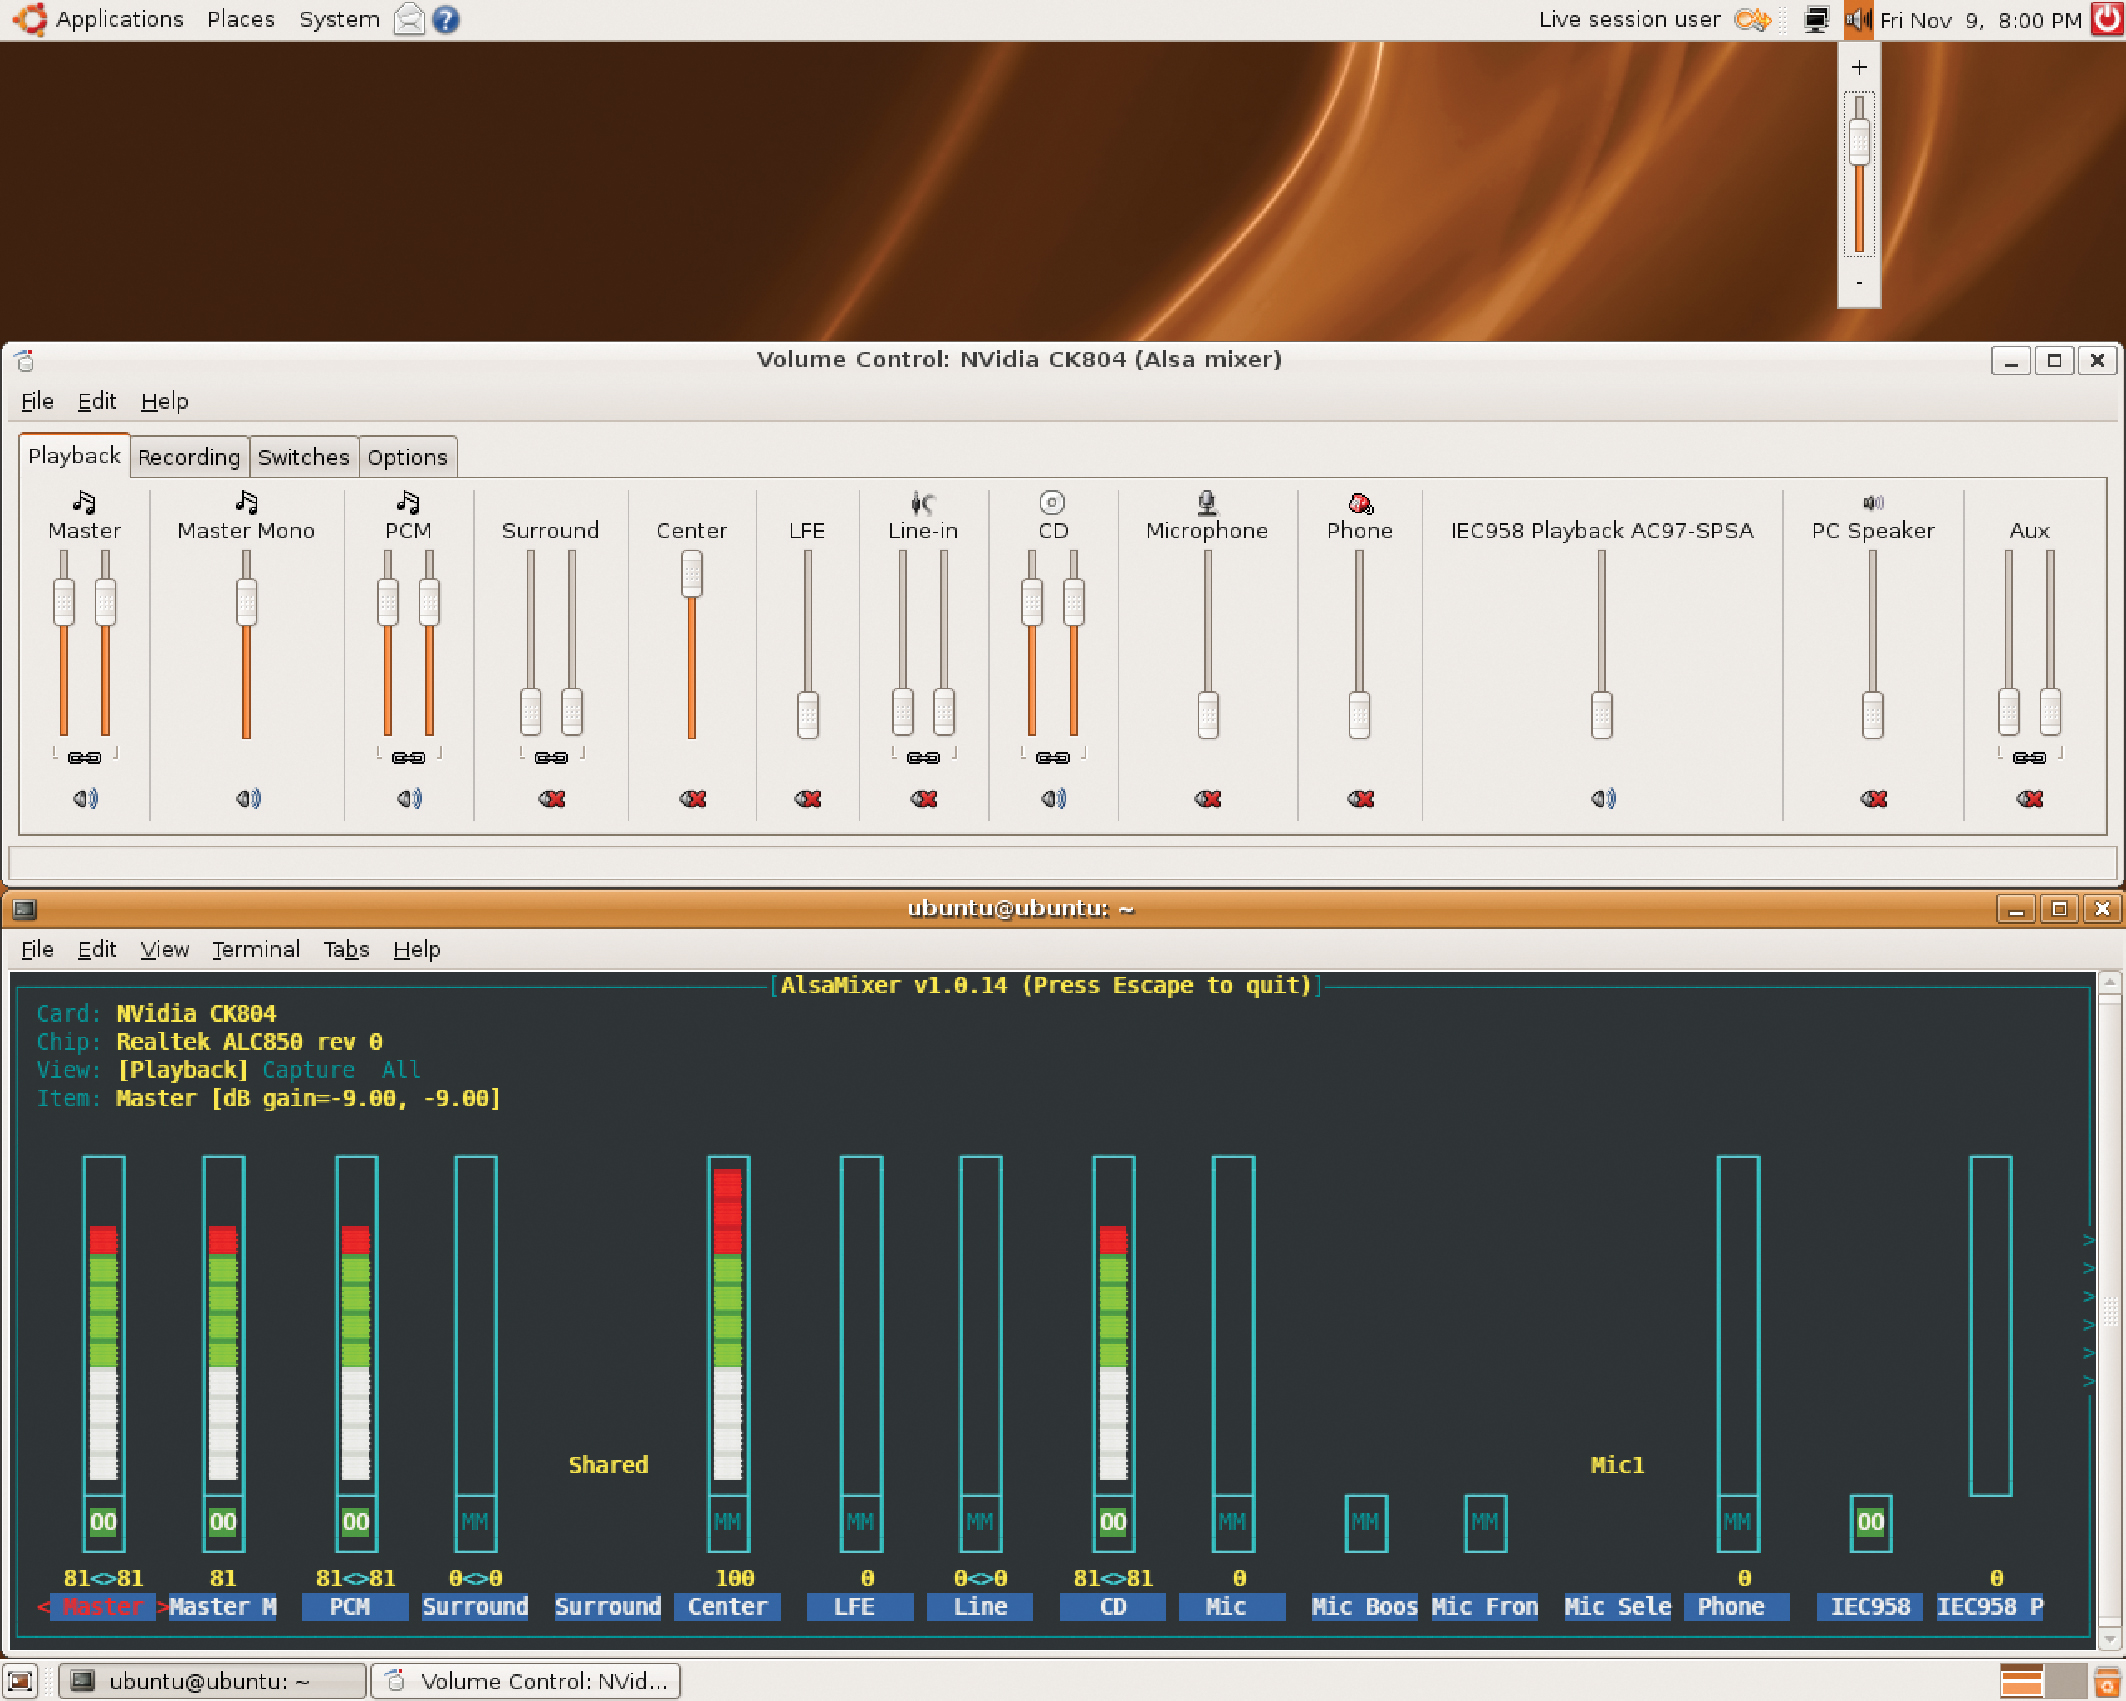
The Advanced Linux Sound Architecture – ALSA for short – is the base level audio system built into the Linux kernel. It is ALSA’s job to communicate with the sound hardware, to which end it provides an API (Application Programming Interface) that can be used to write audio and MIDI hardware drivers.
Coding a driver from scratch isn’t a job for a layperson, but ALSA only really cares about the underlying audio chipset used by the soundcard/interface, and so sometimes all that’s required are some basic modifications to an existing driver that targets the same chipset.
The Advanced Linux Sound Architecture – ALSA for short – is the base level audio system built into the Linux kernel
ALSA drivers exist for most consumer-grade soundcards, ie those built into computer motherboards and inexpensive peripherals. Things aren’t so ubiquitous when it comes to specialised studio-grade audio hardware: there are drivers for a range of older cards and interfaces, but few for modern devices.
The good news is that ALSA fully supports USB audio and MIDI class compliance standards. As a result, if you use a USB audio and/or MIDI interface that is class compliant – and most modern examples are – then it should work just fine with ALSA.
Audio servers
The default method by which applications communicate with ALSA depends on the distro, but most use either PulseAudio or the more modern PipeWire. These are referred to as audio or sound servers as their job is to route audio streams within the system and to-and-from the hardware being managed by ALSA.
Systems like PulseAudio and PipeWire aren’t designed to deliver the low I/O latencies and high sample rates needed for music production. Some audio software gets around this by providing an option to connect directly to ALSA, but this then prevents any other app from using the same hardware at the same time, and removes the ability to route signals to and from other apps and nodes in the system.
You don't know jack
Enter the JACK audio server (‘JACK’ being a recursive acronym for JACK Audio Connection Kit). JACK performs a similar task to PulseAudio and PipeWire, routing audio and MIDI signals within the system but, crucially, it is low latency and supports high sample rates.
Most modern Linux audio apps support JACK (some, such as Bitwig Studio, demand it) but if you need to work with non-JACK software it’s no problem: you can connect PulseAudio/PipeWire with JACK so that their streams are handled as just another node in the system.
JACK itself is a command line tool, but happily there are a few GUI-based apps for configuring and controlling it, like QjackCtl, Cadence and, in Ubuntu Studio, Studio Controls. Routing signals is managed separately, and, again, there are GUI-based apps for this, popular examples being Carla, Catia or Patchage.
OS as a DAW
Music making on Windows and macOS has coalesced towards a paradigm that sees almost everything happen within the DAW. The DAW deals with the inputs, outputs, plugins, instruments – the lot. In many ways it’s as though the DAW were a music-making operating system sitting atop a host OS.
JACK on Linux changes this paradigm, turning your computer into the ultimate modular DAW. You can, for example, load up a drum machine, a pattern sequencer and a few synths, hook up some controllers, then use JACK to provide the central transport, processing and routing hub.
You can also access the individual tracks and busses within apps (including video editors), as well as route audio and MIDI signals to/from other computers via the network. You can still work exclusively within a DAW app, but you aren’t restricted to doing so.
Not rocket science
By exposing so many of its nuts and bolts to the user, Linux audio systems can appear complicated at first glance. In reality, the learning curve is shallow, and is little different to the curve you’d experience switching between Windows and macOS. And if considering building your first ever music production system around Linux, it will prove no more complicated to get to grips with than any other platform.
By exposing so many of its nuts and bolts to the user, Linux audio systems can appear complicated at first glance
Naturally there are fine details that can be very specific to the blend of distro, hardware and software being used, and we can’t cover every combination here, but there are many excellent sources of information and guidance that are just a web search away.
Good places to start are the wikis hosted by Linux Audio, ALSA Project and Ubuntu Studio, whilst JACK Audio is the place to go to learn more about JACK. And if you ever come up against a problem that you can’t solve there are many forums and discussion boards frequented by a community of users, all eager to help.
Installing software
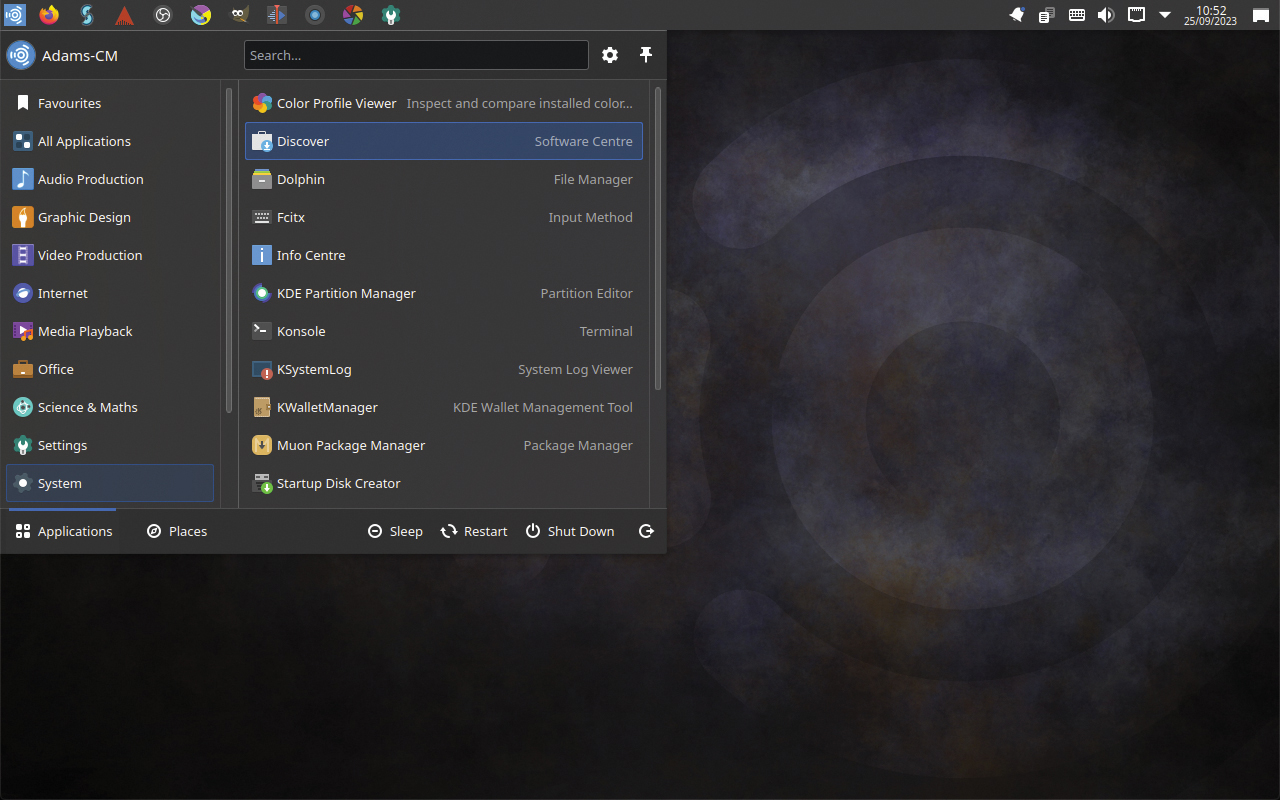
There are a few different ways that software is installed to Linux. The easiest is via the software manager app – in Ubuntu Studio this is the Discover app we used in the previous tutorial. Open Discover (or your distro’s software manager) and navigate to its Applications>Multimedia (or similar) section. Browse for an interesting-looking app to install.
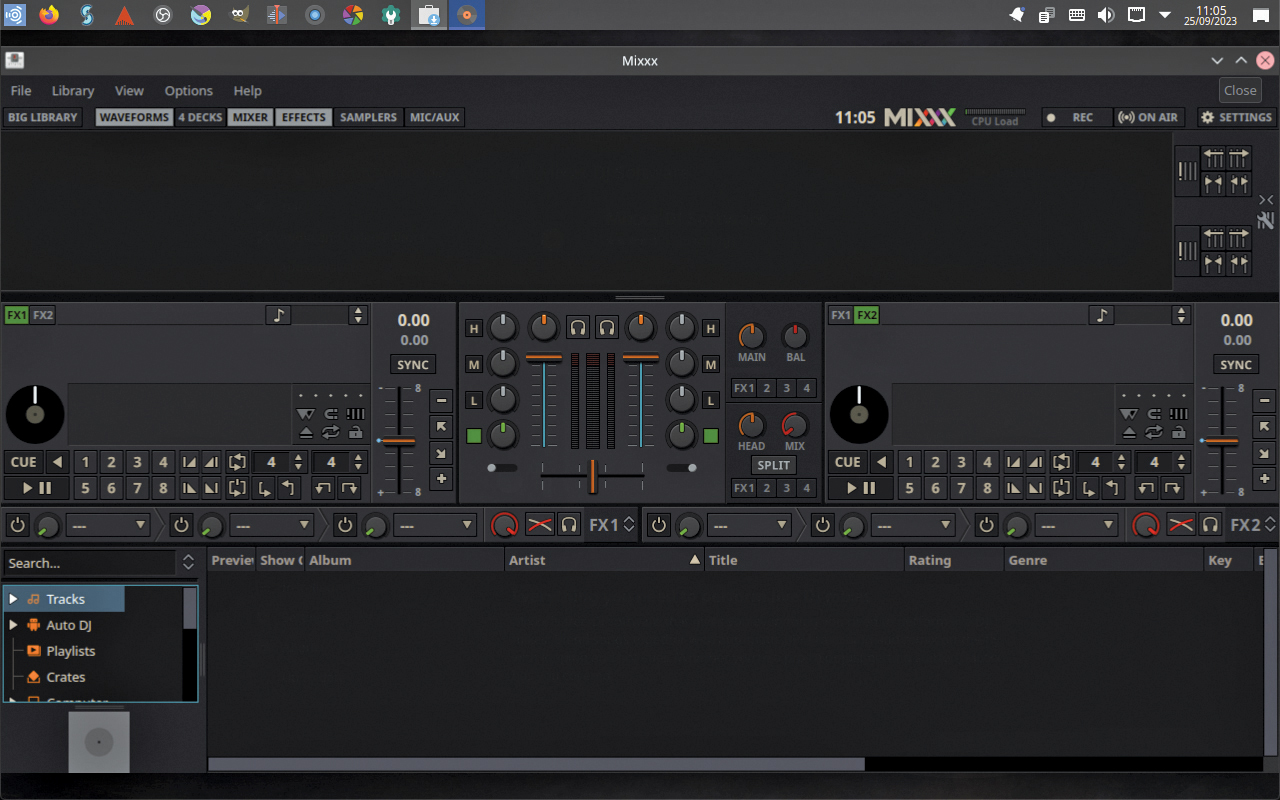
Once you’ve found something you want to try, click its Install button – we’re going to check out Mixx DJ Software. You’ll be asked to enter your user password, then the software will be automatically installed. If you later wish to uninstall the software (or any other apps managed via the software manager) just find the app’s entry and click the Remove button.
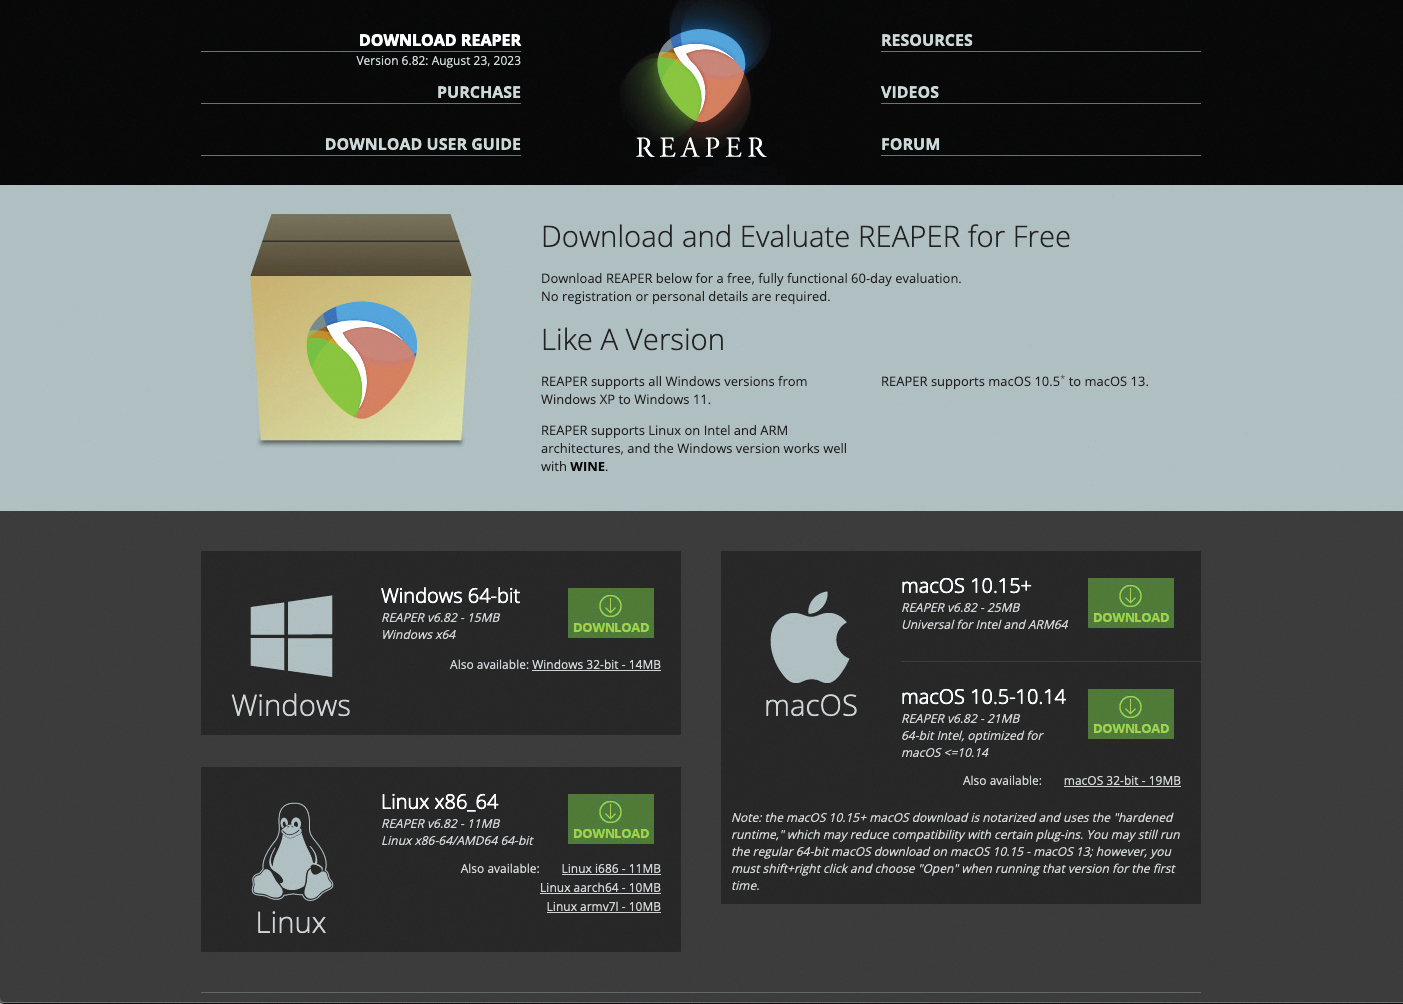
Next, download and install an app manually. Reaper works great on Linux, so head to Reaper's website, go to Downloads and grab the Linux version; most people need the default x86_64 version. When complete, use your file browser (‘Dolphin’ in Ubuntu Studio) to view the downloaded file – it should be in the default Downloads folder.
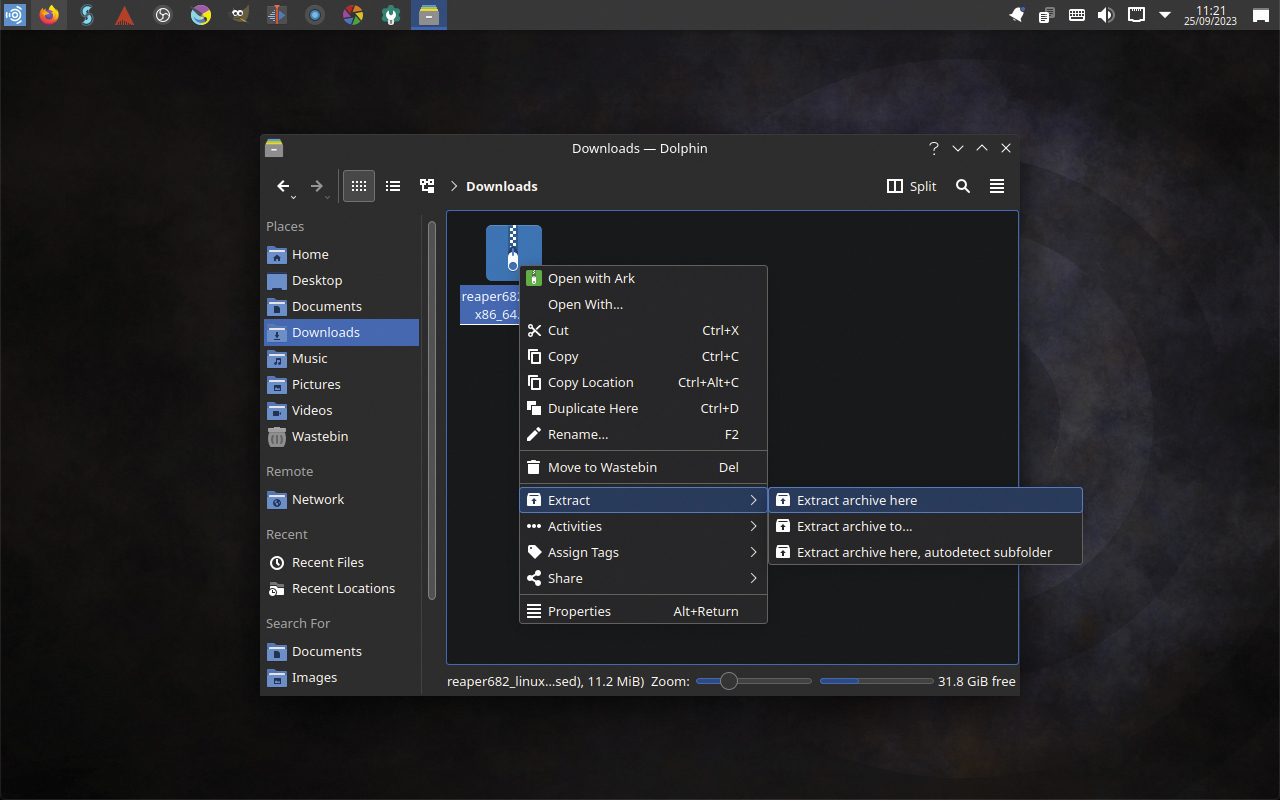
Linux software downloads often come as TAR archive files, and such archives are referred to as ‘tarballs’. A tarball has to be unpacked before it can be used. The easiest way to do this is directly in your file browser, where you can right-click on the tarball and select ‘Extract > Extract archive here’. Do this with the Reaper tarball.
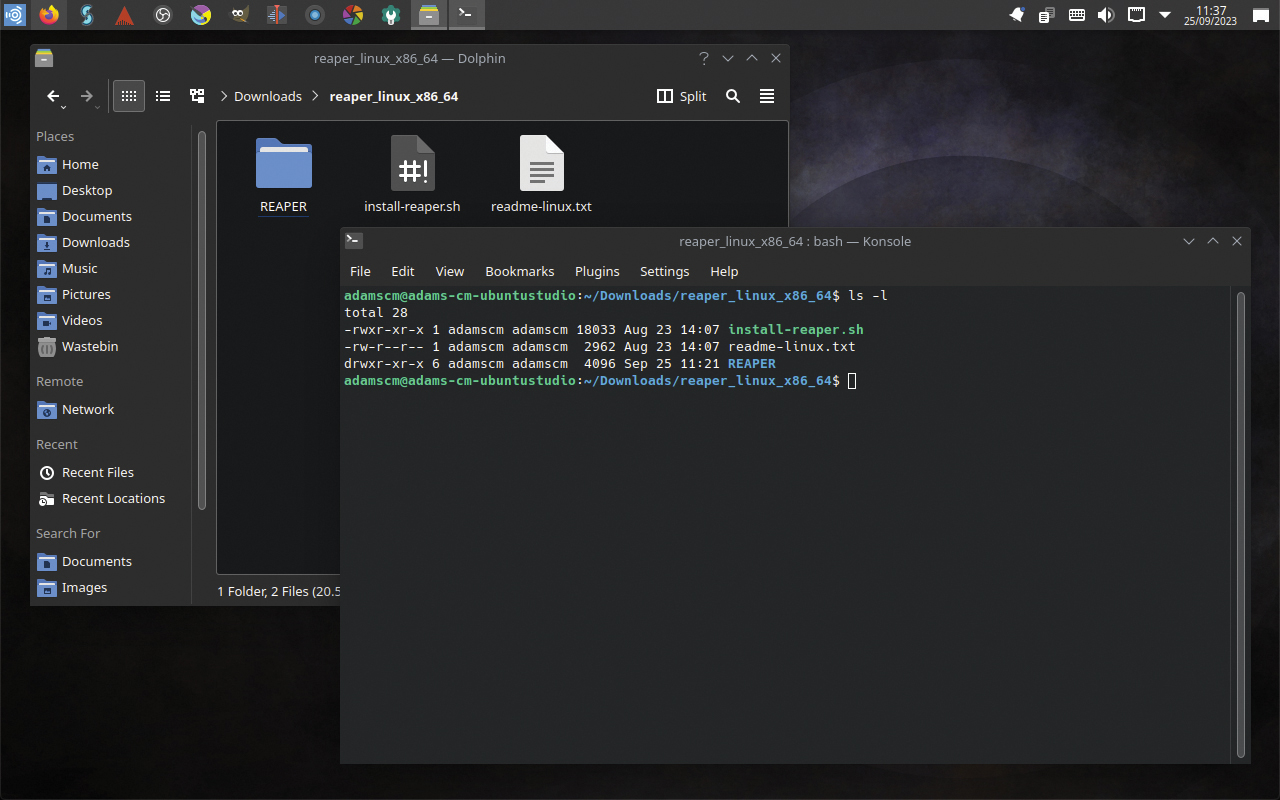
Reaper can run as-is from the extracted folder, but it’s best to run the included installation script that places files properly and creates menu shortcuts. Open the extracted folder then right-click in an empty space and select ‘Open Terminal’. The command line should show the current folder name (the [~] means “user’s folder”). Type [ls -l] and hit enter to list the folder contents.
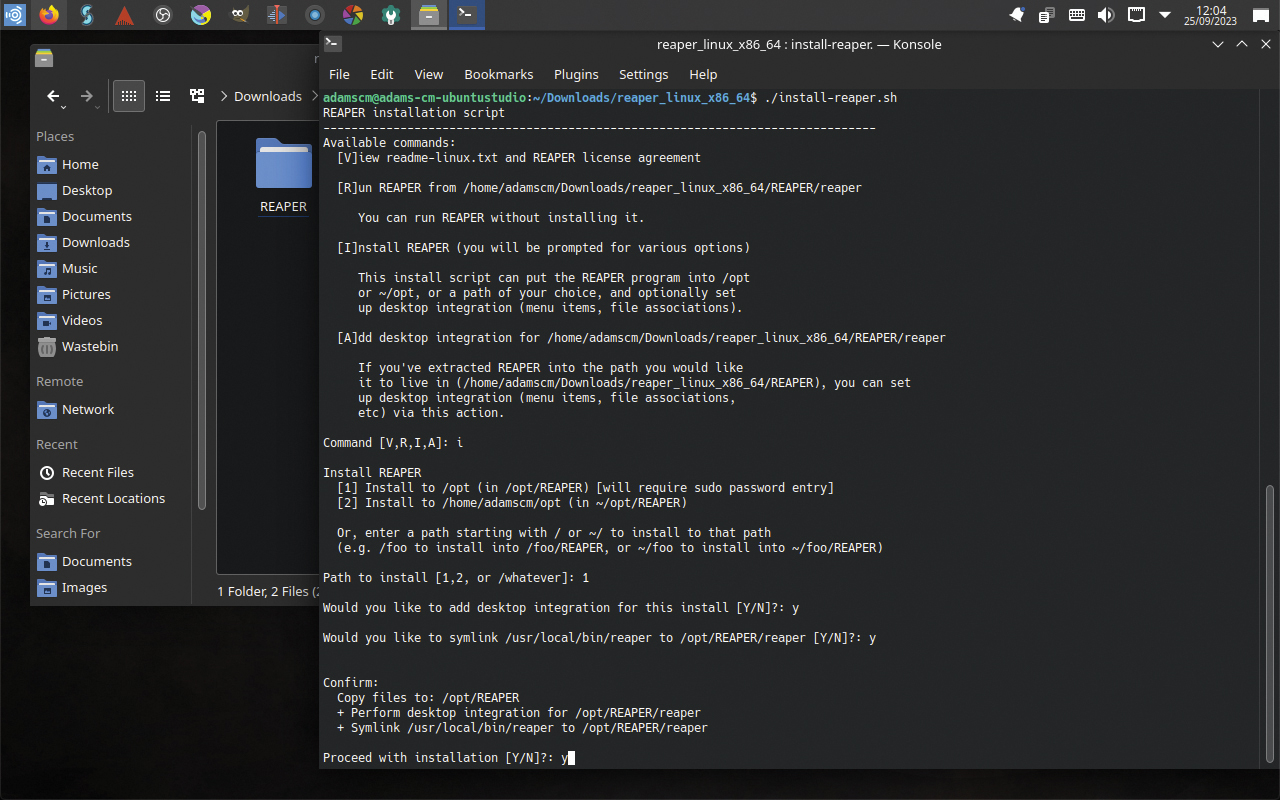
The installation script’s name is shown in the list: “install-reaper.sh”. To execute it, we type [./] directly followed by the name. The Reaper installer will launch and ask you to choose various settings. Work through the options, enter your password if requested and, once done, Reaper will be ready to launch – go ahead and fire it up to check it works.
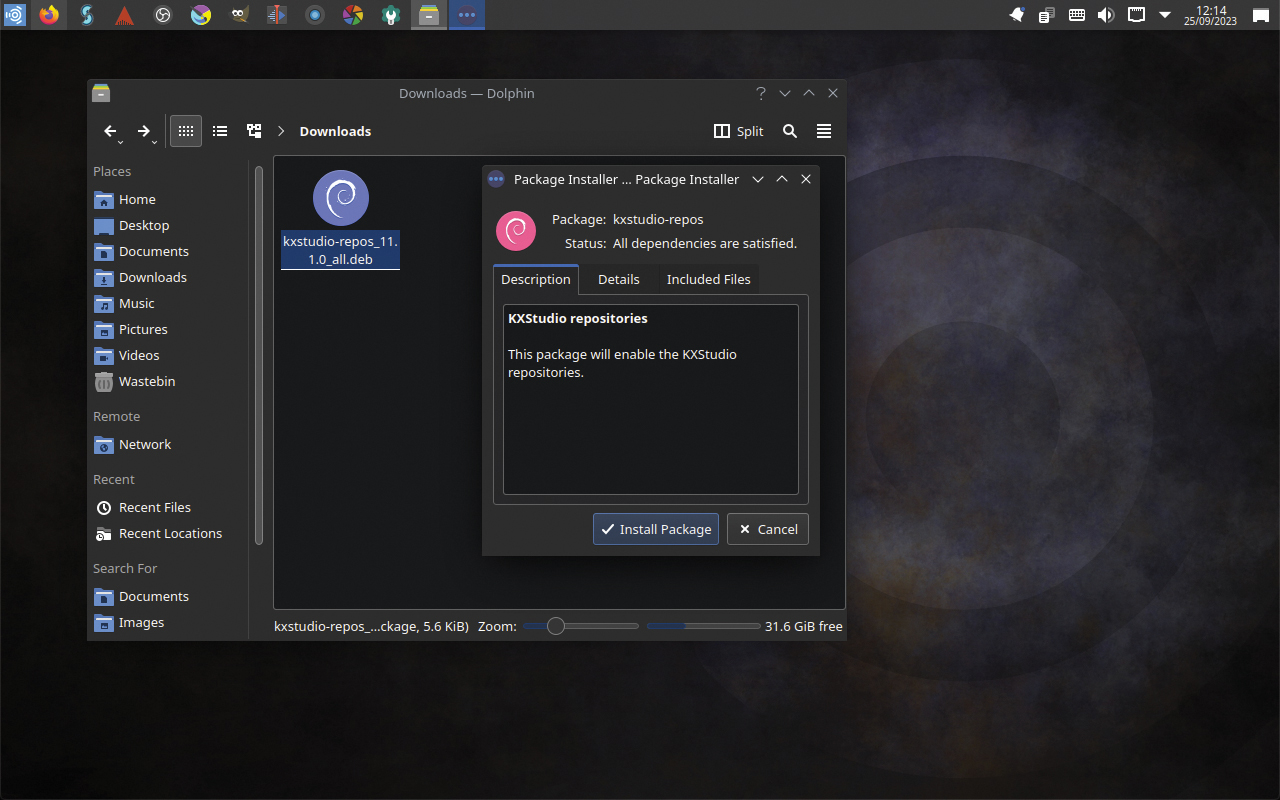
(The remaining steps require a Debian- or Ubuntu-based distro). Open a web browser and head to kx.studio/Repositories. Locate the link for kxstudio-repos.deb and download the file. Go to your file browser, locate the downloaded file, and double-click it. Select ‘Install Package’ in the popup that opens. This adds the KX Studio repos to your OS’s package manager.
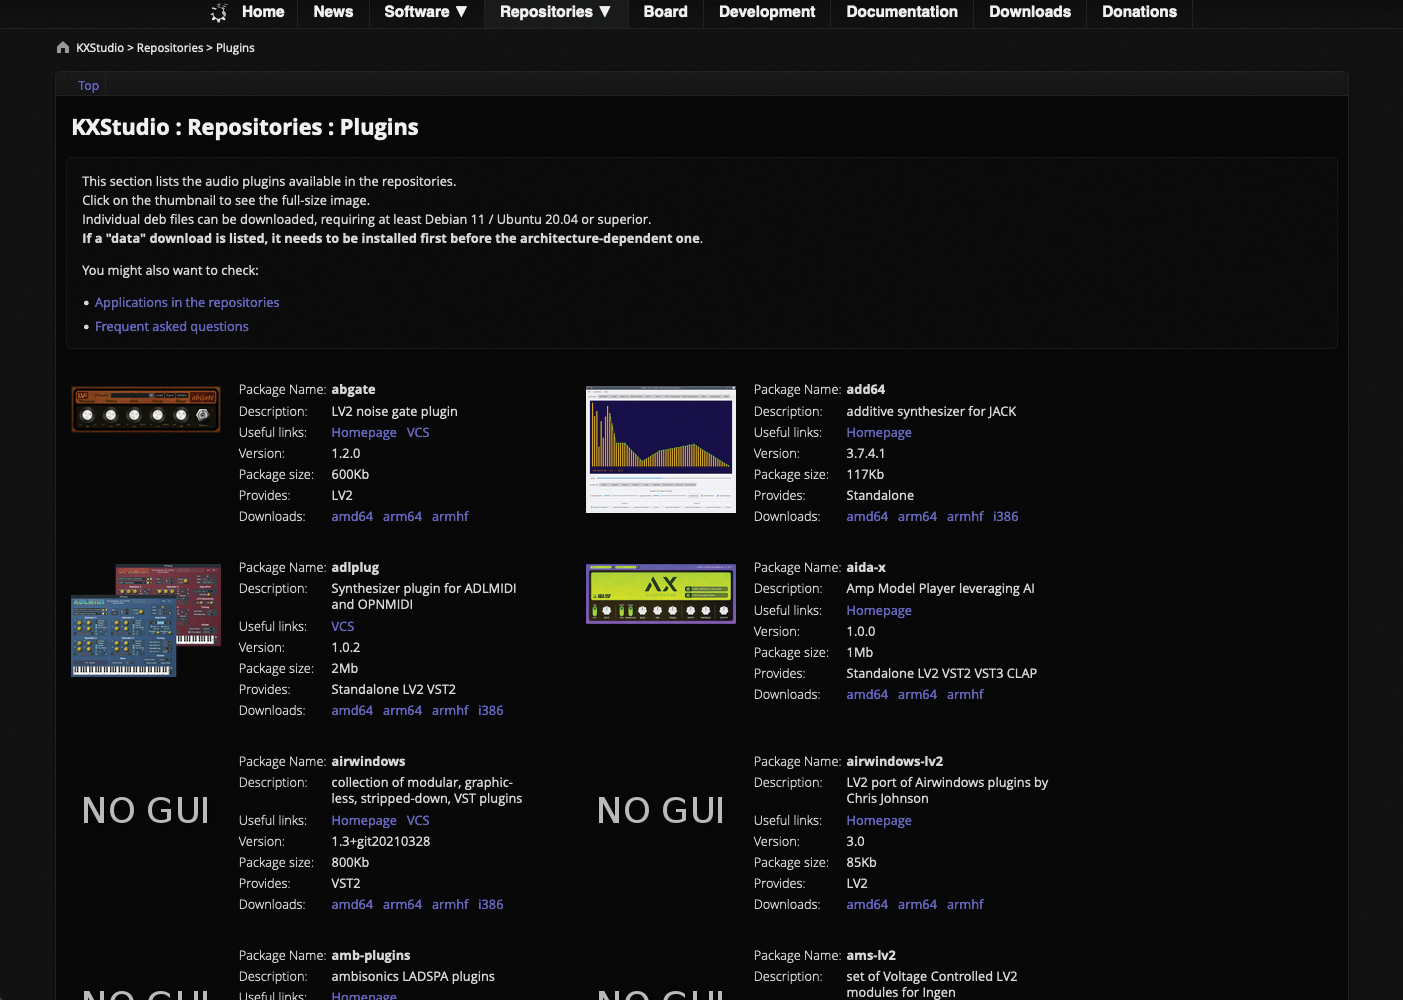
In your web browser, use KX Studio’s Software listings to find an app or plugin you would like to install (note that, if using Ubuntu Studio, some will be pre-installed). Once you’ve identified an app/plugin, make a note of the package name that’s shown – we’re going to install the Dragonfly Reverb plugins, so the package name is ‘dragonfly-reverb’.
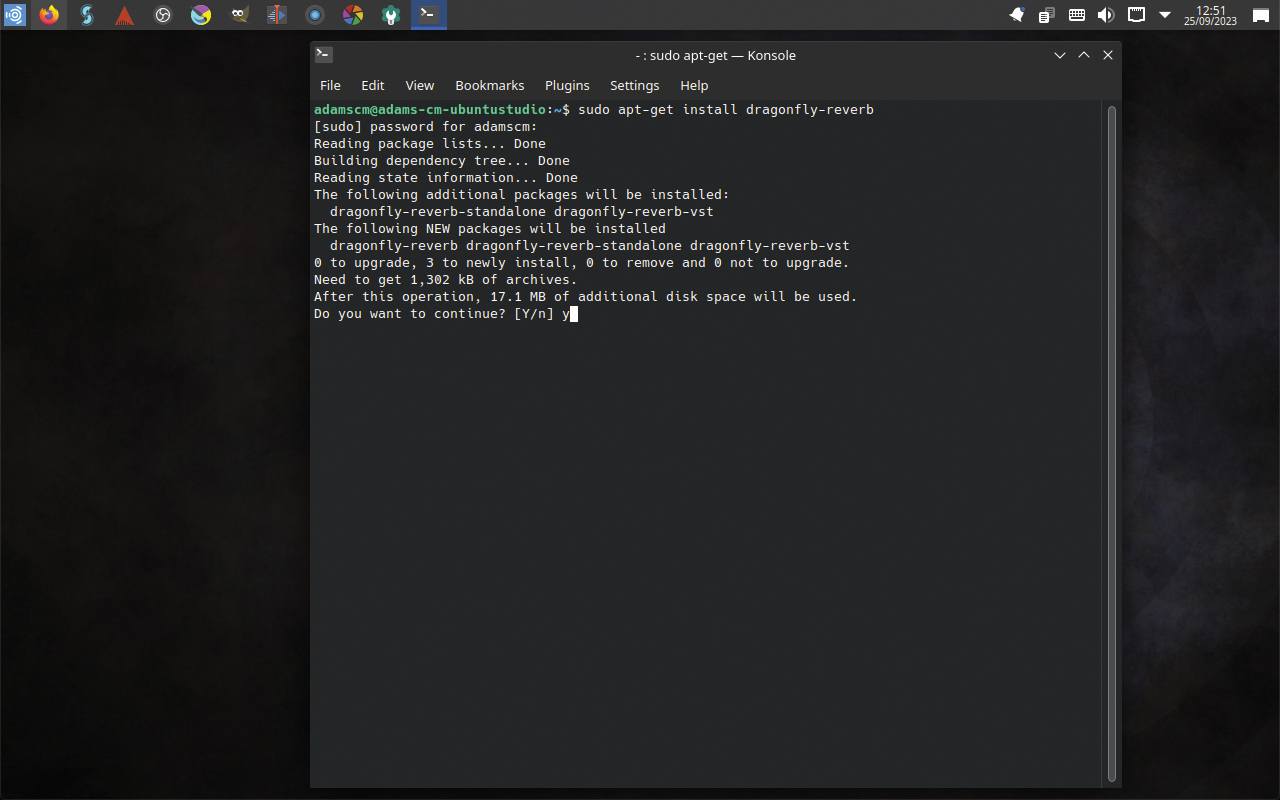
Open the terminal (‘Konsole’ in Ubuntu Studio). Type [sudo apt-get install] followed by the package name and hit enter. [sudo] tells terminal to run the subsequent command as a system user, so you will be asked for your password. The package manager will look up details and ask if you wish to proceed. Hit Y to continue when prompted… and that’s it. Easy.
Terrified by the terminal?
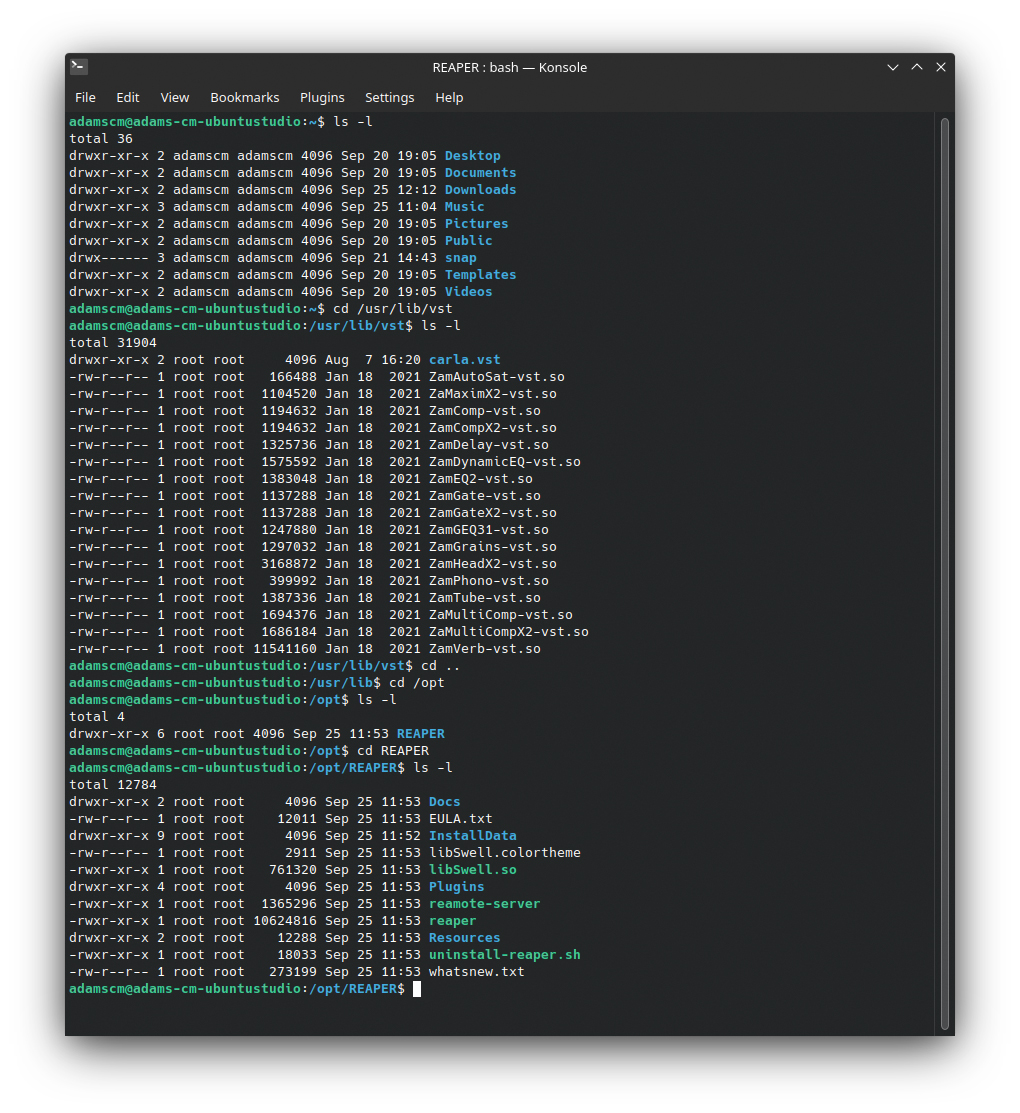
Modern Linux desktop environments include many interactive graphic tools that make working with the OS as easy as with Windows or macOS. We’re talking file browser apps, settings panels, and the like.
Despite the presence of such tools, there remain a number of common tasks that are most often performed in the command line terminal. Users of macOS should be on familiar ground here as the terminal is a component of the Unix-like origins of both macOS and Linux, and so it’s almost identical on both platforms, even sharing many commands.
Command line interfaces like the terminal are admittedly a bit tedious to use, but they’re easy enough once you get the hang of things. Most instructions start with a command – “cd” for example, which navigates to a folder – and are followed by one or more switches and/or parameters, for example the name of the folder you wish to navigate to. Simple.
Working with JACK and Carla
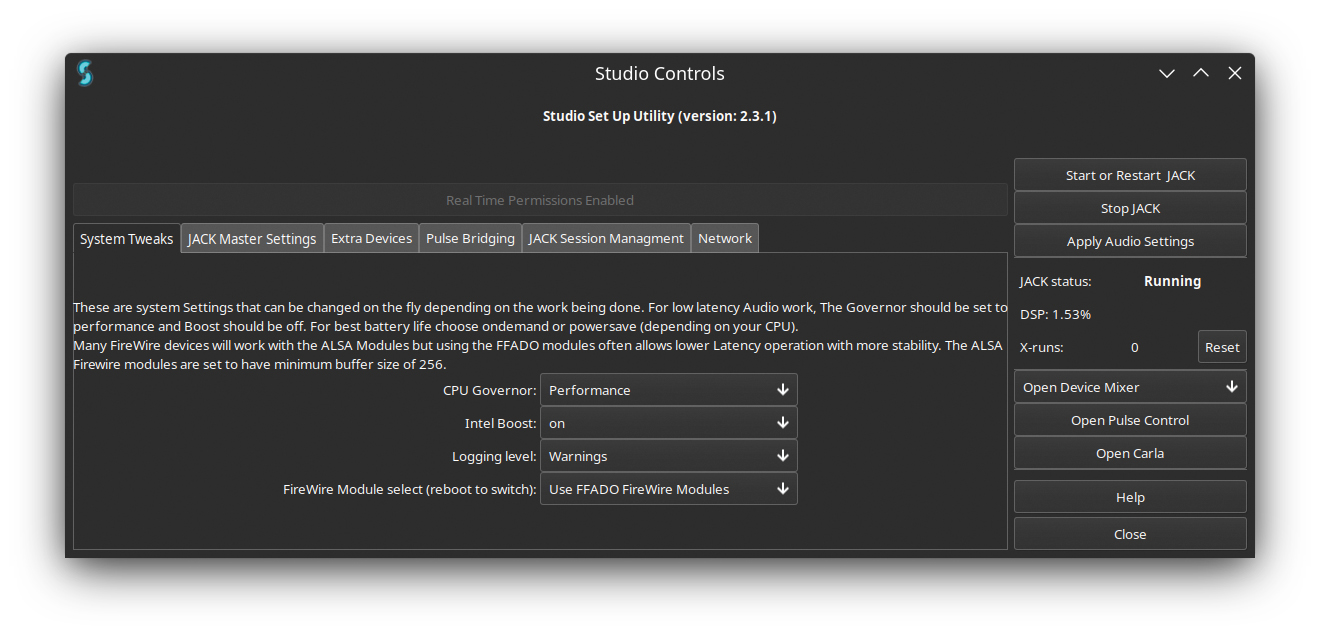
The first thing to do before starting a music-making session in Linux is to ensure JACK is configured and running. We’ll be using Ubuntu Studio’s Studio Control app for this. If using another distro then look for or install QjackCtl or Cadence. Our instructions will translate to these other apps, although you may find you have to hunt out the controls and settings we discuss.
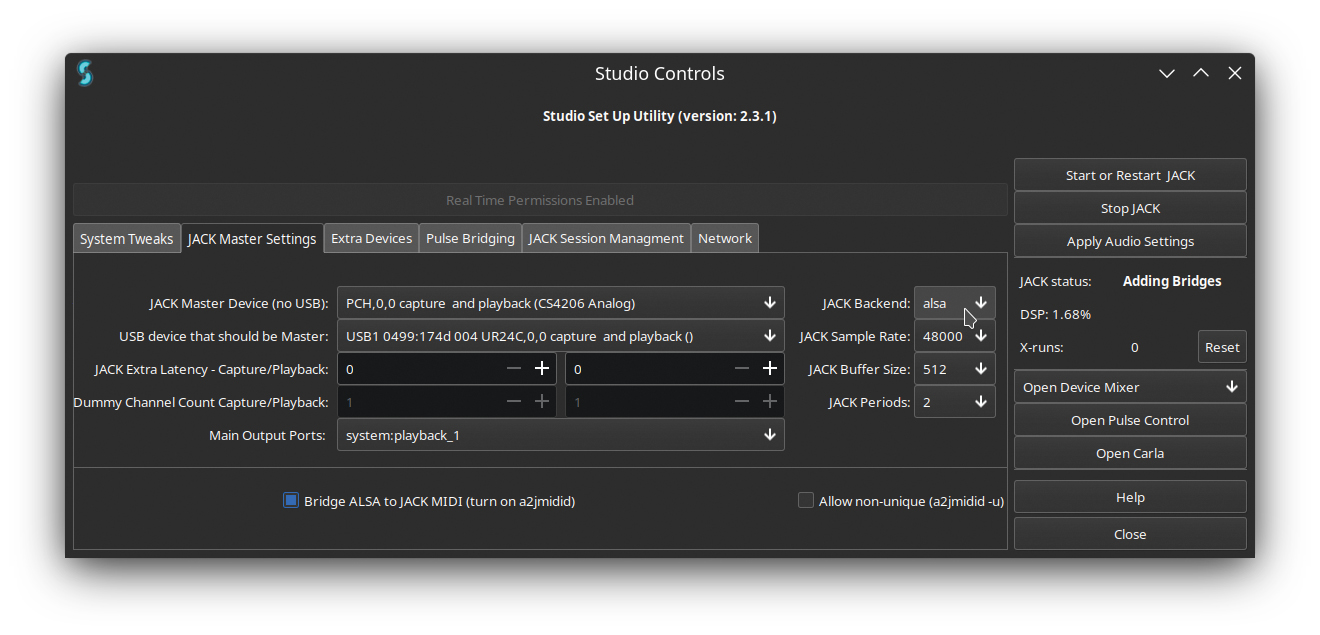
Take a look at the settings on Studio Controls’ first tab. The panel provides a clear explanation of the settings on offer so make your choices then switch to the JACK Master Settings tab. If your audio interface has built in MIDI ports enable the ‘Bridge ALSA to JACK MIDI’ option. Set the JACK Backend option to ‘ALSA’.
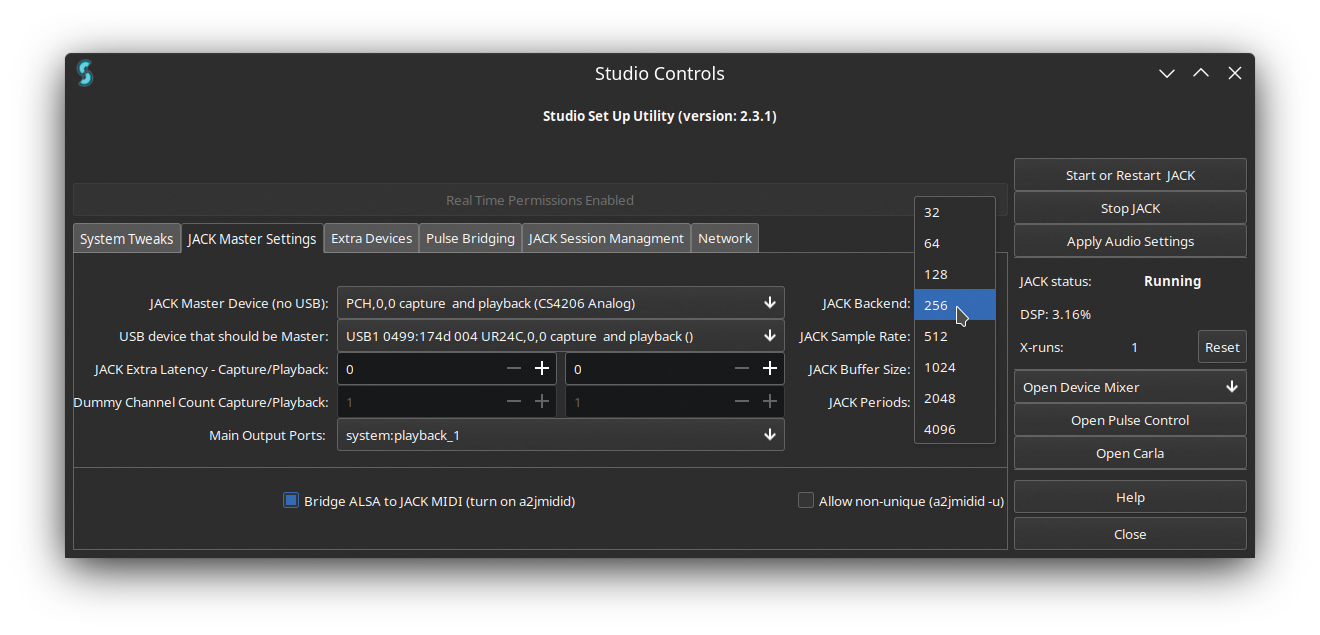
Set the master JACK sample rate, buffer size and periods values. These determine how JACK communicates with the ALSA system, so what you set here will effectively override any settings given to individual devices (see step 5). Note that the periods value controls the number of buffers, effectively multiplying the raw latency of the selected buffer size – keep it at 2 if possible.
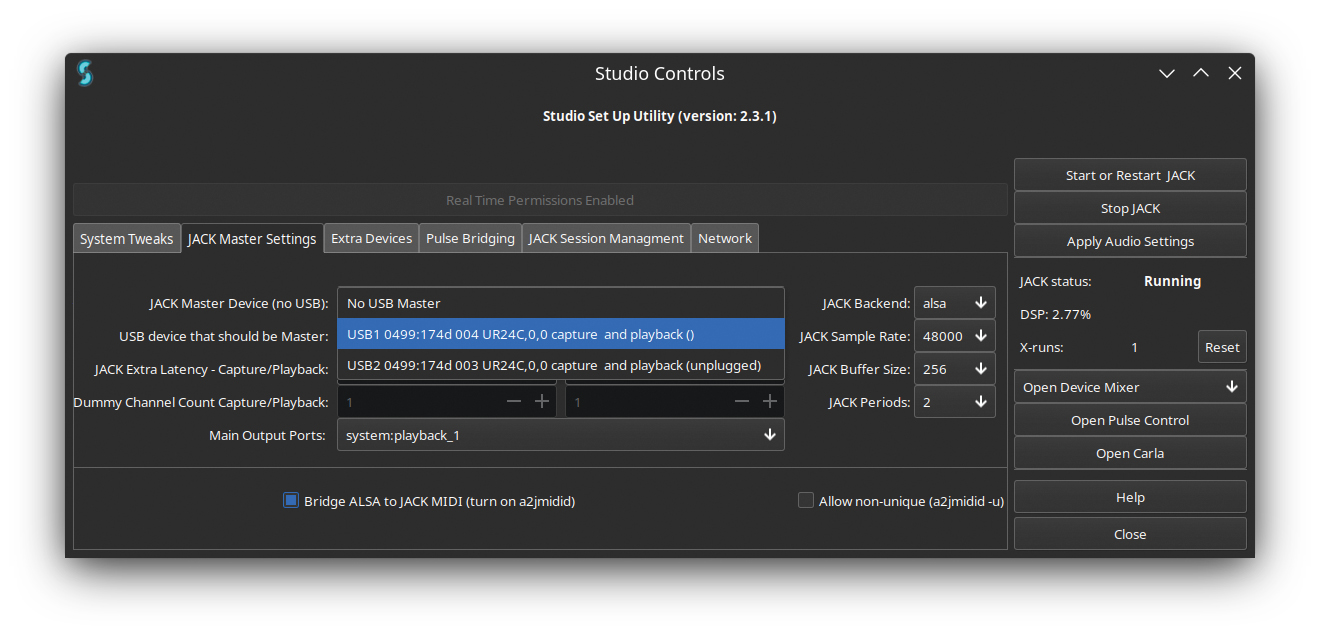
Studio Controls allows us to define both non-USB and USB master devices, the latter taking precedence if and when connected. If using a non-USB interface then select it in the first dropdown, otherwise select your computer’s built in sound hardware here. If using a USB interface, select it in the second dropdown menu. Leave all remaining settings as they are
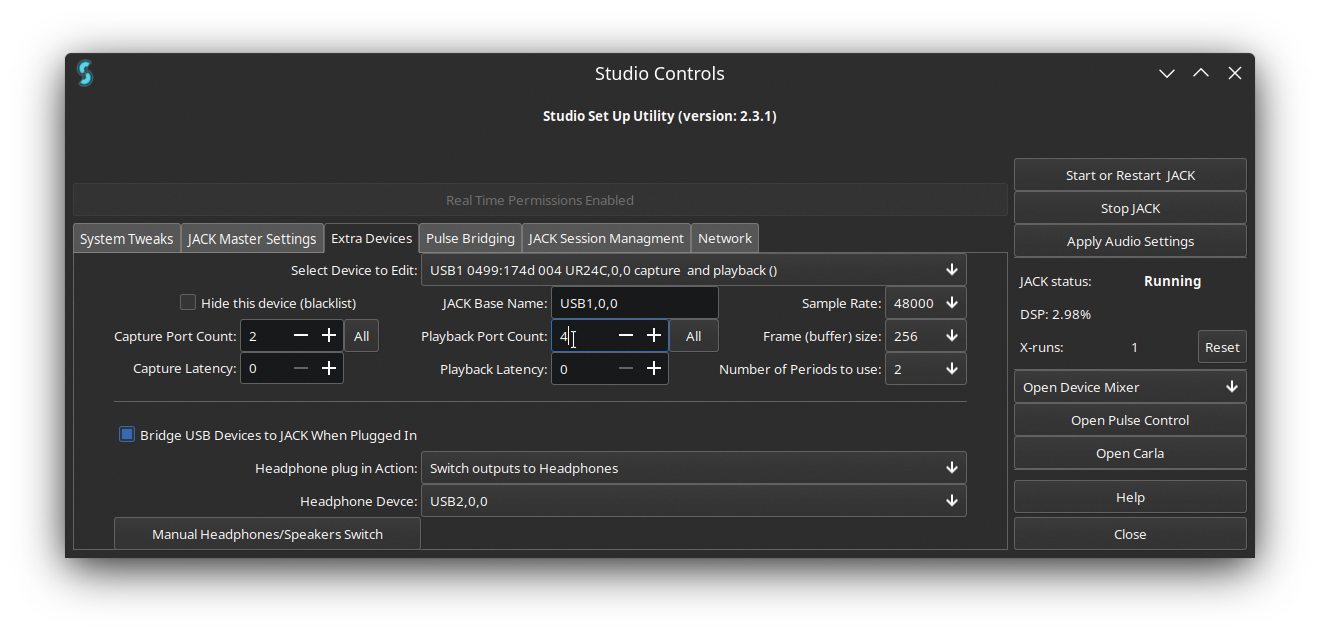
Switch to the Extra Devices tab. Use the ‘Select Device to Edit’ dropdown to select your low latency audio interface or soundcard, then enter the hardware’s input and output count in the Capture Port Count and Playback Port Count fields (respectively). Configure the interface’s sample rate and buffers – for best performance they should match JACK’s global settings.
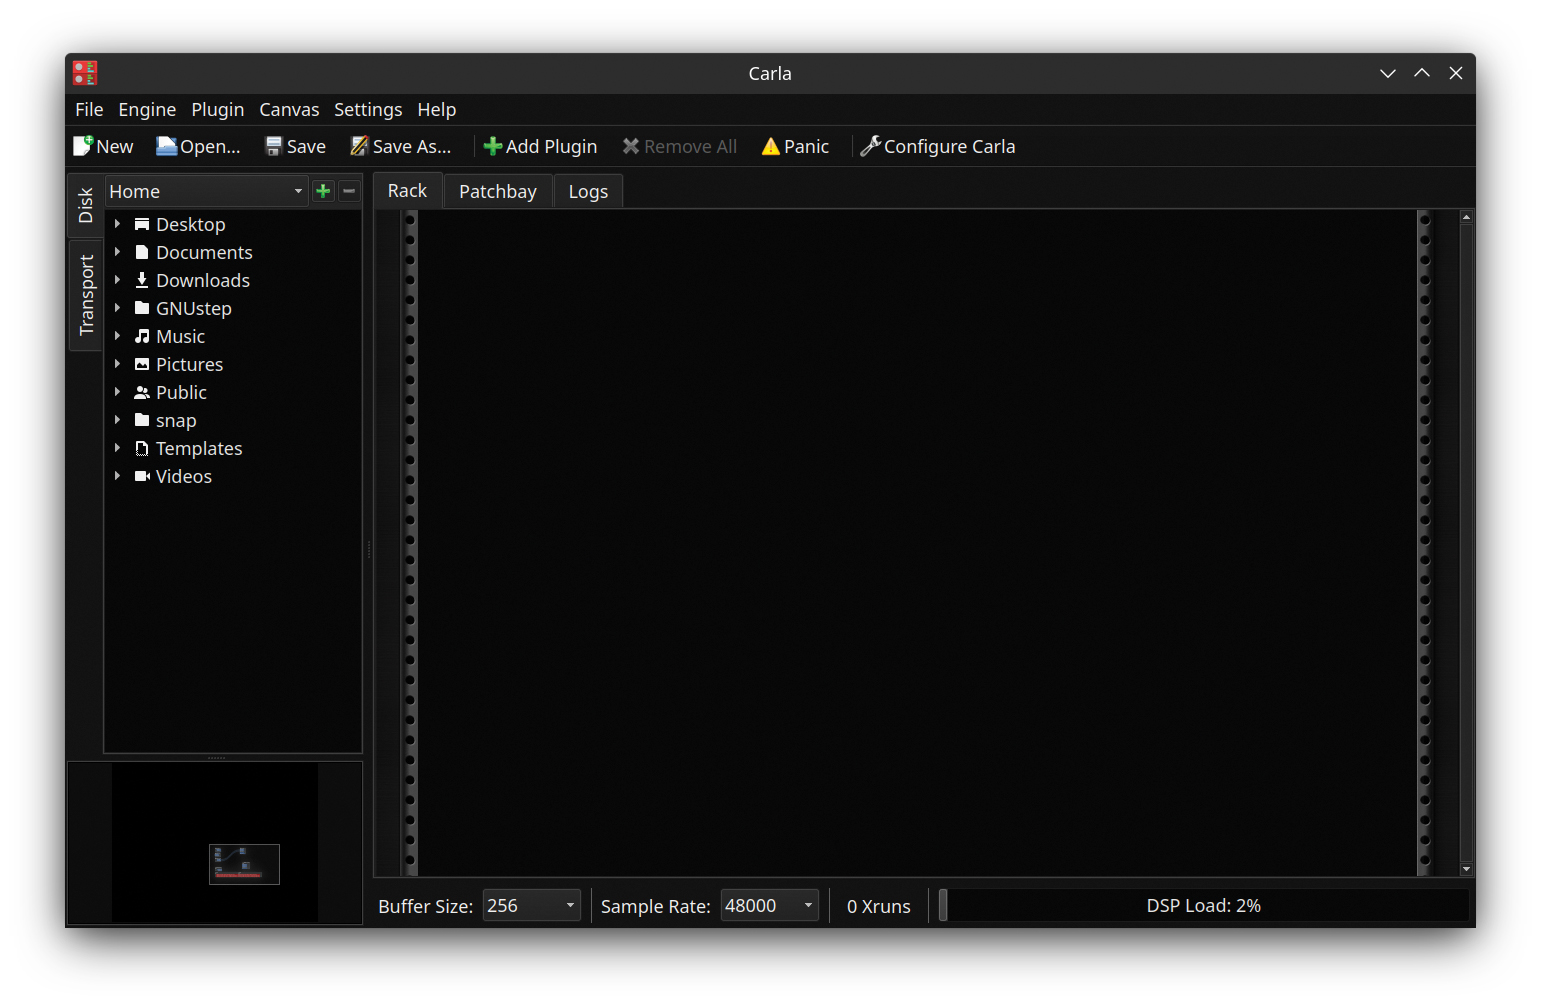
The remaining settings are not important for the time being, so click the ‘Apply Audio Settings’ button then wait while JACK restarts and rebuilds its connections. When the JACK status reads ‘Running’ once more, click the ‘Open Carla’ button. When Carla launches, you will find you’re presented with an empty rack. (You can install Carla from the KX Studio repo if needed.)
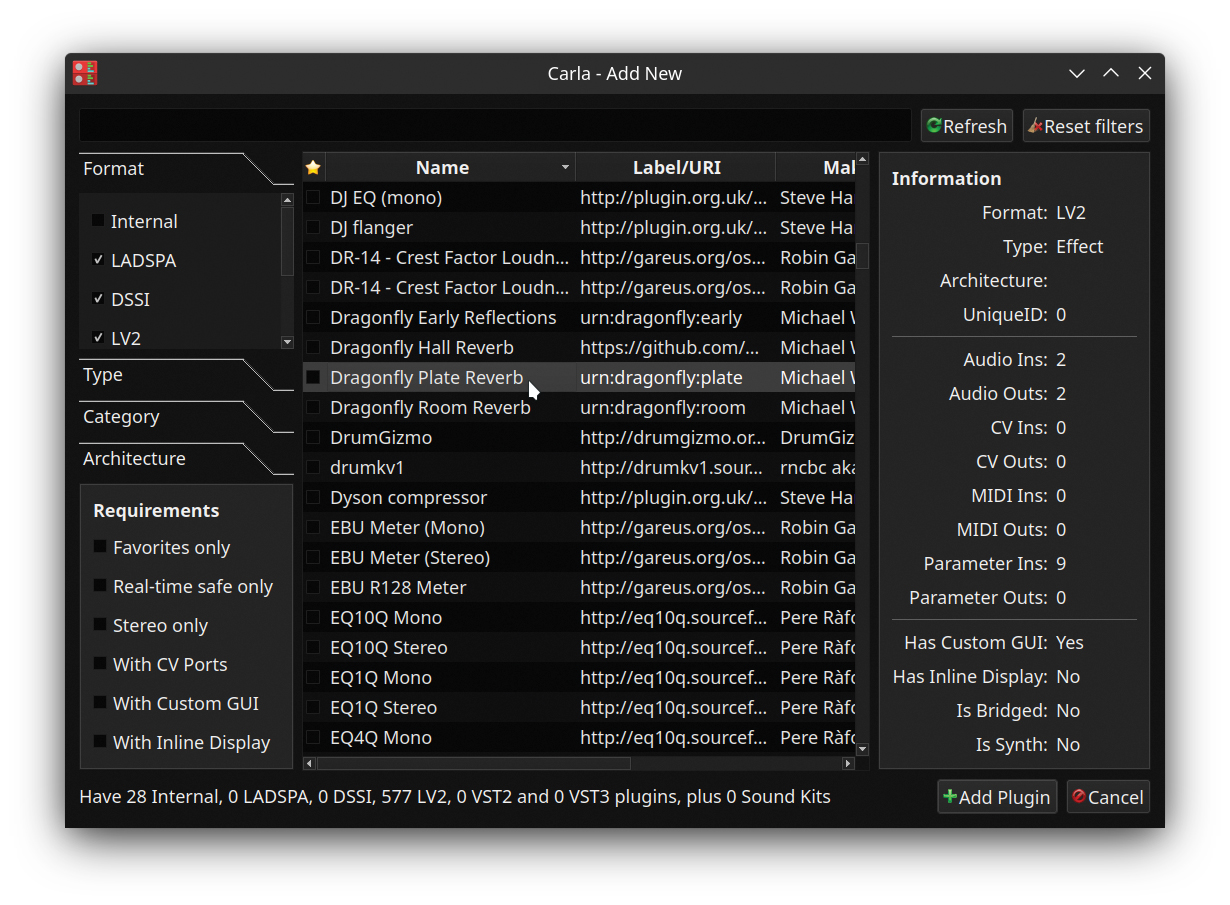
Click the Add Plugin button. In the plugin browser, use the Type filter to show only instruments. Choose an instrument – we went for MDA ePiano – and click the ‘Add Plugin’ button to add it to the rack. Repeat the process, this time filtering for Effects, and add a reverb – we’ve gone with Dragonfly Plate, which we installed in the previous tutorial.
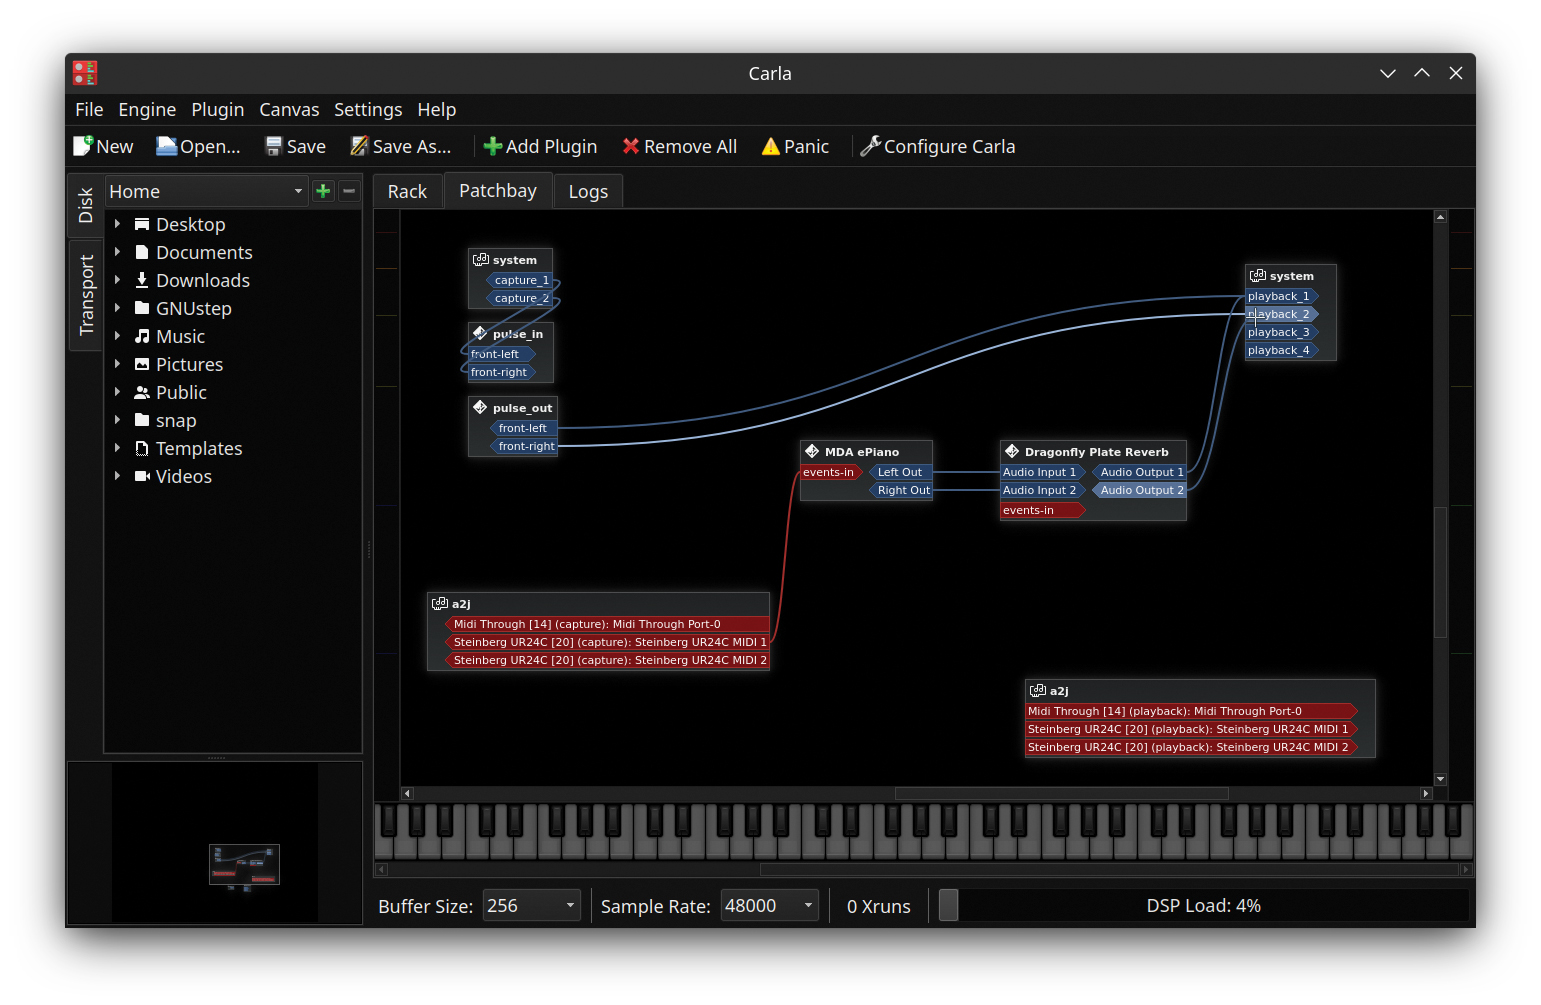
Switch to the Patchbay tab; note that audio and CV connections are blue and event (ie MIDI) connections red. Link your audio interface’s MIDI capture port (or other MIDI capture device) to the plugin instrument’s Events-In port. Connect the instrument’s outputs to the reverb’s inputs, and the reverb’s outputs to the main system playback output pair.
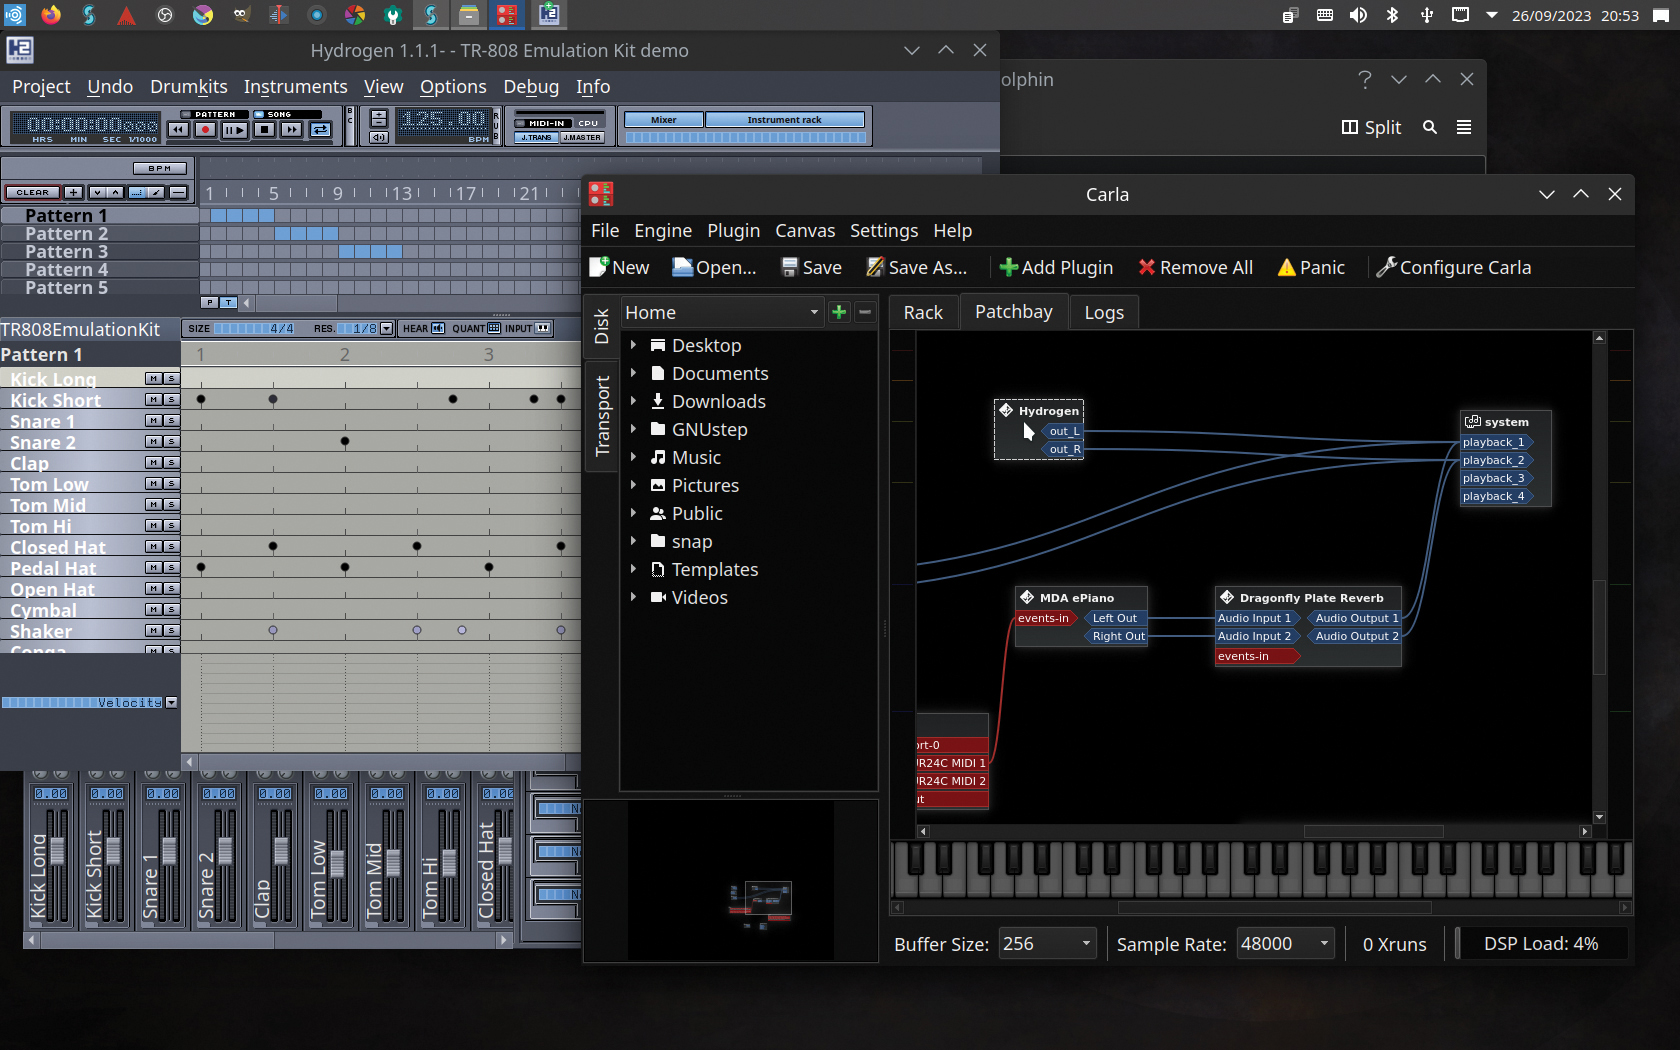
Return to the Rack view and start playing. Adjust settings directly in the rack using the basic knob-based controls, or click the cog icon next to a plugin’s power button to open its GUI (if it has one). Launch a standalone instrument (Hydrogen drum machine, say) and hook it up using Carla’s Patchbay. Don’t forget to save your Carla patch!
Linux DAWs and apps
A quick browse through a Linux OS’s software manager shows there’s no shortage of Linux music-making apps, and no shortage of apps in general – there’s some very cool stuff to play with, and it’s all free!
There is some chaff too – projects whose developers and maintainers lost interest, or that never reach a stable release stage, and some that just aren’t very good. But there are some true gems too, and invariably you will find FOSS options that can take the place of the proprietary closed-source apps found on the Big Two.
A quick browse through a Linux OS’s software manager shows there’s no shortage of Linux music-making apps
Modern development tools and practices mean that compiling the same source code for different operating systems is much easier than it once was, and consequently many of these FOSS apps are also available for Windows and macOS. This means you can try them out without needing to set up a Linux system, or just use them as free alternatives to premium production software.
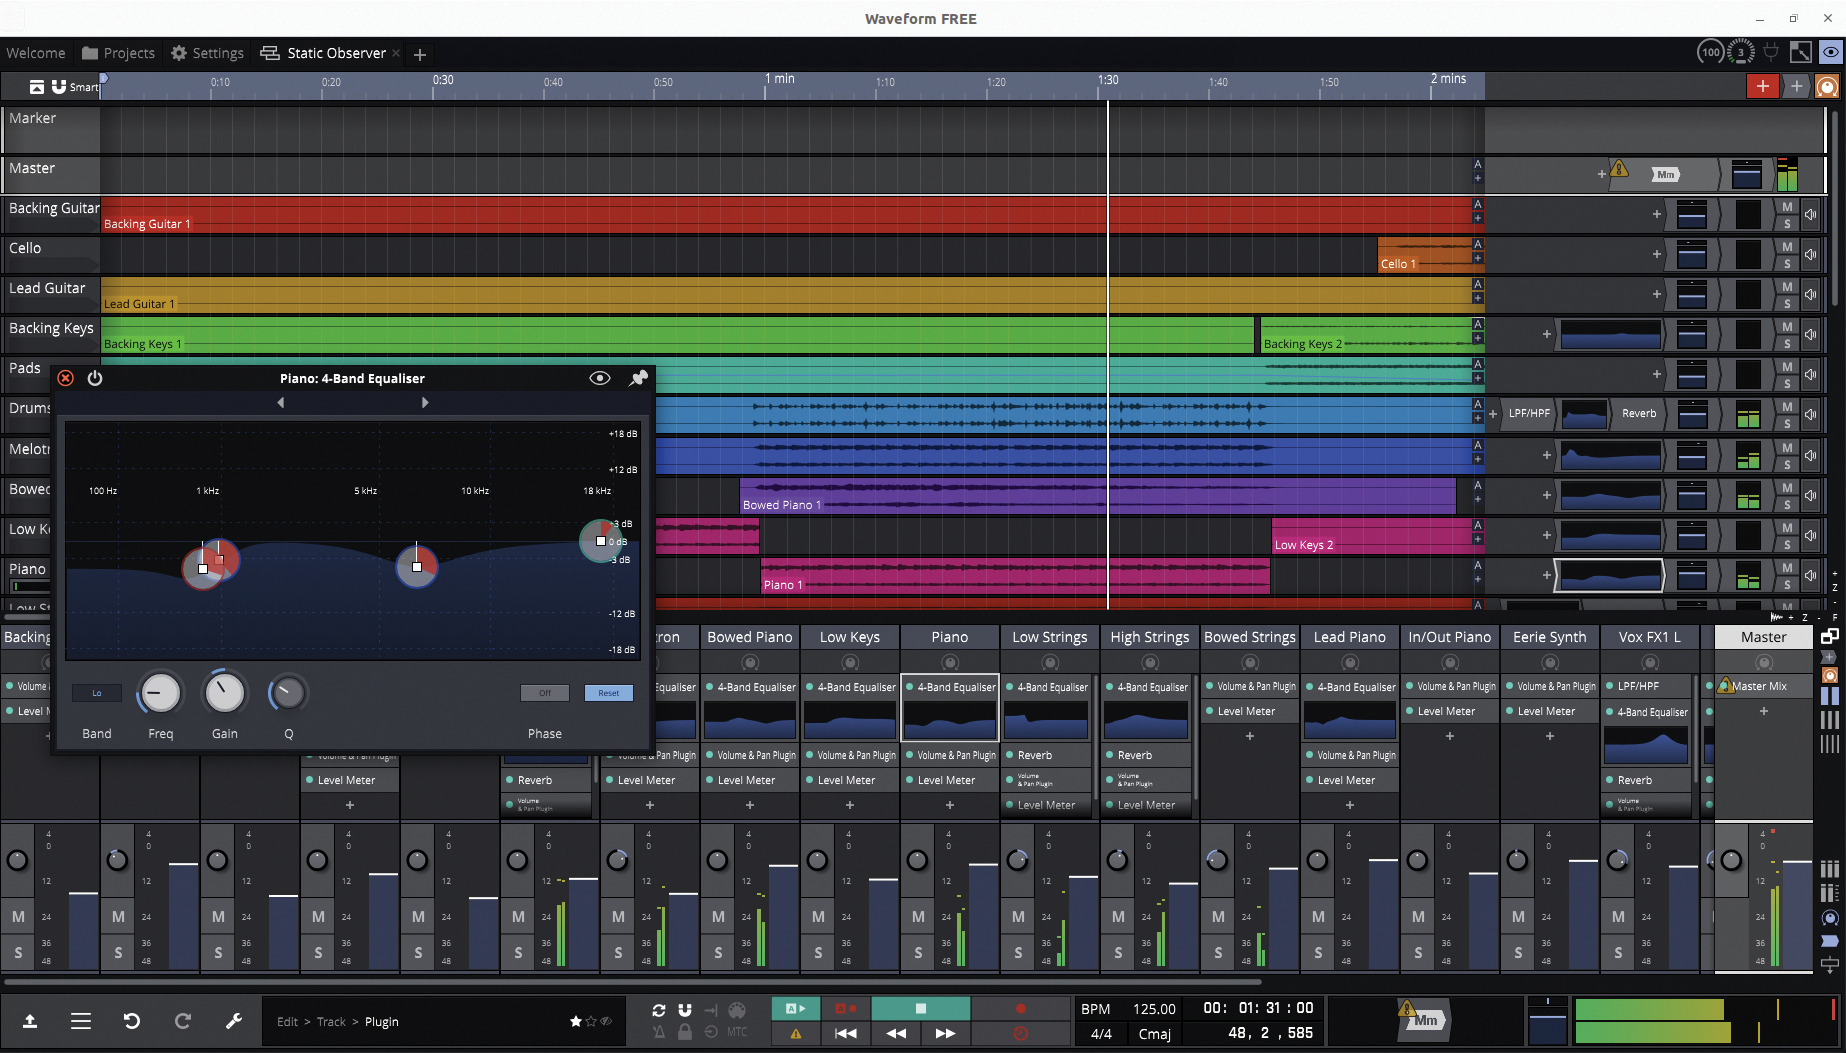
Linux does not limit you to using free DAWs and audio tools; there is an increasing amount of premium commercial music software hitting the platform too. Bitwig, Reaper and Waveform are notable examples of DAWs that have native Linux versions, and some developers of premium plugins, such as u-he, offer Linux-native versions of their effects and instruments.
Linux plugin formats
There are a number of different plugin formats that can be used in Linux. The oldest is LADSPA (Linux Audio Developers Simple Plugin API) and most – if not all – Linux DAWs and host apps support the format (as do some Windows- and macOS-based hosts). There’s a vast choice of free LADSPA plugins to choose from, and while they’re intended primarily for audio effects and filters, there are some instruments that use the format too.
The DSSI (Disposable Soft Synth Interface, pronounced “Dizzy”) format extends LADSPA to make it better suited to plugin instruments. Finally, the most up-to-date format, and the one that nearly all modern Linux plugins are written in, is LV2 – you’ll find reams of these online.
Just as in Windows and macOS, the plugins you use have to be compatible with the host application you’re working with. Thanks to JACK, though, if your DAW, or any other app, can’t work directly with a particular plugin then you can host it in Carla, which supports every Linux plugin format (and more), and simply route audio through it.
Linux VSTs
VST – or Virtual Studio Technology – was originally developed by Steinberg as an audio plugin API for Cubase, and because it wanted third-party developers to create plugins that would extend and showcase Cubase’s capabilities, it ensured the standard and SDK (Software Development Kit) were license-free. This quickly established VST as the standard for audio plugins, and it has remained so through its VST2 and VST3 advancements.
The open nature of the standard means that it’s supported on Linux as well, but a VST plugin’s source code has to be compiled for Linux. Such a plugin is known as a LinuxVST.
Wine
Wine is a commonly used Linux tool that allows Windows applications to run on Linux. It isn’t a virtual machine or emulator, but rather a translation layer that converts Windows API calls into POSIX (Portable Operating System Interface) commands and vice versa, thereby allowing Windows applications to run smoothly and efficiently within a Linux (or other POSIX-compliant) OS. This ability extends to Windows VST plugins.
Wine isn’t a magic bullet and won’t work with everything, especially apps and plugins that employ advanced licence control mechanisms. It can be finicky to configure and use too, and it requires a host that can work with Windows VSTs, such as Carla or Ardour. Moreover, Wine’s usefulness in a music production environment is slowly diminishing as Linux enjoys ever-growing support from premium software and plugin development houses.
Is it the year of Linux in the studio?
It’s true that few of the premium products that you read about in these very pages each month will run natively on Linux, and this can be off-putting. But in the absence of big name competition, Linux’s community of smart, industrious developers have assembled a host of alternatives, many of which are comparable to their premium equivalents in every way other than cost. Once you add JACK into the mix, it’s hard to argue with the view that not only is Linux ready for the studio, it’s in some ways more ready than Windows or macOS.
If you’re a newcomer seeking a powerful but inexpensive studio solution or just an inquisitive soul who likes to try new things, then perhaps it’s time to give Linux a try in your studio?
Maybe it’s a stretch to hope 2024 will be the year of Linux in music. However, if you’re a newcomer seeking a powerful but inexpensive studio solution, want to level-up a modest setup without huge expense, an experienced producer who’s sick of the Windows/macOS hegemony, or just an inquisitive soul who likes to try new things, then perhaps it’s time to give it a try in your studio?

