
It goes without saying that the ability to record and edit audio in the digital domain brings enormous benefits, enabling us to produce punchy, cutting-edge music entirely within our computers.
However, there’s still something undeniably special about audio processed in the analogue domain. Wouldn’t it be great, then, if you could make your digital recordings sound more analogue?
Thanks to an incThanks to an increasing number of extremely talented plugin developers, this has very much become a viable possibility, as they painstakingly model the gloriously chaotic analogue processes behind magnetic tape, valves, transformers and more. Of course, all of these things have been around in plugin form for ages now, but the current generation focuses particularly on the subtleties and nuances, emulating the effects of tape and desk circuits used at regular operating levels.
In general terms, the analogue recording chain runs from a mic or DI, via a preamp, desk channel and sometimes desk bussing, out to a tape deck. The resultant multitrack recording is then replayed via desk channels and summed to stereo. Within this process, there’s an awful lot going on that simply doesn’t factor into a DAW setup.
Probably the most significant element is the tape machine, where various pre-emphasis and playback EQ circuitry combines with your chosen operating level, biasing and, of course, tape type to greatly influence the outcome.
Beyond this, desk bussing also influences sound, and when you punctuate the signal chain with transformer and amplification circuits, some of which may be valve-based, there are clearly many sources of analogue colouration being brought to bear.
In these walkthroughs we’ll put some of these tools to the test by taking some pristine digital sounds and analogue-ising them. We’ll apply our plugins on an ‘as needed’ basis, using tape, transformer and/or valve processing on individual sounds or groups of tracks where they’re best suited. Don’t forget to check out the accompanying audio examples.
Drums and tape, a match made in heaven
It’s often said that drums and tape make the perfect pairing, but why? And is this still a meaningful suggestion in the digital age?
If you’ve ever recorded drums on a high-quality professional multitrack tape machine, the experience of playing them back and hearing the sound change can be both exciting and unnerving. Tape typically applies a level of mid- to high-frequency smoothness, overall glue and subtle compression to the sound. However, the degree to which this occurs is dependent on many small factors, and it can be pretty baffling knowing how to use it to your advantage.
The factors involved include the level captured to tape, the tape type, tape speed (and the inherent head bump or bass boost associated with it), the choice of EQ curve and, of course, the type of machine used. And to make matters even more complicated, a tape machine has two heads – sync and repro – which sound slightly different to each other. The first can record and play back, with heads physically lined up to enable overdubs to be carried out perfectly in time; the second offers a higher-quality ‘playback-only’ solution for when you get to the mixing stage. Typically, you’ll be listening on the sync head when tracking and making recording decisions.
Broadly speaking, analogue tape affects an audio signal in a beneficial way, but there are some changes that may arise which are less desirable, including crosstalk, print-through, edge tracks, softening of transients and tape hiss. The last of these can become quite significant if you EQ high frequencies heavily after recording. Thankfully, the plugin emulations we’re using in this tutorial focus on the positives, so although you might be able to dial in some tape noise if you want it, you can thankfully switch it out or turn it down if it’s becoming a problem.
In this walkthrough, we’ll put the emulated tape/drum combination to the test. Unlike in the analogue world, we can adjust our drum tracks individually, deciding how much tape effect is applied to each. We can also adjust the tape type and line-up individually.
Click here to download the audio files for this tutorial
Tape emulation

Step 1: There are quite a few tape emulation plugins to choose from – for this walkthrough we’re going for Universal Audio’s Studer 800. Not only is this a meticulous virtualisation, but the A800 is an old engineer favourite for drum tracking. With its many presets, this plugin allows us to very easily replicate a typical drum tracking situation.

Step 2: Tape type plays an important role in how noisy things are and how much saturation you can achieve, and some of the more recent high-output tapes can be much harder to saturate. Here we’re going for an older but very popular tape for drum tracking: Ampex 456. This saturates easily and should work well for the kick and snare.

Step 3: Let’s start by loading up a very linear preset so that we can hear what, if any, difference a linear machine makes. We’re also going for a tape speed of 15ips. Although more noisy, this imparts a slightly different frequency response with better low end. To allow for peaks, tweak the input level so the VU is reading between -5dB and -10dB. (Audio: Step 3a and Step 3b)

Step 4: With our linear setting, we’re getting some enhancement to the sound. Now let’s see if we can improve things by pushing the level to tape. Initially this adds to the sound, enhancing the thump of the kick, but eventually the returns diminish and it starts to sucks the life out of the sound. Back the level off to the optimum point.

Step 5: We have some other parameters to play with. We can switch to the Sync head or, indeed, just the Input. Both are worth trying, with the latter modelling only the input electronics. There’s also the Noise setting, which introduces both mains hum and noise based on the line-up preset (CCIR or NAB). We keep the noise but turn down the hum.

Step 6: For our snare drum we’re going to stick with the 456 and 15ips, once again starting with the same linear preset as the kick. This time, however, more drive is the order of the day. As a final twist, we can adjust the pre-emphasis record EQ setting to change the high-frequency response.

Step 7: For our overheads, we go for a different approach. Using a quieter and more linear tape (GP9) at 30ips, again our starting point is a linear preset – but note that the operating level is now higher with the high-output tape. A/B-ing the sound for the overheads reveals the addition of some top-end smoothness. (Audio: Step 7a and Step 7b.)

Step 8: To step things up, we drive the tape harder by increasing the Input level. This adds a little crunch and some ‘glue’ to the sound. For our final trick, we go in and try overbiasing the tape. This increases saturation and reduces the high-frequency output, which is most noticeable on the hi-hats and snare.
Virtual consoles and bussing plugins
If you’re happy with the process of emulating classic tape machines, the thought of emulating analogue mixing desks shouldn’t be at all intimidating. In some respects, though, the whys and wherefores of a desk’s behaviour are hard to quantify. Analysing and emulating the channels and output section individually is one thing, but creating a full-on model of how it all combines, blending those channels depending on signal levels and frequencies, couldn’t be harder. And that’s before you get into the various operating modes and specific signal paths of each individual desk.
Desk plugins tend to offer separate channel and buss versions, the idea being that you insert these on the first insert point of each channel or buss respectively. Although this is not an exhaustive list, some great examples include Slate Digital’s Virtual Console Collection (VCC and part of Virtual Mix Rack), Waves’ NLS Non-Linear Summer or Scheps Omni Channel, Sonimus Satson, the Brainworx bx_console series. Not all of these plugins actually name the mixing desks they model, but most do allude to them, so you can be reasonably certain of what you’re using, and that it will sound great.
Satson is the simplest, offering one desk option (essentially an SSL 4000 Series). VCC – which is two plugins, Virtual Channel and Virtual Mixbuss – now has six desk options, including SSL, Neve, API and Trident models. Brainworx bx_console offers two SSL emulations plus a model of a rare Neve VXS console. Given that this is owned by Dirk Ulrich, the CEO of Brainworx, you’d expect to hear the company’s famous modelling in full effect! Finally, Waves NLS is three desks owned by three particular producers: Mike Hedges’ EMI TG, Yoad Nevo’s Neve 5116, and Mark Stent’s SSL 4000G.
Beyond all this, some plugins offer crosstalk for stereo instances, optional automatic gain control and ganged grouping for easy multichannel adjustment. Some of the extra features with VCC include level calibration, meter ballistics and oversampling settings, while Waves NLS includes more than 100 discretely modelled channels for the collection.
Console emulation

Step 1: We’ll use the channel and buss plugins from Slate Digital’s VCC – part of the company’s Virtual Mix Rack – as they sit at the more subtle end of the desk emulation spectrum. It’s best to start out mixing with them in place, so the first step is to load them into VMR and then the first insert slots of the channels and the master buss.

Step 2: Virtual Mix Rack offers an almost insane amount of processing in one rack (pretty much all of Steven Slate’s plugins) so you can – should you wish – have multiple classic consoles applied to one channel or (here) the same console applied to two channels plus other outboard loaded into VMR.

Step 3: Now let’s try the various desk emulations. In this instance we’re going for the upfront API desk (USA A from the six presets) on our drums, with the Neve on everything else. On our master buss we opt for the classic SSL mix buss (Brit4k). Ah, the awesomeness of being able to combine desks.

Step 4: Finally, it’s drive time. By using a group Drive control, we can adjust different sets of sounds very quickly. The Drive control on VCC simply changes the non-linear response without affecting the balance. Having ramped up the channel Drive, we reduce the Drive slightly on the master buss.
Other ways to get that ‘analogue’ sound
As we’ve already noted, the analogue recording path is pretty complex, with plenty of points at which noise, distortion and non-linearities can be introduced. So, once you’ve got things going with some tape and desk emulations, there are still various other things you can do to add further analogue flavour.
For warmth and a good balance of harmonic distortions (see Harmonic Distortions in the Analogue Recording Chain, below), look for both valve- and transformer-based plugins. For more edgy sounds, seek out solid-state designs, and don’t overlook emulations of classic outboard gear – compressors and EQs, mainly.
As CPU power has increased, so have the ambitions of plugin designers in terms of accurately modelling all aspects of the analogue path. So, if you know that a unit has a valve amp section (the Pultec EQP-1A, say), check to see if the designer has included this in their plugin emulation of it. The other thing to bear in mind is that this process is additive, in the sense that making small changes to many tracks of audio will have a cumulative effect, so don’t go hunting for massively coloured processors when only subtle changes are called for.
Plug away
As with the tape and desk emulations covered we've earlier, this is by no means an exhaustive list, but here are a few suggestions to get you started.
For valve sounds, Wave Arts Tube Saturator is a classic, free Mac plugin. Based on a 12AX7 valve, it models the two triodes in the 12AX7 to emulate two cathode triode amplifiers, much like the preamp stage of a tube hi-fi amp. At the lowest drive level, it’s pretty clean with just a little harmonic distortion.
Next, SPL’s Twin Tube, another classic plugin. Based on their hardware unit of the same name, this one includes separate saturation and harmonics circuits. The first creates harmonic distortion as you push it into distortion, while the latter adds harmonics at one of four specific frequencies (2, 3, 6 and 10kHz). Combining the two helps to fatten sounds and add air.
Although the name implies a level of aggressiveness, SoundToys Decapitator can also be used in subtle ways. It includes five different flavours based on five specific valve and transistor preamps. Of course, if you do want to ramp it up, all five can deliver that too.
While we’re on the subject of ramping it up, iZotope’s Trash is designed for audible distortion, but can be tamed via its waveshaper’s curve editor if you want something more subtle. Mellowmuse SATV, meanwhile, boasts four analogue options – transistor, transformer, tube and tape – each with individual drive, mix blend and grouping.
Another oldy in terms of its longevity (and, yes, looks) but a very good performer is Voxengo’s VariSaturator, which includes both valve and digital saturation, with split processing between high and low bands.
Finally, we have to mention Slate Digital again and their Virtual Buss Compressors. With extensive modelling of analogue non-linear behaviour, there’s a certain ‘black box’ nature to these plugins that you have to experience to fully appreciate.
In fact the company’s Virtual Mix Rack is one of the most elegant ways of combining consoles, outboard, effects, you name it, in one simple solution – see our walkthrough on the previous page for more on this.
Harmonic distortion
When we talk about the benefits gained from an analogue signal path, it’s the harmonic distortions that have the most obvious sonic effect. These are the harmonics that are generated by the circuit and added to the fundamental frequency, of which they’re multiples, numbered sequentially. So the second harmonic is twice the fundamental, the third harmonic three times, and so on.
Viewing these from a pitch perspective, it’s only when you hit the seventh harmonic and beyond that the multiples start to become dissonant against the fundamental. Helpfully, though, the amplitudes of these harmonics tail off anyway.
When it comes to our analogue components, harmonic distortions increase as each component is driven, and it’s their relative levels (odd versus even) that influence the overall sound.
Typically, the even harmonic distortions (second, fourth and so on) sound solid and complementary, fattening up the fundamental, while odd harmonics sound more complex and edgy, enhancing the fundamental. Transistor circuits generate predominantly odd harmonics, while transformers produce both odd and even.
Magnetic tape recorders also produce both odd and even harmonics, although the even ones tend to be less pronounced than those produced by a transformer. Finally, valves typically put out a mixture of odd and even harmonics, although the onset of saturation tends to be gradual – hence the popularity of valves for driven sounds.
Emulating other types of analogue processing

Step 1: Our bass is solely a DI signal, and although we like the roundness, it lacks character. Adding tube saturation by way of Wave Arts’ free Tube Saturator, is a great way to mimic a decent amp, without having to mic it. We get some effect at very low drive, but opt for a bit more drive and some extra saturation. (Audio: Step 1a and Step 1b)

Step 2: Our acoustic guitar sound has top-end sparkle and body but seems to lack bite, sounding a bit weedy. By using a combination of saturation and enhancement, courtesy of SPL’s Twin Tube, we can bring back its presence. Here we’re dialling in the harmonics at 6kHz.
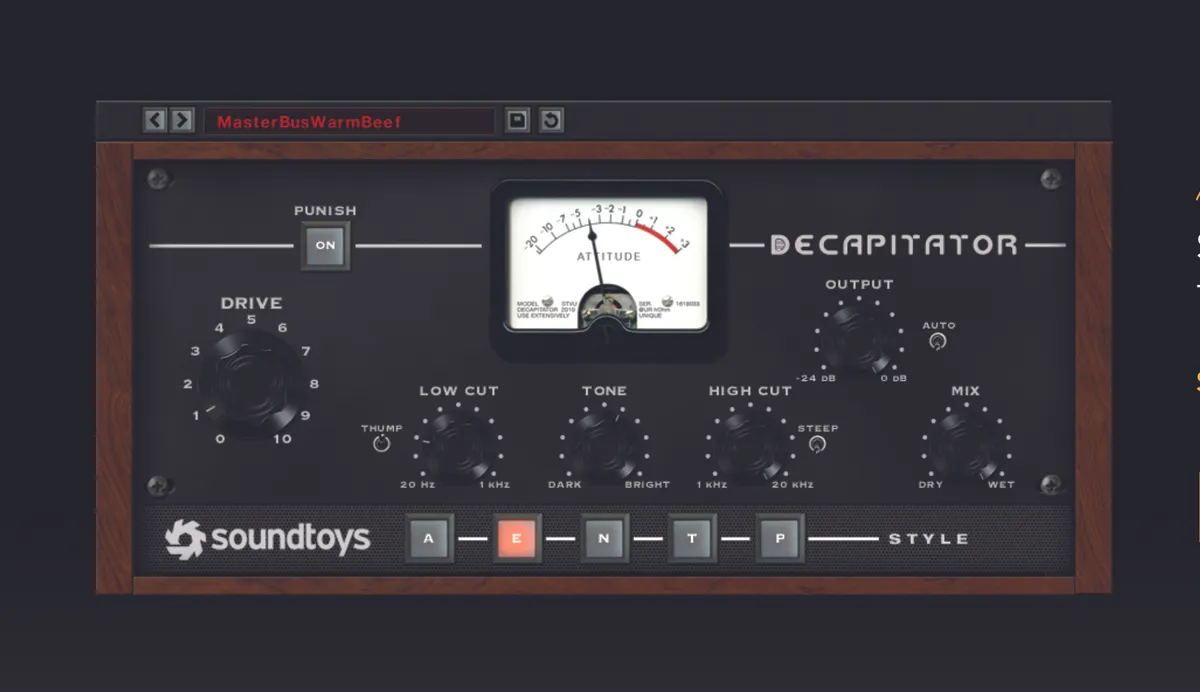
Step 3: Saturation doesn’t come much better than by way of Soundtoys’ Decapitator. In truth we can apply it to most parts of our mix to great effect – and are tempted to do just that. But as we say in the main text, a little can often go a long way, so try applying some mid range saturation to the electric guitar.

Step 4: Our snare sounds a little too polite, and although we don’t go for transistor distortion often, here it could be just the thing. First, we dial in lots of drive to get the desired effect, then use the handy Mix control on Mellowmuse’s SATV to blend in the desired balance. (Audio: Step 4a and Step 4b)

Step 5: Rather than head for EQ on our kick drum, we’re going to use a combination of valve and solid-state saturation, courtesy of Voxengo’s VariSaturator. We’ve positioned the crossover at 1kHz, using valve saturation on the low frequencies and solid-state on the high frequencies. The result is a more punchy kick.

Step 6: The piano sound is pretty well balanced but lacks air and feels a bit congested in the low mids. With an emulation plugin such as Slate’s FG-Mu, we can take advantage of its analogue flavour without actually compressing the signal at all. The result is a more open and engaging piano sound. (Audio: Step 6a and Step 6b)
Bringing it all together
Back in the days of analogue, equipment choices were less flexible than today – but as is the case in many areas of the digital world, working in the software domain offers the musician almost too much choice. Keep your head, however, and this is actually a good thing, as there are plenty of sounds – particularly quiet or very dynamic ones – that really don’t benefit from being recorded to analogue tape.
Noise, for example, was a big issue with classical recordings, as the music’s dynamic range really pushed the capabilities of analogue tape. It’s no surprise, then, that that particular sector of the industry shifted to digital recording technologies as soon as it could. You might also have noticed that classic analogue desks, such as those by SSL and Neve, incorporated gate/expanders on every channel, with a view to keeping tape hiss and other system noise at bay.
One of the most appealing benefits of plugin emulations, then, is that they not only put us in control of the sound with far more precision than the original gear, but also that they let us apply it ‘as needed’. This extends to controlling parameters in far more detail than is possible in the real world, including things like noise and hum, as well as tape levels, tape biasing and drive levels in general.
In the walkthrough below we’re going to bring everything together, taking our multitrack of sounds and processing each element using what we feel are the most appropriate techniques. Along the way we’ll A/B the results to hear what difference each change makes. We’ll use our previous examples as a starting point but stay open to adjusting these sounds as needed – in essence, we’ll do whatever works best for the overall picture.
Finally, we’ll look at the master buss. Although mastering is still the final stage of production, any mix engineer worth their salt will tell you that they’re already making pre-mastering decisions at the mix stage, using stereo compression and EQ, and, if available, mixing to half-inch tape. So, our final stage will make use of a mastering tape machine for some added analogue flavour.

Step 1: For our drums, we’ve gone for a favourite: Ampex 456 at 15ips by way of the UA Studer 800 plugin. By ganging the plugins together we’re driving the tape hard, which adds presence to the sound. The kick is too squashed, so we ease back its input level into the plugin, turning up its output to compensate. (Audio: Step 1a and Step 1b)

Step 2: Now let’s add some bussing. We position these plugins straight after the tape machine to emulate an analogue signal path. Once again, grouping them makes things simple as we can increase the drive across them easily. The Slate VCC Neve desk is working wonders on the bottom end of the kick and snare, so we go with that.

Step 3: Rather than head for a bass compressor, we load up a modern rock-style setup for the tape. By driving this, we get just the right containment for the bass. Then we load a plugin that we know emulates the valve amp section – the IK Multimedia EQP-1A. This gives just a touch of upper-mid enhancement.

Step 4: To give the piano a bit more flavour, we reach for a valve processor. The key here is to add character without it ever sounding distorted. The right tool for the job is Wave Arts’ free Tube Saturator, which brings the sound together a bit and adds some edge, making the piano sound less clinical. (Audio: Step 4a and Step 4b)

Step 5: For the electric guitar part, we want more edge and some mid-range crunch. Here you can experiment with your stock DAW plugins like Phat FX from Logic, Magneto in Cubase or Ableton Saturator in Live.

Step 6: We’re taking a slightly different approach for the acoustic guitar, with just a desk emulation. Driven pretty hard, the Trident-style desk from the Slate Digital VCC adds brightness and presence to the sound. (Audio: Step 6a and Step 6b)

Step 7: Moving on to the master buss, we try a trick favoured by Tom Lord-Alge, using FG-Red from Slate Digital’s Virtual Buss Compressors trio of plugins – but only for its transformer flavour. Thankfully, with its dedicated control, we can add as much or as little of this as we like.

Step 8: Our final dollop of analogue glue comes courtesy of the half-inch machine. This time we’re after the most hi-fi option, so we go for high-output tape – FG9 – at 30ips with Normal Bias. Note that the line-up is not enhanced and we’re not driving the tape hard. (Audio: Step 8 – whole mix before/after processing)
