Most electronic musicians are likely to find Polyend’s latest groovebox, Play, significantly more intuitive than the Polish brand’s last instrument – the esoteric, retro-inspired Tracker.
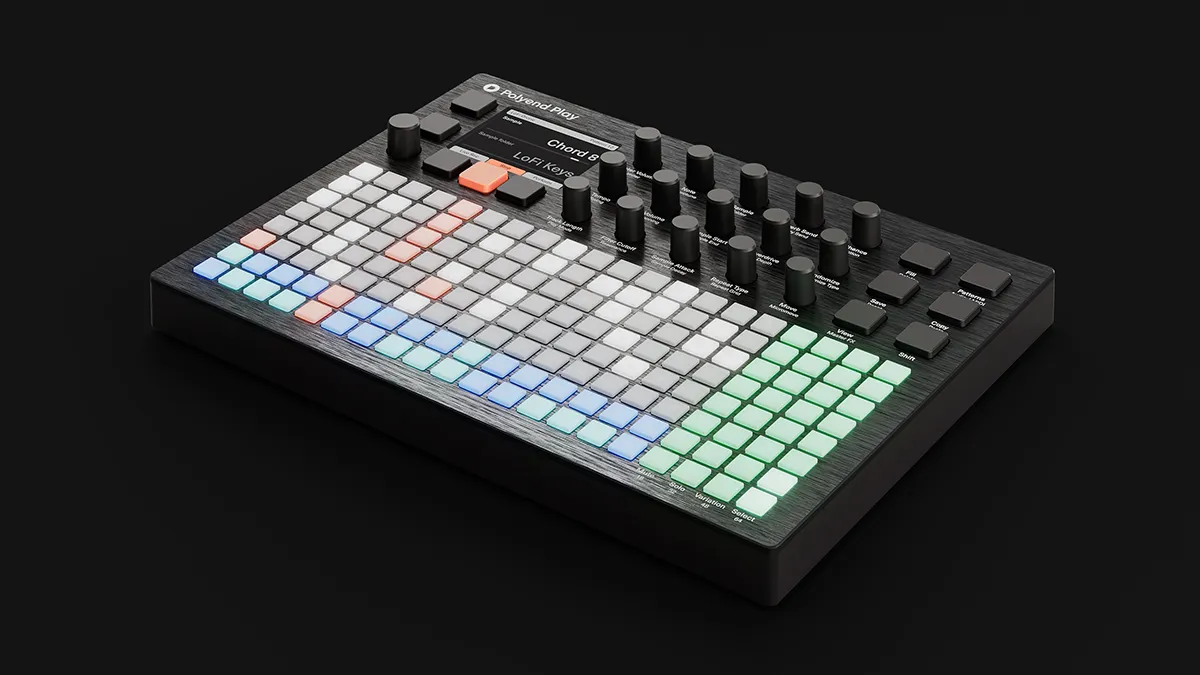
Whereas Tracker is based around a numerical sequencer that runs from top to bottom, Play’s sequencer moves from left to right, arranged – at least on a basic level – into eight 16-step tracks.
Because of this, any user with a little prior drum machine knowledge can get up and running quickly. That said, those trying to apply standard sequencer fundamentals to Play’s workflow will quickly realise that this isn’t quite as simple a machine as it first appears.

Polyend releases Play, a super-flexible sample and MIDI groovebox
As explained later, Play’s sequencer lets each step be assigned its own sounds and parameters. You can treat Play’s eight sequencer tracks like a classic groovebox, where each houses just one type of sound – kick, snare, clap, etc. There are certainly benefits to this approach; using the function buttons to the right of the interface, each track can be easily edited as a single set of sounds and the 16 variation slots can house fills, breaks and alternative versions of your pattern.
However, there are equally strong arguments for mixing and matching sounds across sequencer lanes. For one thing, this allows for grooves featuring considerably more than just eight samples. What’s more, Play’s excellent Perform mode lets users easily treat selected tracks with quick punch-in effects.
By having, say, an assortment of your percussive hits bundled onto a single track, Play lets you easily apply performance effects to just those grouped sounds. Each track can have its own length and beat division too, making for a quick way to build polyrhythms and evolving patterns.
As you can see, there’s a lot you can do with Play’s sequencer, and Polyend have thrown in tools to make it easy to get creative. Play is an incredibly handy external sequencer too.
By hitting the Audio/Midi button we can exploit many of these features to create elaborate patterns for the internal sampled sounds and your favourite MIDI gear simultaneously. It’s a lot to take in! Let’s explore some quick tips to get up to speed…
9 ways to get more from Play
1. Tracks vs Steps
Sequencing with Play isn’t quite the same as using a standard track-focused groovebox. With a classic groovebox such as, for example, a 909, each sequencer track relates to a specific sound – kick, snare, clap, etc – and making any parameter changes, such as altering the tuning or decay, alters the sound across all steps of that track.
With Play, samples, triggers and parameter settings are applied individually to each step across the 8x16 sequencer grid. This means that multiple different sounds can be placed on any horizontal ‘track’ – a combination of kicks, bass stabs and hi-hats, for example – and that the same sound can be spread across different tracks as you see fit.
You can edit parameters for an entire track at once, by using the Select pads in the far right column. Users can also simultaneously edit steps across different tracks by holding Shift and selecting all the pads they want to edit.
2. Quick copy
Because sounds and parameters aren’t fixed across tracks – as outlined above – one of the first workflow tools you should get used to using is Play’s Quick Copy function.
This allows users to ‘grab’ a sound and its parameter settings and apply it to a new step. It’s handy when you want to duplicate or move a sound in a pattern you’re working on. To do so, simply press and hold any existing step to copy it, then press an empty step to paste. This works for copying new variations too.
3. MIDI thru
Play features a ‘soft’ MIDI thru function whereby if a MIDI signal goes into an input and no tracks or steps are selected in MIDI sequencer mode, the input will be routed directly through to MIDI out. However, the Scale mode is applied to the MIDI, making for a convenient tool for transposing sequences from another sequencer or controller.
4. Let's get polyrhythmic

Play offers great tools for polyrhythms. For one thing, each ‘track’ in the sequencer can have its own sequence length, making it easy to program patterns that cycle at different rates. For true polyrhythms though, combine this feature with the track speed parameter, accessed by selecting one or more tracks and adjusting Tempo rotary.
This lets us set different beat divisions for each track in the sequencer. For example, choose one track in a pattern and apply a beat division of 3/2. Now change this track’s length to 24 steps. We thus create a 3/4 rhythm that cycles in sync with the 4/4 patterns on other tracks. Experiment with timing and length for fresh ideas.
5. Reverse samples
Unlike with a lot of samplers, Play doesn’t have a straightforward ‘reverse’ mode for sample playback. It’s still quite possible to easily reverse samples though. Simply set a lower value for Sample End than for Sample Start – ie placing the end playback point before the beginning.

6. Note length and velocity
When using the internal audio engine, Play’s sequencer gives no specific control over either velocity or length of triggers – these are effectively handled by the volume and sample end/decay parameters. Obviously these are important parameters when it comes to external sequencing.
In MIDI sequencer mode, the Volume/Pan rotary switches to controlling velocity and note length. Length here is set as a decimal value ranging from 0.25 up to 64, which equates to a division of steps – ie, 0.25 is a note a quarter of a step long, 64 will sustain for a full 64-step pattern. Unfortunately, at least in the current firmware, there’s no way to input ties or create continuous droning notes.

7. User packs
Although you can import samples one by one, the most efficient way to get user samples into Play is to import them as a ready-to-go sample pack. Doing this is as simple as bundling the samples you want for your project into a folder and importing that into the Sample Packs folder on the SD card.
However, to make the most of Play’s workflow it’s also worth dividing your sample pack into subfolders and considering how these are named. Dividing your pack into subfolders around sound types – eg, kick, snare, hi-hat, etc – makes browsing far quicker using the secondary Folder function of the Sample select knob.

What’s more, some of Play’s features, most notably the Fill tool, search for specifically named sub folders to auto-fill sounds. By ensuring your sub folder names match those used by Polyend’s official kits – Kick, Snare, HiHat, Clap – you can apply Fill mode’s beat templates. Of course, just because you name a folder ‘snare’, doesn’t mean the sounds contained within need to match.
8. Sample pack formatting
Play will import samples in mono or stereo WAV format, with 16, 24 or 32-bit sample rates. Stereo samples are always converted to mono. When you’re creating sample packs, Play only recognises a single level of subfolders. You can only import a maximum 255 samples to the sample pool at once – even if this doesn’t max out the sample memory. If you go over this amount in a user sample pack, samples at the bottom end of the list simply won’t be imported when you’re loading the pack.
9. Worry-free tweaking
Play’s Perform mode lets users add a whole array of fun punch-in effects that are cool for breakdowns of build ups. It also allows for non-destructive parameter changes using the rotaries though.
This is great for live performance freak outs: simply enter Perform mode, go to town on whatever parameter takes your fancy – such as sample pitch, reverb or delay depth or the filter. As soon as you exit Perform mode all parameters will snap back to their original settings!
Getting creative with Play's Fill mode

Step 1: Start with a New Project and load a stock kit to Play’s memory. We’re going with the IDM Kit. First let’s use Fill to program a kick pattern. Select the top sequencer row by pressing the button on the very right. Now hit Fill. We change the type to Kick, select pattern Breakbeat 7, then hit Fill again.

Step 2: This gives us a simple pattern and automatically inserts a kick sample from the loaded pack. It’s worth noting, however, the element of randomisation introduced in the sample pitch and settings. If the first fill isn’t to your taste, hit Fill again to roll the dice a second time.

Step 3: Now let’s repeat the process on the next sequencer row to add a snare. We’re using the pattern Electro 3. We do the same for the third row, adding Hi-Hat pattern Drum_Bass 3. However, next we also reduce the Hi-Hat track length to 12 step, this gives our pattern some variation as it cycles.

Step 4: On row four, let’s add a percussive sound, but this time use a Euclidean pattern. Since we’re not using a stock pattern, we need to select a sample manually first. We can do this by de-selecting any rows (far right buttons) and browsing to an appropriate percussion sample.

Step 5: Now we select row four and hit Fill again, this time using Euclidean mode. This will spread sample triggers evenly throughout the pattern length, based on the number of events set. We set seven events and hit Fill to engage them.

Step 6: Play’s Variations allow up to 16 alternate versions to be stored for each sequencer row. By repeating the steps above – but trying new Fill mode Patterns – we can quickly generate a host of patterns and jam by jumping between them.
