
New player? You’ve probably spent hours trawling the internet for the best guitar lessons to kickstart your guitar playing and found yourself with information overload.
In this lesson, we’re going to look at everything you need to get your new guitar journey off to the best possible start.
This beginner guitar tutorial and its accompanying video are designed to be used as a bunch of standalone lessons, each segment features a different topic that you should learn and focus on to improve your knowledge and abilities on the instrument.
Let's get started!
1. Understanding the parts of a guitar

The guitar is made up of many different parts. Some of these parts are for aesthetic reasons, and other parts have vital roles in making the guitar what is it. It’s first important to understand what the parts of the guitar are, and how they work.
- Body – The core structure of the body shape is the main thing that attracts us visually to a guitar. The wood a body is made from also affects the weight, resonance and feel of an instrument and to some degree, the tone of the guitar.
- Neck – The neck is the part of the guitar you will hold with your fretting hand.
- Fretboard – This sits on top of the neck. This is where you will be pressing down with your fretting hand to sound various notes.
- Frets – These are small, metal dividers that are spaced in a specific manner along the fretboard. Each fret will provide you with a different note on each string.
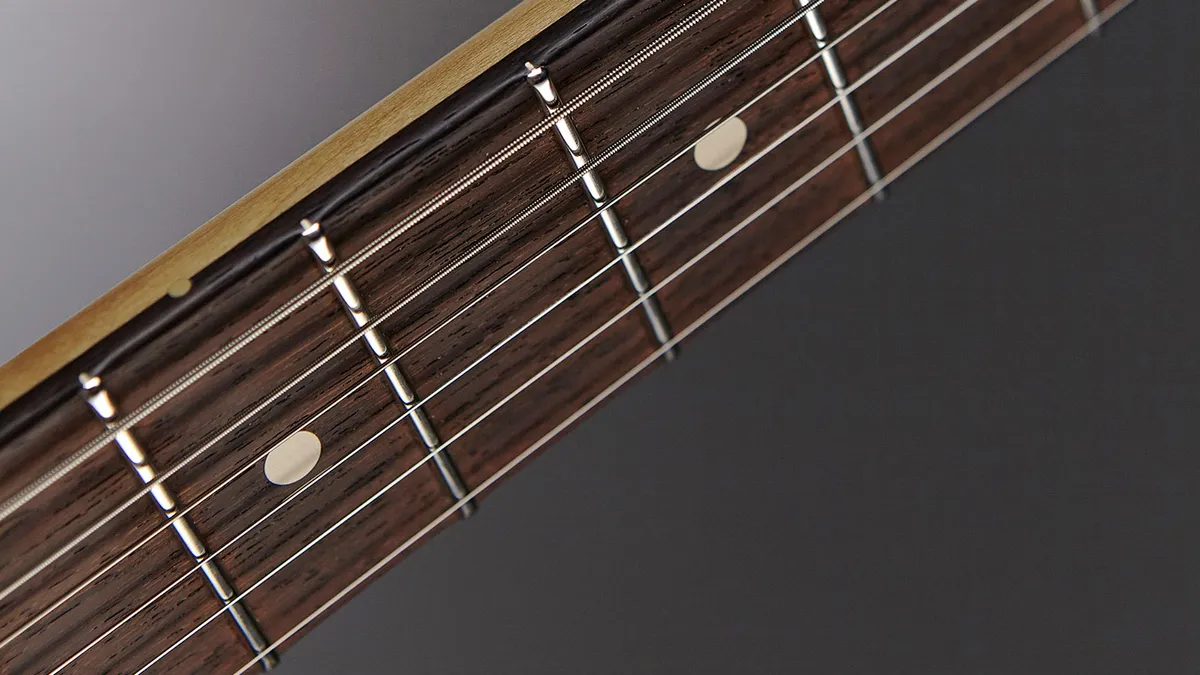
- Fret markers – They will sit at specific points of the fretboard and provide you with a visual guide as to where certain frets and notes are. They are found on frets 3, 7, 9, 12, 15, 17 and 19. The 12th fret is usually marked with two dots to indicate the octave: it's the the same note, but higher.
- Side dots – These are found on the side of the neck and correspond to the same frets as the fret markers. They are only visible from the player's perspective and allow you to see which fret you are on without needing to look around the guitar neck.
- Headstock – Found at the top of the neck. The shape of the headstock is often a big part in a guitar brand's identity.
- Tuning pegs – The tuning pegs allow you to raise or lower the pitch of each string until they are in tune.
- Nut – Sits between the fretboard and the headstock. It allows the strings to move in a straight line down to the bridge and also serves as the first point of contact for the string where it starts to vibrate and create pitched notes.

- Bridge – Found at the opposite end to the nut, the bridge is the other point of contact where the string vibrates from. All the notes you have available exist between the nut and the bridge.
- Saddles – The saddles allow you to adjust the strings' action (height of the string from the fretboard) and the intonation (the overall length of the string).
- Pickups – These are usually copper wire wound magnets that pick up the vibration of the guitar strings and turn it into the sound you hear from your amplifier. The build and placement of pickups affect the tone that you hear.
- Output jack – Where you plug your guitar cable to connect your guitar to an amplifier.

- Volume control – The volume control allows you to control the output level of the guitar.
- Tone control – This rolls off high frequencies, giving you a darker sound. When the tone control is set to 10 (full) it is considered to be disengaged from the circuit. It only becomes active when turned down to attenuate high frequencies.
- Pickup switch – This allows you to choose between different pickups or combinations of pickups on the guitar to achieve different tones.
2. How to hold the guitar

Holding the guitar correctly has many benefits. It allows you to develop good habits with your posture and your grip on the instrument. Having these good practices in place from the early stages helps you avoid issues further down the line.
If you develop bad technique with how you hold the guitar or how you sit it can lead to all sorts of unwanted issues like back and neck pain, tendonitis, carpel tunnel syndrome and other strain-related injuries to your arms and wrists.
The most common way to hold a guitar is to sit the body on the thigh of the leg of the hand you strum with. This puts the guitar either parallel to the floor or with a slight upward tilt which allows you to maintain a good wrist angle when playing.
You can also sit the guitar at a steeper angle on the inside of the opposite thigh. This approach is more common in classical guitarists and provides you with more flexibility to move your wrist around and create wider note stretches.
With your fretting hand, you should aim to keep your wrist at a comfortable angle. A slight bend in the wrist is ok but try not to allow your wrist to sit in an unnatural angle for too long.
Depending on the size of your hands, and your playing style, you may find yourself playing either with your thumb over the top of the neck or with your thumb placed on the peak of the neck curve. Try both to see what feels right.
How to tune the Guitar
Being in tune is very, very important for all guitar players. Tuning the guitar is a very simple thing to do, all you need is a guitar tuner and a little patience. Don’t worry if the first attempt takes a while, you’ll get faster over time.
For the purpose of this lesson, you’ll be tuning the guitar to a tuning known as standard tuning. Low to high the strings will be tuned to E A D G B E.

Using your guitar tuner, play a single string and check the reading on the tuner. This will tell you if the note is sharp (too high) or flat (too low). You then make the appropriate adjustments with the tuning pegs to raise or lower the pitch until the tuner shows the string in tune.
Repeat this for all remaining strings until they are all in tune
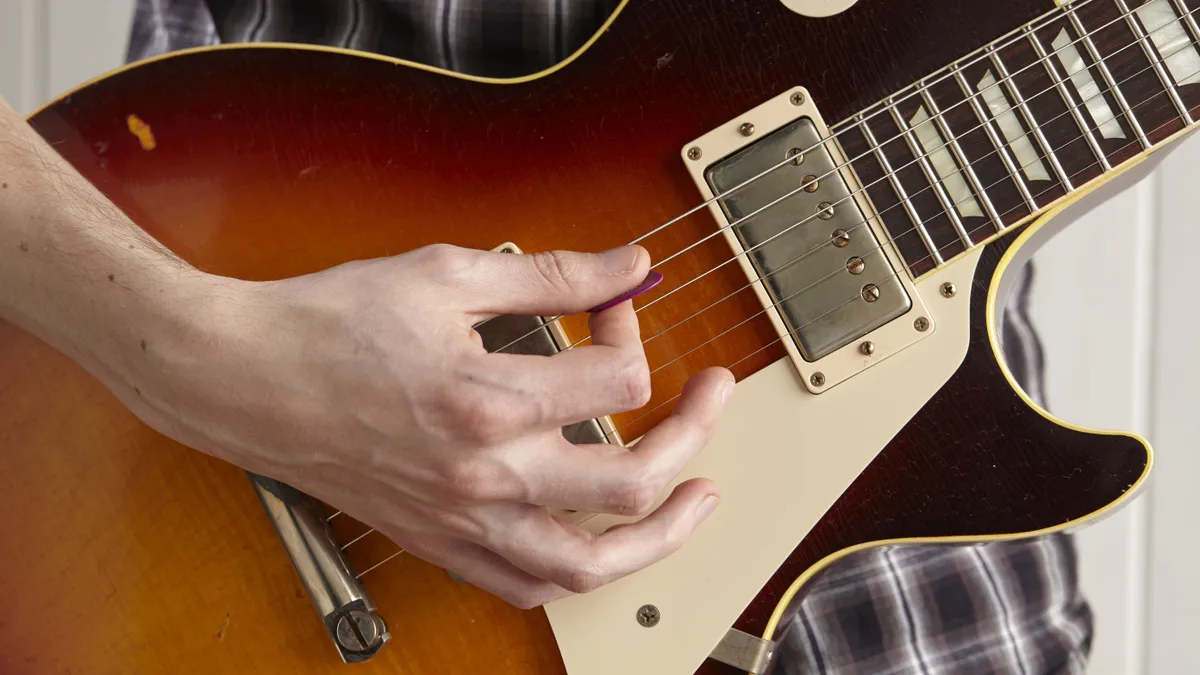
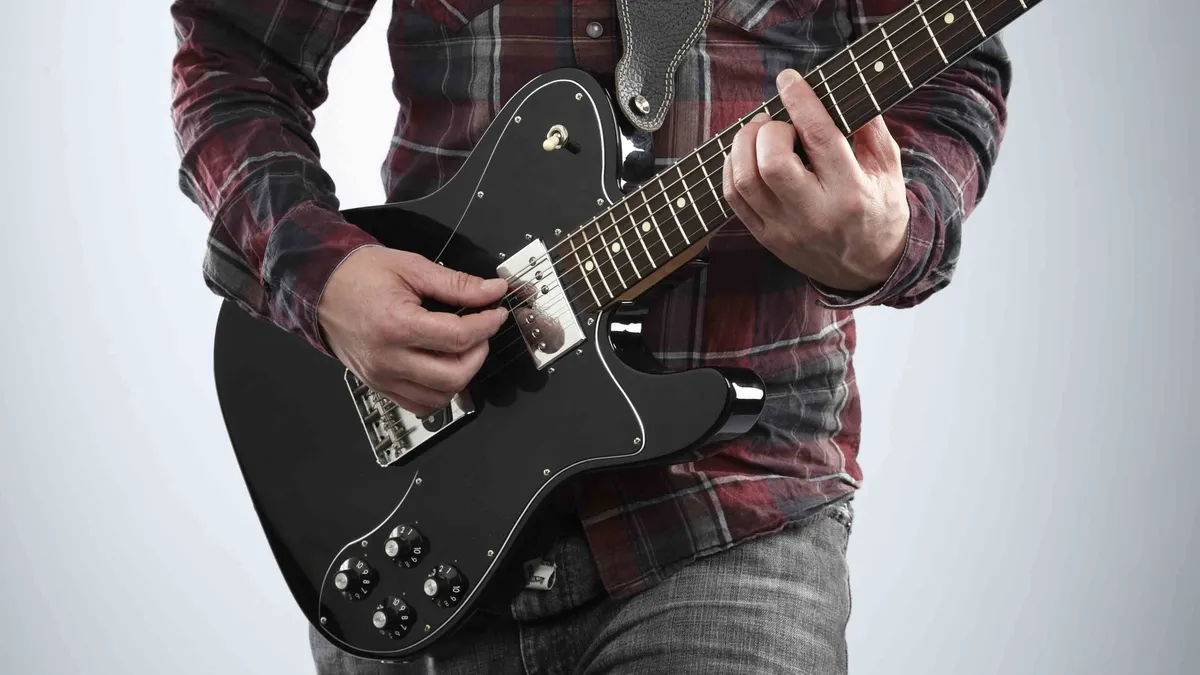
4. How to pick correctly

Once you’re tuned up, it’s time to work on your hands and getting things moving. Let's start by focusing on your picking hand.
When you’re playing guitar you will be using a combination of picking single strings, multiple strings or strumming chords. To start getting your hands coordinated for single-string picking you can do some simple exercises.
Start by resting your fretting hand on the strings to deaden the sound and pick just the low E string as shown in the video below. Keeping the motion small, you don’t want to overextend your arm when picking single notes. Start by picking in a downward motion.
Once you’ve done that a few times, you can alternate between the E and A strings, picking each four times.
Now that you’ve gotten used to the feeling of downpicking, you can go the opposite way and pick upward. To do this your plectrum will start under the string and come up. Combining the two directions is known as alternate picking.
5. Correct fretting technique
Fretting technique is one of the biggest hurdles that all new guitar players face. Knowing how hard to press down to get clean-sounding notes, but without using excess pressure and stress on your hands is a skill that takes some time to develop.
Fretting pressure
A great exercise for this is to pick a note anywhere on the guitar, and rest your finger lightly above it. Pick this note and you’ll hear a muted note. Now keep picking, gradually increasing the finger pressure until the note sounds, this is as hard as you need to press down. Try this with each finger and build up the finger strength by doing this regularly.
For the best results you want your finger to sit as close to the fret as possible without it being on top of the fret. This maximises your chances of getting clean-sounding notes – and we all want those!

Finger independence
In the early stages of playing guitar, the fingers on your fretting hand won’t have a great deal of independence. This is something that you can start to resolve with a really simple exercise. Doing this will allow you to build finger strength but also allow your fingers to learn to move on their own.
• Starting with your first and middle fingers, play the 5th fret on the low E with your index finger and the 6th fret with your middle finger.
• Alternate pick as you move between these two notes.
• Then start to walk it across the other strings, starting with the A and working to the high E.
• Once you get comfortable with playing two notes on each string, add your ring finger to the 7th fret of the E string, and carry on picking that across all the strings.
•Finally, you can add your little finger to the 8th fret and repeat across all the strings.
You can do this higher up the neck if you find the stretch is too large lower down, or you can go lower than the 5th fret to increase the stretch between notes.
6. Basic guitar chords

Chords are a big part of music so it’s essential to learn them. A chord is when you play multiple notes across multiple strings at the same time. As a new player, you don’t need to know any complex chords just yet, start with some basics. We’re going to learn some chords known as open chords. The reason they are called open chords is because they feature open strings on the guitar alongside fretted notes.
In the video you will hear the terms major and minor. These are descriptive words that describe how a chord sounds. Major chords have a more upbeat sound and minor chords have a more sombre sound. There is a theoretical reason to how this works, but you don’t need to worry about that at this point in your guitar journey.
How to read chord diagrams
In this lesson you will see the chords written out in chord boxes. These are visual aids to use when it comes to learning chords.
The solid line at the top is the guitar's nut, the horizontal lines are the frets and the vertical lines are the strings. Starting from the left being your thickest string and the right being the thinnest.

Inside these boxes you will see dots, the dots tell you where to place your fingers to play the chord shape. At the bottom of the diagram there are some numbers, these numbers correspond to the number of the finger of the fretting hand:
When you see a O at the top of a string, this means play that string open. When you see an X this means do not play that string at all.
Now let's learn some chords!
E major

To play an E major chord you will be putting your middle finger on the 2nd fret of the A, your ring finger on the 2nd fret of the D and your index finger on the 1st fret of the G. The Low E, B and E strings are all played open.
E minor

To play an E Minor chord you will be putting your middle finger on the 2nd fret of the A and your ring finger on the 2nd fret of the D. The Low E, G, B and E strings are all played open.
A major
To play an A major chord you will be putting your index finger on the 2nd fret of the D, your middle finger on the 2nd fret of the G and your ring finger on the 2nd fret of the B. The Low E string is not played for this. The A and E strings are played open.
A minor

To play an A minor chord you will be putting your middle finger on the 2nd fret of the D, your ring finger on the 2nd fret of the G and your index finger on the 1st fret of the B. The Low E string is not played for this. The A and E strings are played open.
D major

To play a D major chord you will be putting your index finger on the 2nd fret of the G, your ring finger on the 3nd fret of the B and your middle finger on the 2nd fret of the E. The Low E and A strings are not played for this. The D string is played open.
D minor

To play a D minor chord you will be putting your middle finger on the 2nd fret of the G, your ring finger on the 3nd fret of the B and your index finger on the 1st fret of the E. The Low E and A strings are not played for this. The D string is played open.
C major

To play a C major chord you will be putting your ring finger on the 3rd fret of the A, your middle finger on the 2nd fret of the D and your index finger on the 1st fret of the B. The Low E string is not played for this. The G and E strings is played open.
G major

To play a G major chord you will be putting your middle finger on the 3rd fret of the Low E, your index finger on the 2nd fret of the A, your ring finger on the 3rd fret of the B and your little finger on the 3rd fret of the E. The D and G strings are played open. You can also play this chord by putting your ring finger on the 3rd fret of the E and playing the B string open.
Changing Between Chords

Once you’ve gotten to grips with playing chords on their own, you need to start putting them together.
Take any chord from this list, and strum it four times, then take another chord, move your fingers into that and then strum that four times. Move back and forth between these two shapes.
At first, this will be very slow but your hands will start to make the connections and work out the movement patterns and this will speed up.
You can even sit there changing chord shapes without strumming to get your hands moving.
Try different combinations of these chords because you will experience many different chord changes when you start learning songs.
7. Basics of rhythm and strumming

The next step is to start understanding rhythm and using this to learn how to strum in different rhythmic groups.
For the most part, you’re going to be hearing music with a four-beat cycle, this is called a bar of music. We would count this as 1 2 3 4 and then repeat. When you have a bar of music divided up into four strums (notes) – these are known as quarter notes.
Start by strumming a chord four times, and try to keep the spacings even. Try to avoid speeding up or slowing down.
Quarter notes are the basic building blocks of rhythm but are a few other note lengths you should be aware of:
Half Notes
If you divide the four-beat bar into two you get a half note. A half note is a note that lasts for two beats of the bar, meaning you have two notes, each lasting two beats each making up your bar. Thinking of this as strumming on the one and three beats.
Whole Notes
A whole note is a note that lasts for an entire bar. If you strum on the one beat and let the chord run for beats two, three and four, this takes you to the end of the bar with only a single note.
Eighth Notes
We can also sub-divide each notes into shorter notes. An eighth note is when you take a quarter note and split it into two. You still have four beats in the bar, but each beat now has two notes on it. We could this with an “&”
1 & 2 & 3 & 4 &
8. Easy songs to learn with chords
Now it’s time to put together your rhythm and chord skills and learn some easy songs. These songs are great strumalong songs that you can easily pickup and put this stuff to the test.
Bob Dylan – Knockin’ On Heaven's Door
This track uses just a G, D and C chords. The rhythm for this is straight quarter notes with an eighth note added to the fourth beat:
1 2 3 4 &
In this song you’ll be playing a full bar of G, a full bar of D and two full bars of C.
Nirvana – Polly
This track uses the E minor, G, C and D chords. The rhythm for this one is a little trickier because it changes for each chord. When learning this one, break it down chord by chord and then put it together.
The first bar rhythm is 1 2 & 3 & 4 &. Over the 1 2 & you’re playing the E Minor before shifting to G over beats 3 and 4.
The second bar is 1 & & & 4 &. You’ll notice this is mostly played on the off beats. You’re playing the D chord over the 1 & before a brief pause as you shift to C. You play the C chord on the & of the second beat and let it ring for a quarter note taking you to the & 4 &.
This sounds a lot more complicated than it is, start slow and get the rhythm locked in before playing it full speed.
Tom Petty – Free Fallin’
To play this at the pitch of the recorded version you’ll need a capo on the 3rd fret of your guitar. This song uses the D, G and A chords.
There is a lot of space in this song, but some of the changes are also fast. In the first bar you’re changing from D to G. The D is played on beat 1 and the G lands on the & of beat 2. This rings to the end of the bar.
The second bar you’re playing the G back to the D over the 1 beat. G on the 1, D on the &. Let the D ring until the & of 2 which is where you play the A which rings to the end of the bar.
9. Fretting hand techniques
Aside from just fretting notes with your fretting hand, there are also a range of techniques you an deploy to get different effects with. In this lesson we’re going to focus on three techniques from a family of techniques known as legato. This is an Italian word that means 'to join together' so we’re going to be learning three ways to join notes together with your fretting hand.

Hammer-on
A hammer-on is when you pick a fretted note and then using another finger on your fretting hand, hammer onto a second note. This gives you a smoother transition to the second note. If you pick both notes, you get the noticeable pick attack of each note. A hammer-on removes this second pick attack.

Pull-off
A pull-off is the opposite to a hammer-on. While a hammer-on goes from a lower note to a higher note, a pull-off goes from a higher note to a lower note.
The overall idea is the same, but the technique will be slightly different. To perform a pull-off you need to fret both the notes you’ll be playing. When you pick, you will hear the sound of the higher note, you then pull off which sounds the lower note.
If you just lift your finger you will hear the second note, but it will sound slightly quieter. To get an even volume between the notes, pull your higher fretting finger off with a slight downward motion to flick the string. This will give the second note some extra volume.

Slide
You can also slide between notes. This involves picking a note and sliding to another note on the same string without releasing the fretting pressure. When you’re performing slides you want to be mindful of the pressure. Too much pressure causes the note to drag across each fret between the start and end points, and too little means the note will stop ringing before it arrives at its destination.
Practise slides with each finger on your fretting hand and start over two or three fret distances before working up to bigger distances.
10. Power chords
An essential chord type to learn for rock-based music is a power chord. A power chord is a two or three-note chord that is a transposable chord – meaning you can move it anywhere you want along the fretboard.
When it is rooted on the Low E and A strings, the shape remains the same. You can play them rooted from the D or G but the shape changes. For this lesson we’ll focus on the E and A rooted power chords.
To play a power chord you pick a note on the Low E and fret it with your index finger. With your third finger you will want to play a note on the A string that is two frets higher. With your little finger play the D string on the same fret as the A string. This three-note chord is your power chord.
If you’re struggling to add the little finger for the D string note, just drop it and play the two lower notes.

This shape can be moved anywhere on the low E string and also anywhere on the A string.


You can also play power chords from an open position. The principle is the same, but instead of your index finger fretting the lowest note, that note will be open. These can be rooted on the E or A strings.
11. Easy guitar riffs
Now that you’re picking single notes and playing power chords it's time to learn some rock riffs. These riffs are great to start you off and below there's a link to another lesson with more riffs you can check out as well.
Cream - Sunshine Of Your Love
This is a single-note riff that works across three different strings making it a great riff to learn for your coordination skills.
The riff walks down from the D to the A string before going into the last phrase that alternates between the E and A strings. At this point you’re doing a small string bend with your index finger on the 8th fret of the A string. Check the video for details on how to do this.
Deep Purple - Smoke On The Water
This riff is made up of a note pairing called a double stop. It is two notes played on the same fret on adjacent strings. The entire riff is based on the D and G strings.
You can use just one finger to press down the fretted double stops by laying it slightly flat across the strings.
Listen out for the moments you need to stop the double stops from ringing. To do this you either lightly lift up your fretting finger to stop the note, or use spare fingers on your fretting hand to rest on the strings.
Black Sabbath - Iron Man
Here is a riff that is entirely power chord-based. This starts with an ascending power chord phrase before a repeated sliding moment. The sliding phrase includes both notes of the power chord at once. You’re only sliding them down by a single fret, but spent time making sure both fretting fingers are sliding at the same time and over the same distance.
As this riff is entirely rooted on the A string, be careful not to hit the open Low E and introduce any unwanted notes.
Check out more great guitar riffs to learn for beginners
Practice tips
One of the most important things that any new guitar player can do is understand how and when to practice.
• Don’t forget, playing something that you can already play is not practicing.
• If you have a busy schedule, it can be tough to find large blocks of time to sit down and work on things, but you can get a lot done with some small, focused sessions.
• Aim to spend 10-15 minutes working on one thing from this list with full focus and attention. For that time period, don’t work on anything else. Aim to position multiple of these short sessions throughout your week. Over the course of a week, with multiple 10-15 minute sessions focusing on a topic, you will find yourself much closer to nailing it.
• Focusing in on one specific thing can help you learn it faster rather than juggling a lot of things at the same time and not really committing to them.
• These little and often practice sessions are great for slotting into a busy lifestyle but still seeing results.
