
Serum's effects rack provides some powerful tools which can be modulated to your heart's content. In this walkthrough we're going to use them to boost a bassline…

Step 1: Let’s use Serum’s FX arsenal to make a stock bassline into something with more attitude and edge. Start off by placing Serum FX on the Bass channel, with a MIDI track routed ready to trigger modulation later on. Turn on the Filter unit and select the multimode L/B/H24 filter type, which sweeps through low, band and high pass.

Step 2: Set the Filter Cutoff to around 300Hz, with the Resonance at roughly 50%. This’ll make the bass feel warmer, with more focus on the low mid. Pushing the Drive and Morph controls to around 30% gives the bass a more crunchy edge, while taking some sub away. Now, we can modulate the Filter controls to give our bass extra attitude…

Step 3: Turn on Note Latch, so that Serum’s modulation triggers on playback. Assign LFO 1 to the Filter Cutoff, so the LFO cycle opens the Filter cutoff by around +10. Change the LFO1 Rate to 1 bar to slow the effect, then assign LFO 1 to the Morph dial at -20. This’ll move the filter more towards low pass, modulating the sub frequencies.

Step 4: The modulation has given the bass unpredictable dynamics, so fix that by placing the Compressor after the Filter. Set the Compressor’s Attack and Release to around 50-60ms to start, then adjust the Threshold until you get around 4dB of gain reduction. 1dB or so of makeup gain will bring the levels in check.

Step 5: A little Distortion will spice up the bass. Place the Distortion after the Compressor, then select Downsample mode for bit-crushed goodness. Reduce the Wet/Dry mix to 50% to blend, then modulate Drive using LFO1 so it reduces as the LFO waveform increases. Now use Serum’s MIDI triggering to customise.
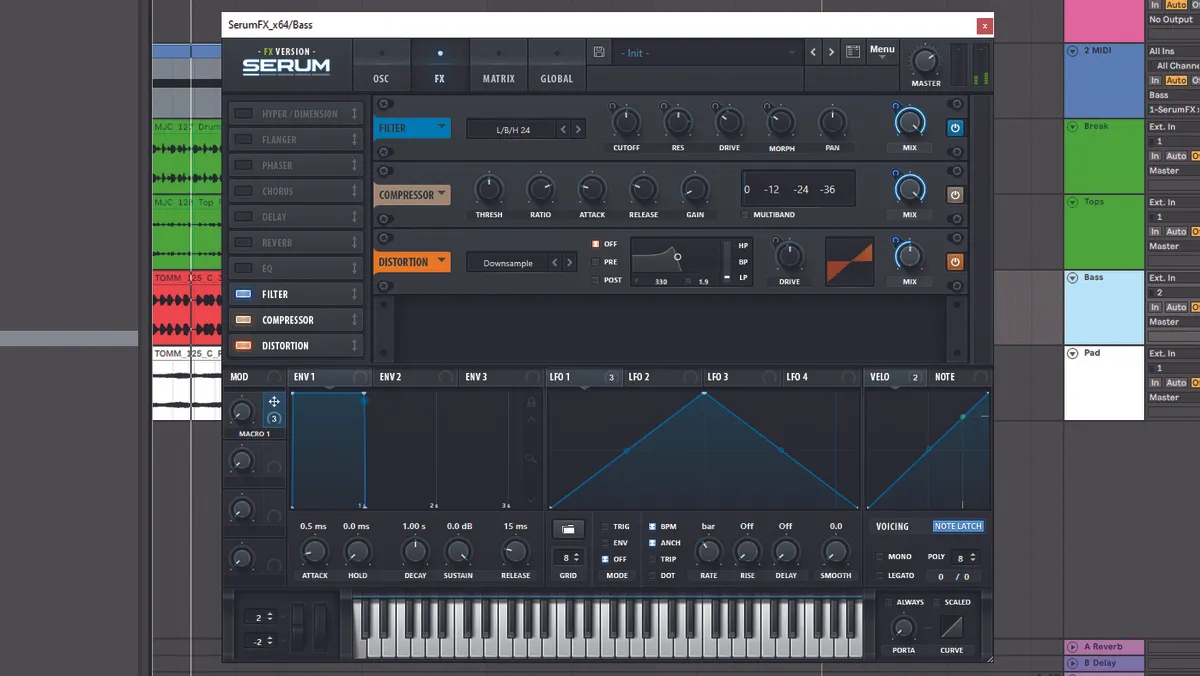
Step 6: Assign Velocity to the Filter Resonance at +40. Next, assign the same source to the Filter’s Drive at +20. Now, when you trigger our MIDI channel, created earlier, you hear note velocity changes altering the effect’s tone/feel. To finish, assign Macro 1 to each effect’s Wet/Dry to create a universal mix control.
